2009 BMW M5 SEDAN Start
[x] Cancel search: StartPage 85 of 266

Controls
83Reference
At a glance
Driving tips
Communications
Navigation
Entertainment
Mobility
1.Hold the vehicle with the brake.
2.Release the brake and begin to drive imme-
diately.
After releasing the brake, begin to drive
immediately; otherwise, the starting
assistant no longer holds the vehicle after
approx. 2 seconds and your vehicle will start to
roll backward.<
Start off quickly on slopes. Do not hold
the vehicle on a hill by pressing the accel-
erator, but apply the footbrake or handbrake
instead. Otherwise overheating and heavy wear
can result in the area of the Sequential Manual
Transmission.<
To protect the clutch of the Sequential Manual
Transmission from overheating, the starting-off
behavior is changed under heavy loading, e.g. a
rapid succession of starts on slopes. This can
be noticed from shaking during starting off.
On a slippery surface
1.Select the "P 400" program of M Engine
Dynamic Control, refer to page60.
2.Gently press accelerator pedal to prevent
wheels from spinning when starting off.
Clutch protection with manual
transmission
Be sure to avoid riding the clutch for longer peri-
ods.
Your BMW M5 is equipped with an overload
protection for the clutch. Riding the clutch for
longer periods is detected and the engine man-
agement system limits the engine speed to pro-
tect the clutch. This can result in the vehicle fail-
ing to accelerate when the clutch pedal is
partially depressed.
EDC Electronic Damping
Control
The concept
If the influencing variables such as road surface
quality or operating conditions such as steer-
ing, braking etc. change, the damping automat-ically adjusts to the new conditions within a
fraction of a second.
You can choose from three programs.
"Comfort" program
Select the "Comfort" program if you want com-
fort-oriented coordination of shock absorbers
and steering.
"Normal" program
The "Normal" program offers control that is bal-
anced between comfort and sportiness.
"Sport" program
Select the "Sport" program if you want a con-
sistently sporty coordination of shock absorb-
ers and steering.
Selecting program
Sequential Manual Transmission with Drive-
logic:
Manual transmission:
Press the EDC button repeatedly:
>"Comfort": LED off.
>"Normal": one LED lights up.
>"Sport": both LEDs light up.
Page 86 of 266

Technology for comfort, convenience and safety
84 The last selected program is active each time
the engine is started.
You can also activate your preferred program
with the button on the steering wheel, refer
to MDrive on page52.
FTM Flat Tire Monitor*
The concept
The Flat Tire Monitor detects a pressure loss in
one tire by comparing the speeds of the individ-
ual wheels during driving.
In the event of a pressure loss, there is a change
in the rolling circumference and therefore the
rotation speed of the corresponding wheel. The
system detects this change and reports it as a
flat tire.
Functional requirement
In order to ensure that a flat tire is reported cor-
rectly, the system must be initialized while the
tires have the correct inflation pressure.
The initialization must be repeated after
each time the tire inflation pressure is cor-
rected and after every tire or wheel change.<
System limits
The Flat Tire Monitor cannot indicate sudden
severe tire damage caused by outside factors
and does not detect a natural, even pressure
drop in all four tires.
In the following situations, the system could be
delayed or malfunction:
>System has not been initialized
>Driving on snowy or slippery road surface
>Sporty driving style: slip in the drive wheels,
high lateral acceleration
>Driving with snow chains
*
Initializing system
The initialization finishes during driving,
which can be interrupted at any time.
When driving resumes, the initialization is con-
tinued automatically. The system is initialized after this activation phase. When driving with
snow chains, the system is not initialized.<
With Sequential Manual Transmission via the
button in the center console:
1.Start the engine, but do not start driving.
2.Press the button for approx. 5 seconds.
After the button is released, the warning
lamp lights up in yellow for several seconds
in the instrument cluster, refer to Indication
of a flat tire. The message "Initializing FTM"
appears on the Control Display for a few
seconds.
3.Start to drive.
The initialization finishes during driving
without feedback.
Via iDrive, for operating principle refer to
page16:
1.Press the button.
This opens the start menu.
2.Press the controller to open the menu.
3.Turn the controller until "Settings" is
selected and press the controller.
4.Select "Vehicle / Tires" and press the con-
troller.
Page 87 of 266

Controls
85Reference
At a glance
Driving tips
Communications
Navigation
Entertainment
Mobility
5.Change to upper field if necessary. Turn the
controller until "FTM" is selected and press
the controller.
6.Start the engine, but do not start driving.
7.Select "Reset" and press the controller.
8.Select "Yes" and press the controller.
"resetting FTM …" is displayed for a few
seconds. The warning lamp in the instru-
ment cluster lights up yellow for a few sec-
onds.
9.Start to drive.
The initialization finishes during driving
without feedback.
Indication of a flat tire
The warning lamp lights up red. A mes-
sage appears on the Control Display.
In addition, an acoustic signal sounds.
There is a flat tire or extensive inflation pressure
loss.
1.Reduce speed and stop the vehicle care-
fully. Avoid sudden braking and steering
maneuvers.
2.Identify damaged tire. To do this, check the
tire inflation pressure using the M Mobility
System, refer to Producing tire inflation
pressure on page227.3.Repair flat tire with M Mobility System, refer
to page225, or replace the damaged wheel,
refer to Changing wheels on page227.
TPM Tire Pressure Monitor*
The concept
TPM checks the tire inflation pressure in the
four mounted tires. The system reports when
the tire inflation pressure has dropped consid-
erably in one or several tires.
Functional requirement
In order to assure the reliable reporting of a flat
tire, the system must be reset at the correct tire
inflation pressure.
Always use wheels with TPM electronics, oth-
erwise fault-free operation of the system is not
ensured.
Reset the system again after each correc-
tion of the tire inflation pressure and after
every tire or wheel change.<
System limits
TPM cannot announce sudden serious tire
damage caused by external influences.
The system does not function properly if it has
not been reset, e.g. a flat tire is reported despite
correct tire inflation pressures.
The system is inactive and cannot display a flat
tire if a wheel has been mounted without TPM
electronics, or if TPM is temporarily interfered
with by other systems or devices which use the
same radio frequency.
Status display on Control Display
The tire and system status is indicated by the
color of the tires.
TPM takes the fact that the tire pressure
changes during driving into account. A correc-
tion is only required if requested by TPM with
the color.
Green
The tire pressure matches the learned set state.
Page 88 of 266

Technology for comfort, convenience and safety
86 "TPM active" appears on the Control Display.
One wheel is yellow
Flat tire or a major drop in inflation pressure in
the indicated tire. A message appears on the
Control Display.
All wheels are yellow
Flat tire or a major drop in inflation pressure in
several tires. A message appears on the Control
Display.
Gray
The system cannot detect a flat tire.
Reasons for this can be:
>TPM is being reset
>Temporary interference due to systems or
devices which use the same radio fre-
quency
>Malfunction
Resetting system
Reset the system again after each correc-
tion of the tire inflation pressure and after
every tire or wheel change.<
Resetting finishes during driving, which can be
interrupted at any time. When driving resumes,
resetting is continued automatically.
iDrive, for operating principle refer to page16.
1.Press the button.
This opens the start menu.
2.Press the controller to open the menu.
3.Select "Settings" and press the controller.
4.Select "Vehicle / Tires" and press the con-
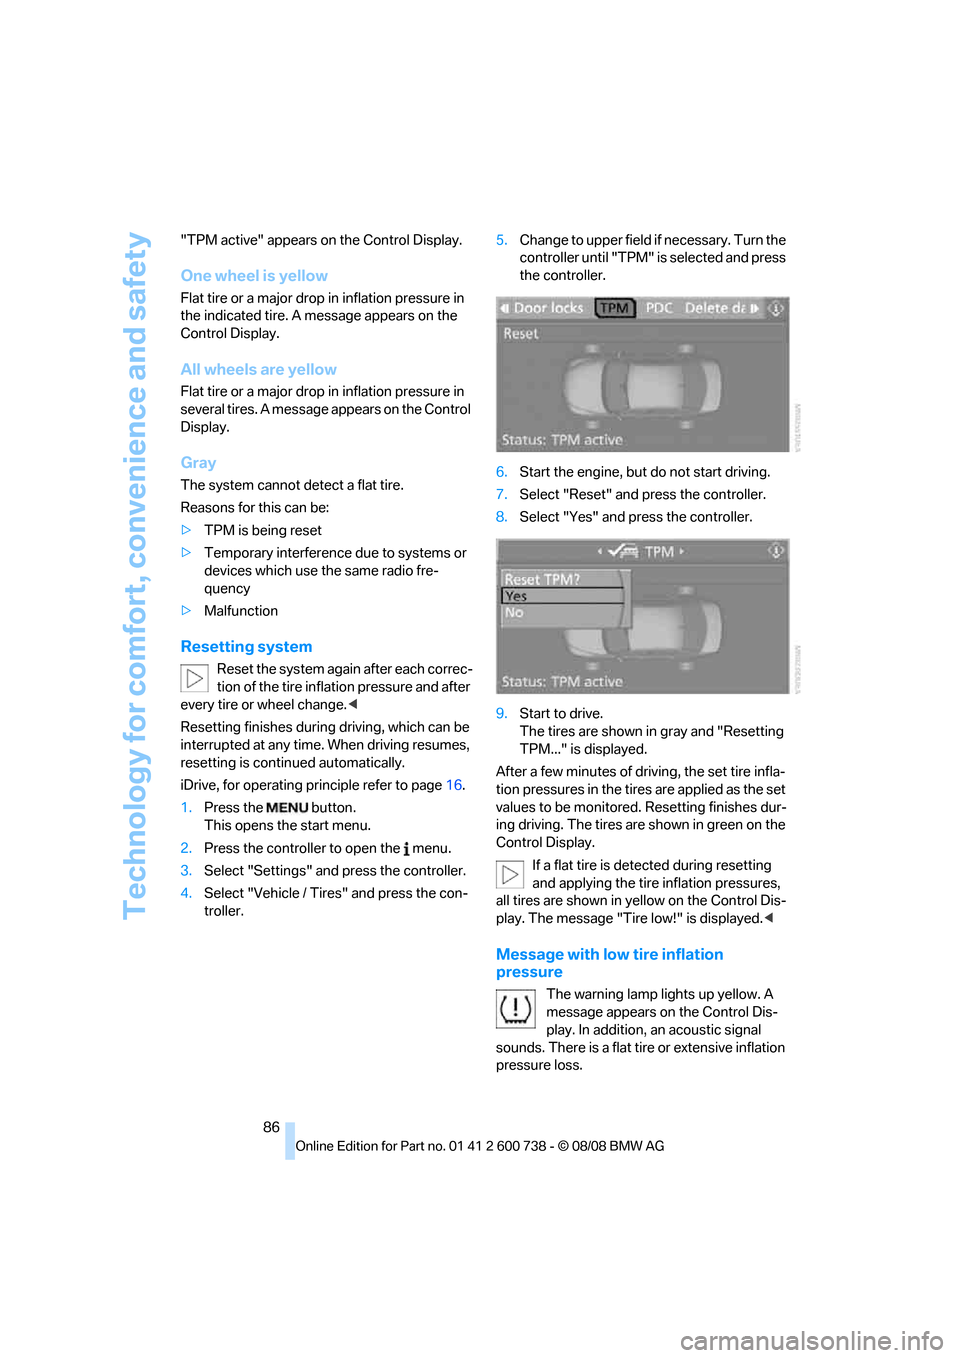
troller.5.Change to upper field if necessary. Turn the
controller until "TPM" is selected and press
the controller.
6.Start the engine, but do not start driving.
7.Select "Reset" and press the controller.
8.Select "Yes" and press the controller.
9.Start to drive.
The tires are shown in gray and "Resetting
TPM..." is displayed.
After a few minutes of driving, the set tire infla-
tion pressures in the tires are applied as the set
values to be monitored. Resetting finishes dur-
ing driving. The tires are shown in green on the
Control Display.
If a flat tire is detected during resetting
and applying the tire inflation pressures,
all tires are shown in yellow on the Control Dis-
play. The message "Tire low!" is displayed.<
Message with low tire inflation
pressure
The warning lamp lights up yellow. A
message appears on the Control Dis-
play. In addition, an acoustic signal
sounds. There is a flat tire or extensive inflation
pressure loss.
Page 89 of 266

Controls
87Reference
At a glance
Driving tips
Communications
Navigation
Entertainment
Mobility
1.Reduce speed and stop the vehicle care-
fully. Avoid sudden braking and steering
maneuvers.
2.If all four wheels are shown in yellow, iden-
tify the damaged tire on the vehicle.
3.Repairing flat tire with M Mobility System,
refer to page225, or replace the damaged
wheel or wheels, refer to Changing wheels*
on page227.
The spare tire
* is equipped with the necessary
TPM electronics and is also monitored after
mounting and after resetting the system.
Have the tire replaced by a BMW center or a
workshop informed on handling TPM which
works according to BMW repair procedures
with correspondingly trained personnel.
Malfunction
The yellow warning lamp flashes and
then lights up continuously. The tires
are shown in gray on the Control Dis-
play and a message is displayed. No flat tire can
be detected.
A message like this is displayed in the following
situations:
>In case of a malfunction;
have the system checked.
>If a wheel is mounted without TPM elec-
tronics.
>If TPM is temporarily interfered with by
other systems or devices which use the
same radio frequency.
Declaration according to NHTSA/
FMVSS 138 Tire Pressure Monitoring
Systems
Each tire, including the spare*, should be
checked monthly when cold and inflated to the
inflation pressure recommended by the vehicle
manufacturer on the vehicle placard or tire infla-
tion pressure label. If your vehicle has tires of a
different size than the size indicated on the
vehicle placard or tire inflation pressure label,
you should determine the proper tire inflation
pressure for those tires. As an added safety fea-
ture, your vehicle has been equipped with a tire pressure monitoring system, TPMS, that illumi-
nates a low tire pressure telltale when one or
more of your tires are significantly underin-
flated. Accordingly, when the low tire pressure
telltale illuminates, you should stop and check
your tires as soon as possible, and inflate them
to the proper pressure. Driving on a significantly
underinflated tire causes the tire to overheat
and can lead to tire failure. Underinflation also
reduces fuel efficiency and tire tread life, and
may affect the vehicle's handling and stopping
ability. Please note that the TPMS is not a sub-
stitute for proper tire maintenance, and it is the
driver's responsibility to maintain correct tire
pressure, even if underinflation has not reached
the level to trigger illumination of the TPMS low
tire pressure telltale.
The TPMS malfunction indicator is combined
with the low tire pressure telltale. When the sys-
tem detects a malfunction, the telltale will flash
for approximately one minute and then remain
continuously illuminated. This sequence will
continue upon subsequent vehicle startups as
long as the malfunction exists. When the mal-
function indicator lights up, the system may not
be able to detect or signal low tire pressure as
intended. TPMS malfunctions may occur for a
variety of reasons, including the installation of
replacement or alternate tires or wheels on the
vehicle that prevent the TPMS from functioning
properly. Always check the TPMS malfunction
telltale after replacing one or more tires or
wheels on your vehicle to ensure that the
replacement or alternate tires and wheels allow
the TPMS to continue to function properly.
Page 92 of 266

Technology for comfort, convenience and safety
90
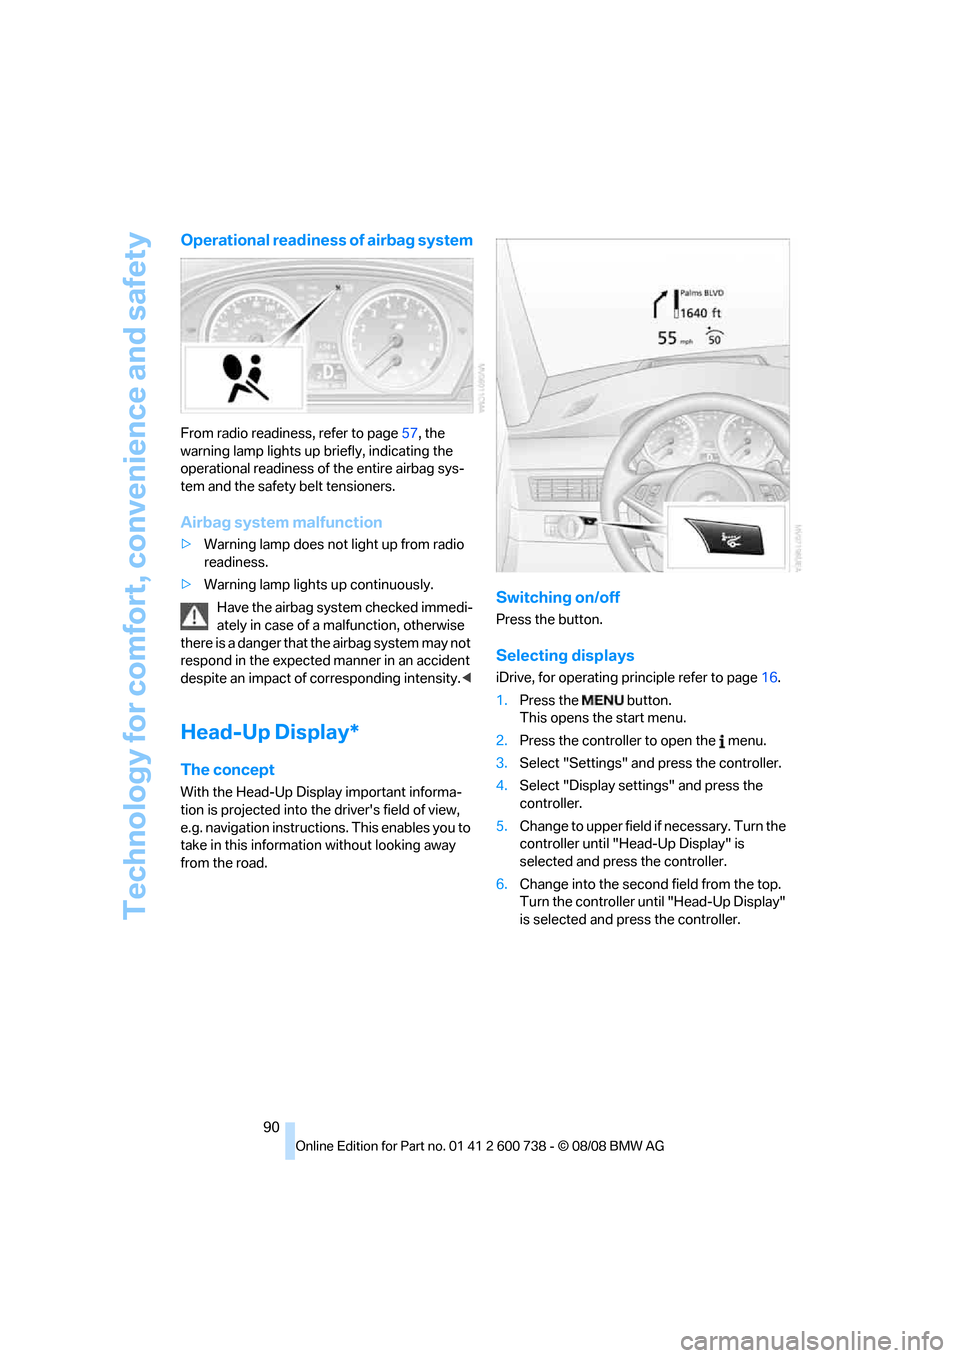
Operational readiness of airbag system
From radio readiness, refer to page57, the
warning lamp lights up briefly, indicating the
operational readiness of the entire airbag sys-
tem and the safety belt tensioners.
Airbag system malfunction
>Warning lamp does not light up from radio
readiness.
>Warning lamp lights up continuously.
Have the airbag system checked immedi-
ately in case of a malfunction, otherwise
there is a danger that the airbag system may not
respond in the expected manner in an accident
despite an impact of corresponding intensity.<
Head-Up Display*
The concept
With the Head-Up Display important informa-
tion is projected into the driver's field of view,
e.g. navigation instructions. This enables you to
take in this information without looking away
from the road.
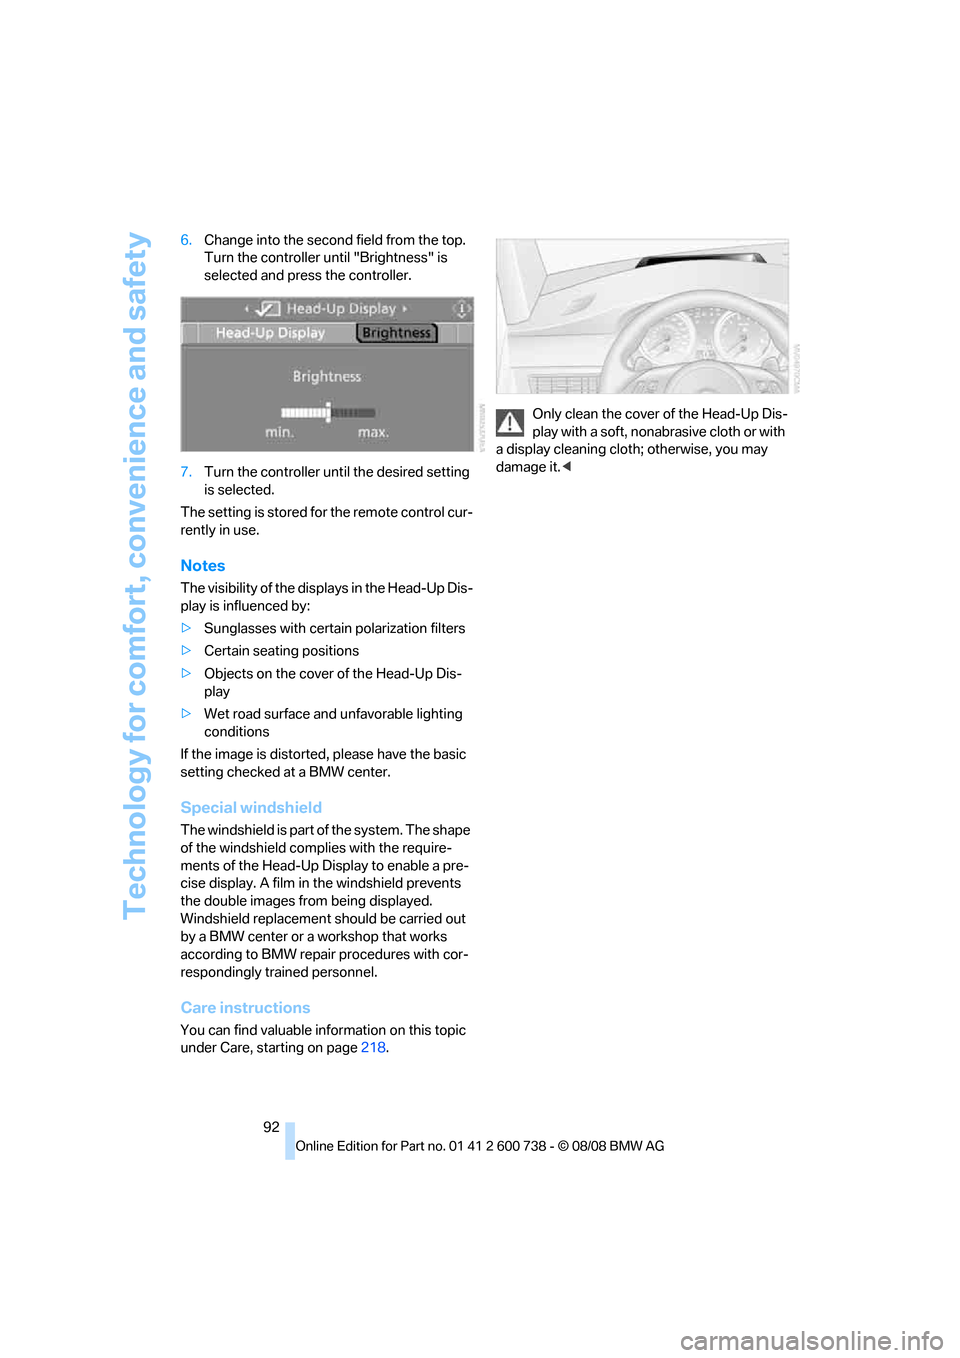
Switching on/off
Press the button.
Selecting displays
iDrive, for operating principle refer to page16.
1.Press the button.
This opens the start menu.
2.Press the controller to open the menu.
3.Select "Settings" and press the controller.
4.Select "Display settings" and press the
controller.
5.Change to upper field if necessary. Turn the
controller until "Head-Up Display" is
selected and press the controller.
6.Change into the second field from the top.
Turn the controller until "Head-Up Display"
is selected and press the controller.
Page 93 of 266

Controls
91Reference
At a glance
Driving tips
Communications
Navigation
Entertainment
Mobility
7.Select desired information of Head-Up Dis-
play.
8.Press the controller.
The information appears in the Head-
Up Display.
"M View": the M view appears in the
Head-Up Display. Information unavailable in
the M view appears on the Control Display
in gray and cannot be selected.
"M View": the default view is displayed.
The M view for the Head-Up Display can also be
selected with the button on the steering
wheel, refer to MDrive on page52.
The settings are stored for the remote control
currently in use.
Default view
1Navigation instructions
2Stored desired speed of cruise control
3Speed
M view
1Current engine speed, highlighted
2Advance warning field of tachometer
3Red warning field of tachometer, also refer
to Tachometer on page67
4Speed
5Gear display
For information on the shift lights in the
tachometer, refer to page63.
Setting brightness
The brightness of the display is adapted to the
ambient lighting conditions. However, you can
change the basic setting.
With the low beams switched on, the brightness
can also be adjusted with the knurled wheel of
the instrument lighting.
iDrive, for operating principle refer to page16.
1.Press the button.
This opens the start menu.
2.Press the controller to open the menu.
3.Select "Settings" and press the controller.
4.Select "Display settings" and press the
controller.
5.Change to upper field if necessary. Turn the
controller until "Head-Up Display" is
selected and press the controller.
Page 94 of 266

Technology for comfort, convenience and safety
92 6.Change into the second field from the top.
Turn the controller until "Brightness" is
selected and press the controller.
7.Turn the controller until the desired setting
is selected.
The setting is stored for the remote control cur-
rently in use.
Notes
The visibility of the displays in the Head-Up Dis-
play is influenced by:
>Sunglasses with certain polarization filters
>Certain seating positions
>Objects on the cover of the Head-Up Dis-
play
>Wet road surface and unfavorable lighting
conditions
If the image is distorted, please have the basic
setting checked at a BMW center.
Special windshield
The windshield is part of the system. The shape
of the windshield complies with the require-
ments of the Head-Up Display to enable a pre-
cise display. A film in the windshield prevents
the double images from being displayed.
Windshield replacement should be carried out
by a BMW center or a workshop that works
according to BMW repair procedures with cor-
respondingly trained personnel.
Care instructions
You can find valuable information on this topic
under Care, starting on page218.Only clean the cover of the Head-Up Dis-
play with a soft, nonabrasive cloth or with
a display cleaning cloth; otherwise, you may
damage it.<