2009 BMW 650I CONVERTIBLE climate control
[x] Cancel search: climate controlPage 114 of 272

Climate
112 In the highest setting you activate the maximum
heating output, regardless of the outside tem-
perature.
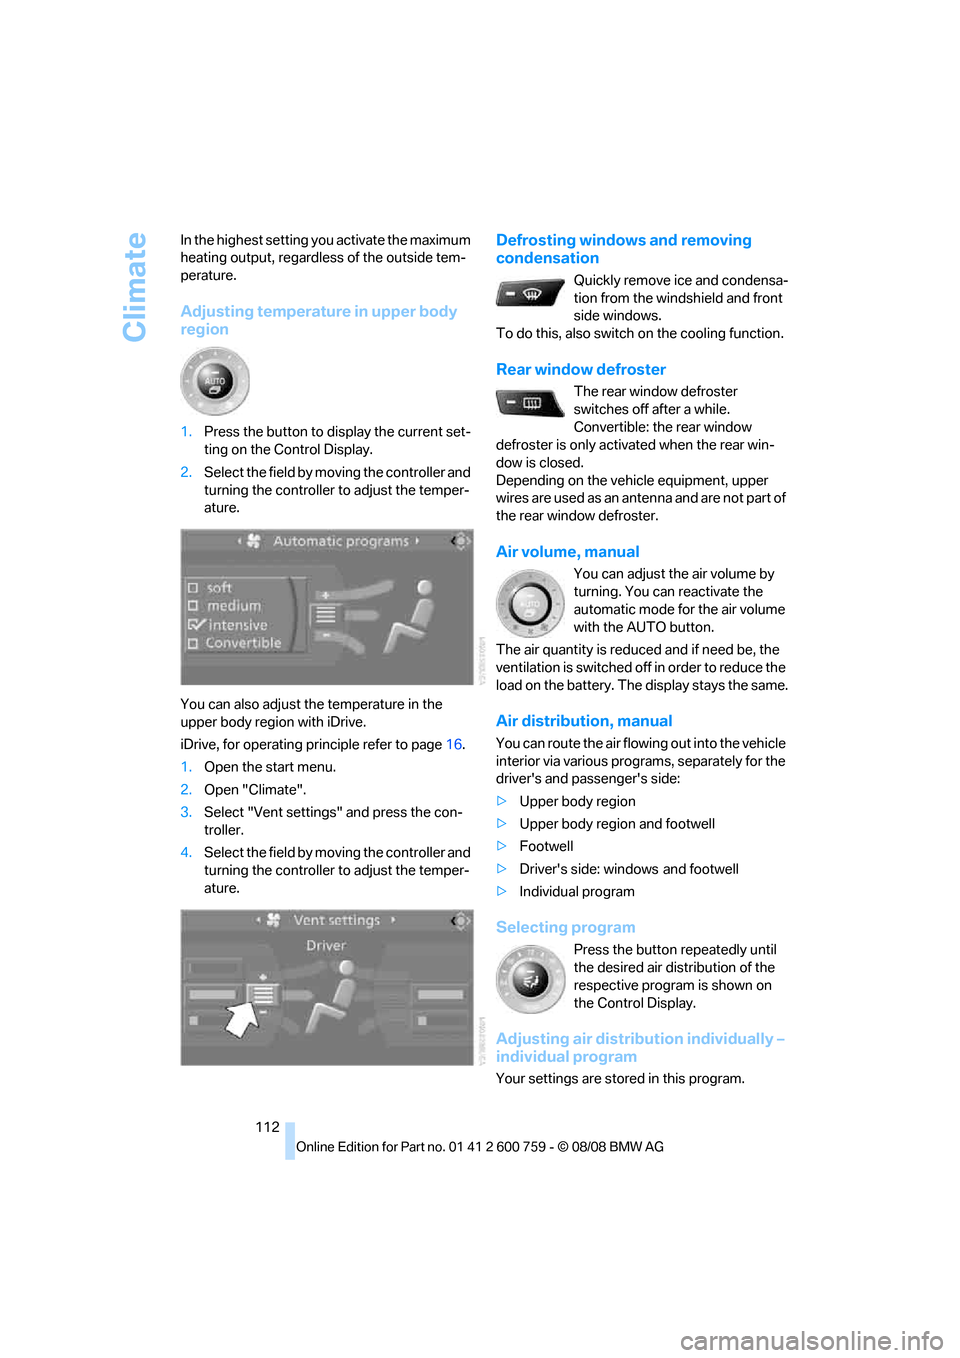
Adjusting temperature in upper body
region
1.Press the button to display the current set-
ting on the Control Display.
2.Select the field by moving the controller and
turning the controller to adjust the temper-
ature.
You can also adjust the temperature in the
upper body region with iDrive.
iDrive, for operating principle refer to page16.
1.Open the start menu.
2.Open "Climate".
3.Select "Vent settings" and press the con-
troller.
4.Select the field by moving the controller and
turning the controller to adjust the temper-
ature.
Defrosting windows and removing
condensation
Quickly remove ice and condensa-
tion from the windshield and front
side windows.
To do this, also switch on the cooling function.
Rear window defroster
The rear window defroster
switches off after a while.
Convertible: the rear window
defroster is only activated when the rear win-
dow is closed.
Depending on the vehicle equipment, upper
wires are used as an antenna and are not part of
the rear window defroster.
Air volume, manual
You can adjust the air volume by
turning. You can reactivate the
automatic mode for the air volume
with the AUTO button.
The air quantity is reduced and if need be, the
ventilation is switched off in order to reduce the
load on the battery. The display stays the same.
Air distribution, manual
You can route the air flowing out into the vehicle
interior via various programs, separately for the
driver's and passenger's side:
>Upper body region
>Upper body region and footwell
>Footwell
>Driver's side: windows and footwell
>Individual program
Selecting program
Press the button repeatedly until
the desired air distribution of the
respective program is shown on
the Control Display.
Adjusting air distribution individually –
individual program
Your settings are stored in this program.
Page 115 of 272

Controls
113Reference
At a glance
Driving tips
Communications
Navigation
Entertainment
Mobility
iDrive, for operating principle refer to page16.
1.Open the start menu.
2.Open "Climate".
3.Select "Vent settings" and press the con-
troller.
The driver's and front passenger side can
be adjusted separately with the fields on the
right or left side.
4.Select the driver's or front passenger side
if necessary.
Move the controller to the right or left
repeatedly until the driver's or front passen-
ger side is selected.
5.Select the desired field by moving the con-
troller.
6.Turn the controller to adjust the air distribu-
tion.
Driver's side:
1Air directed toward the windshield and side
windows
2Air for the upper body
3Air to footwell
Front passenger side:
4Air for the upper body
5Air to footwell
Pressing the AUTO button cancels the
manual air distribution settings.<
The automatic mode for the air volume remains
effective with manual air distribution.
Switching cooling function on and off
The cooling function cools and
dehumidifies the incoming air
before also reheating it as
required, according to the temperature setting. This function is only available when the engine
is running.
The cooling function helps to avoid condensa-
tion on the window surfaces or to quickly
remove them.
Depending on the weather, the windshield may
fog over briefly when the engine is started.
The cooling function is also switched on with
the AUTO program.
Maximum cooling
Maximally cooled air is obtained as
quickly as possible at an outside
temperature above approx. 327/
06 and with the engine running.
At the lowest temperature, the automatic cli-
mate control switches into recirculating air
mode. The maximum air volume flows out of the
vents for the upper body. Therefore, open these
vents for maximum cooling.
AUC Automatic recirculated-air
control/recirculated-air mode
You can respond to pollutants or
unpleasant odors in the immediate
environment by suspending the
supply of outside air. The system then recircu-
lates the air currently within the vehicle. During
AUC operation, a sensor detects pollutants in
the outside air and controls the shut-off auto-
matically.
By pressing the button repeatedly, you can
request three operating modes:
>LED off: outside air flows in continuously.
>Right LED on, AUC mode: the system
detects pollutants in the outside air and
shuts off the supply as needed.
>Left LED on, recirculated-air mode: the
supply of outside air is permanently shut off.
Should the windows fog up in the recircu-
lated-air mode, press the AUTO button or
switch off the recirculated-air mode and
increase the air volume if necessary.
The recirculated-air mode should not be used
over an extended period of time, as the air qual-
Page 116 of 272

Climate
114 ity inside the vehicle deteriorates continu-
ously.<
Residual heat
The heat stored in the engine is
used to heat the passenger com-
partment, e.g. while stopped at a
school to pick up a child.
1.Switch off the engine.
2.Turn to the right, refer to arrow.
The function can be switched on when the fol-
lowing conditions are met:
>up to 15 minutes after switching off the
engine
>with engine at operating temperature
>with sufficient battery voltage
>at an outside temperature below 777/
256
From radio readiness the interior temperature,
the air volume and the air distribution can be
set.
Switching automatic climate control on
and off
1.Turn to the left to minimum air volume.
2.After approx. 1 second, turn to the left
again.
Y o u s w i t c h o n t h e s y s t e m a g a i n b y p r e s s i n g a n y
button of the automatic climate control.
Ventilation
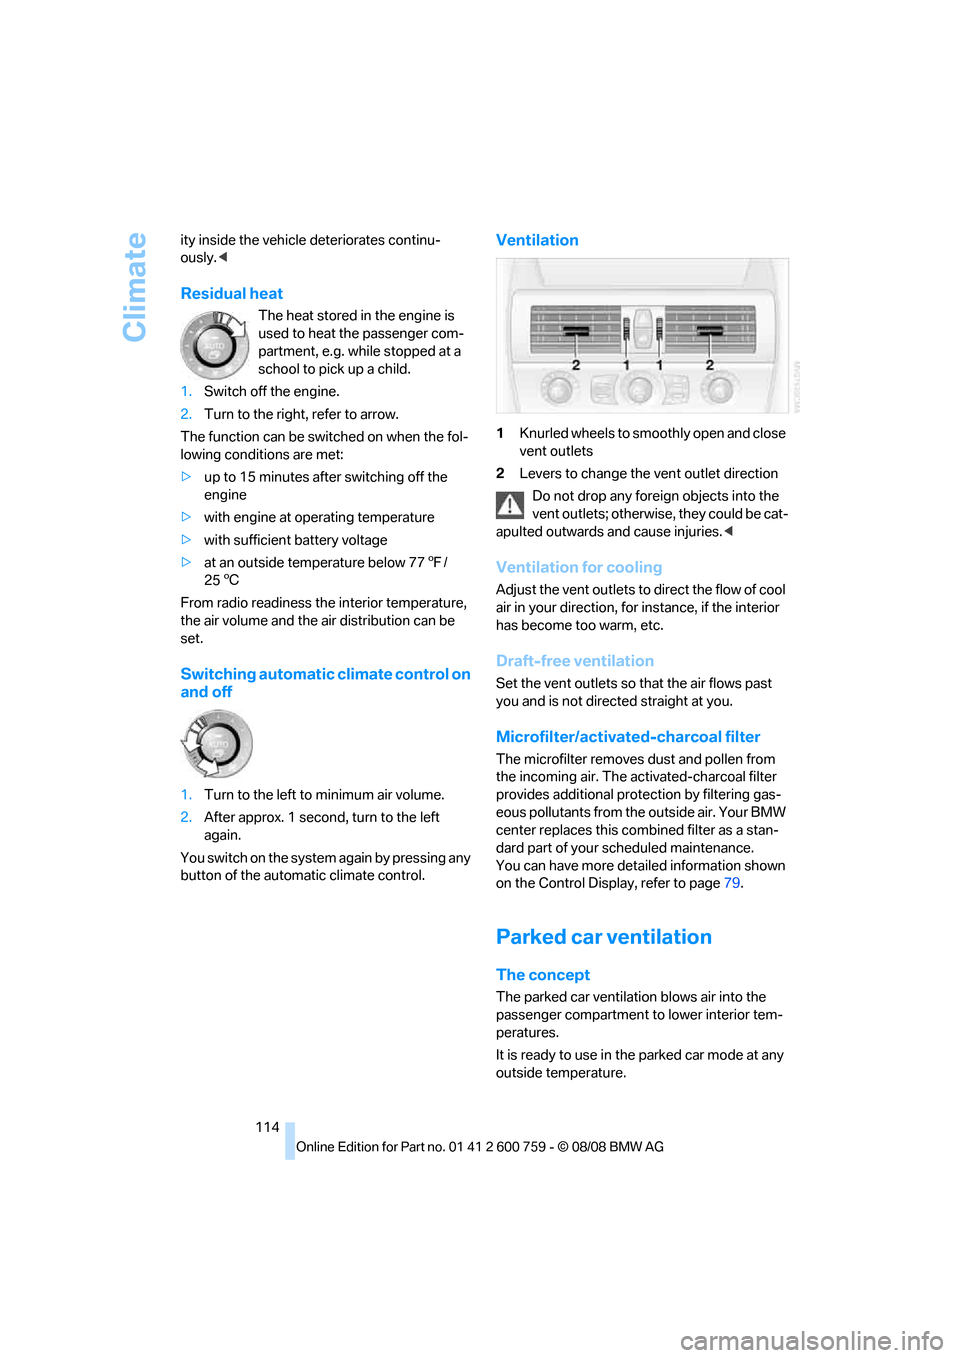
1Knurled wheels to smoothly open and close
vent outlets
2Levers to change the vent outlet direction
Do not drop any foreign objects into the
vent outlets; otherwise, they could be cat-
apulted outwards and cause injuries.<
Ventilation for cooling
Adjust the vent outlets to direct the flow of cool
air in your direction, for instance, if the interior
has become too warm, etc.
Draft-free ventilation
Set the vent outlets so that the air flows past
you and is not directed straight at you.
Microfilter/activated-charcoal filter
The microfilter removes dust and pollen from
the incoming air. The activated-charcoal filter
provides additional protection by filtering gas-
eous pollutants from the outside air. Your BMW
center replaces this combined filter as a stan-
dard part of your scheduled maintenance.
You can have more detailed information shown
on the Control Display, refer to page79.
Parked car ventilation
The concept
The parked car ventilation blows air into the
passenger compartment to lower interior tem-
peratures.
It is ready to use in the parked car mode at any
outside temperature.
Page 117 of 272

Controls
115Reference
At a glance
Driving tips
Communications
Navigation
Entertainment
Mobility
You can set two different times for the system
to start. The parked car ventilation can also be
switched on and off directly. It remains
switched on for 30 minutes.
Since the system uses a substantial amount of
electrical current, you should refrain from acti-
vating it twice in succession without allowing
the battery to be recharged in normal operation
between use.
The air emerges through the upper body region
vent outlets in the instrument panel. Therefore,
please open the vent outlets.
The parked car ventilation is operated via iDrive.
Switching on and off directly
iDrive, for operating principle refer to page16.
1.Open the start menu.
2.Move the controller to the left to open "Cli-
mate".
3.Select "Parked car operation" and press the
controller.
4.Select "Automatic ventilation" and press
the controller.
5.Select "Parked car ventilation" and press
the controller.
The parked car ventilation is switched on.
The symbol on the display of the automatic
climate control flashes.
Preselecting activation times
1.Open the start menu.
2.Move the controller to the left to open "Cli-
mate".
3.Select "Parked car operation" and press the
controller.4.Select "Activation time" and press the con-
troller.
5.Move the controller to the left or right to
select "Timer 1" or "Timer 2".
6.Select the time and press the controller.
The first setting of the time display is
selected.
7.Turn the controller to make the adjustment.
8.Press the controller to apply the setting.
The next setting is selected.
9.Make the remaining adjustments. After the
last adjustment, the time is stored.
Activating activation time
Move the controller to the left or right to select
"Timer 1" or "Timer 2" and then press the con-
troller.
Page 118 of 272

Climate
116 The switch-on time is activated.
The symbol on the display of the automatic
climate control lights up.
The symbol on the display of the automatic
climate control flashes when the parked car
ventilation has switched on.
The parked car ventilation is only avail-
able for activation within the next
24 hours. Please reactivated it after this time.<
Page 129 of 272

Driving tips
127Reference
At a glance
Controls
Communications
Navigation
Entertainment
Mobility
Thinking ahead when driving
Avoid unnecessary acceleration and braking.
To do so, maintain the appropriate distance
from the vehicle in front of you. An anticipatory
and smooth driving style reduces fuel con-
sumption.
Avoiding high engine speeds
Use 1st gear only for starting off. Accelerate
rapidly in 2nd gear and above. Avoid high
engine speeds in doing so and shift into the
next gear early.
When you have reached the desired speed,
shift into the highest possible gear and drive
with the lowest possible engine speed while
maintaining a constant a vehicle speed.
In general: driving at a low engine speed
reduces fuel consumption and minimizes wear.
Taking advantage of coasting
When approaching a red light, let off the gas
and allow the vehicle to coast to a stop in the
highest possible gear.
On steep roadways, let off the gas and allow the
vehicle to roll in the appropriate gear.
The flow of fuel is interrupted when coasting.
Switching off the engine during longer
stops
Switch off the engine at longer stops such as
traffic signals, railroad crossings, or in traffic
jams. Even having the engine switched off for
approx. 4 seconds results in fuel savings.
Switching off functions currently not
required
Functions such as the cooling function of the
automatic climate control, seat heating or rear
window defroster draw large amounts of power
and consume additional fuel. Their influence is
particularly pronounced in city traffic and stop &
go operation. For this reason, it is a good idea to
switch these functions off when they are not
really needed.
Having maintenance carried out
Have the vehicle serviced regularly in order to
achieve the optimum economy and service life
of your vehicle. BMW recommends having the
maintenance performed by a BMW center. Also
please pay attention to the BMW maintenance
system, refer to page225.
General driving notes
Closing luggage compartment lid
Only drive with the luggage compartment
lid completely closed, otherwise exhaust
can penetrate into the passenger compart-
ment.<
If it is absolutely necessary to drive with the lug-
gage compartment lid open:
1.Coupe: close both windows and the glass
sunroof.
Convertible: with closed top, close all win-
dows.
2.Increase the air volume of the automatic cli-
mate control to a high level, refer to
page112.
Hot exhaust system
As in all vehicles, extremely high temper-
atures are generated on the exhaust sys-
tem. Do not remove the heat shields installed
adjacent to it, and never apply undercoating to
them. When driving, standing at idle and while
parking take care to avoid possible contact
between the hot exhaust system and any highly
flammable materials such as hay, leaves, grass,
etc. Such contact could lead to a fire, and with it
the risk of serious property damage as well as
personal injury. Do not touch hot exhaust tail
pipes. Otherwise there is a risk of burns.<
Hydroplaning
When driving on wet or slushy roads,
reduce road speed. If you do not, a wedge
of water can form between tires and road sur-
face. This phenomenon is referred to as hydro-
planing, and is characterized by a partial or
complete loss of contact between the tires and
Page 194 of 272

Telephoning
192
Adjusting volume
Turn the knob during a call to select the desired
volume.
This volume for the hands-free system is main-
tained, even if the other audio sources are set to
minimum volume.
You can also adjust the volume with the buttons
on the steering wheel, refer to page11.
The setting is stored for the remote control cur-
rently in use.
Operation via iDrive
You can operate the following functions via
iDrive:
>Accepting/refusing a call
>Dialing phone numbers
>Dialing phone numbers from the phone
book
>Dialing stored phone numbers, e.g. from the
list of accepted calls.
>Ending a call
When the ignition is switched off or in radio
readiness, e.g. after taking the remote control
out of the ignition lock, you can continue an
ongoing call via the hands-free system for sev-
eral minutes.
Speech quality
If the person you are talking to cannot under-
stand you well, this may be due to excessively
loud background noises. The full mobile phone
preparation package can compensate for these
noises to a certain degree. To optimize the speech quality during a call, we recommend
that you:
>Reduce background noises, e.g. by closing
the windows, reducing the air volume of the
automatic climate control or pointing the
opened front vent outlets downward
>Reduce volume of hands-free system
Requirements
>The logon data of the mobile phone are
stored in the vehicle and the mobile phone
is ready to operate.
>The engine is running or the ignition is
switched on.
>The mobile phone is detected by the vehi-
cle.
Opening Communication
Many of the functions described below are con-
trolled using the "Communication" menu.
iDrive, for operating principle refer to page16.
1.Press the button to open the start
menu.
2.Move the controller forward to open "Com-
munication".
Receiving calls
If you have the phone number of the caller
stored in the phone book and the phone num-
ber has been transmitted, the name of the entry
is displayed.
Accepting a call
Press the button on the steering wheel.
Alternative:
Page 218 of 272

Wheels and tires
216
Tire identification marks
Knowledge of the labeling on the side of the tire
makes it easier to identify and choose the right
tires.
Tire size
Speed letter
T = up to 118 mph/190 km/h
H = up to 131 mph/210 km/h
V = up to 150 mph/240 km/h
W = up to 167 mph/270 km/h
Y = up to 186 mph/300 km/h
Tire Identification Number
Tires with DOT codes meet the guidelines of
the US Department of Transportation.
DOT code:
Tire age
The tire's date of manufacture is indicated on
the sidewall:
DOT ... 1008 indicates that the tire was manu-
factured in week 10 of 2008.
BMW recommends replacing all tires at least
every 6 years, even if some tires may last for
10 years.
Uniform Tire Quality Grading
Quality grades can be found where applicable
on the tire sidewall between tread shoulder and
maximum section width. For example:
Tread wear 200 Traction AA
Temperature A
DOT Quality Grades
Tread wear
Traction AA A B C
Temperature A B C
All passenger car tires must conform to
Federal Safety Requirements in addition
to these grades.<
Tread wear
The tread wear grade is a comparative rating
based on the wear rate of the tire when tested
under controlled conditions on a specified gov-
ernment test course.
For example, a tire graded 150 would wear one
and one-half, 1γ, times as well on the govern-
ment course as a tire graded 100. The relative
performance of tires depends upon the actual
conditions of their use, however, and may
depart significantly from the norm due to varia-
tions in driving habits, service practices and dif-
ferences in road characteristics and climate.
Traction
The traction grades, from highest to lowest, are
AA, A, B, and C.
These grades represent the tire's ability to stop
on wet pavement as measured under controlled
conditions on specified government test sur-
faces of asphalt and concrete. A tire marked C
may have poor traction performance.
The traction grade assigned to this tire is
based on straight-ahead braking traction
tests, and does not include acceleration, cor-
nering, hydroplaning, or peak traction charac-
teristics.<
Temperature
The temperature grades are A, the highest, B,
and C, representing the tire's resistance to the
generation of heat and its ability to dissipate e.g.
Nominal width in mm
Aspect ratio in Ξ
Radial belt construction
Rim diameter in inches
Load rating
(not on ZR tires)
Speed code letter
(in front of the R on ZR tires)
245/45 R 18 96 W
e.g.
Manufacturer code
for tire make
Tire size and tire design
Tire ageDOT xxxx xxx 1008