Page 97 of 272

Controls
95Reference
At a glance
Driving tips
Communications
Navigation
Entertainment
Mobility
replacement or alternate tires or wheels on the
vehicle that prevent the TPMS from functioning
properly. Always check the TPMS malfunction
telltale after replacing one or more tires or
wheels on your vehicle to ensure that the
replacement or alternate tires and wheels allow
the TPMS to continue to function properly.
Active steering*
The concept
The active steering is a system that actively var-
ies the steering angle of the front wheels in rela-
tion to the steering wheel movements.
When you are driving in the low road speed
range, e. g. in a town or when parking, the steer-
ing angle increases, i.e. the steering becomes
very direct. In the higher speed range, on the
other hand, the steering angle is reduced more
and more. This improves the handling capability
of your BMW over the entire speed range.
In critical situations, the system can make tar-
geted corrections to the steering angle pro-
vided by the driver and thus stabilize the vehicle
before the driver intervenes. This stability-pro-
moting intervention is deactivated when DSC is
switched off, refer to page89.
Malfunction
The warning lamp lights up yellow and
a message is shown on the Control Dis-
play. Active steering is malfunctioning
or is temporarily deactivated. At low speed,
larger steering wheel movements are required,
while the vehicle reacts more sensitively to
steering wheel movements in the higher road
speed range. The stability-promoting interven-
tion can also be deactivated. Proceed cau-
tiously and drive defensively. Have the system
checked if the active steering is malfunctioning.
Brake force display
>On the left: normal braking.
>On the right: heavy braking.
Airbags
The following airbags are located under the
marked covers:
1Front airbags
2Coupe: Head airbags
3Side airbags4Knee airbag
5Knee airbag
Page 98 of 272

Technology for comfort, convenience and safety
96
Protective action
To ensure that the safety systems con-
tinue to provide optimized protection,
please observe the adjustment instructions on
page49.<
The front airbags help protect the driver and
front passenger by responding to frontal
impacts in which safety belts alone cannot pro-
vide adequate restraint. When needed, the
head and side airbags help provide protection in
the event of side impact. The relevant side air-
bag supports the side upper body area. The
head air bag supports the head. The knee air-
bag protects the legs from colliding with the
cockpit.
The airbags are deliberately not triggered in
every impact situation, e. g. less severe acci-
dents or rear-end collisions.
Do not apply adhesive materials to the
cover panels of the airbags, cover them or
modify them in any other way. Do not attempt to
remove the airbag restraint system from the
vehicle. Do not modify or tamper with either the
wiring or the individual components in the air-
bag system. This category includes the uphol-
stery in the center of the steering wheel, on the
instrument panel, the side trim panels on the
doors and on the Coupe, the roof pillars along
with the sides of the headliner. Do not attempt
to remove or dismantle the steering wheel.
Do not touch the individual components
directly after the system has been triggered,
because there is a danger of burns.
In the event of malfunctions, deactivation, or
triggering of the airbag restraint system, have
the testing, repair, removal, and disposal of air-
bag generators executed only by a BMW center
or a workshop that works according to BMW
repair procedures with correspondingly trained
personnel and has the required explosives
licenses. Otherwise unprofessional attempts to
service the system could lead to failure in an
emergency or undesired airbag triggering,
either of which could result in personal injury.<
Warnings and information on the airbags is also
provided on the sun visors.
Automatic deactivation of front
passenger airbags
The occupation of the seat is detected by eval-
uating the impression on the occupied seat sur-
face of the front passenger seat. The system
correspondingly activates or deactivates the
front, knee and side airbags on the front pas-
senger side.
The current status of the front passenger
airbag, i.e. deactivated or activated, is
indicated by the indicator lamp over the interior
rearview mirror, refer to Operating state of front
passenger airbags in the following.<
Before transporting a child in the front
passenger seat, read the safety informa-
tion and follow the instructions under Trans-
porting children safely, refer to page58.
The front, knee and side airbags on the front
passenger side can be deactivated for teenag-
ers and adults in certain sitting positions; the
indicator lamp for the front passenger airbags
lights up when this occurs. In these cases,
change the sitting position so that the front pas-
senger airbags are activated and the indicator
lamp goes out. If the desired status cannot be
produced by changing the sitting position,
transport the corresponding person in the rear
seat.
Do not fit seat covers, seat cushion padding,
ball mats or other items onto the front passen-
ger seat unless they are specifically recom-
mended by BMW. Do not lay objects under the
seat which could press against the seat from
below. Otherwise a correct evaluation of the
occupied seat surface cannot be ensured.<
Page 99 of 272

Controls
97Reference
At a glance
Driving tips
Communications
Navigation
Entertainment
Mobility
Operating state of front passenger
airbags
The illustration here shows a possible arrange-
ment in the Coupe. With some vehicle equip-
ment packages or in the Convertible, the
arrangement of the switches and indicator
lamps may differ somewhat.
The indicator lamp for the front passenger air-
bags indicates the operating status of the front,
knee and side airbags on the front passenger
side depending on whether the seat is occu-
pied. The indicator lamp shows whether the
front passenger airbags are activated or deacti-
vated.
>The indicator lamp lights up when a child in
a child restraint system intended for the
purpose is properly detected on the seat.
The front, knee and side airbags on the front
passenger side are deactivated.
Most child's seats are detected by the
system. Especially the child's seats
required by the NHTSA at the time the vehicle is
manufactured. After installing a child's seat,
make sure that the indicator lamp for the front
passenger airbags lights up. This indicates that
the child's seat has been detected and the front
passenger airbags are not activated.<
>The indicator lamp does not light up if, for
example, the system detects a person of
sufficient size seated correctly on the seat.
The front, knee and side airbags on the front
passenger side are activated.
>The indicator lamp does not light up when
the seat is empty.
But the front, knee and side airbags on the
front passenger side are still deactivated.
Operational readiness of airbag system
From radio readiness, refer to page60, the
warning lamp lights up briefly, indicating the
operational readiness of the entire airbag sys-
tem and the safety belt tensioners.
Airbag system malfunction
>Warning lamp does not light up from radio
readiness.
>Warning lamp lights up continuously.
Have the airbag system checked immedi-
ately in case of a malfunction, otherwise
there is a danger that the airbag system may not
respond in the expected manner in an accident
despite an impact of corresponding intensity.<
Convertible: rollover
protection system
The rollover protection system is automatically
activated in the event of an accident or a critical
driving situation, extreme inclination on the lon-
gitudinal axis, or loss of ground contact. The
rollover bars located behind the rear head
restraints are deployed within fractions of a sec-
ond.
As a supplement to the rollover bar integrated
into the windshield frame, the rollover protec-
tion system ensures that all vehicle occupants
have the necessary headroom.
Always keep the path of movement of the
rollover protection system clear.
In minor accidents, you are protected by the
fastened safety belt and, depending on acci-
dent severity, by the safety belt tensioner and
multi-phase airbag retention system.<
Page 100 of 272

Technology for comfort, convenience and safety
98
Lowering
If the rollover protection system experienced no
impact after automatic activation, then it can be
lowered again. No tools are necessary for this
purpose.
1.Press the release backward and hold in that
position.
2.Press the rollover protection unit halfway
down from above.
3.Let go of the release.
4.Press the rollover protection unit down until
it snaps into place.
5.Use the same procedure for the second roll-
over protection unit.
Have the rollover protection system checked
after unexpected triggering.
Never move the convertible top when the
rollover protection system is raised.
No changes of any nature may be made to the
individual components of the rollover protec-
tion system and wiring.
Work on the rollover protection system may
only be performed at a BMW center.
Unprofessional attempts to service the system
can lead to failure or malfunction.
For a system check and to ensure long-term
functioning, you must comply with the mainte-nance intervals of the service requirements,
refer to page79.<
Head-Up Display*
The concept
With the Head-Up Display important informa-
tion is projected into the driver's field of view,
e.g. navigation instructions. This enables you to
take in this information without looking away
from the road.
Switching on/off
Press the button.
Page 101 of 272

Controls
99Reference
At a glance
Driving tips
Communications
Navigation
Entertainment
Mobility
1Navigation instructions
2Display
>Cruise control
>Active cruise control
>Leaving lane warning
3Speed
Selecting displays
iDrive, for operating principle refer to page16.
1.Press the button.
This opens the start menu.
2.Press the controller to open the menu.
3.Select "Settings" and press the controller.
4.Select "Display settings" and press the
controller.
5.Change to upper field if necessary. Turn the
controller until "Head-Up Display" is
selected and press the controller.
6.Change into the second field from the top.
Turn the controller until "Head-Up Display"
is selected and press the controller.
7.Select desired information of Head-Up Dis-
play.8.Press the controller.
The information appears in the Head-
Up Display.
The settings are stored for the remote control
currently in use.
Setting brightness
The brightness of the display is adapted to the
ambient lighting conditions. However, you can
change the base setting.
With the low beams switched on, the brightness
can also be adjusted with the knurled wheel of
the instrument lighting.
iDrive, for operating principle refer to page16.
1.Press the button.
This opens the start menu.
2.Press the controller to open the menu.
3.Select "Settings" and press the controller.
4.Select "Display settings" and press the
controller.
5.Change to upper field if necessary. Turn the
controller until "Head-Up Display" is
selected and press the controller.
6.Change into the second field from the top.
Turn the controller until "Brightness" is
selected and press the controller.
7.Turn the controller until the desired setting
is selected.
The setting is stored for the remote control cur-
rently in use.
Notes
The visibility of the displays in the Head-Up Dis-
play is influenced by:
>Sunglasses with certain polarization filters
Page 102 of 272

Technology for comfort, convenience and safety
100 >Certain seating positions
>Objects on the cover of the Head-Up Dis-
play
>Wet road surface and unfavorable lighting
conditions
If the image is distorted, please have the base
setting checked at a BMW center.
Special windshield
The windshield is part of the system. The shape
of the windshield complies with the require-
ments of the Head-Up Display to enable a pre-
cise display. A film in the windshield prevents
double images from being displayed.
Windshield replacement should be carried out
by a BMW center or a workshop that works
according to BMW repair procedures with cor-
respondingly trained personnel.
Care instructions
You can find valuable information on this topic
under Care, starting on page227.
Only clean the cover of the Head-Up Dis-
play with a soft, nonabrasive cloth or with
a display cleaning cloth; otherwise, you may
damage it.<
BMW Night Vision*
The concept
BMW Night Vision is a driver assistance system
that is designed to provide enhanced vision for
certain objects at night. This can be especially
helpful for detecting people and larger animals.
When objects are detected, the driver may be
able to take appropriate action sooner. For example, the driver may identify and detect the
presence of persons or animals in the road
ahead or off to the sides and can be more alert,
slow down or stop, blow the horn etc. The driver
can decide which actions are appropriate and
then react accordingly.
A certain area in front of the vehicle is viewed by
an infrared camera and a generated image is
shown on the Control Display. The resulting
thermal image shows the relative heat radiation
of the objects present in the camera's field of
view. Warmer objects appear brighter and
cooler objects appear darker. Contrast is
dependent on the temperature difference
between the objects and the background and
on the amount of heat radiation of the object
itself. As a result, it is quite possible that a per-
son is not continually recognizable as a person
in shape, since the thermal radiation can be
affected by different clothing which blocks heat
loss. Objects with little temperature difference
to the surrounding area, or little heat radiation
are less noticeable, for example in cold weather.
Any improvement in detection depends on
many factors such as the object size and tem-
perature compared to the surroundings, or
other nearby objects, the visual recognition
skills of the driver, weather conditions, and
other factors.
Driving hints
With the system active, periodically but briefly,
glance at the thermal image on the Control Dis-
play to notice objects that could be people or
larger animals. The glance should be similar to
glancing at the rear view mirror. Do not stare at
the image for long periods while driving, as this
will remove attention from the road. If you notice
an ob je c t o f intere st ahea d, be pre pare d to slow
down or stop, blow the horn, or take other
appropriate action.
System limits
The system is designed to supplement but not
replace forward vision through the windshield.
The driver is responsible for safe driving at
night. BMW Night Vision is not designed to be
Page 103 of 272

Controls
101Reference
At a glance
Driving tips
Communications
Navigation
Entertainment
Mobility
used as a continuous viewing window for driv-
ing at night.
No system, no matter how sophisticated, can
operate without limitations. BMW Night Vision
operation is subject to physical and environ-
mental limitations that will reduce the ability of
the system to detect and display a clear thermal
image. Some of the situations in which these
limitations can occur are:
>on steep hilltops or depressions and in tight
curves
>in tunnels, as the contrast is inherently low
>when the camera lens is dirty
>in dense fog, heavy rain or snowfall
>when displaying very hot objects such as
transformers, car exhausts etc.
>when the image briefly freezes during nor-
mal system adjustment.
BMW Night Vision's potential benefits
can be limited by the driving style of the
driver, the size and relative temperature of the
detected objects, dirt or contamination on the
camera lens, adverse weather like snow, rain or
fog, and other factors not mentioned here. It will
always be the driver's responsibility to drive at a
speed and in a manner that recognizes potential
hazards and adjust accordingly.
BMW Night Vision is not a substitute or replace-
ment for the driver's responsibility to adapt to
visibility and traffic conditions. The forward view
illuminated by the headlamps must always be
the basis for making safe driving decisions, oth-
erwise a safety risk will result.
1.Turn the light switch to position2 or3, refer
to page104.
2.With low beams switched on:
>Press the button. Depending on the
vehicle's equipment, the location of the
button may differ somewhat.
>Press one of the programmable buttons
on the steering wheel, refer to page57.
The image will be displayed on the Control Dis-
play after a few seconds. Depending on the last
mode selected, either the normal or full screen
image will be displayed.
Due to the system's need to adjust periodically,
a still image is displayed at certain intervals for
fractions of a second. This is normal and not an
indication of a problem.
To prevent driving without headlamps, at a
speed of more than approx. 3 mph/5 km/h and
when dark, the thermal image on the Control
Display is only shown when the low beams are
on.
Deactivating BMW Night Vision
>Press the button.
>Press the button on the steering wheel.
Page 104 of 272

Technology for comfort, convenience and safety
102 >Press the button.
>Via iDrive, refer to Selecting settings.
Selecting settings
iDrive, for explanation of principle, refer to
page16.
1.Activate BMW Night Vision.
2.Press the controller to display the menu
items.
3.Select the menu item and press the control-
ler:
>"Night Vision off":
Deactivate BMW Night Vision.
>"Zoom":
At higher speeds, the image is zoomed
in.
>"Curve mode":
Depending on the steering angle and
other parameters, the image section fol-
lows the course of the road to some
degree.
>"Full screen":
The image is shown on the entire Con-
trol Display.
>"Contrast":
The contrast of the screen can be
adjusted.
>"Brightness":
The brightness of the screen can be
adjusted.
"Curve mode" can only be activated with
the "Zoom" function switched on. With
"Full screen" activated, "Curve mode" and
"Zoom" cannot be selected.
currently in use.
To exit the menu:
The image automatically disappears after
approx. 5 seconds.
Cleaning camera
The function of the camera may be affected by
heavy rain and fog, dirt, snow or ice on the lens.
When this occurs, the displayed image on the
Control Display may become gray.
To minimize icing, the camera lens is automati-
cally heated. However, it may be necessary to
clean the camera lens manually under severe
weather conditions. When doing so, cautiously
remove any debris, ice or snow. To avoid dam-
age to the lens, do not use sharp or abrasive
instruments to clean ice, snow, or dirt off the
lens.
When the windshield is cleaned with the head-
lamps on, the camera lens area is automatically
sprayed as well. Refer to page66.
Leaving lane warning*
The concept
This system warns you from a speed of approx.
40 mph/70 km/h when the vehicle is leaving the
lane you are currently in on roads with lane limit
lines. You feel this due to a slight vibration of the
steering wheel.
The system does not warn you if you signal
before leaving the lane.
It is best to use the system on well-developed
roads and freeways.
 1
1 2
2 3
3 4
4 5
5 6
6 7
7 8
8 9
9 10
10 11
11 12
12 13
13 14
14 15
15 16
16 17
17 18
18 19
19 20
20 21
21 22
22 23
23 24
24 25
25 26
26 27
27 28
28 29
29 30
30 31
31 32
32 33
33 34
34 35
35 36
36 37
37 38
38 39
39 40
40 41
41 42
42 43
43 44
44 45
45 46
46 47
47 48
48 49
49 50
50 51
51 52
52 53
53 54
54 55
55 56
56 57
57 58
58 59
59 60
60 61
61 62
62 63
63 64
64 65
65 66
66 67
67 68
68 69
69 70
70 71
71 72
72 73
73 74
74 75
75 76
76 77
77 78
78 79
79 80
80 81
81 82
82 83
83 84
84 85
85 86
86 87
87 88
88 89
89 90
90 91
91 92
92 93
93 94
94 95
95 96
96 97
97 98
98 99
99 100
100 101
101 102
102 103
103 104
104 105
105 106
106 107
107 108
108 109
109 110
110 111
111 112
112 113
113 114
114 115
115 116
116 117
117 118
118 119
119 120
120 121
121 122
122 123
123 124
124 125
125 126
126 127
127 128
128 129
129 130
130 131
131 132
132 133
133 134
134 135
135 136
136 137
137 138
138 139
139 140
140 141
141 142
142 143
143 144
144 145
145 146
146 147
147 148
148 149
149 150
150 151
151 152
152 153
153 154
154 155
155 156
156 157
157 158
158 159
159 160
160 161
161 162
162 163
163 164
164 165
165 166
166 167
167 168
168 169
169 170
170 171
171 172
172 173
173 174
174 175
175 176
176 177
177 178
178 179
179 180
180 181
181 182
182 183
183 184
184 185
185 186
186 187
187 188
188 189
189 190
190 191
191 192
192 193
193 194
194 195
195 196
196 197
197 198
198 199
199 200
200 201
201 202
202 203
203 204
204 205
205 206
206 207
207 208
208 209
209 210
210 211
211 212
212 213
213 214
214 215
215 216
216 217
217 218
218 219
219 220
220 221
221 222
222 223
223 224
224 225
225 226
226 227
227 228
228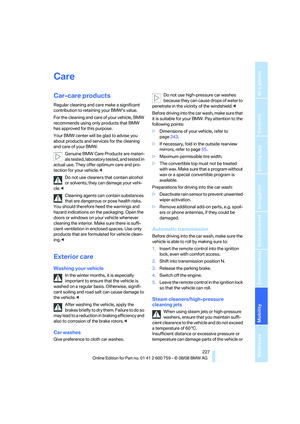 229
229 230
230 231
231 232
232 233
233 234
234 235
235 236
236 237
237 238
238 239
239 240
240 241
241 242
242 243
243 244
244 245
245 246
246 247
247 248
248 249
249 250
250 251
251 252
252 253
253 254
254 255
255 256
256 257
257 258
258 259
259 260
260 261
261 262
262 263
263 264
264 265
265 266
266 267
267 268
268 269
269 270
270 271
271