2009 BMW 525I TOURING Set time
[x] Cancel search: Set timePage 22 of 294

iDrive
20
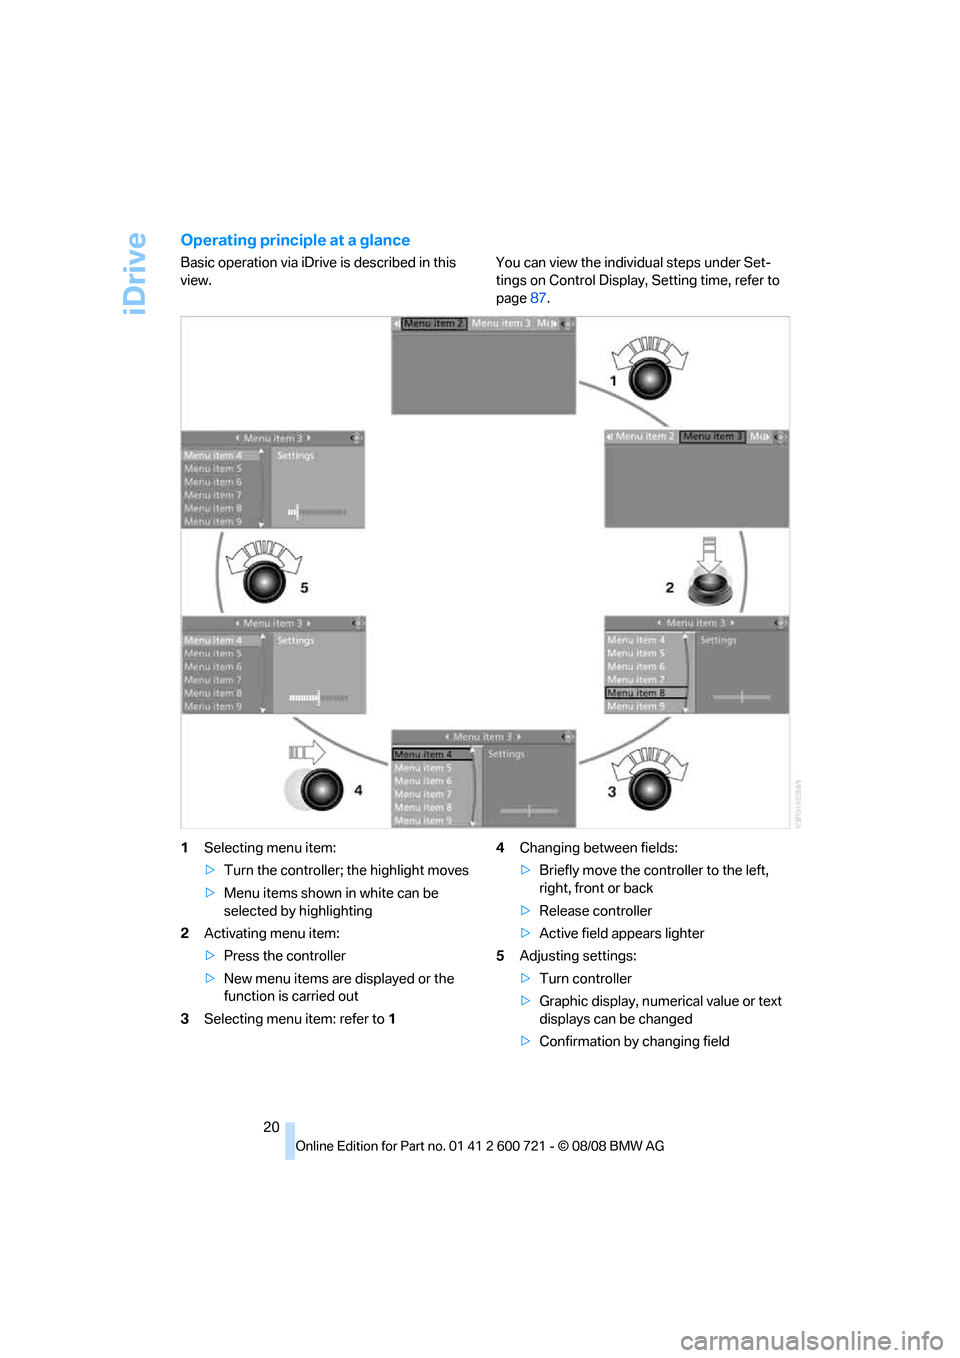
Operating principle at a glance
Basic operation via iDrive is described in this
view.You can view the individual steps under Set-
tings on Control Display, Setting time, refer to
page87.
1Selecting menu item:
>Turn the controller; the highlight moves
>Menu items shown in white can be
selected by highlighting
2Activating menu item:
>Press the controller
>New menu items are displayed or the
function is carried out
3Selecting menu item: refer to 14Changing between fields:
>Briefly move the controller to the left,
right, front or back
>Release controller
>Active field appears lighter
5Adjusting settings:
>Turn controller
>Graphic display, numerical value or text
displays can be changed
>Confirmation by changing field
Page 33 of 294

Controls
31Reference
At a glance
Driving tips
Communications
Navigation
Entertainment
Mobility
Remove the adapter from the holder in the
glove compartment and slide the spare key into
the adapter before use.
Personal Profile
The concept
You can set a number of functions of your BMW
individually according to your preferences. Per-
sonal Profile ensures that most of these set-
tings are stored for the remote control currently
in use without you having to do anything. When
the vehicle is unlocked, the corresponding
remote control is detected and the settings
stored for it are called up and carried out.
This means that you will always find your BMW
set to your own personal settings even if
another person with his/her own remote control
and settings has used the vehicle since the last
time you drove it. The individual settings are
stored for a maximum of four remote controls,
for two with comfort access
*.
Personal Profile settings
Details on the settings are provided on the
specified pages.
>Behavior of the central locking system
when unlocking vehicle, refer to page32
>Automatic locking of the vehicle, refer to
page35
>Programming buttons
* on steering wheel,
refer to page56>Displays on Control Display:
>Brightness of the Control Display, refer
to page88
>Measuring units for consumption, route/
distances, temperature, and pressure,
refer to page89
>12h/24h clock format, refer to page88
>Date format, refer to page88
>Language on Control Display, refer to
page89
>Lighting settings:
>Triple turn signal activation, refer to
page68
>Welcome lamps, refer to page108
>Pathway lighting, refer to page109
>Daytime running lamps
*, refer to
page109
>High-beam assistant
*, refer to page110
>PDC Park Distance Control
*: optical warn-
ing, refer to page90
>Head-Up Display
*: selection and bright-
ness of display, refer to page102
>BMW Night Vision
*: display settings, refer
to page105
>Automatic climate control: AUTO program
and intensity, cooling function, and auto-
matic recirculated air control/recirculated
air mode, temperature, air distribution, tem-
perature in the upper body region, refer to
text starting on page115
>Navigation system
*: voice instructions for
destination guidance, refer to page159
In addition, the following, most recently
selected settings are recalled during unlocking:
>Programmable memory buttons: selecting
stored functions, refer to page22
>Positions of driver's seat, outside mirrors,
and steering wheel
*, refer to page49
>Audio sources: volume and tone settings,
refer to page169
Page 34 of 294

Opening and closing
32 >Radio:
>Display of stored stations, refer to
page172
>Switching RDS Radio Data System on/
off
*, refer to page175
>Phone: volume setting, refer to page200
Central locking system
The concept
The central locking system functions when the
driver's door is closed.
The system simultaneously engages and
releases the locks on the following:
>Doors
>Luggage compartment lid or tailgate and
rear window
>Fuel filler door
Operating from outside
>Via the remote control
>Using door lock
>With comfort access
* via the door handles
In addition, it the remote control is used, the
welcome lamps, the interior lamps and the
courtesy lamps
* are switched on or off. The
alarm system
is armed/disarmed at the same
time.
You can find more detailed information on the
alarm system
on page39.
Operating from inside
Via the button for central locking, refer to
page35. The fuel filler door is not locked.
In the event of a sufficiently severe accident, the
central locking system unlocks automatically. In
addition, the hazard warning flashers and inte-
rior lamps come on.
Opening and closing:
Using remote control
Persons or animals left unattended in a
parked vehicle can lock the doors from
the inside. Always take along the remote control
when leaving the vehicle so that the vehicle can
then be opened from the outside.<
Unlocking
Press the button.
The interior lamps, the courtesy lamps
*, and
the welcome lamps are switched on.
Setting unlocking behavior
You can set whether the first press of the button
unlocks only the driver's door or the entire vehi-
cle.
iDrive, for operating principle refer to page16.
1.Press the button.
This opens the start menu.
2.Press the controller to open the menu.
3.Select "Settings" and press the controller.
4.Select "Vehicle / Tires" and press the con-
troller.
5.Change to upper field if necessary. Turn the
controller until "Door locks" is selected and
press the controller.
6.Select "Central locking" and press the con-
troller.
7.Select "Unlock button" and press the con-
troller.
Page 37 of 294

Controls
35Reference
At a glance
Driving tips
Communications
Navigation
Entertainment
Mobility
Opening and closing: from
inside
This button serves to unlock or lock doors and
the luggage compartment lid or tailgate and
rear window with the front doors closed, but
does not activate the anti-theft system. The fuel
filler door remains unlocked.
Automatic locking
iDrive, for operating principle refer to page16.
1.Press the button.
This opens the start menu.
2.Press the controller to open the menu.
3.Select "Settings" and press the controller.
4.Select "Vehicle / Tires" and press the con-
troller.
5.Change to upper field if necessary. Turn the
controller until "Door locks" is selected and
press the controller.
6.Select "Central locking" and press the con-
troller.
7.Select a menu item:
>"Relock door if not opened"
The central locking system locks again after a short time if no door has been
opened.
>"Lock after driving"
The central locking system locks the
vehicle as soon as you start to drive.
8.Press the controller.
The setting is selected.
The setting is stored for the remote control cur-
rently in use.
Unlocking and opening
>Either unlock the doors together with the
button for the central locking system and
then pull the door handle above the armrest
or
>pull on the door handle of each door twice:
the first time unlocks the door, the second
time opens it.
Locking
>Use the central locking button to lock all of
the doors simultaneously, or
>press down the lock button of a door.
To prevent you from being locked out, the
open driver's door cannot be locked using
the lock button.
Persons or animals left unattended in a
parked vehicle can lock the doors from
the inside. Always take along the remote control
when leaving the vehicle so that the vehicle can
then be opened from the outside.<
Doors
Automatic soft closing*
To close the doors, merely push them gently.
The closing process will then be carried out
automatically.
Make sure that the closing path of the
doors is clear; otherwise injuries may
result.<
Page 56 of 294

Adjusting
54 3.Select "Driver's seat climate" or "Passen-
ger's seat climate" and press the controller.
Turn the controller to adjust the distribution.
The setting is applied.
Rear
Operation similar to front seat heating; two tem-
perature levels, without temperature distribu-
tion.
Active seat ventilation*
The appearance and arrangement of the but-
tons may vary depending on the equipment.
1Active seat ventilation
2Active seat ventilation with seat heatingPress the respective button once per ventila-
tion level. The ventilation level appears on the
Control Display. The maximum level is supplied
when three LEDs are lit.
The air quantity is reduced and if need be, the
ventilation is switched off in order to reduce the
load on the battery. The LEDs remain lit.
To switch off: Press button longer.
The highest level is used for rapid cooling,
e.g. when the vehicle has become heated
up. After a short time, the system is automati-
cally switched down one level in order to pre-
vent excessive cooling.<
Active seat*
The seat cushion is actively varied by alter-
nately raising and lowering the right and left half
of the seat cushion. This reduces muscular ten-
sion and fatigue to help prevent lower back
pain.
Press the button to switch on; the LED lights
up.
The action of the system is reduced and if need
be, switched off in order to reduce the load on
the battery. The LED remains lit.
If you switch off the active seat, it can take up
to 1 minute before the two halves of the seat
cushion have returned to their initial position.
Mirrors
Exterior mirrors
The mirror on the passenger's side is
more curved than the driver's mirror.
Page 70 of 294

Driving
68
Activating system
Press the SPORT button.
The LED in the button lights up and SPORT is
displayed in the instrument cluster.
Deactivating system
>Press the SPORT button again
>Engage reverse gear
>Switch off engine
The LED in the button and SPORT in the instru-
ment cluster go out.
Turn signals/
headlamp flasher
1High beams
2Headlamp flasher
3Turn signals
Using turn signals
Press the lever beyond the resistance point.
To turn off manually, press the lever to the
resistance point.
Atypically rapid flashing of the indicator
lamp indicates that a turn signal bulb
needs to be replaced.<
Signaling briefly
Press lever to resistance point and hold for as
long as you wish to signal.
Triple turn signal activation
Press the lever to the resistance point; the turn
signal flashes three times.
You can activate or deactivate this function.
iDrive, for operating principle refer to page16.
1.Press the button.
This opens the start menu.
2.Press the controller to open the menu.
3.Select "Settings" and press the controller.
4.Select "Vehicle / Tires" and press the con-
troller.
5.Change to upper field if necessary. Turn the
controller until "Lighting" is selected and
press the controller.
6.Select "Triple turn signal" and press the
controller.
Triple turn signaling is activated.
The setting is stored for the remote control cur-
rently in use.
Page 73 of 294

Controls
71Reference
At a glance
Driving tips
Communications
Navigation
Entertainment
Mobility
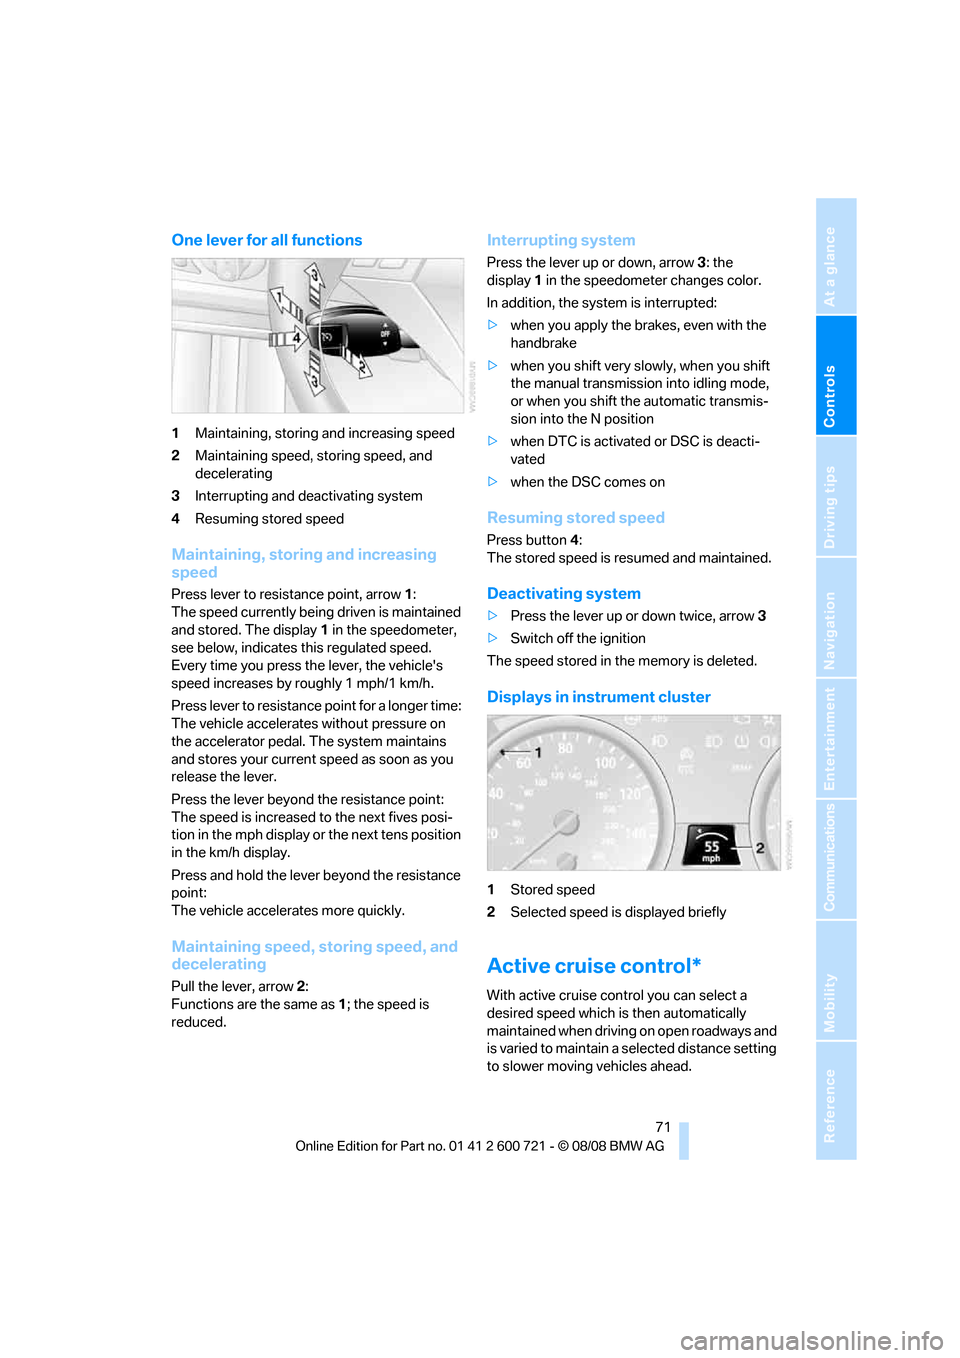
One lever for all functions
1Maintaining, storing and increasing speed
2Maintaining speed, storing speed, and
decelerating
3Interrupting and deactivating system
4Resuming stored speed
Maintaining, storing and increasing
speed
Press lever to resistance point, arrow 1:
The speed currently being driven is maintained
and stored. The display1 in the speedometer,
see below, indicates this regulated speed.
Every time you press the lever, the vehicle's
speed increases by roughly 1 mph/1 km/h.
Press lever to resistance point for a longer time:
The vehicle accelerates without pressure on
the accelerator pedal. The system maintains
and stores your current speed as soon as you
release the lever.
Press the lever beyond the resistance point:
The speed is increased to the next fives posi-
tion in the mph display or the next tens position
in the km/h display.
Press and hold the lever beyond the resistance
point:
The vehicle accelerates more quickly.
Maintaining speed, storing speed, and
decelerating
Pull the lever, arrow2:
Functions are the same as1; the speed is
reduced.
Interrupting system
Press the lever up or down, arrow3: the
display1 in the speedometer changes color.
In addition, the system is interrupted:
>when you apply the brakes, even with the
handbrake
>when you shift very slowly, when you shift
the manual transmission into idling mode,
or when you shift the automatic transmis-
sion into the N position
>when DTC is activated or DSC is deacti-
vated
>when the DSC comes on
Resuming stored speed
Press button4:
The stored speed is resumed and maintained.
Deactivating system
>Press the lever up or down twice, arrow3
>Switch off the ignition
The speed stored in the memory is deleted.
Displays in instrument cluster
1Stored speed
2Selected speed is displayed briefly
Active cruise control*
With active cruise control you can select a
desired speed which is then automatically
maintained when driving on open roadways and
is varied to maintain a selected distance setting
to slower moving vehicles ahead.
Page 75 of 294

Controls
73Reference
At a glance
Driving tips
Communications
Navigation
Entertainment
Mobility
as snow, strong rain or fog; or when entering
interchanges, service/parking areas or toll
booths. It is also important to regulate your
vehicle's speed and distance setting within
applicable legal limits. Always be ready to take
action or apply the brakes if necessary, espe-
cially when the system is actively following a
vehicle in front of you. Otherwise, driving condi-
tions can result which lead to a violation of the
law or elevated risk of an accident.
The minimum initial activation speed is 20 mph/
30 km/h, and the maximum speed is 110 mph/
180 km/h. However, you can also activate the
system while stopped, refer to While stopped,
page74.
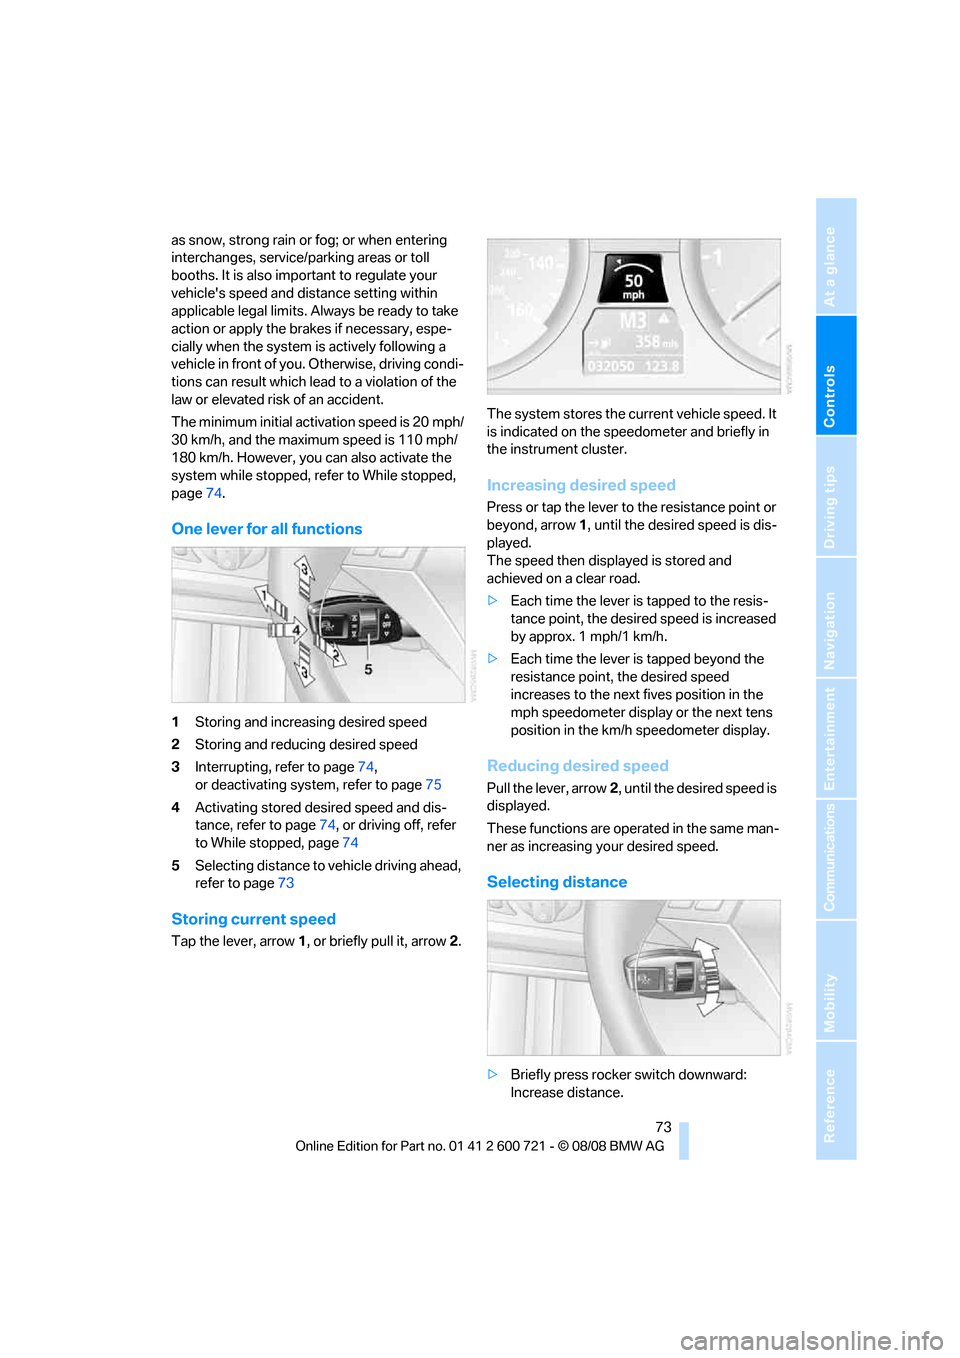
One lever for all functions
1Storing and increasing desired speed
2Storing and reducing desired speed
3Interrupting, refer to page74,
or deactivating system, refer to page75
4Activating stored desired speed and dis-
tance, refer to page74, or driving off, refer
to While stopped, page74
5Selecting distance to vehicle driving ahead,
refer to page73
Storing current speed
Tap the lever, arrow1, or briefly pull it, arrow2.The system stores the current vehicle speed. It
is indicated on the speedometer and briefly in
the instrument cluster.
Increasing desired speed
Press or tap the lever to the resistance point or
beyond, arrow1, until the desired speed is dis-
played.
The speed then displayed is stored and
achieved on a clear road.
>Each time the lever is tapped to the resis-
tance point, the desired speed is increased
by approx. 1 mph/1 km/h.
>Each time the lever is tapped beyond the
resistance point, the desired speed
increases to the next fives position in the
mph speedometer display or the next tens
position in the km/h speedometer display.
Reducing desired speed
Pull the lever, arrow2, until the desired speed is
displayed.
These functions are operated in the same man-
ner as increasing your desired speed.
Selecting distance
>Briefly press rocker switch downward:
Increase distance.