2009 BMW 330D navigation system
[x] Cancel search: navigation systemPage 39 of 268
Controls
37Reference
At a glance
Driving tips
Communications
Navigation
Entertainment
Mobility
Sedan: glass roof*, electric
To prevent injuries, watch the glass roof
while closing it.
Take the remote control with you when you
leave the car, otherwise children could operate
the roof and possibly injure themselves. <
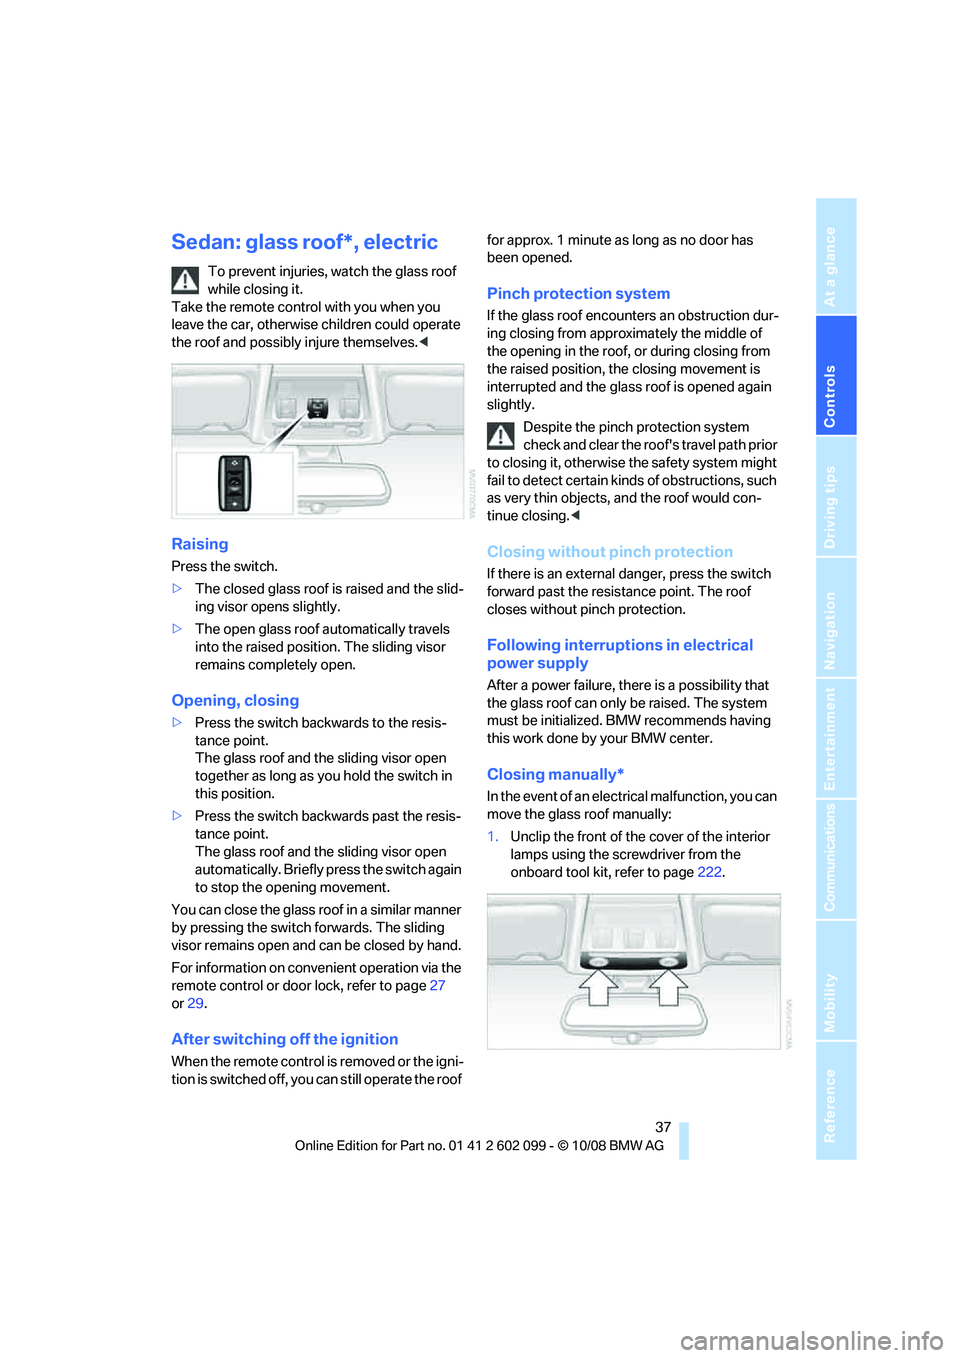
Raising
Press the switch.
>The closed glass roof is raised and the slid-
ing visor opens slightly.
> The open glass roof automatically travels
into the raised position. The sliding visor
remains completely open.
Opening, closing
> Press the switch backwards to the resis-
tance point.
The glass roof and the sliding visor open
together as long as you hold the switch in
this position.
> Press the switch back wards past the resis-
tance point.
The glass roof and the sliding visor open
automatically. Briefly pr ess the switch again
to stop the opening movement.
You can close the glass ro of in a similar manner
by pressing the switch forwards. The sliding
visor remains open and can be closed by hand.
For information on convenient operation via the
remote control or door lock, refer to page 27
or 29 .
After switching off the ignition
When the remote control is removed or the igni-
tion is switched off, you can still operate the roof for approx. 1 minute as long as no door has
been opened.
Pinch protection system
If the glass roof encounters an obstruction dur-
ing closing from approx
imately the middle of
the opening in the roof, or during closing from
the raised position, the closing movement is
interrupted and the glass roof is opened again
slightly.
Despite the pinch protection system
check and clear the roof's travel path prior
to closing it, otherwise the safety system might
fail to detect certain kind s of obstructions, such
as very thin objects, and the roof would con-
tinue closing. <
Closing without pinch protection
If there is an external danger, press the switch
forward past the resistance point. The roof
closes without pinch protection.
Following interruptions in electrical
power supply
After a power failure, ther e is a possibility that
the glass roof can only be raised. The system
must be initialized. BMW recommends having
this work done by your BMW center.
Closing manually*
In the event of an electrical malfunction, you can
move the glass roof manually:
1. Unclip the front of the cover of the interior
lamps using the screwdriver from the
onboard tool kit, refer to page222.
ba8_E9091_cic.book Seite 37 Mittwoch, 29. Oktober 2008 2:59 14
Page 41 of 268
Controls
39Reference
At a glance
Driving tips
Communications
Navigation
Entertainment
Mobility
Opening and closing the roof and
sliding visor at the same time
Tap the switch twice in quick succession
beyond the resistance point.
Tapping the switch again stops the operation.
Convenience functions
> With the roof open, pr ess the switch twice:
The roof is raised.
> With the roof open, ta p the switch twice in
the direction for opening:
The roof is opened fully.
Comfort position
In the comfort position, the roof is not com-
pletely open, thus reducing wind noise in the
passenger compartment.
E a c h t i m e t h e p a n o r a m a g l a ss r o o f i s o p e n e d o r
closed completely, it stops in the comfort posi-
tion. If desired, continue the movement by
pressing the switch.
After switching off the ignition
When the remote control is removed or the igni-
tion is switched off, you can still operate the roof
for approx. 1 minute as long as no door has
been opened.
Pinch protection system
If the panorama glass roof or the sliding visor
encounters an obstruction while closing from a
position about two-thirds closed, or during
closing from the raised position, the closing
movement is interrup ted and the panorama
glass roof and the sliding visor are opened again
slightly.
Despite the pinch protection system
check and clear the roof's travel path prior
to closing it, otherwise the safety system might
fail to detect certain kinds of obstructions, such
as very thin objects, and the roof would con-
tinue closing. <
Closing without pinch protection
If there is an external danger, press the switch
forward past the resistan ce point and hold it
there. The roof closes without pinch protection.
Following interruptions in electrical
power supply
After a power failure, ther e is a possibility that
the panorama glass roof can only be raised. The
system must be initialized. BMW recommends
having this work done by your BMW center.
Closing manually*
In the event of an electrical malfunction, you can
move the panorama glass roof manually:
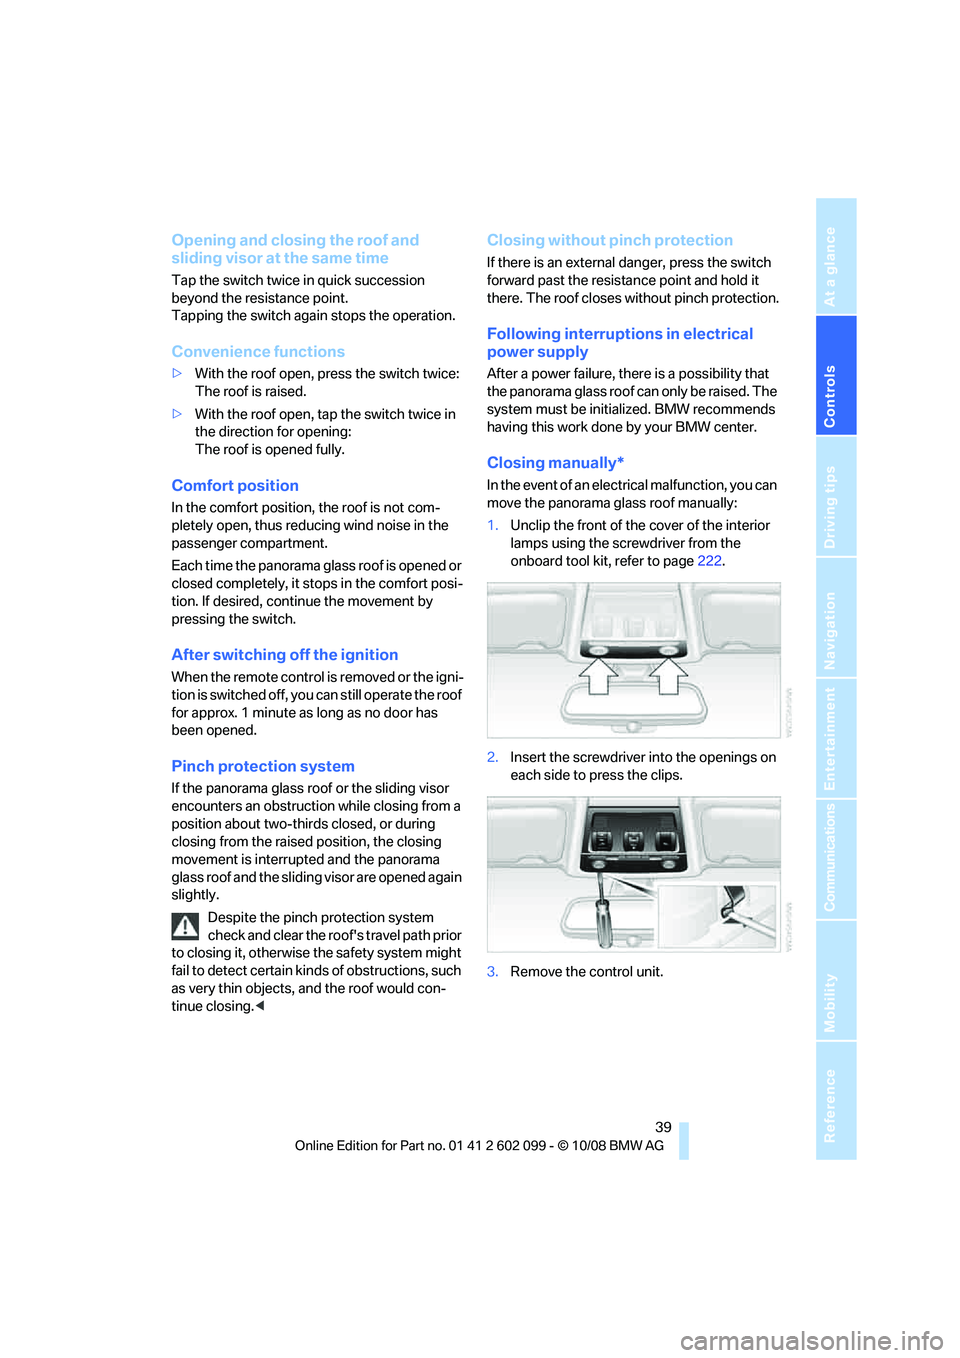
1. Unclip the front of the cover of the interior
lamps using the screwdriver from the
onboard tool kit, refer to page222.
2. Insert the screwdriver into the openings on
each side to press the clips.
3. Remove the control unit.
ba8_E9091_cic.book Seite 39 Mittwoch, 29. Oktober 2008 2:59 14
Page 49 of 268
Controls
47Reference
At a glance
Driving tips
Communications
Navigation
Entertainment
Mobility
respondingly trained personnel. Otherwise, it is
not guaranteed that the safety devices will func-
tion properly. <
Rear center safety belt
With through- loading system*:
Before using the center rear seat, release the
latch plate from the fixt ure on the rear window
shelf and insert it into the belt lock of the center
safety belt. Make sure you hear the latch plate
engage in the belt buckle.
Mirrors
Exterior mirrors
The front passenger's mirror is more con-
vex than the driver's mirror. The objects
seen in the mirror are closer than they appear.
Do not gauge your distan ce from traffic behind
you on the basis of what you see in the mirror;
otherwise there is an incr eased risk of an acci-
dent. <
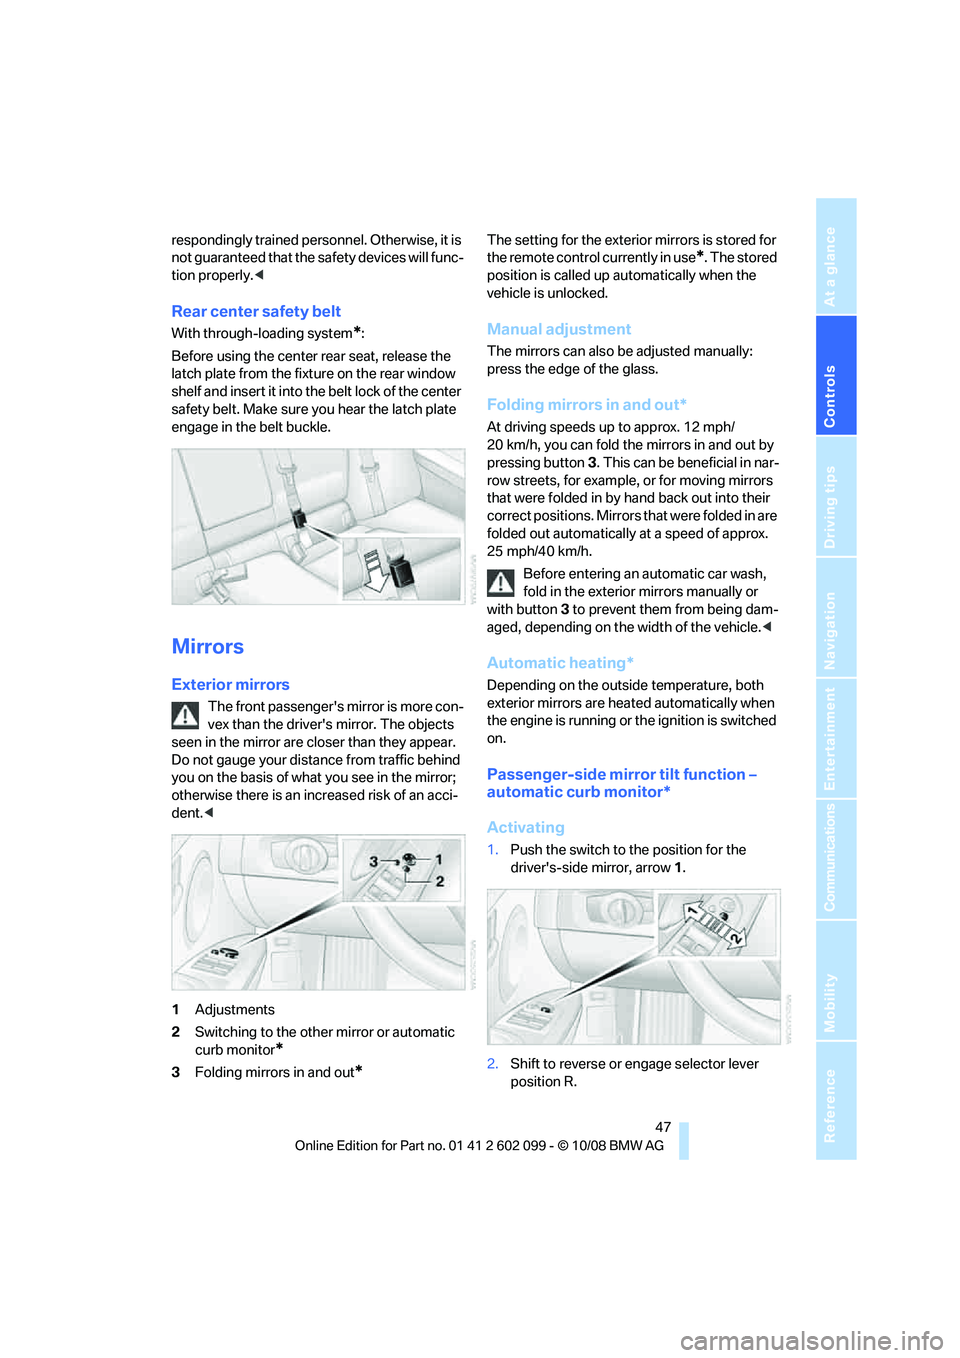
1 Adjustments
2 Switching to the other mirror or automatic
curb monitor
*
3Folding mirrors in and out*
The setting for the exterior mirrors is stored for
the remote control currently in use
*. The stored
position is called up automatically when the
vehicle is unlocked.
Manual adjustment
The mirrors can also be adjusted manually:
press the edge of the glass.
Folding mirrors in and out*
At driving speeds up to approx. 12 mph/
20 km/h, you can fold the mirrors in and out by
pressing button 3. This can be beneficial in nar-
row streets, for example, or for moving mirrors
that were folded in by hand back out into their
correct positions. Mirrors that were folded in are
folded out automatically at a speed of approx.
25 mph/40 km/h.
Before entering an automatic car wash,
fold in the exterior mirrors manually or
with button 3 to prevent them from being dam-
aged, depending on the width of the vehicle. <
Automatic heating*
Depending on the outside temperature, both
exterior mirrors are heated automatically when
the engine is running or the ignition is switched
on.
Passenger-side mirror tilt function –
automatic curb monitor*
Activating
1.Push the switch to the position for the
driver's-side mirror, arrow 1.
2. Shift to reverse or engage selector lever
position R.
ba8_E9091_cic.book Seite 47 Mittwoch, 29. Oktober 2008 2:59 14
Page 51 of 268
Controls
49Reference
At a glance
Driving tips
Communications
Navigation
Entertainment
Mobility
Transporting children safely
The right place for children
Do not leave children unattended in the
vehicle, otherwise they could endanger
themselves and/or other persons by opening
the doors, for example. <
The rear center seat is not suitable for installing
child-restraint systems for all age groups,
approved for the age group in question.
Children always in the rear
Accident research has shown that the safest
place for children is on the rear seat.
Children under the age of 13 or smaller
than 5 ft/150 cm may be transported only
in the rear in suitable child-restraint systems
appropriate for their age, weight and size. Oth-
erwise there is an increase d risk of injury in the
event of an accident. <
Children 13 years of age or older must be buck-
led in with a safety belt as soon as there no
longer is any child-restraint system that is
appropriate for their age, size and weight.
Exception for front passenger seat
Should it be necessa ry to use a child-
restraint system on the front passenger
seat, the front and side airbags for the front pas-
senger must be deactiva ted. Otherwise, a child
traveling on that seat w ill face a significant risk
of injury if the airbags are triggered off, even
with a child-restraint system. <
For more information on automatic deactivation
of the front passenger airbags refer to page 88.
Installing child-restraint
systems
Observe the child-restraint system man-
ufacturer's instructio ns when selecting,
installing and using child -restraint systems.
Otherwise the protective effect may be dimin-
ished. < Standard child-restraint systems are designed
to be secured with a lap be
lt or with the lap-belt
section of a lap-and-shoulder belt. Incorrectly
or improperly installed child-restraint systems
can increase the risk of injury to children.
Always follow the installation instructions for
the system with the greatest care.
On the front passenger seat
After installing a child-restraint system on
the front passenger seat, make sure that
the front and side airbags for the front passen-
ger are deactivated, ot herwise there is an
increased risk of injury if the airbags deploy. <
Backrest width*
The backrest width of the front passen-
ger's seat must be at its widest possible
setting. Do not change the setting after install-
ing the child seat. Othe rwise the child seat's
stability on the front passenger's seat is lim-
ited. <
1. Adjust the backrest width to its widest set-
ting, refer to page 43.
2. Install the child seat.
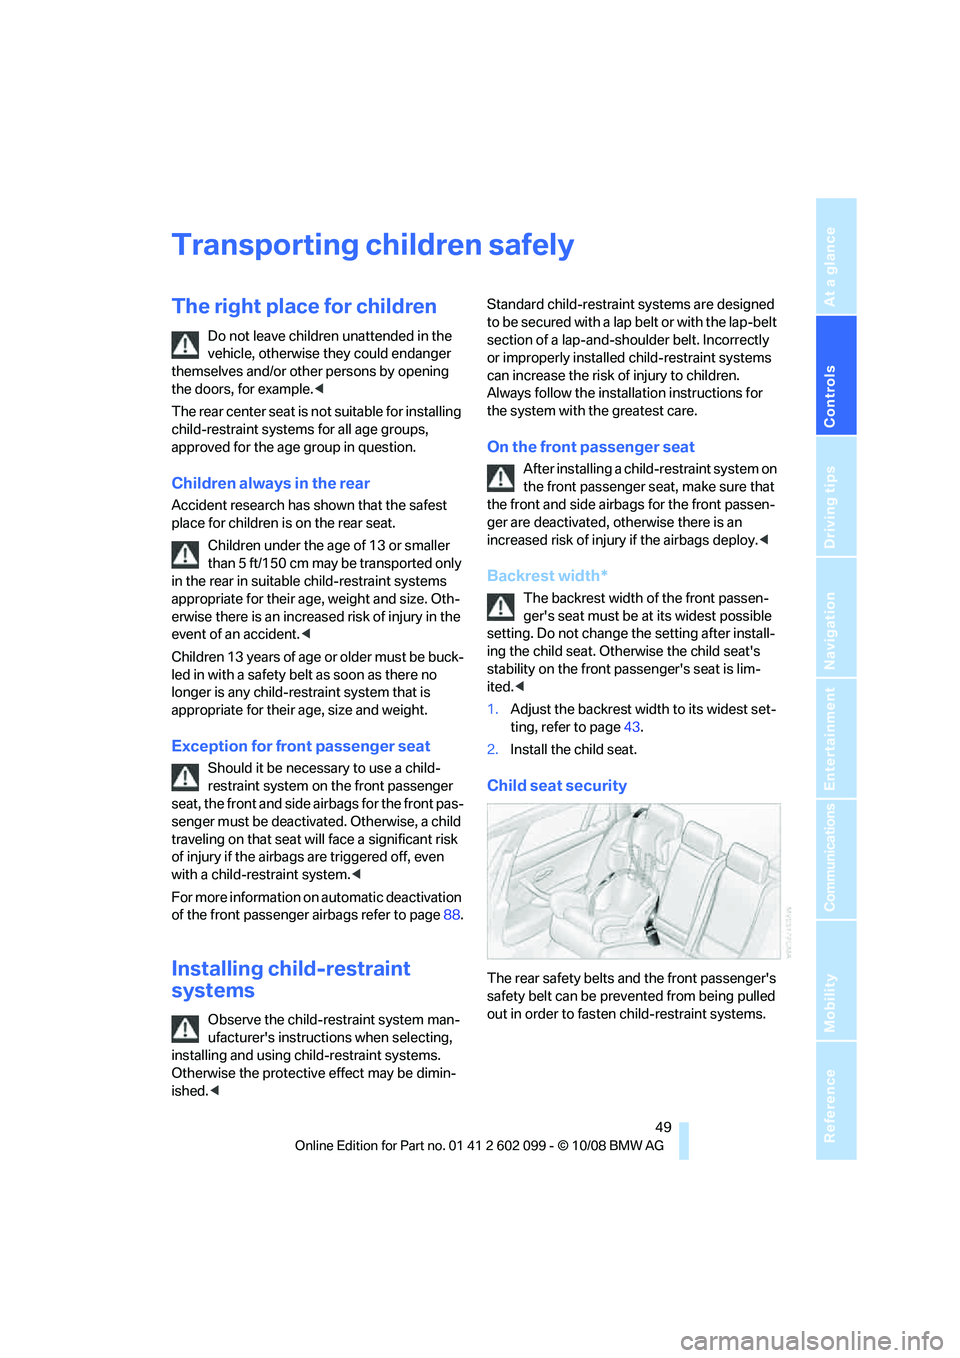
Child seat security
The rear safety belts and the front passenger's
safety belt can be prevented from being pulled
out in order to fasten child-restraint systems.
ba8_E9091_cic.book Seite 49 Mittwoch, 29. Oktober 2008 2:59 14
Page 53 of 268
Controls
51Reference
At a glance
Driving tips
Communications
Navigation
Entertainment
Mobility
Sedan
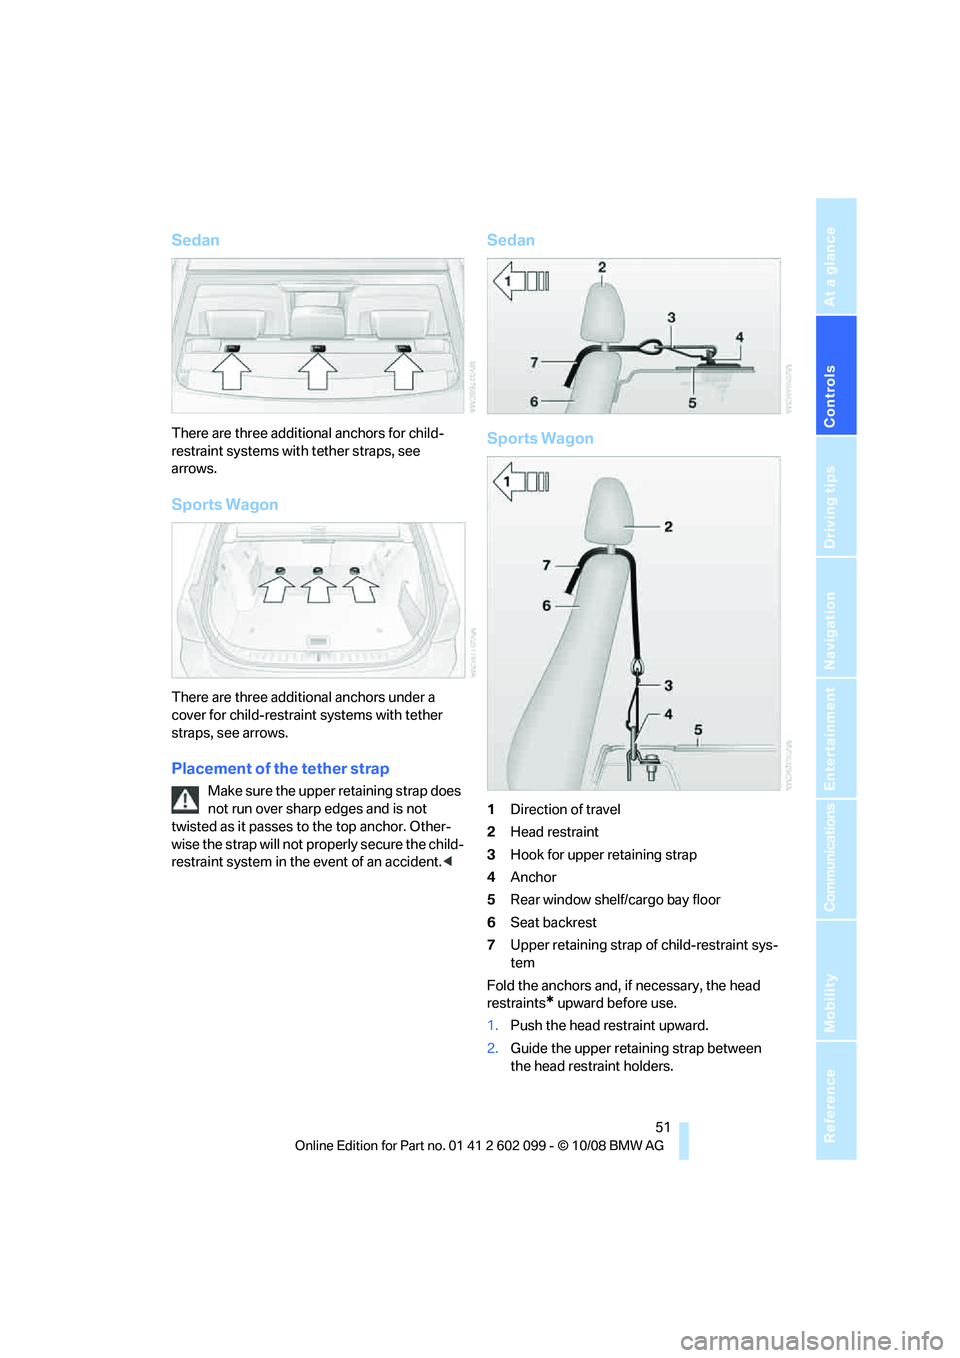
There are three additional anchors for child-
restraint systems with tether straps, see
arrows.
Sports Wagon
There are three additional anchors under a
cover for child-restraint systems with tether
straps, see arrows.
Placement of the tether strap
Make sure the upper retaining strap does
not run over sharp edges and is not
twisted as it passes to the top anchor. Other-
wise the strap will not pr operly secure the child-
restraint system in the event of an accident. <
Sedan
Sports Wagon
1Direction of travel
2 Head restraint
3 Hook for upper retaining strap
4 Anchor
5 Rear window shelf/cargo bay floor
6 Seat backrest
7 Upper retaining strap of child-restraint sys-
tem
Fold the anchors and, if necessary, the head
restraints
* upward before use.
1. Push the head restraint upward.
2. Guide the upper retaining strap between
the head restraint holders.
ba8_E9091_cic.book Seite 51 Mittwoch, 29. Oktober 2008 2:59 14
Page 59 of 268

Controls
57Reference
At a glance
Driving tips
Communications
Navigation
Entertainment
Mobility
>When you use the shift paddles on the
steering wheel to shif t gears in automatic
mode, the transmission switches to manual
mode.
> If you do not accelerate or shift gears using
the shift paddles for a certain amount of
time, the transmission switches back to
automatic mode.
If the selector lever is in the M/S gear
plane, manual mode remains active. <
> To shift up: pull one of the shift paddles.
> To shift down: press one of the shift pad-
dles.
Upshifts and downshifts are executed only
when they will result in a plausible combination
of engine and vehicle speed; thus, for example,
a downshift that would cause the engine to
overrev will not be executed by the system. The
gear selected is briefly displayed in the instru-
ment cluster, followed by the gear actually in
use.
Overriding selector lever lock
Should the selector lever refuse to move out of
position P although the button on the selector
lever is pressed, the sele ctor lever lock can be
overridden:
1. Unclip the sleeve of the selector lever.
2. Pull the sleeve up over the selector lever
until the sleeve is inside out. 3.
Using the screwdriver from the onboard
tool kit, refer to page 222, press the red
lever while moving the selector lever to the
desired position.
Turn signals/
headlamp flasher
1 High beams
2 Headlamp flasher
3 Turn signals
Using turn signals
Press the lever beyond the resistance point.
To turn off manually, press the lever to the
resistance point.
Unusually rapid flashi ng of the indicator
lamp indicates that a turn signal indicator
has failed. <
Indicating a turn briefly
Press the lever as far as the resistance point for
as long as you wish to indicate a turn.
ba8_E9091_cic.book Seite 57 Mittwoch, 29. Oktober 2008 2:59 14
Page 61 of 268
Controls
59Reference
At a glance
Driving tips
Communications
Navigation
Entertainment
Mobility
Do not use the washers if there is any
danger that the fluid will freeze on the
windshield. If you do, your vision could be
obscured. Antifreeze should therefore be
added to the fluid, refer to Washer fluid.
Do not use the washers when the washer fluid
reservoir is empty, otherwise you will damage
the washer pump. <
Windshield washer nozzles
The windshield washer nozzles are heated
automatically while the engine is running or the
ignition is switched on
*.
Sports Wagon: re ar window wiper
1Intermittent operation. When reverse gear
is engaged, the system switches to contin-
uous operation.
2 Cleaning the rear window
The rear window wiper does not move if the
lever is in position 1 before the ignition is
switched on.
To switch on the rear window wiper:
1. Move the lever to its home position.
2. Reselect the desired position.
Do not use the washers when the washer
fluid reservoir is empty, otherwise you will
damage the washer pump. <
Washer fluid
Washer fluid antifreeze is flammable.
Therefore, keep it away from ignition
sources and only store it in the closed original
container that is kept ou t of reach of children,
otherwise there is a risk of personal injury.
Comply with the instructions on the con-
tainer. <
Washer fluid filler neck
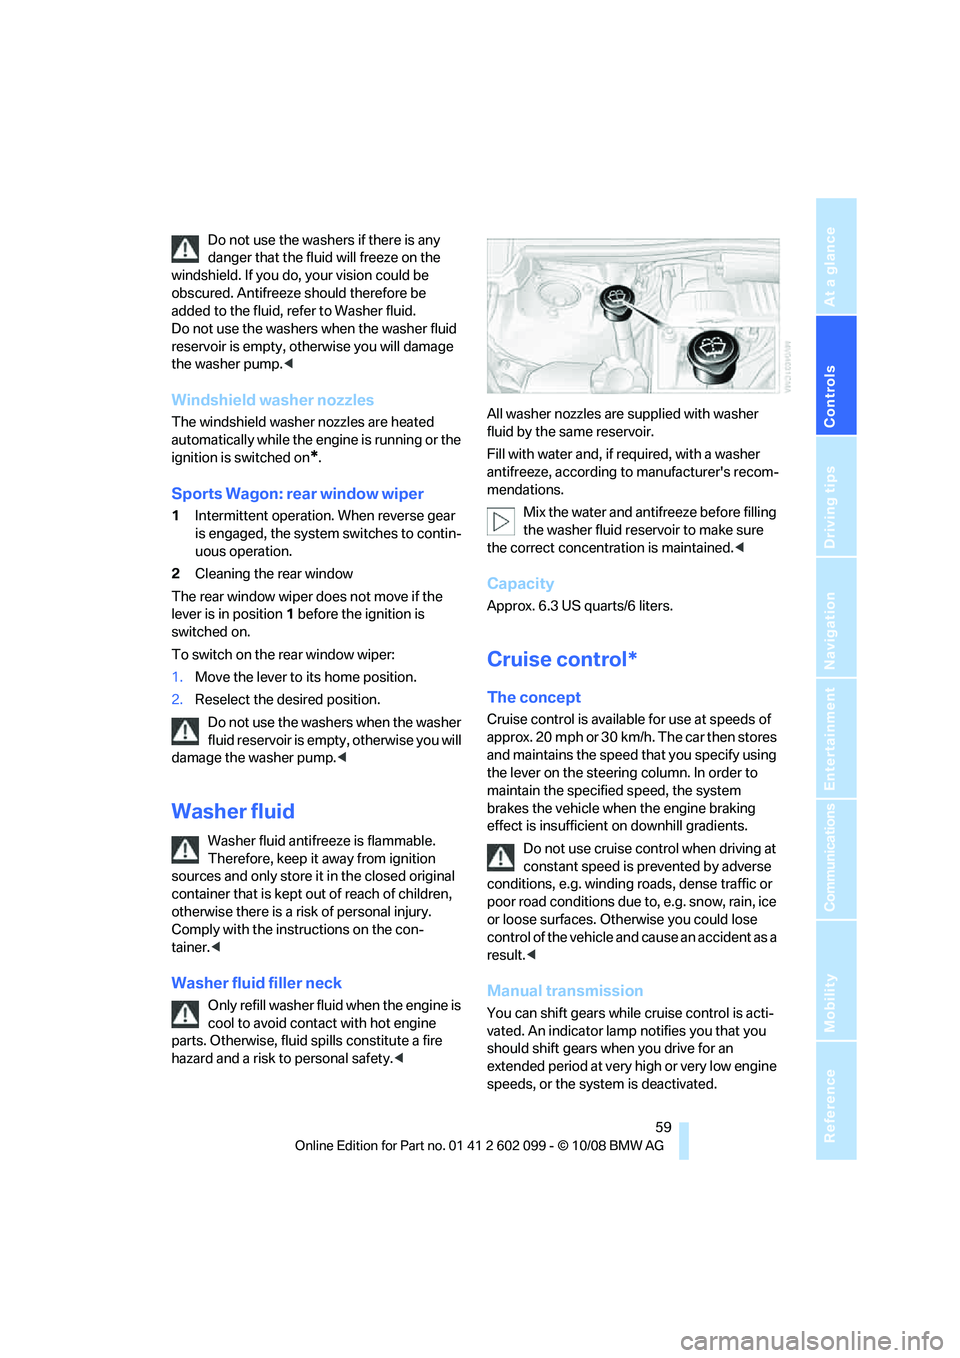
Only refill washer fluid when the engine is
cool to avoid contac t with hot engine
parts. Otherwise, fluid spills constitute a fire
hazard and a risk to personal safety.
Fill with water and, if required, with a washer
antifreeze, according to manufacturer's recom-
mendations.
Mix the water and antifreeze before filling
the washer fluid rese rvoir to make sure
the correct concentration is maintained. <
Capacity
Approx. 6.3 US quarts/6 liters.
Cruise control*
The concept
Cruise control is available for use at speeds of
approx. 20 mph or 30 km/h. The car then stores
and maintains the speed that you specify using
the lever on the steering column. In order to
maintain the specified speed, the system
brakes the vehicle when the engine braking
effect is insufficient on downhill gradients.
Do not use cruise control when driving at
constant speed is prevented by adverse
conditions, e.g. winding roads, dense traffic or
poor road conditions due to, e.g. snow, rain, ice
or loose surfaces. Otherwise you could lose
control of the vehicle and cause an accident as a
result. <
Manual transmission
You can shift gears while cruise control is acti-
vated. An indicator lamp notifies you that you
should shift gears wh en you drive for an
extended period at very high or very low engine
speeds, or the system is deactivated.
ba8_E9091_cic.book Seite 59 Mittwoch, 29. Oktober 2008 2:59 14
Page 63 of 268
Controls
61Reference
At a glance
Driving tips
Communications
Navigation
Entertainment
Mobility
Resuming a speed stored beforehand
Press the button, arrow 4. The last stored
speed is resumed and maintained.
In the following instances, the stored speed is
deleted and can no longer be resumed:
> When driving stability control systems are
intervening
> In cars with a manual transmission: when
you switch gears very sl owly or shift to neu-
tral
> In cars with an automatic transmission:
when you engage selector lever position N
> When the ignition is switched off
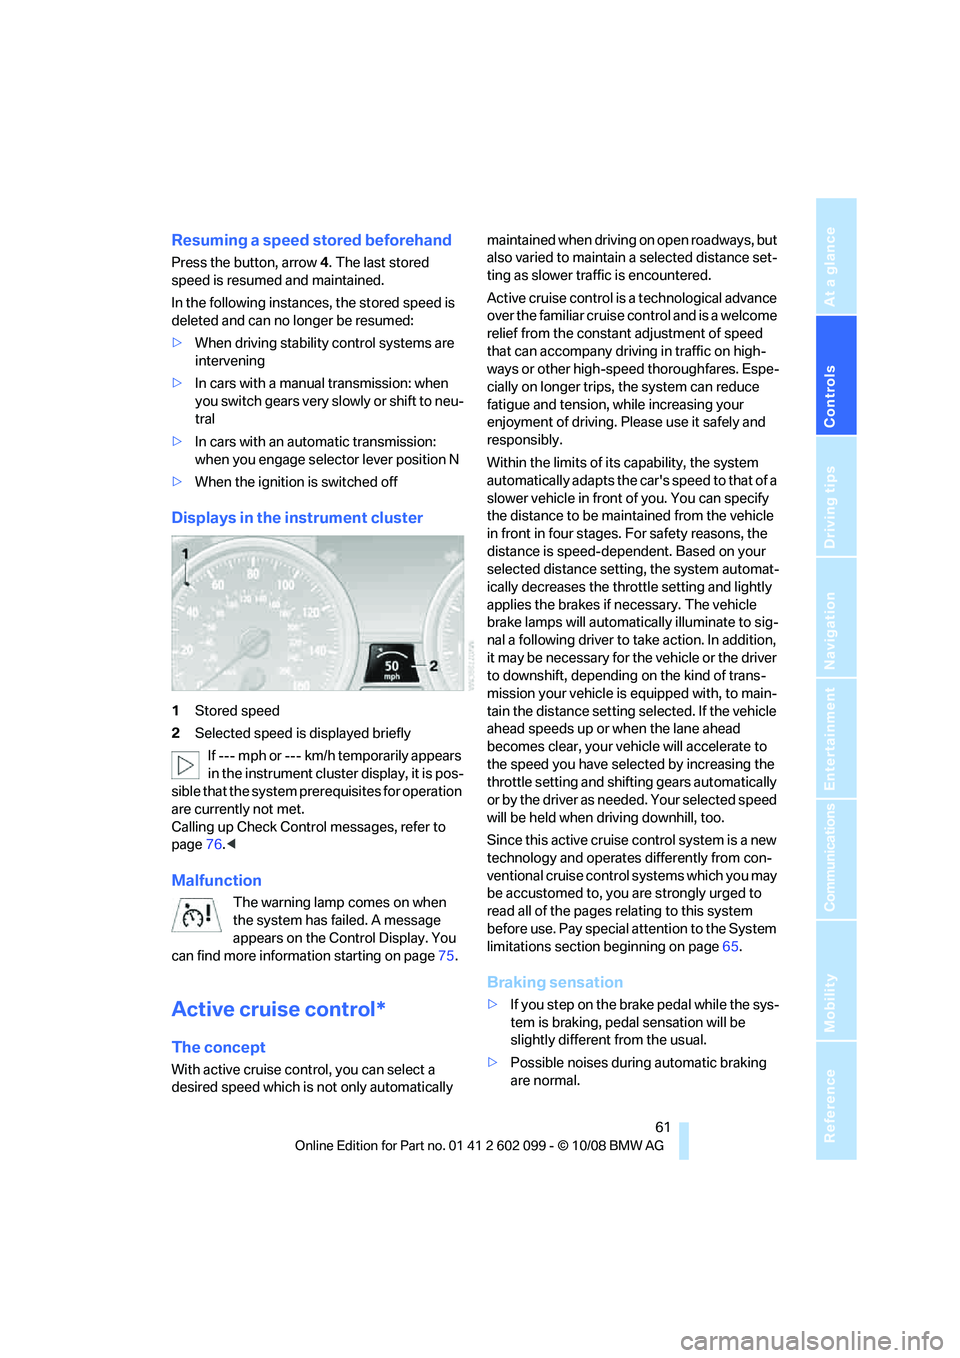
Displays in the instrument cluster
1Stored speed
2 Selected speed is displayed briefly
If --- mph or --- km/h temporarily appears
in the instrument cluster display, it is pos-
sible that the system prerequisites for operation
are currently not met.
Calling up Check Control messages, refer to
page 76.<
Malfunction
The warning lamp comes on when
the system has failed. A message
appears on the Control Display. You
can find more information starting on page 75.
Active cruise control*
The concept
With active cruise cont rol, you can select a
desired speed which is not only automatically maintained when driving
on open roadways, but
also varied to maintain a selected distance set-
ting as slower traffic is encountered.
Active cruise control is a technological advance
over the familiar cruise control and is a welcome
relief from the constant adjustment of speed
that can accompany driving in traffic on high-
ways or other high-speed thoroughfares. Espe-
cially on longer trips, the system can reduce
fatigue and tension, while increasing your
enjoyment of driving. Please use it safely and
responsibly.
Within the limits of its capability, the system
automatically adapts the ca r's speed to that of a
slower vehicle in front of you. You can specify
the distance to be main tained from the vehicle
in front in four stages. For safety reasons, the
distance is speed-dependent. Based on your
selected distance setti ng, the system automat-
ically decreases the thro ttle setting and lightly
applies the brakes if necessary. The vehicle
brake lamps will automatically illuminate to sig-
nal a following driver to take action. In addition,
it may be necessary for the vehicle or the driver
to downshift, depending on the kind of trans-
mission your vehicle is equipped with, to main-
tain the distance setting selected. If the vehicle
ahead speeds up or when the lane ahead
becomes clear, your vehi cle will accelerate to
the speed you have selected by increasing the
throttle setting and shifting gears automatically
or by the driver as needed. Your selected speed
will be held when driving downhill, too.
Since this active cruise control system is a new
technology and operates differently from con-
ventional cruise control systems which you may
be accustomed to, you are strongly urged to
read all of the pages re lating to this system
before use. Pay special attention to the System
limitations section beginning on page 65.
Braking sensation
>If you step on the brake pedal while the sys-
tem is braking, pedal sensation will be
slightly different from the usual.
> Possible noises during automatic braking
are normal.
ba8_E9091_cic.book Seite 61 Mittwoch, 29. Oktober 2008 2:59 14