2009 BMW 328I window
[x] Cancel search: windowPage 36 of 268

Opening and closing
34
Avoiding unintentional alarms
The tilt alarm sensor and interior motion sensor
may be switched off at the same time. This pre-
vents unintentional alarms, e.g. in the following
situations:
>In duplex garages
> During transport on car-carrying trains,
boats/ships or on a trailer
> When animals are to remain in the vehicle
Switching off tilt alarm sensor and
interior motion sensor
Press the button on the remote control
again as soon as the vehicle is locked.
The indicator lamp light s up briefly and then
flashes continuously. The tilt alarm sensor and
the interior motion sensor are switched off until
the next time the vehicle is unlocked and subse-
quently locked again.
Convenient access*
Convenient access enables you to enter your
vehicle without needing to hold the remote con-
trol in your hand. All you need to do is wear the
remote control close to your body, e.g. in your
jacket pocket. The vehicle detects the corre-
sponding remote control within the immediate
vicinity or in the passenger compartment.
Convenient access supports the following
functions:
> Unlocking/locking the vehicle
> Unlocking the luggage compartment lid/
tailgate separately
> Engine starting
> Convenient closure
Functional requirement
>The vehicle or the luggage compartment
lid/tailgate can only be locked when the
vehicle detects that th e remote control cur-
rently in use is ou tside of the vehicle.
> The vehicle cannot be locked or unlocked
again until after approx. 2 seconds. >
The engine can only be started when the
vehicle detects that th e remote control cur-
rently in use is inside the vehicle.
Comparison to the standard remote
control
In general, there is no difference between using
convenient access or pressing the buttons on
the remote control to carry out the functions
mentioned above. You should therefore first
familiarize yourself with the instructions on
opening and closing starting on page 26.
Special features regarding the use of conve-
nient access are described below. If you notice a brief delay while opening or
closing windows or the glass roof/pan-
orama glass roof, the system is checking
whether a remote control is inside the vehicle.
Please repeat the opening or closing proce-
dure, if necessary. <
Unlocking
Grasp the handle on the driver's or front pas-
senger's door completely, arrow 1. This corre-
sponds to pressing the button.
Locking
Touch the surface, arrow 2, with your finger for
approx. 1 second. This corresponds to pressing
the button.
To preserve the battery, please make
sure that the ignition and all electrical
consumers are switched off before locking the
vehicle. <
ba8_E9091_cic.book Seite 34 Mittwoch, 29. Oktober 2008 2:59 14
Page 37 of 268
Controls
35Reference
At a glance
Driving tips
Communications
Navigation
Entertainment
Mobility
Convenient closure
For convenient closure, keep your finger on the
surface, arrow 2.
Unlocking the luggage compartment
lid/tailgate separately
Press the button on the outside of the luggage
compartment lid/tailgate. This corresponds to
pressing the button.
If the vehicle detects that a remote con-
trol has been accident ally left inside the
locked vehicle's cargo bay after the luggage
compartment lid/tailgate or rear window is
closed, the lid will reopen. The hazard warning
flashers flash and an acoustic signal
* sounds. <
Switching on radio readiness
Radio readiness is switched on by pressing the
start/stop button, refer to page 53.
Do not depress the brake or the clutch,
otherwise the engine will start. <
Starting the engine
You can start the engine or switch on the igni-
tion when a remote control is inside the vehicle.
It is not necessary to insert a remote control into
the ignition switch, refer to page 53.
Switching off the engine in cars with
automatic transmission
The engine can only be switched off when the
selector lever is in position P, refer to page 54.
To switch the engine off when the selector lever
is in position N, the remote control must be in
the ignition switch.
Malfunction
Convenient access may malfunction due to
local radio waves. If this happens, open or close
the vehicle via the butto ns on the remote con-
trol or using the integrated key. To start the
engine afterward, insert the remote control into
the ignition switch.
Warning lamps
The warning lamp in the instrument
cluster lights up when you attempt to
start the engine: the engine cannot
be started. The remote co ntrol is not inside the
vehicle or is malfunctioning. Take the remote
control with you inside the vehicle or have it
checked. If necessary, insert another remote
control into the ignition switch.
The warning lamp in the instrument
cluster lights up while the engine is
running: the remote control is no
longer inside the vehicle. After the engine is
switched off, the engine can only be restarted
within approx. 10 seconds.
The indicator lamp in the instrument
cluster comes on and a message
appears on the Control Display:
replace the battery in the remote control.
Replacing the battery
The remote control for convenient access con-
tains a battery that will n eed to be replaced from
time to time.
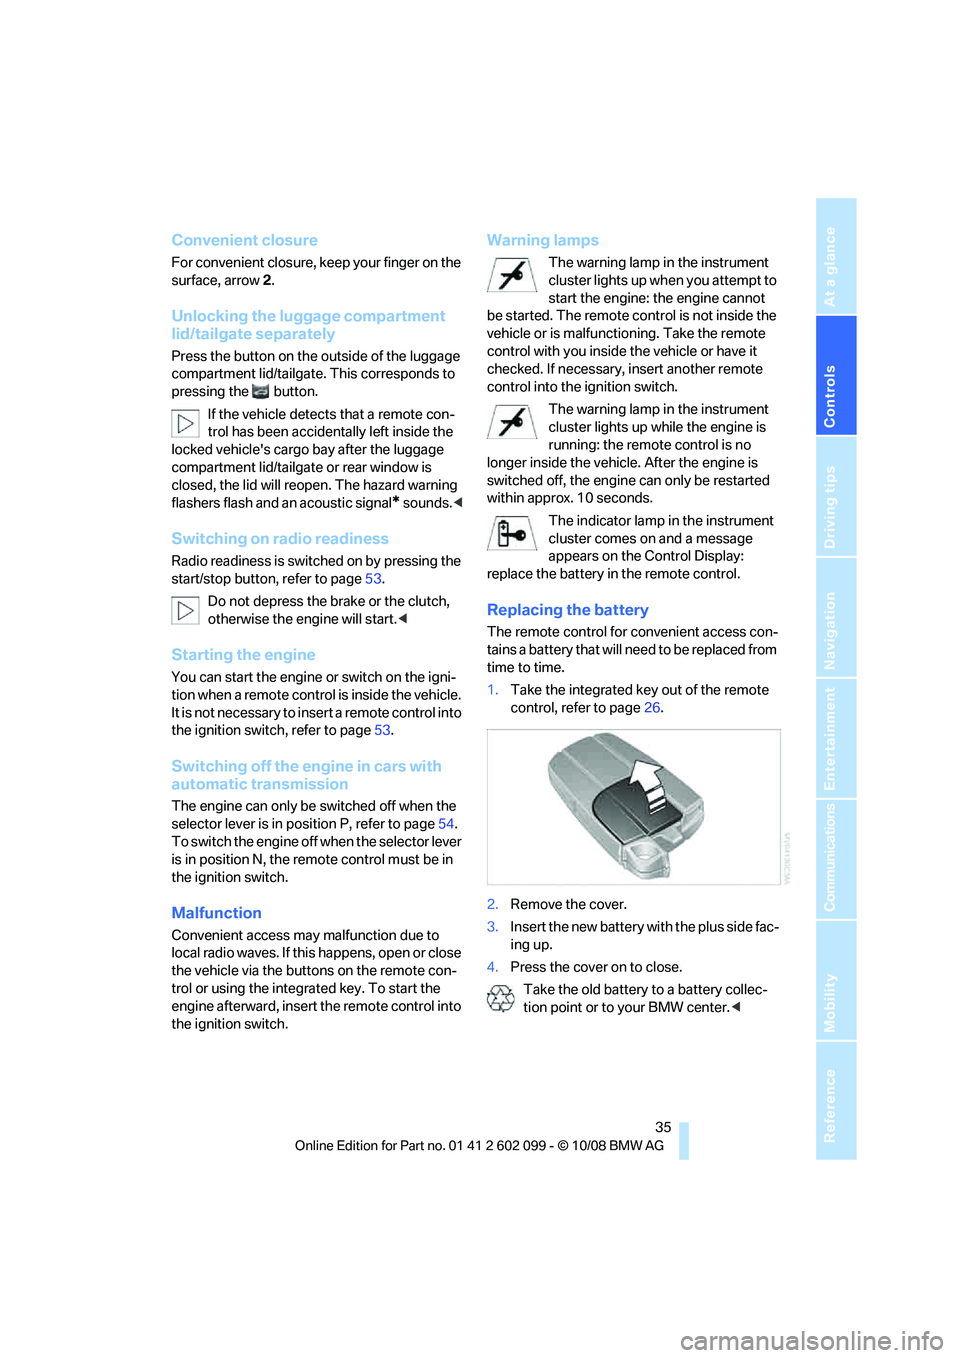
1. Take the integrated ke y out of the remote
control, refer to page 26.
2. Remove the cover.
3. Insert the new battery wi th the plus side fac-
ing up.
4. Press the cover on to close.
Take the old battery to a battery collec-
tion point or to your BMW center. <
ba8_E9091_cic.book Seite 35 Mittwoch, 29. Oktober 2008 2:59 14
Page 38 of 268
Opening and closing
36
Windows
To prevent injuries, watch the windows
while closing them.
Take the remote contro l with you when you
leave the car, otherwise children could operate
the electric windows and possibly injure them-
selves. <
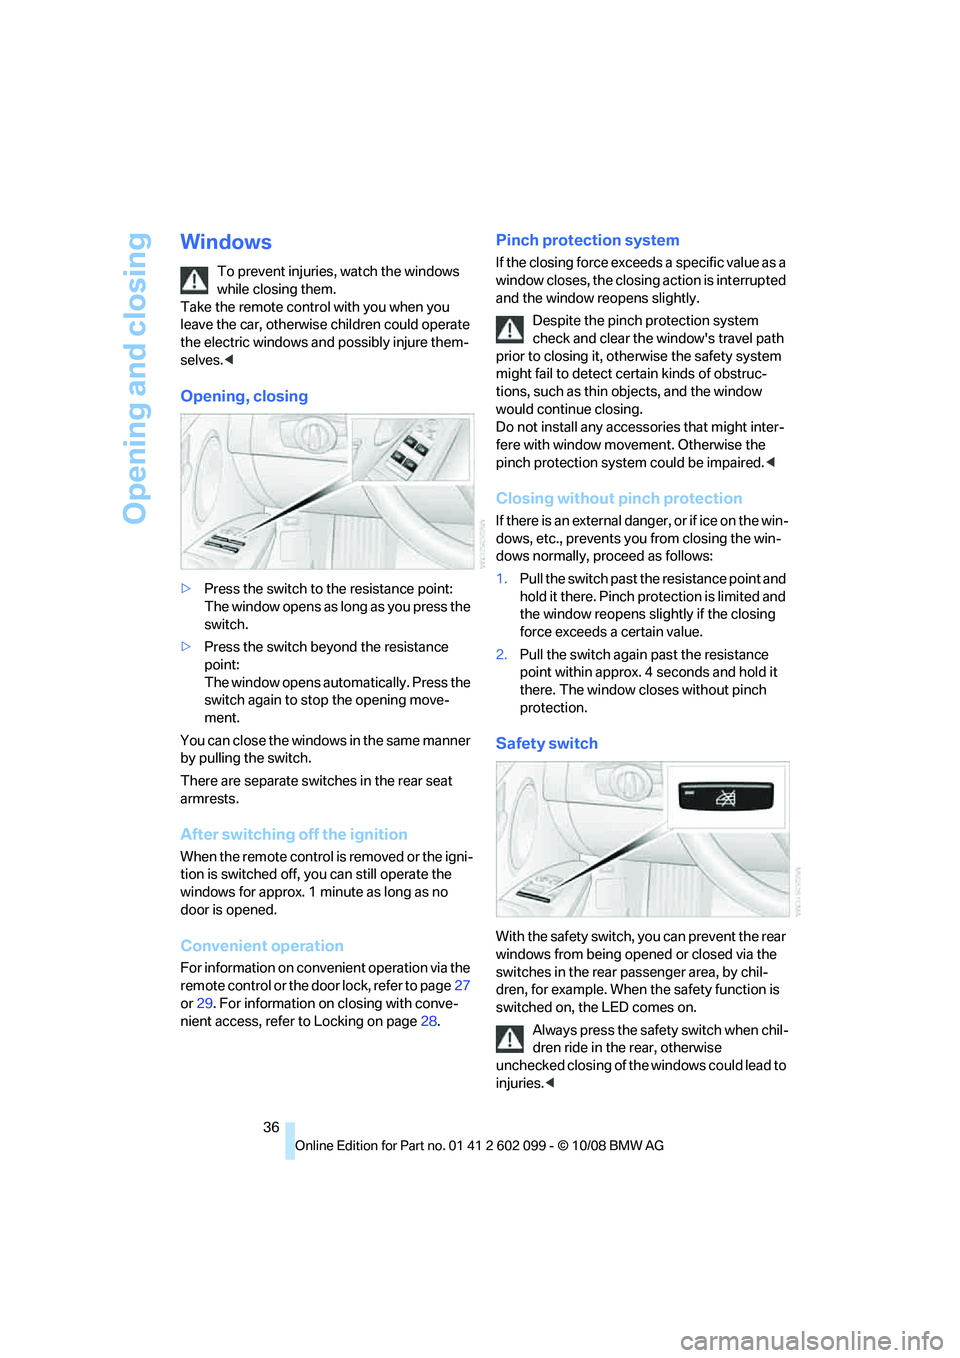
Opening, closing
>Press the switch to the resistance point:
The window opens as long as you press the
switch.
> Press the switch beyond the resistance
point:
The window opens automatically. Press the
switch again to stop the opening move-
ment.
You can close the windows in the same manner
by pulling the switch.
There are separate switches in the rear seat
armrests.
After switching off the ignition
When the remote control is removed or the igni-
tion is switched off, you can still operate the
windows for approx. 1 minute as long as no
door is opened.
Convenient operation
For information on convenient operation via the
remote control or the do or lock, refer to page27
or 29 . For information on closing with conve-
nient access, refer to Locking on page 28.
Pinch protection system
If the closing force exceeds a specific value as a
window closes, the closing action is interrupted
and the window reopens slightly.
Despite the pinch protection system
check and clear the window's travel path
prior to closing it, othe rwise the safety system
might fail to detect certain kinds of obstruc-
tions, such as thin objects, and the window
would continue closing.
Do not install any accesso ries that might inter-
fere with window movement. Otherwise the
pinch protection system could be impaired. <
Closing without pinch protection
If there is an external danger, or if ice on the win-
dows, etc., prevents you from closing the win-
dows normally, proceed as follows:
1.Pull the switch past the resistance point and
hold it there. Pinch protection is limited and
the window reopens slightly if the closing
force exceeds a certain value.
2. Pull the switch again past the resistance
point within approx. 4 seconds and hold it
there. The window closes without pinch
protection.
Safety switch
With the safety switch, you can prevent the rear
windows from being opened or closed via the
switches in the rear passenger area, by chil-
dren, for example. When the safety function is
switched on, the LED comes on.
Always press the safety switch when chil-
dren ride in the rear, otherwise
unchecked closing of the windows could lead to
injuries. <
ba8_E9091_cic.book Seite 36 Mittwoch, 29. Oktober 2008 2:59 14
Page 49 of 268
Controls
47Reference
At a glance
Driving tips
Communications
Navigation
Entertainment
Mobility
respondingly trained personnel. Otherwise, it is
not guaranteed that the safety devices will func-
tion properly. <
Rear center safety belt
With through- loading system*:
Before using the center rear seat, release the
latch plate from the fixt ure on the rear window
shelf and insert it into the belt lock of the center
safety belt. Make sure you hear the latch plate
engage in the belt buckle.
Mirrors
Exterior mirrors
The front passenger's mirror is more con-
vex than the driver's mirror. The objects
seen in the mirror are closer than they appear.
Do not gauge your distan ce from traffic behind
you on the basis of what you see in the mirror;
otherwise there is an incr eased risk of an acci-
dent. <
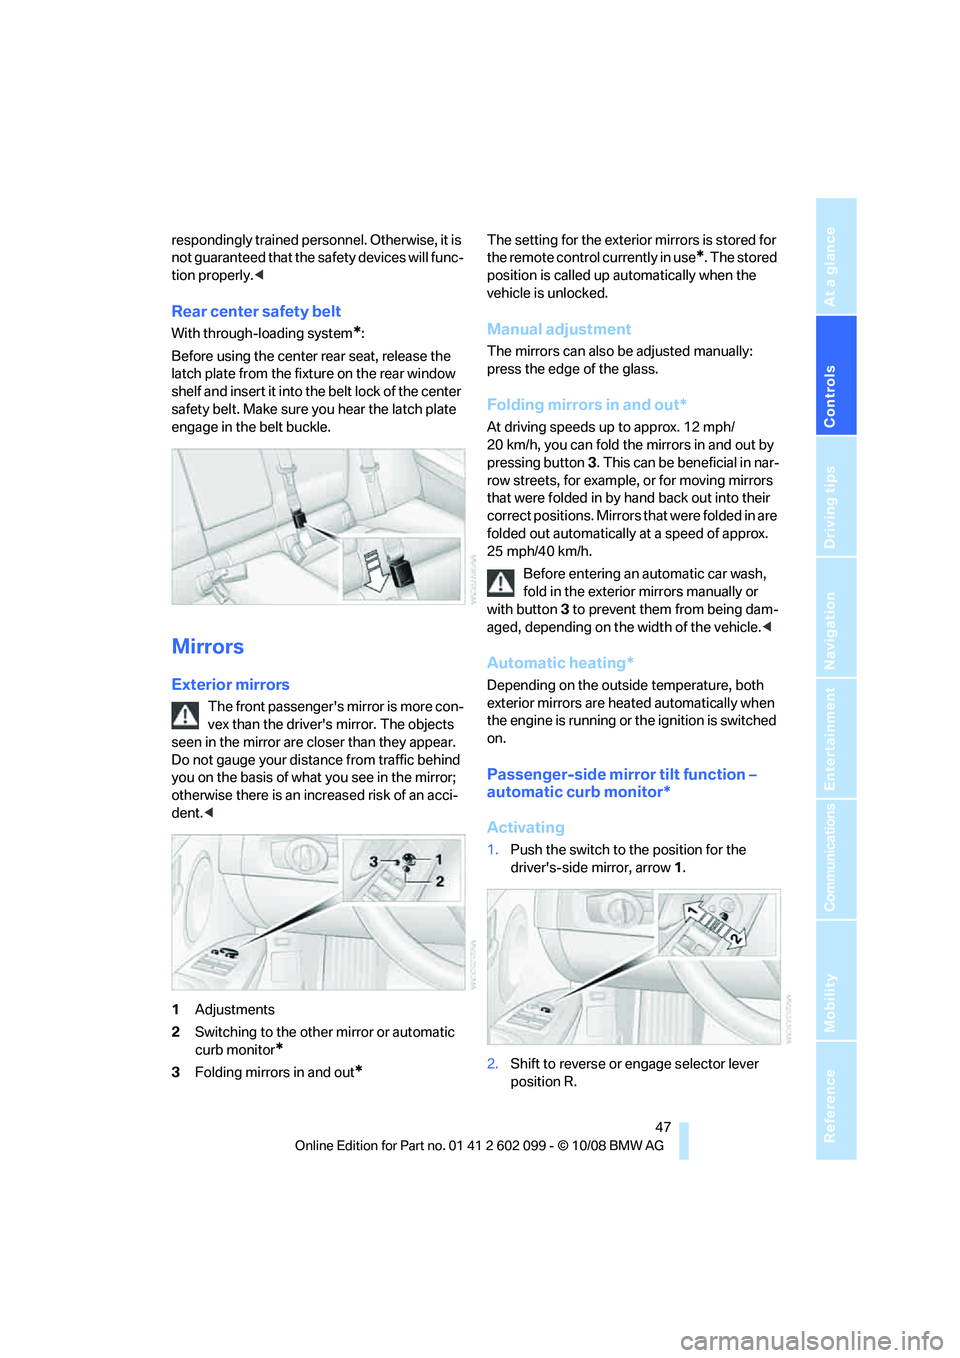
1 Adjustments
2 Switching to the other mirror or automatic
curb monitor
*
3Folding mirrors in and out*
The setting for the exterior mirrors is stored for
the remote control currently in use
*. The stored
position is called up automatically when the
vehicle is unlocked.
Manual adjustment
The mirrors can also be adjusted manually:
press the edge of the glass.
Folding mirrors in and out*
At driving speeds up to approx. 12 mph/
20 km/h, you can fold the mirrors in and out by
pressing button 3. This can be beneficial in nar-
row streets, for example, or for moving mirrors
that were folded in by hand back out into their
correct positions. Mirrors that were folded in are
folded out automatically at a speed of approx.
25 mph/40 km/h.
Before entering an automatic car wash,
fold in the exterior mirrors manually or
with button 3 to prevent them from being dam-
aged, depending on the width of the vehicle. <
Automatic heating*
Depending on the outside temperature, both
exterior mirrors are heated automatically when
the engine is running or the ignition is switched
on.
Passenger-side mirror tilt function –
automatic curb monitor*
Activating
1.Push the switch to the position for the
driver's-side mirror, arrow 1.
2. Shift to reverse or engage selector lever
position R.
ba8_E9091_cic.book Seite 47 Mittwoch, 29. Oktober 2008 2:59 14
Page 53 of 268
Controls
51Reference
At a glance
Driving tips
Communications
Navigation
Entertainment
Mobility
Sedan
There are three additional anchors for child-
restraint systems with tether straps, see
arrows.
Sports Wagon
There are three additional anchors under a
cover for child-restraint systems with tether
straps, see arrows.
Placement of the tether strap
Make sure the upper retaining strap does
not run over sharp edges and is not
twisted as it passes to the top anchor. Other-
wise the strap will not pr operly secure the child-
restraint system in the event of an accident. <
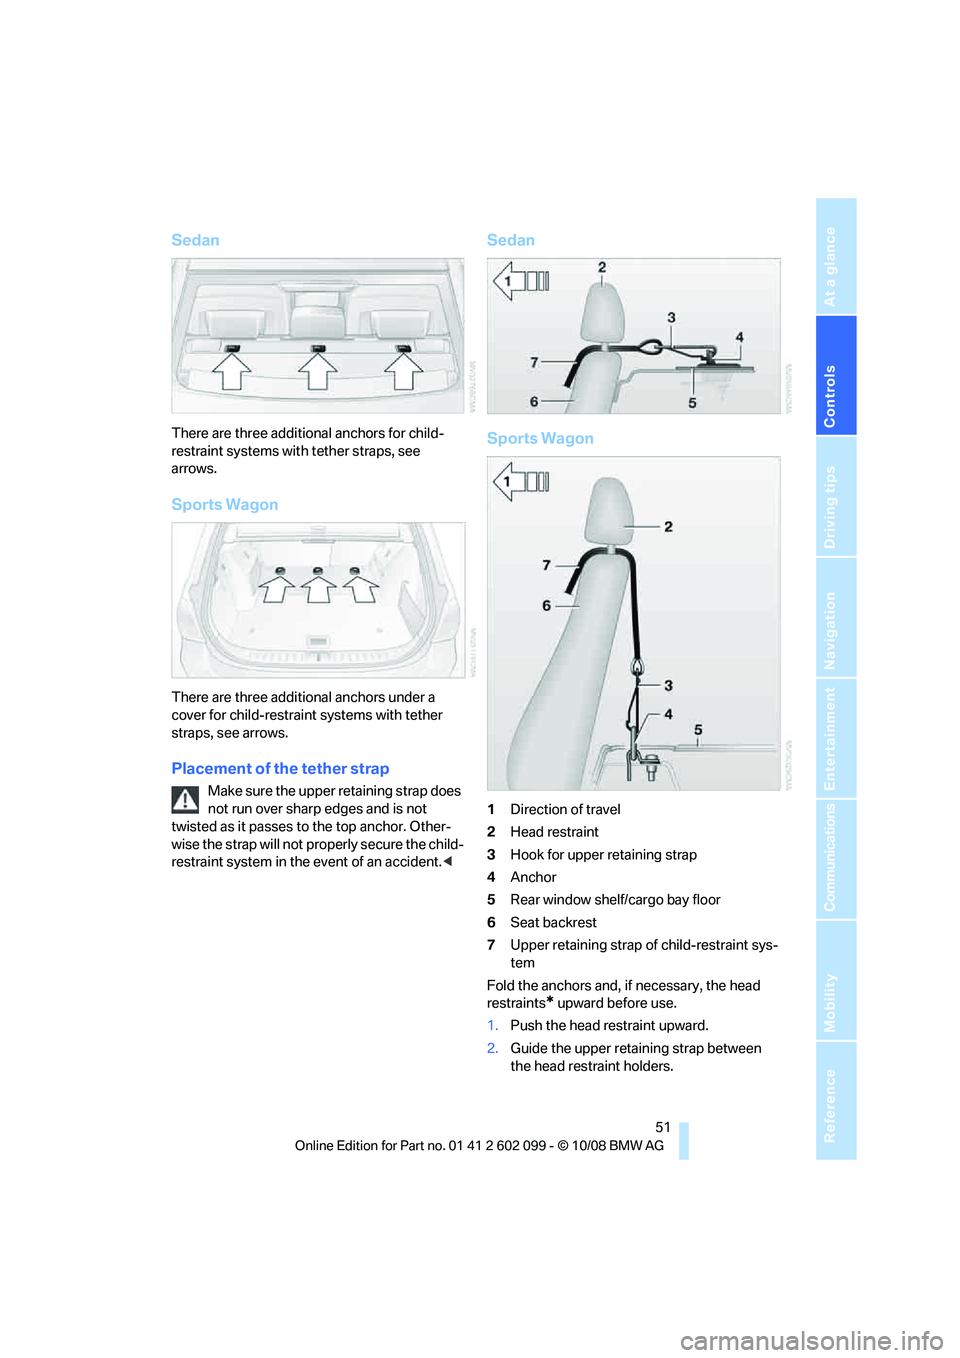
Sedan
Sports Wagon
1Direction of travel
2 Head restraint
3 Hook for upper retaining strap
4 Anchor
5 Rear window shelf/cargo bay floor
6 Seat backrest
7 Upper retaining strap of child-restraint sys-
tem
Fold the anchors and, if necessary, the head
restraints
* upward before use.
1. Push the head restraint upward.
2. Guide the upper retaining strap between
the head restraint holders.
ba8_E9091_cic.book Seite 51 Mittwoch, 29. Oktober 2008 2:59 14
Page 54 of 268
Transporting children safely
52
3.
Use the hook to clip the retaining strap to
the anchor.
4. Push the head restraint into its lowermost
position.
5. Pull the retaining strap taut.
On journeys
Child-safety locks for rear doors
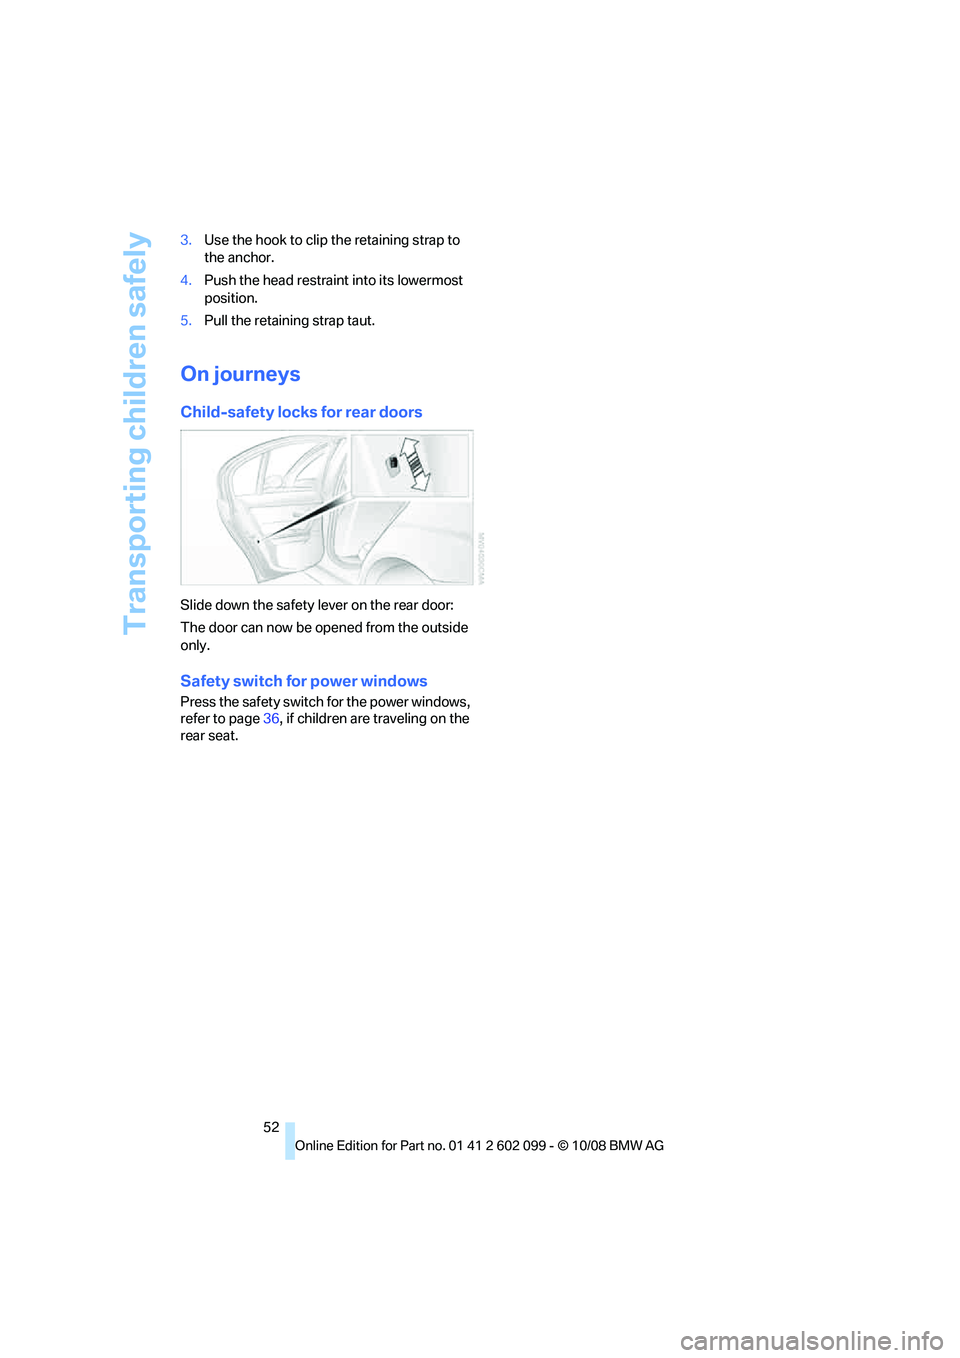
Slide down the safety lever on the rear door:
The door can now be opened from the outside
only.
Safety switch for power windows
Press the safety switch for the power windows,
refer to page 36, if children are traveling on the
rear seat.
ba8_E9091_cic.book Seite 52 Mittwoch, 29. Oktober 2008 2:59 14
Page 61 of 268
Controls
59Reference
At a glance
Driving tips
Communications
Navigation
Entertainment
Mobility
Do not use the washers if there is any
danger that the fluid will freeze on the
windshield. If you do, your vision could be
obscured. Antifreeze should therefore be
added to the fluid, refer to Washer fluid.
Do not use the washers when the washer fluid
reservoir is empty, otherwise you will damage
the washer pump. <
Windshield washer nozzles
The windshield washer nozzles are heated
automatically while the engine is running or the
ignition is switched on
*.
Sports Wagon: re ar window wiper
1Intermittent operation. When reverse gear
is engaged, the system switches to contin-
uous operation.
2 Cleaning the rear window
The rear window wiper does not move if the
lever is in position 1 before the ignition is
switched on.
To switch on the rear window wiper:
1. Move the lever to its home position.
2. Reselect the desired position.
Do not use the washers when the washer
fluid reservoir is empty, otherwise you will
damage the washer pump. <
Washer fluid
Washer fluid antifreeze is flammable.
Therefore, keep it away from ignition
sources and only store it in the closed original
container that is kept ou t of reach of children,
otherwise there is a risk of personal injury.
Comply with the instructions on the con-
tainer. <
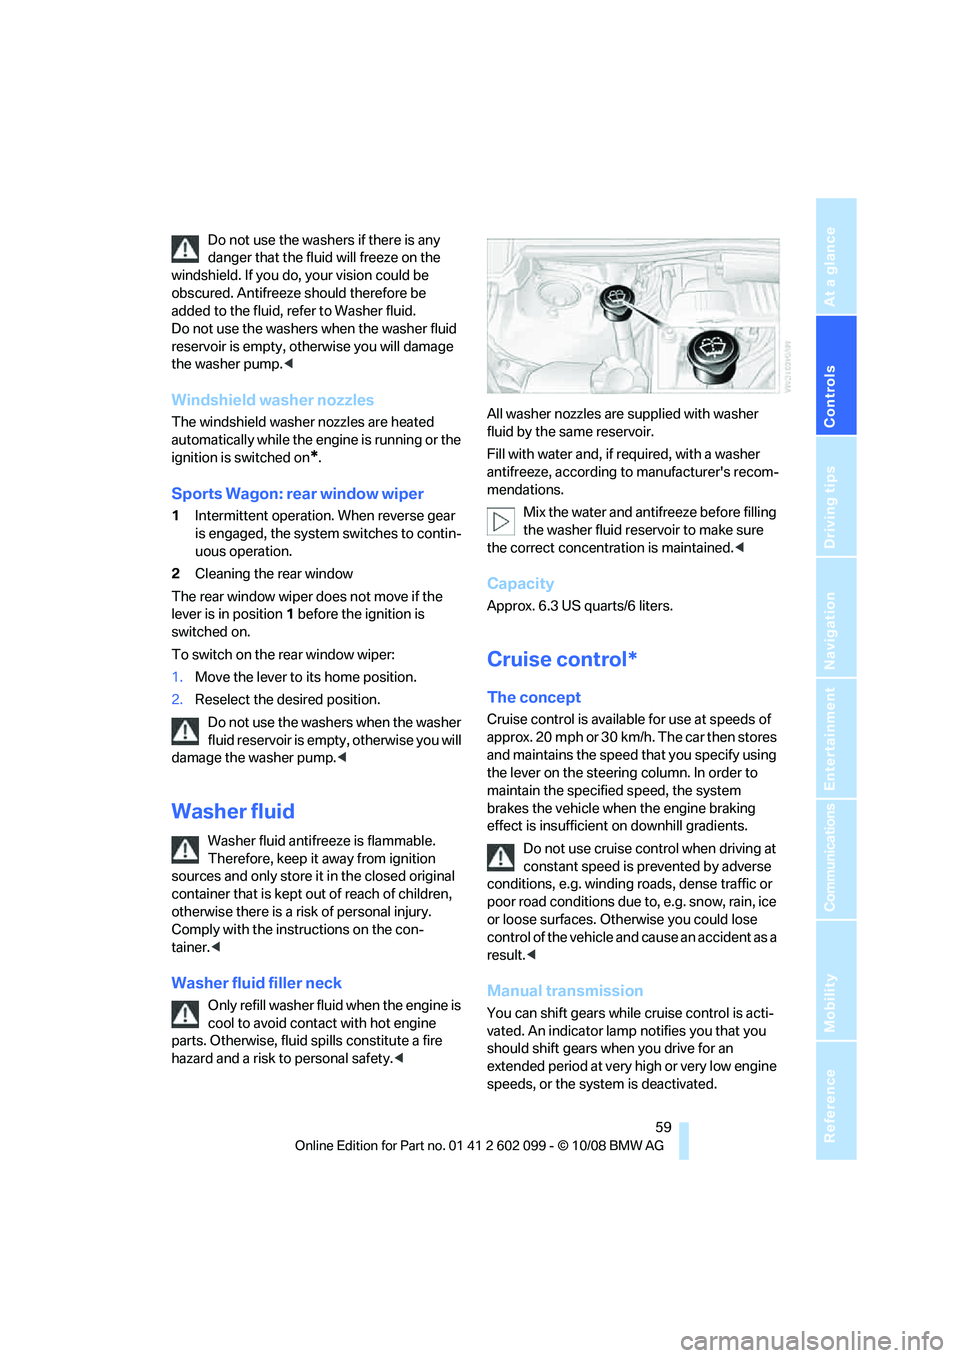
Washer fluid filler neck
Only refill washer fluid when the engine is
cool to avoid contac t with hot engine
parts. Otherwise, fluid spills constitute a fire
hazard and a risk to personal safety.
Fill with water and, if required, with a washer
antifreeze, according to manufacturer's recom-
mendations.
Mix the water and antifreeze before filling
the washer fluid rese rvoir to make sure
the correct concentration is maintained. <
Capacity
Approx. 6.3 US quarts/6 liters.
Cruise control*
The concept
Cruise control is available for use at speeds of
approx. 20 mph or 30 km/h. The car then stores
and maintains the speed that you specify using
the lever on the steering column. In order to
maintain the specified speed, the system
brakes the vehicle when the engine braking
effect is insufficient on downhill gradients.
Do not use cruise control when driving at
constant speed is prevented by adverse
conditions, e.g. winding roads, dense traffic or
poor road conditions due to, e.g. snow, rain, ice
or loose surfaces. Otherwise you could lose
control of the vehicle and cause an accident as a
result. <
Manual transmission
You can shift gears while cruise control is acti-
vated. An indicator lamp notifies you that you
should shift gears wh en you drive for an
extended period at very high or very low engine
speeds, or the system is deactivated.
ba8_E9091_cic.book Seite 59 Mittwoch, 29. Oktober 2008 2:59 14
Page 90 of 268
Technology for driving comfort and safety
88
Airbags
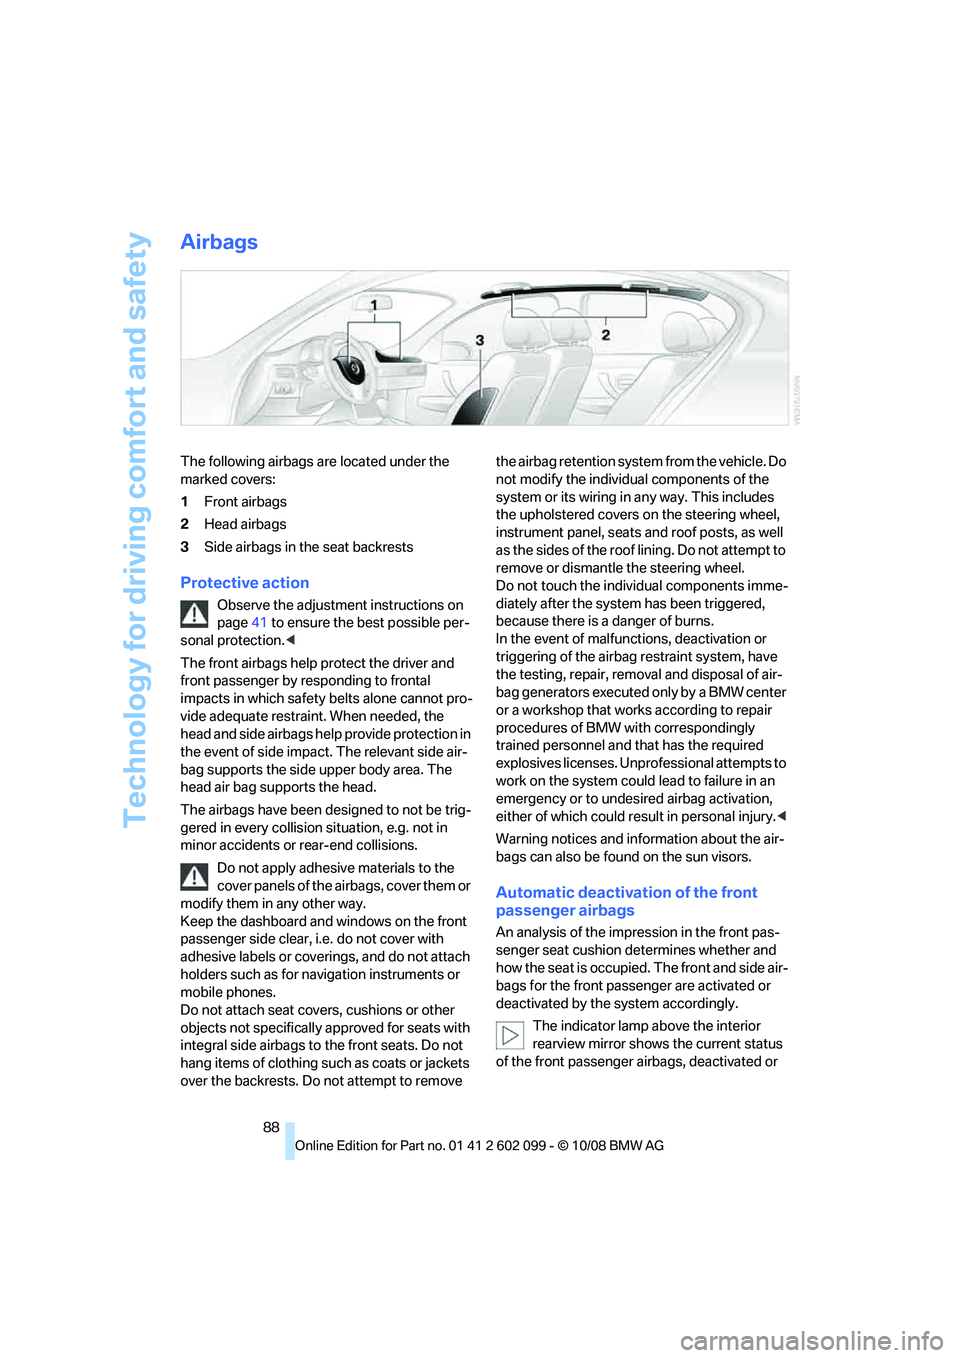
The following airbags are located under the
marked covers:
1Front airbags
2 Head airbags
3 Side airbags in the seat backrests
Protective action
Observe the adjustment instructions on
page 41 to ensure the best possible per-
sonal protection. <
The front airbags help protect the driver and
front passenger by re sponding to frontal
impacts in which safety belts alone cannot pro-
vide adequate restrain t. When needed, the
head and side airbags help provide protection in
the event of side impact. The relevant side air-
bag supports the side upper body area. The
head air bag supports the head.
The airbags have been designed to not be trig-
gered in every collision situation, e.g. not in
minor accidents or rear-end collisions.
Do not apply adhesive materials to the
cover panels of the airbags, cover them or
modify them in any other way.
Keep the dashboard and windows on the front
passenger side clear, i.e. do not cover with
adhesive labels or coveri ngs, and do not attach
holders such as for navigation instruments or
mobile phones.
Do not attach seat cove rs, cushions or other
objects not specifically approved for seats with
integral side airbags to the front seats. Do not
hang items of clothing such as coats or jackets
over the backrests. Do not attempt to remove the airbag retention system from the vehicle. Do
not modify the individual components of the
system or its wiring in any way. This includes
the upholstered covers
on the steering wheel,
instrument panel, seats and roof posts, as well
as the sides of the roof lining. Do not attempt to
remove or dismantle the steering wheel.
Do not touch the individual components imme-
diately after the system has been triggered,
because there is a danger of burns.
In the event of malfunctions, deactivation or
triggering of the airbag restraint system, have
the testing, repair, removal and disposal of air-
bag generators executed only by a BMW center
or a workshop that works according to repair
procedures of BMW with correspondingly
trained personnel and that has the required
explosives licenses. Unprofessional attempts to
work on the system could lead to failure in an
emergency or to undesi red airbag activation,
either of which could resu lt in personal injury.<
Warning notices and information about the air-
bags can also be found on the sun visors.
Automatic deactivation of the front
passenger airbags
An analysis of the impr ession in the front pas-
senger seat cushion determines whether and
how the seat is occupied. The front and side air-
bags for the front passenger are activated or
deactivated by the system accordingly.
The indicator lamp above the interior
rearview mirror shows the current status
of the front passenger ai rbags, deactivated or
ba8_E9091_cic.book Seite 88 Mittwoch, 29. Oktober 2008 2:59 14