2009 AUDI S6 roof rack
[x] Cancel search: roof rackPage 4 of 398

Table of contents
Table of contents
Vehicle literature ........ .
About this Owner's Manual .............. ...... . .
Controls and
equipment ............ ..... .
Instruments and controls ..... .
General il lustration ............. .
Instruments and
warning/indicator lights ....... .
Instruments .............. ..... .
Warning/indicator lights ........ .
Driver information display ..... .
Introduction ................... .
On-Board Diagnostic system (OBD)
Auto Check Control ............ .
Speed warning system ..... .. .. .
Trip computer ..... ... .. .. ... .. .
Opening and closing .......... .
Keys ... ..... .......... ... ..... .
Power locking system ..... ... .. .
Rear lid ....................... .
Child safety lock .... ......... .. . 5
6
9
11
1
1
12
12
16
23
23
27
28
36
38
41
41
45
50
51
Convenience key . . . . . . . . . . . . . . . . 52 Anti-theft
alarm system ........ .
Power windows ... ... .... .... .
S liding/ti lting power sunroof . .. .
Clear vision . .... .. .. .......... .
Lights ... ................ ... .. .
In ter ior l ights ...... ... .. .. .. .. .
Vision ... ... ......... ...... ... .
Wiper and washer system ...... .
Mirrors .................... ... .
Digital compass ............... .
Seats and storage ..... .... ... .
General recommendations ..... .
Power seat . ... ... ......... ... .
Seat m emory ...• ........ .... ..
Rear seats .......... ....... ... .
Head restraints ........ ..... .. .
Arm rest ....... ... ... ... ... •..
Luggage compartment ..... ... .
Roof rack ..... .......... ... .• ..
Cupholder .. ...... ... .. ... ..• ..
Ashtray ................... ... .
Cigarette lighter /socket ........ .
Storage ............ ....... ... .
Warm and cold ............... .
Climate control ........ .. ... .. .
Basic settings ......... •. ... ....
On the road . ... ..... .. ..... ... .
Steering .................... .. .
Ignition lock and ignition switch .
Starting and stopping the engine
Starting and stopping the engine
with Convenience key ....... .. .
Electromechanical parking brake .
Cruise control ......... ........ .
54
55
58
63
63
68
69
71
75
78
80
80
81
84
85
86
88
88
93
95
96
97
99
102
102
1 1 1
114
114
116
117
118
121 124
Adaptive Cruise Control ....... .
Speed and distance control system
Driver informa tion ....... ...... .
System limitations ............. .
Audi lane assist ............... .
Lane assist ......... ........ .. .
Audi side assist ............... .
Lane Change Assistant .. ..... .. .
Notes ....................... •.
Automatic transmission ....... .
tiptronic® (6-speed automatic
transmission) ... .... ... ... .... .
multitronic® ..........•........
Audi Parking System ......... . .
Park Assist Systems .... ... .... .
Audi Park ing System (rear) ...... .
Audi Parking System (rear, with rear-
view camera) .... .. ...... ..... .
Specia l parking situations ..... •.
Settings in the MMI ....... ..... .
Saf ety tips . ............ .... ... .
Adaptive Air Suspension ...... .
Adaptive Air Suspension and
Damping ............. ........ .
Homelink® . ................ ... .
Universal remote control ....... . 127
127
135
140
143
143
146
146
153
155
155
161
169
169
169
171
178
180
181
184
184
188
188
Page 64 of 398

Opening and closing
Fig. 50 Section from
headliner: crank for
emergency operation
- Remove the two screws::::> page 61, fig. 49 -arrows -from
the light unit.
- Carefully remove the light unit.
- Remove the crank from the bracket on the fuse cover on
the driver's side::::>
page 351, fig. 265.
-Push the crank into the hexagonal hole as far as it can go
::::> fig. 50 .
- Hold the crank down and turn it to close the roof.
Re-install the complete light unit.
Have the problem corrected.
[ i ] Tips
To turn the crank for emergency closing more easily , you should use
the screwd river handle as an aid . First remove the screw driver from
the handle, then push the handle onto the crank .•
Page 95 of 398

& WARNING
• The ski sack is intended only for the transportation of skis and
other light objects. To reduce the risk of serious personal injury
never transport heavy or pointed objects in the ski sack.
• When braking rapidly or during an accident the load could be
displaced and cause injury to occupants.
• Sharp edges on the load must be covered for protection.
Always fasten the belt tightly around the sack and its contents
=> page 92, fig. 90.
[ i J Tips
Never stow the ski sack away if it's wet or damp (for example, snow
melting from skis) . Let it dry completely before you stow it away .•
Roof rack
First things first
A roof rack can be fitted to carry additional luggage on
the roof.
-Always read and follow the instructions provided by the
roof rack manufacturer when the roof rack system must
be installed.
If you are transporting luggage or other objects on the roof, please
note the following:
• Your vehicle has specially designed aerodynamic roof rails . Only
install a roof rack specifically designed for your model. Contact the
nearest Audi dealer for information on approved modular roof racks
for your vehicle.
• These approved roof racks are the basis for a complete roof rack
system. Additional attachments for the basic roof rack are neces-
Controls and equip
ment
Seats and storage
sary to safely transport luggage, bicycles, surf boards, skis or small
boats. All necessary hardware for these systems is available at your
authorized Audi dealer.
• We recommend that you keep the installation instructions for
your roof rack system together with your Owner's literature in the
vehicle.
When should the roof rack be removed?
• Before going through an automatic car wash (it is best to ask the
car wash operator for advice).
• When not in use , to reduce fuel consumption, wind noise and to
guard against theft.
& WARNING
• Use of an unapproved roof rack or incorrect mounting of an
approved roof rack can cause the roof rack or the items attached
to it to fall off the roof onto the road.
• Objects falling from the roof of a vehicle can cause a crash and
personal injury.
• Only mount the system between the markings shown in
=> page 94, fig. 91.
• The roof rack system must be installed exactly according to the
instructions provided.
0 Note
• Your vehicle warranty does not cover any damages to the vehicle
caused by using roof racks or mounting structures not approved by
Audi for your vehicle. The same applies to damage resulting from incorrect roof rack installation .
• Always check the roof rack mountings and hardware before each
trip and during a trip to make sure everything is securely tightened.
If necessary, retighten the mountings and check the entire system
from time to time . .,,
I • •
Page 96 of 398

Seats and storage
• After mounting a roof rack system, or when you transport
objects on the roof of your vehicle, the height of the vehicle is natu
rally increased . Be careful when driving under low bridges or in
parking garages for example. This could cause damage to the load
and even the vehicle itself. •
Mounting locations
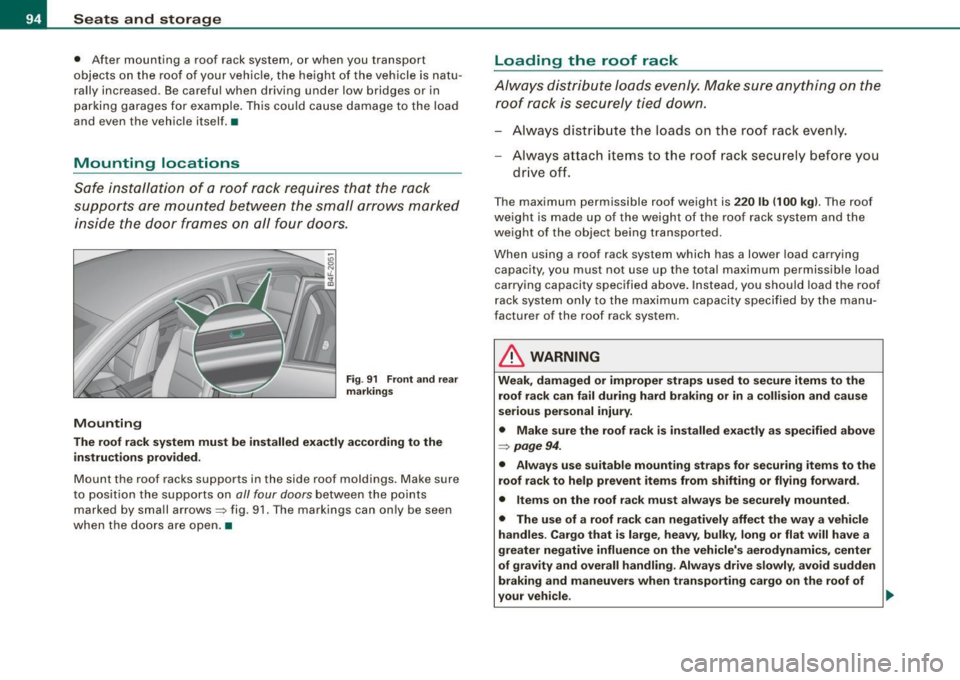
Safe installation of a roof rack requires that the rack
supports are mounted between the small arrows marked
inside the door frames on all four doors.
Mounting
Fig. 91 Front and rear
markings
The roof rack system must be installed exactly according to the
instructions provided.
Mount the roof racks supports in the side roof moldings. Make sure
to position the supports on
all four doors between the points
marked by small arrows=> fig. 91. The markings can only be seen
when the doors are open.•
Loading the roof rack
Always distribute loads evenly. Make sure anything on the
roof rack is securely tied down.
Always distribute the loads on the roof rack evenly.
- Always attach items to the roof rack securely before you
drive off.
The maximum permissible roof weight is 220 lb 1100 kg). The roof
weight is made up of the weight of the roof rack system and the
weight of the object being transported .
When using a roof rack system which has a lower load carrying
capacity, you must not use up the total maximum permissible load
carrying capacity specified above. Instead, you should load the roof
rack system only to the maximum capacity specified by the manu
facturer of the roof rack system .
& WARNING
Weak, damaged or improper straps used to secure items to the
roof rack can fail during hard braking or in a collision and cause
serious personal injury.
• Make sure the roof rack is installed exactly as specified above
=> page 94.
• Always use suitable mounting straps for securing items to the
roof rack to help prevent items from shifting or flying forward.
• Items on the roof rack must always be securely mounted.
• The use of a roof rack can negatively affect the way a vehicle
handles. Cargo that is large, heavy, bulky, long or flat will have a
greater negative influence on the vehicle's aerodynamics, center
of gravity and overall handling. Always drive slowly, avoid sudden
braking and maneuvers when transporting cargo on the roof of
your vehicle. .,_
Page 97 of 398

& WARNING ! continued )
• Never exceed the maximum permi ssible load carrying capa city
of the roof of you r vehicle , the p ermi ssible axle w eight s and th e
permis sible tot al w eight of your vehicle~
page 367 , "Weight s".
• Alwa ys drive slo wly, av oid sudden brak ing and maneuver s
when tran sporting cargo on the roof of your vehicle.
<£> For the sake of the environment
Sometimes it may be easier to leave a roof rack insta lled even
though you are not using it. Due to the increased a ir resistance your
veh icle wi ll unnecessarily use more fuel. Remove the roof rack if you
a re no t going to use it .•
Cupholder
Cupholder in center console
The cupholder is located under a cover.
Con tro ls and eq uip
ment
• • N . . "' •• 0 : : N •. u.
: : ~
.. . .
.. . .
Fi g. 92 Ce nte r
c on sole : Cuphold er
.. . .
.
. . .
Seats and storag e
• • O'I •• 0 : : ~ : : IL
: : ~ . . . .
.
' .. . .
. .
.
. . .
F ig . 9 3 C enter
co nsol e: Ad apt er for
c uph old er
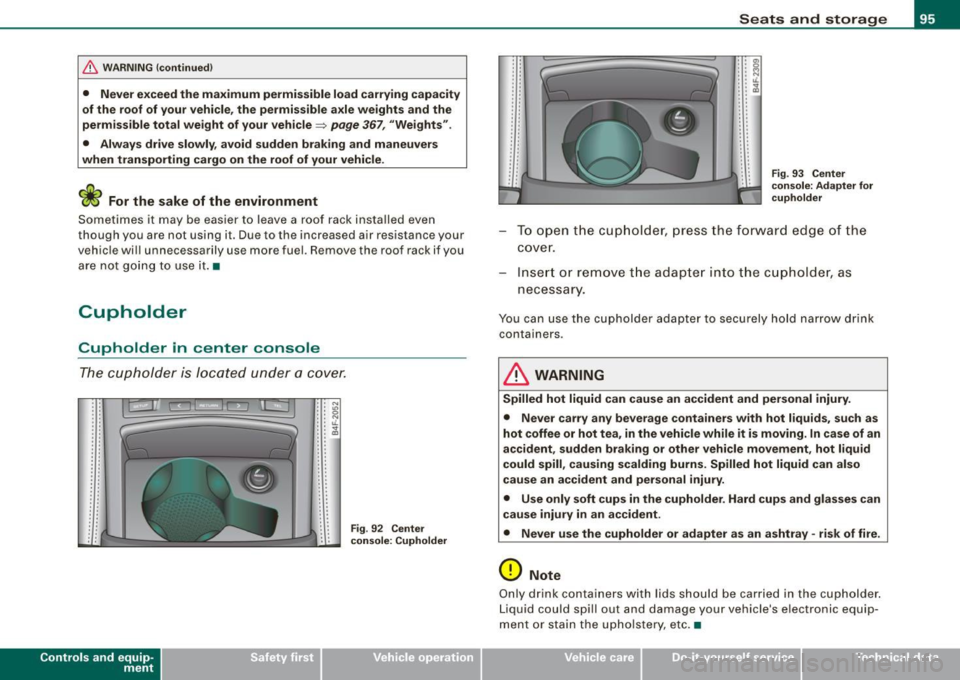
To open t he cup hol de r, pr ess the f orwar d edg e of th e
cove r.
Inse rt or remove t he adap te r into the c upholder, as
necess ary.
You can use the cupholder adapter to securely hold narrow drink
containers.
& WARNING
Spilled hot liquid can cause an accident and per sonal injury .
• Never car ry any beverage con tainers with hot liquids , su ch a s
hot coffee or hot tea , in the vehicle while it is mov ing . In ca se of an
accident , su dden braking or other vehi cle m ovement , hot liquid
could spill , cau sing scald ing burns. Spilled hot liquid c an als o
c au se an ac cident and per sonal injury .
• Use only soft cup s in the cupholder . Hard cups and glasses can
c au se inju ry in a n ac cident .
• Never use th e cupholder or adapter as an a shtray -risk of fire.
0 Note
Only d rink containers with lids should be carried in the cupholder.
Liquid could spill out and damage your vehicle's electronic equip
ment or stain the upho lstery, etc. •
Vehicle care I I irechnical data
Page 227 of 398

Airbag system -----------------=---=---
or the lower parts of the body. Front airbags suppl em ent the three
poi nt s afet y be lts o nly in s ome fro ntal c oll isi ons i n whi ch the v ehicl e
deceleration is hi gh enough to d eploy the airbags .
Front airbags will not deploy:
• if the ignition is switched off when a crash occurs,
• i n sid e collisi ons,
• in r ear- e nd collisions ,
• in ro llovers,
• when the cras h de celer ation me asured b y th e a ir bag sy stem i s
l ess than the minimum threshold nee ded for airbag dep loyment as
r egi stere d by t he ele ctronic control un it.
The front passenger airbag also will not deploy :
• when the front pa ssen ger s eat i s not o cc up ied,
• wh en the weig ht on th e front pass enger seat as se nsed by t he
Advan ced A irb ag System indi cate s that the fr ont air b ag on the
p as se n ge r sid e h as to be turned off b y the e lectronic cont rol unit
(the PASSENGER AIR BAG OFF l ig ht co me s on and sta y s on ).
& WARNING
Sitting in the wrong position can increase the risk of serious injury
in crashes .
• To reduce the risk of injury when the airbags inflate , the driver
and passengers must always sit in an upright position , must not
lean against or place any part of their body too close to the area
where the airbags are located .
• Occupants who are unbelted , out of position or too close to the
airbag can be seriously injured by an airbag as it unfolds with
great force in the blink of an eye
~ page 217.
Controls and equip ment Safety first
Vehicle operation
& WARNING
A child in a rearward-facing child safety seat installed on the front
passenger seat will be seriously injured and can be killed if the
front airbag inflates - even with an Advanced Airbag System .
• The inflating airbag will hit the child safety seat or infant
carrier with great force and will smash the child safety seat and
child against the backrest , center arm rest , door or roof.
• Always install rear-facing child safety seats on the rear seat .
• If you must install a rearward facing child safety seat on the
front passenger seat because of exceptional circumstances and
the PASSENGER AIR BAG OFF light does not come on and stay on, immediately install the rear-facing child safety seat in a rear
seating position and have the airbag system inspected by your
Audi dealer .
& WARNING
Objects between you and the airbag will in crease the risk of injury
in a crash by interfering with the way the airbag unfolds or by
being pushed into you as the airbag inflates .
• Never hold things in your hands or on your lap when the vehicle
is in use.
• Never transport items on or in the area of the front passenger
seat. Objects could move into the area of the front airbags during
braking or other sudden maneuvers and become dangerous
projectiles that can cause serious personal injury if the airbags
inflate .
• Never place or attach accessories or other objects (such as
cupholders , telephone brackets, large, heavy or bulky objects) on
the doors, over or near the area marked "AIRBAG " on the steering
wheel , instrument panel , seat backrests or between those areas
and yourself . These objects could cause injury in a crash , espe-
cially when the airbags inflate . ...
Vehicle care Do-it-yourself service Technical data
Page 236 of 398

___ A_ ir_b _a_ g;:::;_ s--:.. y_s _t _e _m _________________________________________________ _
& WARNING (continued)
-Never carry any objects or pets in the deployment space
between them and the airbags or allow children or other
passengers to travel in this position .
• Always use the built-in coat hooks only for lightweight
clothing. Never leave any heavy or sharp-edged objects in the
pockets that may interfere with side airbag deployment and can
cause personal injury in an accident .
• Always prevent the side airbags from being damaged by heavy
objects knocking against or hitting the sides of the seatbacks.
• The airbag system can only be triggered once . If the airbag has
been triggered, the system must be replaced by an authorized
Audi dealership .
• Damage (cracks, deep scratches etc.) to the original seat covers
or to the seam in the area of the side airbag module must always
be repaired immediately by an authorized Audi dealer.
• If chi ldren are seated improperly, their risk of injury increases
in the case of an accident:::::,
page 238, "Child Safety".
• Never attempt to modify any components of the airbag system
in any way.
• In a side collision , side airbags will not function properly if
sensors cannot correctly measure increasing air pressure inside
the doors when air escapes through larger, unclosed openings in
the door panel.
-Never drive with interior door trim panels removed.
- Never drive when parts have been removed from the inside
door panel and the openings they leave have not been properly
closed.
- Never drive when loudspeakers in the doors have been
removed unless the speaker holes have been properly closed .
- Always make certain that openings are covered or filled if
additional speakers or other equipment is installed in the
inside door panels .
& WARNING (continued)
-Always have work on the doors done by an authorized Audi
dealer or qualified workshop . •
Side curtain airbags
Description of side curtain airbags
The side curtain airbag system can provide supplemental
protection to properly restrained occupants.
B
Fig. 216 Side curtain
airbags , driver 's side:
location
The side curtain airbags are located on both sides of the interior
above the front and rear side windows:::::, fig. 216. They are identi
fied by the word "AIRBAG" on the windshield frame and the center
roof pillar.
The side curtain airbag system supplements the safety belts and can help to reduce the risk of injury for occupants' heads and upper
torso on the side of the vehicle that is struck in a side collision. The
side curtain airbag inflates only in side impacts and only when the
vehicle acceleration registered by the control unit is high enough. If
this rate is below the reference value programmed into the control
unit, the side airbags will not be triggered, even though the car may
be badly damaged as a result of the collision. It is not possible to
define an airbag triggering range that will cover every possible ..,
Page 285 of 398

_____________________________________________ C_ l_ e _a_ n_ in_ g_a _ n_d_ p_ r_ o_ t _e_ c_t _io _ n __ l"III
•
Under certain circumstances, weekly washing may be necessary.
Under other conditions , a monthly washing and waxing may be
adequate .
After the winter, the
underside of the vehicle should be thoroughly
washed, preferably in a professional car wash.
& WARNING
Always read and heed all WARNINGS and other information
~ page 282. •
Automatic car wash
The vehicle can be washed in almost any modern auto
matic car wash.
The vehicle paint is so durable that the vehicle can normally be
washed without problems in an automatic car wash . However, the
effect on the paint depends to a large extent on the design of the
facility, the filtering of the wash water , the type of wash and care
material, etc. If the paint has a dull appearance after going through
the car wash or is scratched , bring this to the attention of the oper
ator immediately . If necessary, use a different car wash .
Before going through a car wash, be sure to take the usual precau
tions such as closing the windows and power roof . Factory installed
antennas must not be removed.
If you have installed additional accessories on the vehicle - such as
spoilers, roof rack, etc. -it is best to ask the car wash operator if
these should be removed.
& WARNING
Always read and heed all WARNINGS and other information
~ page 282. •
Washing the vehicle by hand
A lot of water is needed when washing a vehicle by hand.
-Before you start washing, make sure you have read and
understood the WARNINGS =:>
& in "General informa
tion" on
page 282.
-First soak all dried dirt until it is soft, then rinse it off.
- As you clean your vehicle, start with the roof and work
your way down to the bottom, using a sponge, a sponge glove or a clean brush.
- Rinse the sponge or the sponge glove often, flushing it
clean each time.
- Use special car shampoo only for very persistent dirt.
- Rinse the car thoroughly with water.
- Use a chamois leather to gently w ipe the exterior dry.
Use a separate sponge for cleaning the wheels , door sills and other
regions exposed to road dirt. In this way, you will not scratch the
paint with coarse particles imbedded in the sponge the next time
you wash the car.
& WARNING
• Do not clean the underside of the chassis, fenders, wheel
covers, or other hard to reach parts without protecting your hands
and arms. You may cut yourself on sharp-edged metal parts.
• Always read and heed all WARNINGS and other information
~ page282. _..
Vehicle care
I t •