2009 AUDI S4 CABRIOLET trunk release
[x] Cancel search: trunk releasePage 58 of 340

Opening and closing
As a general rule, you should use the remote control key to
lock and unlock the rear lid
c:5 =:> page 51. With the key slot
in the vertical position the rear lid can be
locked and
unlocked
by the power locking system using either the
remote-control- or the fold-out key:::::>
page 50.
Opening the rear lid
-Pull the handle :::::> page 55, fig. 47 while lifting the lid.
Closing the rear lid
-Pull it down and shut it firmly:::::>& . There is a recess in
the interior trim of the lid to make it easier to pull down.
To unlock the rear lid with the key
- Turn the key from the vertical to position @ :::::> page 55,
fig. 46 the lid springs open slightly.
- Open the lid.
To lock the rear lid with the key
-Turn key slot to horizontal position @.
Turning the key counter-clockwise to position @will release the
rear lid and cause it to rise slightly. In this position the key cannot
be pulled out of the lock cylinder.
Turning the key
clockwise to the horizontal position@ and pulling
it out will cause the
lid to remain locked when the power locking
system is actuated.
In this state the rear lid can only be unlocked with the remote
control unlock button
c:::5 on the master key.
After you turn the key
counter -clockwise back to the vertical posi
tion, the rear lid will again respond to the power locking system.
& WARNING
• After closing the rear lid, always pull up on it to make sure that
it is properly closed. Otherwise it could open suddenly when the
vehicle is moving .
• To help prevent poisonous exhaust gas from being drawn into
the vehicle, always keep the rear lid closed while driving . Never
transport objects larger than those fitting completely into the luggage area, because then the rear lid cannot be fully closed .
• Never leave your vehicle unattended especially with the rear lid
left open. A child could crawl into the car through the luggage
compartment and pull the lid shut, becoming trapped and unable
to get out. To reduce the risk of personal injury, never let children play in or around your vehicle. Always keep the rear lid, as well as
the vehicle doors, closed when not in use.
[ i] Tips
In case of an emergency , the rear lid can be opened from the inside
using the trunk escape handle~
page 290. •
Remote rear lid release c::::5
You can open the rear lid from inside the vehicle using a
switch in the driver's door.
Fig. 48 Driver's door,
rear bottom: remote
rear lid release ...
Page 70 of 340

Pow er to p
R emovin g
- Make sure the single piece section is folded up and
engaged in the vertical position as illustrated=> page
67,
fig. 62.
- Push the arresting pin on each side inward until the arresting button (darker green in => page
67, fig. 62) pops
up.
- Slightly slide the horizontal deflector sect ion forwa rd to
clea r the upholstery and then lift t he deflector out of the
veh icle.
- Turn the deflector so t hat its split sect ion points up verti
cally as shown
G) => page 67, fig. 63
Folding
- Fo ld the reta iner pegs fl ush ag ainst the frame, small
arrows
(D => page 67, fig . 63 .
- Grab the split section at the top on both sides of the joint
and pull it apart in the direct io n of the bold arrows @.
- Fo ld the split halves down until they meet at the bottom.
- Fold the split halv es fo rward in the directi on of bol d
arrows @.•
Operate the power top manually
General notes
The po wer top can be closed manually in the event of a
malfunction.
- App ly the handbrake. - Lower the wi
ndows.
Remove the igni tion key.
You should operate the power top manually only if automatic oper
ation does not wo rk. It is best to contact an Aud i dealer to identify
the cause of the ma lfunction .
Follow this procedure step by step to close the power top manua lly:
• Relea se a nd open the storage bay cover: you must use the
manual release key to unlock the storage bay cover . Unlock the
cover and swing i t ope n.
• Lift th e power top out and unfold it : lift the top out of the storage
bay by hand and extend it forward to the windshield.
• Lock the power top in pla ce: you must use the manual release
key to proper ly engage and lock the power top to the windshie ld.
& WARNING
• Ta ke care not to r ea ch in side the link age me ch an is m or a ny
moving p arts when you lift out and unfold the power top . Carel ess
h andling ri sk s injurie s to your hand s and finger s!
• Nev er driv e the car w it h a power top that is not securely locked
i n pl ace.
If it is not firmly engaged , th e top c an be blo wn ope n by
the air stream and c ause injurie s and damag e to the veh icle . - R isk
of cr ash!
0 Not e
The trunk lid must be closed be fore opening the storage bay cover
as otherwise the two panels can collide . T his can cause consider
able damage to the surfaces on both parts.
[ i ] Tips
It is advisable to have a second person assist you wi th closing the
power top. Particularly the part of folding up and extending the top
~
Page 72 of 340

Power top
Step 1: Unlocking the storage bay cover
The locking mechanism for the storage bay cover is
located in the opening for the ski sack in the rear back
rest.
i :r a:> a,
Fig. 68 Rear seats:
center section of rear
backrest
Fig.
69 Ski sack
tunnel: hole for
inserting the release
key
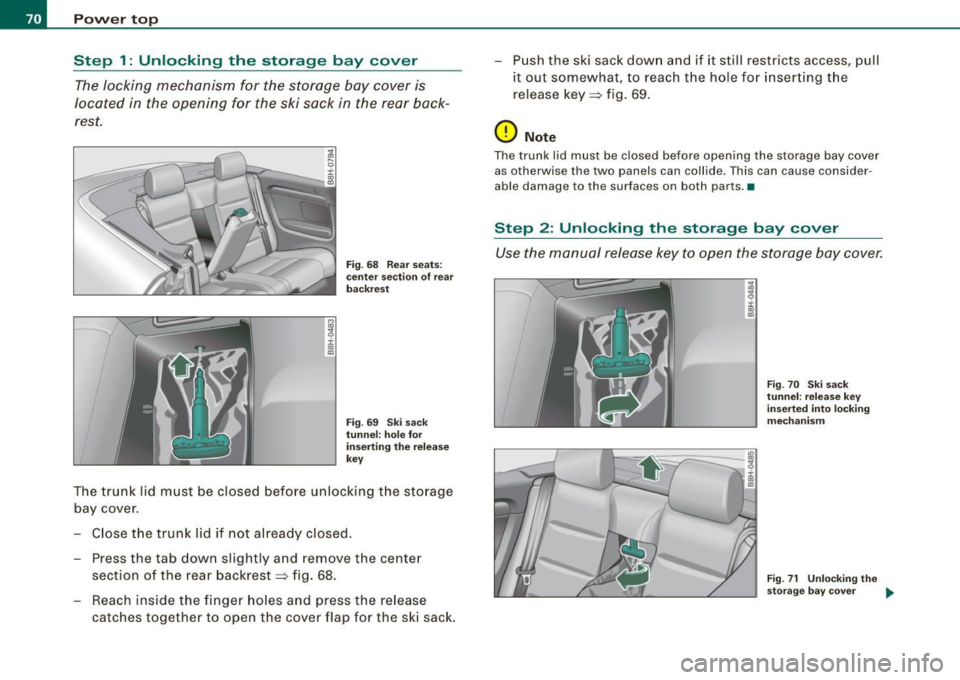
The trunk lid must be closed before unlocking the storage
bay cover.
Close the trunk lid if not already closed.
- Press the tab down slightly and remove the center
section of the rear backrest~ fig. 68.
- Reach inside the finger holes and press the release
catches together to open the cover flap for the ski sack. -
Push the ski sack down and if it still restricts access, pull
it out somewhat, to reach the hole for inserting the
release key~ fig. 69.
0 Note
The trunk lid must be closed before opening the storage bay cover
as otherwise the two panels can collide . This can cause consider
able damage to the surfaces on both parts. •
Step 2: Unlocking the storage bay cover
Use the manual release key to open the storage bay cover.
Fig. 70 Ski sack
tunnel: release key
inserted into locking
mechanism
Fig. 71 Unlocking the
storage bay cover
~
Page 249 of 340

•
Refuelling procedure
-Insert the fue l nozzle from the gaso line pump i nto the
fue l fi ller neck as far as it w il l go.
- Select a medium refue lling rate so that the nozzle
swi tches off automatica lly w hen the tank is ful l.
Putting the fuel cap back on
-Aft er fillin g yo ur ta nk, twist th e fue l fille r cap clockw is e
unt il you hear a de finit e cli ck .
- Cl ose the fue l fille r flap.
To avo id fu el sp illing or evapora ting from the fuel tan k always close
fu el filler cap p rop erly and co mplet ely . An i mprope rly clo sed fue l
fi ller cap may a lso cause a messa ge in the dr iver in fo rm ation display
=>
page 27 or cause the MIL lamp=> page 27 to come on.
,& WARNING
Improper refueling or handling of fuel can cause fire, explosion
and severe burns .
• Fuel is highly flammable and can cause severe burns and other
injuries .
• Failure to shut the engine off while refueling and /or to insert
the pump nozzle fully into the fuel filler ne ck could cause fuel to
spray out of filler neck or to overflow. Fuel spray and overflowing
fuel can cause a fire .
• Never use a cellular telephone while refueling . The electromag
netic radiation can cause sparks that can ignite fue l vapors and
c ause a fire .
• Never get ba ck into your vehicle wh ile refueling . If in e xcep
tional circumstan ces you must get ba ck in your vehicle while refu
eling , make certain that you close the door and touch metal to
di scharge static electricity before touching the filler nozzle again.
Fu el supply and filling your fu el tank
& W ARNING (continued )
Static electricity can cause sparks that can ignite fuel vapors
released during refueling .
• Never smoke or have an open flame anywhere in or near your
vehicle when refueling or filling a portable fuel container.
• For your safety , we strongly recommend that you do not travel
with a portable fuel container in your vehicle. The container , full or
empty may leak and could cause a fire , especially in a crash .
• If, under e xcept ional circumstances , you must transport a
portable fuel container, please observe the following:
-Never fill a portable fuel container while it is anywhere
in or
on the vehicle (for example , in the luggage compartment , or on
the trunk) . Static electricity can build up while filling and can
ignite fuel vapors causing a fire.
- Always place a portable fuel containe r on the ground before
filling.
- Always keep the filler nozzle completely inside the portable
container before and during filling .
- If filling a portable container made of metal , the filler nozzle
must always be in contact with the container. Thi s will help
prevent static ele ctricity from discharging and cause a fire.
- Never spill fuel inside the vehicle or luggage compartment .
Fuel vapors are h ighly flammable .
- Always observe local and state/provincial laws regarding the
use , storage and transportation of fuel conta iners.
- Make certain the fuel container meets indu stry standards
(ANSI / ASTM F852-86).
0 Note
If any fuel has spil led onto the car , it should be removed immedi -
ate ly to prevent da mage to the pa int. _,.
Vehic le care
Page 292 of 340

1111...__W_ h_ a_ t_d_ o_ l _d _o_ n_ o_ vv_ ? ______________________________________________ _
What do I do now?
Trunk escape handle
In case of an emergency, the rear lid can be opened from
the inside using the trunk escape handle.
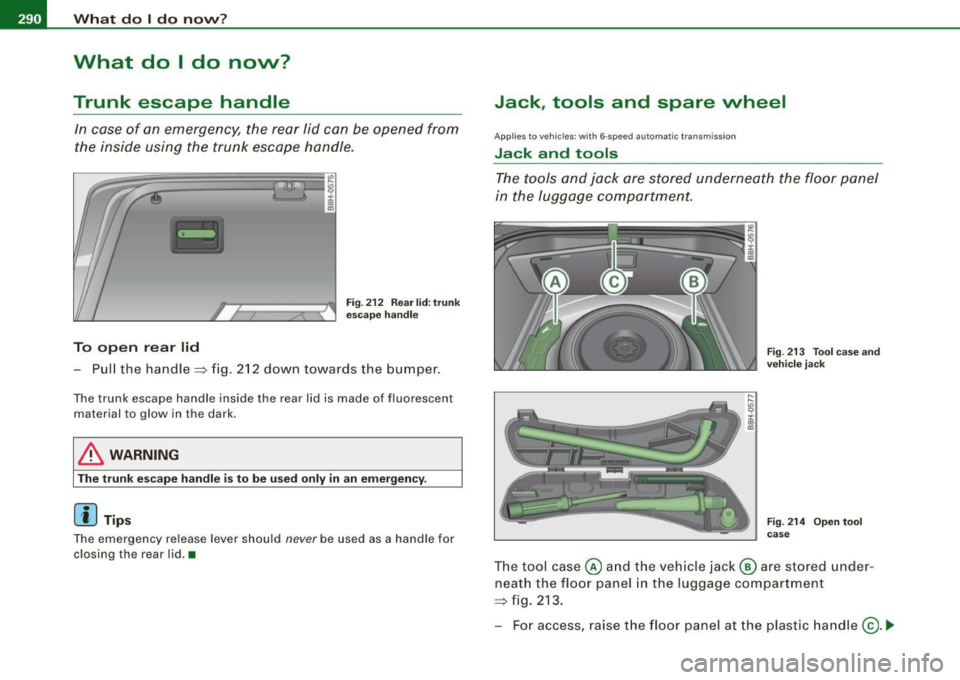
To open rear lid
Fig. 212 Rear lid: trunk
escape handle
-Pull the handle~ fig. 212 down towards the bumper.
The trunk escape handle inside the rear lid is made of fluorescent
material to glow in the dark.
& WARNING
The trunk escape handle is to be used only in an emergency.
[ i ] Tips
The emergency release lever should never be used as a handle for
closing the rear lid. •
Jack, tools and spare wheel
Applies to vehicles: with 6 -speed automatic transmission
Jack and tools
The tools and jack are stored underneath the floor panel
in the luggage compartment.
Fig. 213 Tool case and
vehicle jack
Fig. 214 Open tool
case
The tool case @ and the vehicle jack @ are stored under
neath the floor panel in the luggage compartment
~ fig. 213.
- For access, raise the floor panel at the plastic handle
@. ~
Page 304 of 340

111!11.--___;;F...; u::. s.::..:: e~s :.....:: a..:..n .:..; d::....; b.:..:. u..:..lb ;:..:: s _______________________________________________ _
No.
38
39
41
42
43
Equipment
Central electric, anti -theft alarm system, rear
lid/trunk release
Radio
Horn
Vacant
Electronic Stabilization Program (ESP)
Engine timing
Seat heating
Automatic circuit breakers: Amps
15
20
25
25
15
35
The electric power windows and the electric seat adjusters are
protected with circuit breakers which reset automatically after the
circuit overload has been corrected .
[ i] Tips
• Whenever replacing a fuse, always consult the sticker on the
inside of the fuse panel cover. It contains the most up-to-date infor
mation regarding the fuse arrangement . If in doubt, ask your autho
rized Audi Service advisor.
• Some of the equipment items listed are optional or only avail
able on certain model configurations. •
Bulbs
Replacing light bulbs
For your safety, we recommend that you have your autho
rized Audi dealer replace burned out bulbs for you.
It is becoming increasingly more and more difficult to replace
vehicle light bulbs since in many cases, other parts of the car must first be removed before
you are able to get to the bulb. This applies
especially to the light bulbs in the front of your car which you can
only reach through the engine compartment.
Sheet metal and bulb holders can have sharp edges that can cause
serious cuts, and parts must be correctly taken apart and then prop
erly put back together to help prevent breakage of parts and long
term damage from water that can enter housings that have not
been properly resealed.
For your safety, we recommend that you have your authorized Audi
dealer replace any bulbs for you, since your dealer has the proper
tools, the correct bulbs and the expertise.
Gas discharge lamps (xenon lights)*:
Due to the high electrical voltage, have the bulbs replaced by a qual
ified technician. Headlights with xenon light can be identified by the
high voltage sticker.
& WARNING
Contact with high-voltage components of the electrical system
and improper replacement of gas discharge (Xenon) headlight
bulbs can cause serious personal injury and death.
• Xenon bulbs are pressurized and can explode when being
changed.
• Changing Xenon lamps requires the special training, instruc
tions and equipment.
• Only an authorized Audi dealer or other qualified workshop
should change the bulbs in gas discharge lamps.
& WARNING
There are parts with sharp edges on the openings and on the bulb holders that can cause serious cuts .
~