Page 128 of 648
�Û�Ý
�Û
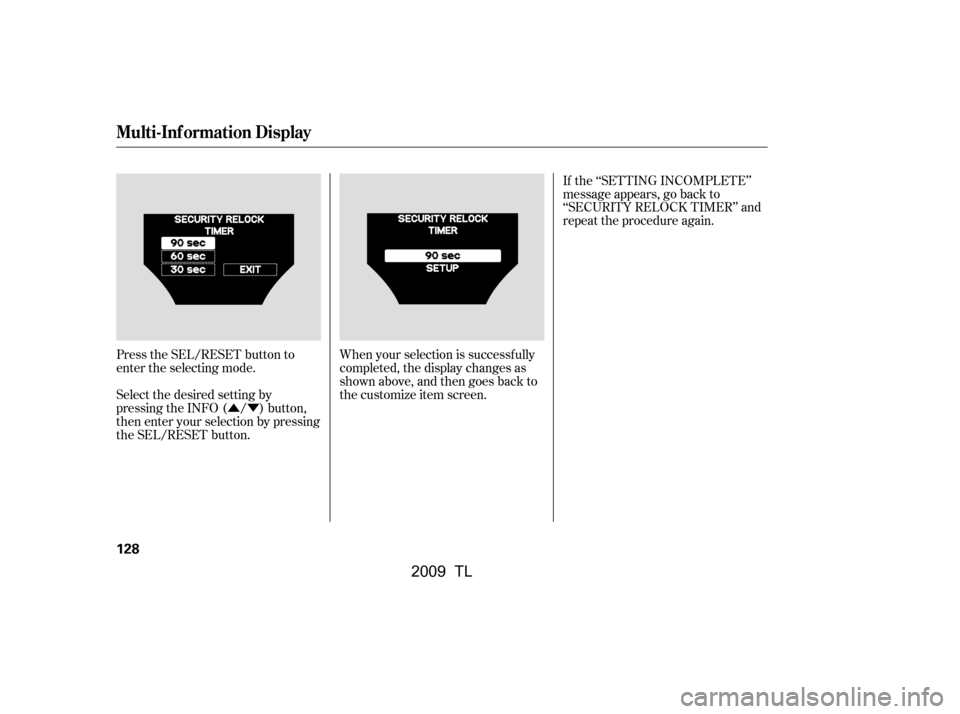
�Ý If the ‘‘SETTING INCOMPLETE’’
message appears, go back to ‘‘KEY
AND REMOTE UNLOCK MODE’’
and repeat the procedure again.
When your selection is successf ully
completed, the display changes as
shown above, and then goes back to
the customize item screen.
Press the SEL/RESET button to
enter the selecting mode.
Select the desired setting by
pressing the INFO ( / ) button,
then enter your selection by pressing
the SEL/RESET button.
You can select whether the driver’s
door or all the doors unlock the f irst
time you press the unlock button on
the remote transmitter/keyless
access remote.
You can choose this item to
customize f rom ‘‘DOOR/WINDOW
SETUP’’ by pressing the INFO ( /
) button repeatedly.
Key and Remote Unlock Mode
CONT INUED
Multi-Inf ormation Display
Inst rument s and Cont rols
125
�\f���—�\f���—�����y�
�������������y���
�)� �����\f�\f�y�\f�
���\f�y
2009 TL
Page 129 of 648
 button, then enter
your selection by pressing the SEL/
RESET button.
Press the SEL/RESET button to
enter the s")
�Û�Ý
�Û
�Ý
Keyless Lock Acknowledgment
Select ON or OFF by pressing the
INFO ( / ) button, then enter
your selection by pressing the SEL/
RESET button.
Press the SEL/RESET button to
enter the selecting mode.
You can choose this item to
customize f rom ‘‘DOOR/WINDOW
SETUP’’ by pressing the INFO ( /
) button repeatedly.
When you push the LOCK button on
the remote transmitter or the
keyless access remote, some
exterior lights f lash, and a beeper
sounds when you push the LOCK
button again within 5 seconds to
verify that the doors and the trunk
arelockedandthesecuritysystem
has set (see page ). You can
customize the exterior lights not to
f lash and the beeper not to sound.
When you press the UNLOCK
button on the remote transmitter or
the keyless access remote to unlock
the driver’s door/all the doors
(depending on the customize
setting), the exterior lights blink
twice to verif y that the door(s) is
unlocked and the security system is
turned off.
To turn this feature on or off, follow
these instructions. 380
Multi-Inf ormation Display
126
�\f���—�
���—�����y�
����\f��������y���
�)� �����\f�\f�y�\f�
���
�y
2009 TL
Page 131 of 648
�Û�ÝWhen your selection is successf ully
completed, the display changes as
shown above, and then goes back to
the customize item screen.
Select the desired setting by
pressing the INFO ( / ) button,
then enter your selection by pressing
the SEL/RESET button.
Press the SEL/RESET button to
enter the selecting mode. If the ‘‘SETTING INCOMPLETE’’
message appears, go back to
‘‘SECURITY RELOCK TIMER’’ and
repeat the procedure again.
Multi-Inf ormation Display
128
�\f���—�\f���—�����y�
�������������y���
�)� �����\f�\f�y�\f�
�����y
2009 TL
Page 132 of 648
�Û�Ý�Û�Ý
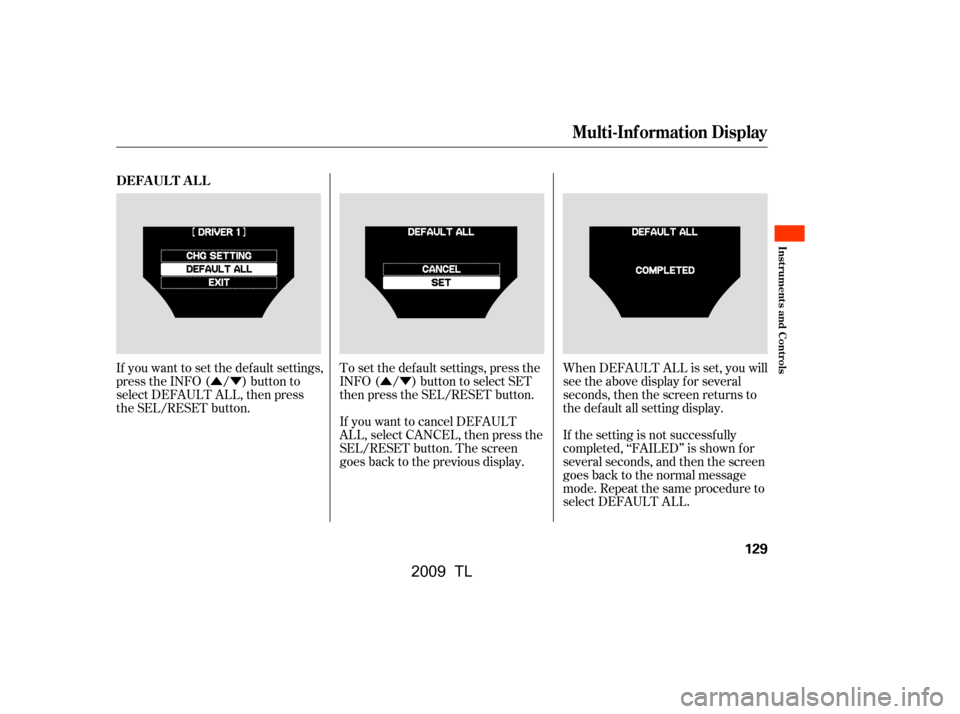
If you want to set the def ault settings,
press the INFO ( / ) button to
select DEFAULT ALL, then press
the SEL/RESET button.
If the setting is not successf ully
completed, ‘‘FAILED’’ is shown f or
several seconds, and then the screen
goes back to the normal message
mode. Repeat the same procedure to
select DEFAULT ALL.
If you want to cancel DEFAULT
ALL, select CANCEL, then press the
SEL/RESET button. The screen
goes back to the previous display.
To set the def ault settings, press the
INFO ( / ) button to select SET
then press the SEL/RESET button.
When DEFAULT ALL is set, you will
see the above display for several
seconds, then the screen returns to
the default all setting display.
DEFAUL T AL L
Multi-Inf ormation Display
Inst rument s and Cont rols
129
�\f���—�\f���—�����y�
�������������y���
�)� �����\f�\f�y�\f�
�����y
2009 TL
Page 227 of 648

Most audio system f unctions can be
controlled by standard buttons, bars,
and knobs. In addition, you can
access some f unctions by using the
selector knob on the audio system.The knob turns lef t and right. Use it
to scroll through lists, or to make
selections or adjustments to a list or
menu item on the display. When you
make a selection, push the center of
the selector (ENTER) to go to that
selection.
When the audio system is in XM
satellite radio mode or playing discs,
pushing the selector (ENTER) knob
switches the display between the
normal display and the extended
display. The extended display has
three segments to display the
detailed inf ormation.
To select any setting such as the
clock or sound adjusting, press the
SETUP button. To use any audio
system f unction, the ignition switch
must be in the ACCESSORY (I) or
ON (II) position. You can select the
item by turning the selector knob.
To go back to the previous display,
press the RETURN button.
Pressing the SETUP button again
will also cancel the setup display
mode.
When you unlock the doors with
your remote transmitter and turn the
audio system on with the ignition
switch in the ACCESSORY (I) or ON
(II) position, the driver’s ID (Driver
1orDriver2)isdetected,andthe
radio presets and sound level
settings (see page ) are turned to
the respective memorized mode
automatically.
231
Selector K nob
SET UP Display
Personalization Setting
Audio System (Models without navigation system)
224
RETURN
BUTTON SELECTOR
KNOBSETUP BUTTON
�\f���—�\f���—�\f���y�
�������������y���
�)� �����\f�\f�y�\f�������y
2009 TL
Page 228 of 648
Playing the A M/FM Radio (Models without navigation system)
Features
225
RETURN BUTTON
SCAN BUTTON
SKIP BAR
A.SEL (AUTO SELECT)
BUTTON
VOL/
(VOLUME/POWER) KNOB
SELECTOR KNOB TITLE BUTTON
PRESET BUTTONS
AM/FM BUTTON
CATEGORY BAR DISPLAY
(SOUND) BUTTON
SETUP BUTTON
�\f���—�
���—�����y�
�\f��\f��������y���
�)� �����\f�\f�y�\f�����\f�y
2009 TL
Page 229 of 648
 or ON (II) position.
Turn the system on by pushing the
VOL/ (power/volume) knob or
the AM/FM button. Adjust the
volume by turning the VOL/")
�µ
�µ �µ
The ignition switch must be in the
ACCESSORY (I) or ON (II) position.
Turn the system on by pushing the
VOL/ (power/volume) knob or
the AM/FM button. Adjust the
volume by turning the VOL/ knob.
The band and f requency that the
radio was last tuned to are displayed.
To change bands, press the AM/FM
button. On the FM band, ST will be
displayed if the station is
broadcasting in stereo. Stereo
reproduction in AM is not available.
On the AM band, AM noise
reduction turns on automatically. You can use any of f ive methods to
f ind radio stations on the selected
band: tune, skip, scan, the preset
buttons, and auto select.
On the FM band, you can also use
the f eatures provided by the radio
data system (RDS). For more
inf ormation on the RDS, see page
.
Use the selector knob to
tune the radio to a desired f requency.
Turn the knob right to tune to a
higher f requency, or lef t to tune to a
lower f requency.
The skip f unction searches
up and down f rom the current
f requency to f ind a station with a
strong signal. To activate it, press
and hold the or side of the
SKIP bar until you hear a beep, then
release it. The scan f unction samples
all stations with strong signals on the
selected band. To activate it, press
the SCAN button, then release it.
You will see SCAN in the display.
The system will scan f or a station
with a strong signal. When it f inds
one, it will stop and play that station
f or about 10 seconds.
If you do nothing, the system will
scan f or the next strong station and
play it f or 10 seconds. When it plays
a station that you want to listen to,
press the SCAN button again.
228
To Play the Radio
To Select a Station
TUNE
SK IPSCAN
Playing the A M/FM Radio (Models without navigation system)
226
�\f���—�\f���—�\f���y�
�������������y���
�)� �����\f�\f�y�\f�����
�y
2009 TL
Page 230 of 648

�µ�µEach preset button can
store one f requency on AM and two
f requencies on FM. If you are
traveling far from home and can no
longer receive your preset stations,
you can use the auto select feature to
find stations in the local area.
You will see a ‘‘0’’ displayed af ter
pressing a preset button if auto
select cannot f ind a strong station f or
that preset button.
If you do not like the stations auto
select has stored, you can store
other f requencies on the preset
buttons as previously described. ,pressthe
A. SEL (auto select) button. This
restores the presets you originally
set.
For inf ormation on AM/FM radio
f requencies and reception, see page .
Select the desired band, AM or
FM. FM1 and FM2 let you store
six stations each.
Usethetune,skip,scan,orRDS
function to tune the radio to a
desired station.
Pick a preset button, and hold it
until you hear a beep.
Repeat steps 1 through 3 to store a
total of six stations on AM and
twelve stations on FM. Press the A. SEL button. ‘‘A-SEL’’
f lashes in the display, and the system
goes into scan mode f or several
seconds. It stores the f requencies of
six AM and twelve FM stations in
the preset buttons.
1.
2.
3.
4. 372To turn of f auto select
Playing the A M/FM Radio (Models without navigation system)
Preset
A UT O SEL ECT
Features
227
�\f���—�\f���—�\f���y�
�������������y���
�)� �����\f�\f�y�\f�������y
2009 TL


Features
225
RETURN BUTTON
SCAN BUTTON
SKIP BAR
A.SEL (AUTO SELECT)
BUTTON
VOL/
(VOLUME/POWER) KNOB
SELECTOR KNOB TITLE BUTTON
PRESET BUTT")