Page 106 of 648
�Û�Ý�Û�Ý
Adjust Alarm Volume
Select the warning alarm volume
f rom three levels.
You can choose this item to
customize f rom ‘‘METER SETUP’’
by pressing the INFO ( / ) button
repeatedly. Press the SEL/RESET button to see
the selections.
Select the desired level by pressing
the INFO ( / ) button, then enter
your selection by pressing the SEL/
RESET button.When your selection is successf ully
completed, the display changes as
shown above, and then goes back to
the customize item screen.
If the ‘‘SETTING INCOMPLETE’’
message appears, go back to
‘‘ADJUST ALARM VOLUME’’ and
repeat the procedure again.
CONT INUED
Multi-Inf ormation Display
Inst rument s and Cont rols
103
�\f���—�\f���—�����y�
�������������y���
�)� �����\f�\f�y�\f�
�\f���y
2009 TL
Page 107 of 648
�Û�Ý�Û�Ý
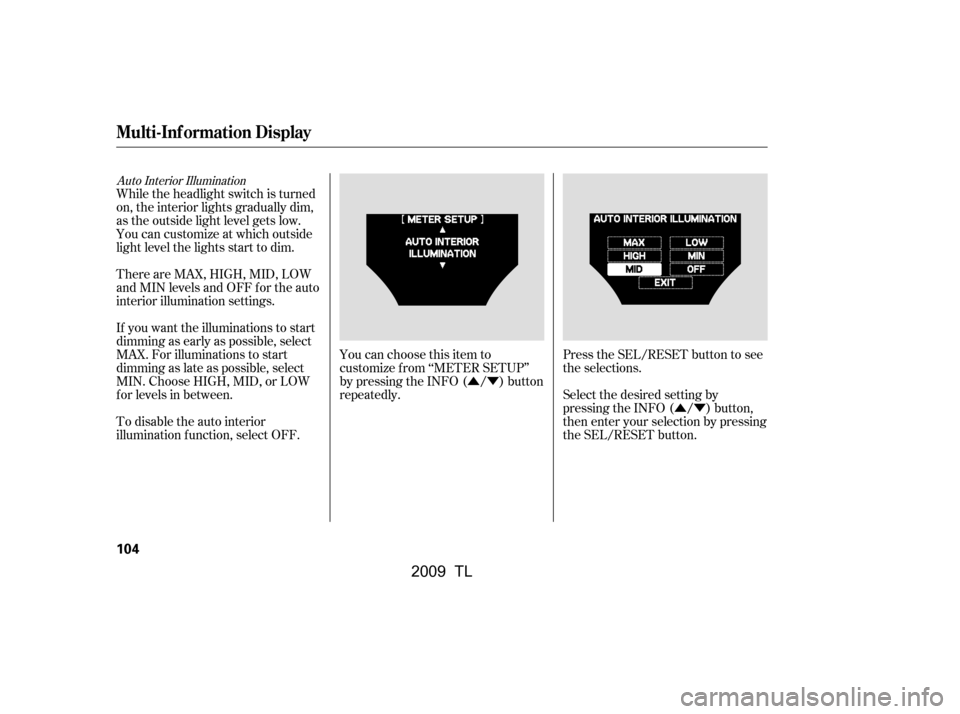
Auto Interior Illumination
While the headlight switch is turned
on, the interior lights gradually dim,
as the outside light level gets low.
You can customize at which outside
light level the lights start to dim.
ThereareMAX,HIGH,MID,LOW
and MIN levels and OFF for the auto
interior illumination settings.
If you want the illuminations to start
dimming as early as possible, select
MAX. For illuminations to start
dimming as late as possible, select
MIN. Choose HIGH, MID, or LOW
f or levels in between.
To disable the auto interior
illumination f unction, select OFF. You can choose this item to
customize f rom ‘‘METER SETUP’’
by pressing the INFO ( / ) button
repeatedly.
Press the SEL/RESET button to see
the selections.
Select the desired setting by
pressing the INFO ( / ) button,
then enter your selection by pressing
the SEL/RESET button.
Multi-Inf ormation Display
104
�\f���—�\f���—�����y�
�������������y���
�)� �����\f�\f�y�\f�
�\f���y
2009 TL
Page 109 of 648
�Û�Ý�Û�Ý
You can choose this item to
customize f rom ‘‘METER SETUP’’
by pressing the INFO ( / ) button
repeatedly.
Press the SEL/RESET button to see
the selections.
Select ON or OFF by pressing the
INFO ( / ) button, then enter
your selection by pressing the SEL/
RESET button.When your selection is successf ully
completed, the display changes as
shown above, and then goes back to
the customize item screen.
If the ‘‘SETTING INCOMPLETE’’
message appears, go back to
‘‘KEYLESS START GUIDANCE
SCREENS’’ and repeat the
procedure again.
Multi-Inf ormation Display
106
�\f���—�\f���—�����y�
������\f��\f���y���
�)� �����\f�\f�y�\f�
�
�
�y
2009 TL
Page 110 of 648
�Û
�Ý
�Û�Ý
�Û�Ý
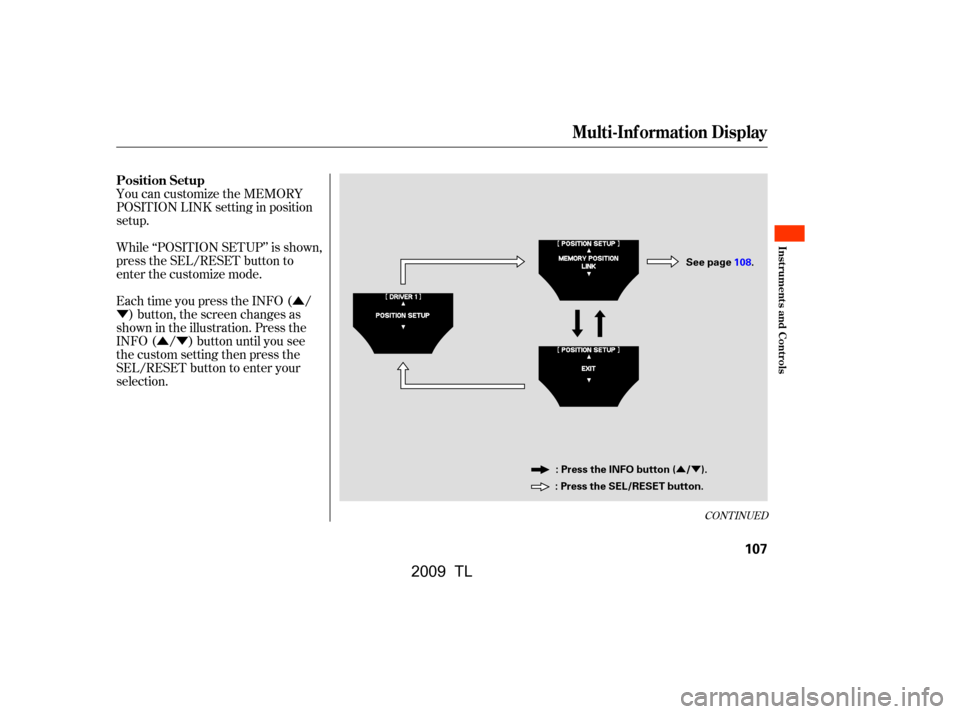
You can customize the MEMORY
POSITION LINK setting in position
setup.
While ‘‘POSITION SETUP’’ is shown,
press the SEL/RESET button to
enter the customize mode.
Each time you press the INFO ( /) button, the screen changes as
shown in the illustration. Press the
INFO ( / ) button until you see
the custom setting then press the
SEL/RESET button to enter your
selection.
CONT INUED
Position Setup
Multi-Inf ormation Display
Inst rument s and Cont rols
107
: Press the SEL/RESET button. : Press the INFO button ( / ). Seepage108.
�\f���—�\f���—�����y�
������\f��
���y���
�)� �����\f�\f�y�\f�
�
���y
2009 TL
Page 111 of 648
�Û
�Ý �Û�Ý
Memory Position Link
On models with keyless access system
When Memory Position Link is set
to ON, the driver’s seat and the
outside mirrors move to the
positions stored in memory. To
cause the memory to activate, open
the driver’s door with the remote
transmitter. On models with keyless
access system, open the driver’s
door with the remote, or grab the
door handle while carrying the
remote.
To set the memory positions, see
page .
For inf ormation on using the remote,
see page . You can choose this item to
customize f rom ‘‘POSITION
SETUP’’ by pressing the INFO ( /
) button repeatedly. Press the SEL/RESET button to see
the selections.
Select ON or OFF by pressing the
INFO ( / ) button, then enter
your selection by pressing the SEL/
RESET button.
164
167
Multi-Inf ormation Display
108
�\f���—�\f���—�����y�
������\f������y���
�)� �����\f�\f�y�\f�
�
���y
2009 TL
Page 113 of 648
�Û
�Ý
�Û�Ý
�Û�Ý
Each time you press the INFO ( /) button, the screen changes as
shown in the illustration. Press the
INFO ( / ) button, until you see
the setting you want to customize,
then press the SEL/RESET button
to enter your selection.
While ‘‘KEYLESS ACCESS SETUP’’
is shown, press the SEL/RESET
button to enter the customize mode. KEYLESS ACCESS BEEP
KEYLESS ACCESS
LIGHT FLASH
DOOR UNLOCK MODE
There are three custom settings for
the keyless access setup:
On models with keyless access system
K eyless A ccess Setup
Multi-Inf ormation Display
110
: Press the INFO button ( / ).
: Press the SEL/RESET button. See page113.
Seepage112.
Seepage111.
�\f���—�\f���—�����y�
������\f������y���
�)� �����\f�\f�y�\f�
�
���y
2009 TL
Page 114 of 648
�Û
�Ý �Û
�Ý
Press the SEL/RESET button to see
the selections. When your selection is successf ully
completed, the display changes as
shown above, and then goes back to
the customize item screen.
To select whether the driver’s door
or all doors unlock when you open
the driver’s door with the remote or
by grabbing the door handle (while
carrying the remote), f ollow these
instructions:
You can choose this item to
customize f rom ‘‘KEYLESS ACCESS
SETUP’’ by pressing the INFO ( /
) button repeatedly. Select DRIVER DOOR or ALL
DOORS by pressing the INFO ( /
) button, then enter your selection
by pressing the SEL/RESET button. If the ‘‘SETTING INCOMPLETE’’
message appears, go back to ‘‘DOOR
UNLOCK MODE’’ and repeat the
procedure again.
CONT INUED
Door Unlock Mode
Multi-Inf ormation Display
Inst rument s and Cont rols
111
�\f���—�\f���—�����y�
������\f������y���
�)� �����\f�\f�y�\f�
�
���y
2009 TL
Page 115 of 648
�Û�Ý
�Û
�Ý Press the SEL/RESET button to see
the selections.
Select ON or OFF by pressing the
INFO ( / ) button, then enter
your selection by pressing the SEL/
RESET button.
When KEYLESS ACCESS LIGHT
FLASH is set to ON, some exterior
lights blink twice when you unlock
thedoorsbygrabbingthedriver’s
door handle while carrying the
remote.
You can choose this item to
customize f rom ‘‘KEYLESS ACCESS
SETUP’’ by pressing the INFO ( /) button repeatedly.
The same exterior lights blink once
when you lock the doors by pushing
the door lock button while carrying
the remote.
Keyless Access Light Flash
Multi-Inf ormation Display
112
�\f���—�\f���—�����y�
������\f����
�y���
�)� �����\f�\f�y�\f�
�
���y
2009 TL