Page 17 of 170
 16
SAFETY
DEVICES
CORRECT USE
OF THE
CAR
WARNING
LIGHTS AND
MESSAGES
IN AN
EMERGENCY
CAR
MAINTENANCE
TECHNICAL
SPECIFICATIONS
INDEX
YOUR CAR
Trip B data (Trip B on)
Through this option it is possibl")
16
SAFETY
DEVICES
CORRECT USE
OF THE
CAR
WARNING
LIGHTS AND
MESSAGES
IN AN
EMERGENCY
CAR
MAINTENANCE
TECHNICAL
SPECIFICATIONS
INDEX
YOUR CAR
Trip B data (Trip B on)
Through this option it is possible to acti-
vate (On) or deactivate (Off) the Trip B
(partial trip) display.
For further information see “Trip com-
puter”.
For activation / deactivation, proceed as
follows:
– briefly press button MENU
ESC: (On)
or (Off) will flash on the display (accord-
ing to previous setting);
– press button
+or –for setting;
– briefly press button MENU
ESCto go
back to the menu screen or press the but-
ton for long to go back to the standard
screen without storing settings.Set time (Clock)
This function enables to set the clock
through two sub-menus: “Time” and
“Mode”.
Proceed as follows:
– briefly press button MENU
ESC, the
display will show the two sub-menus
“Time” and “Mode”;
– press button
+or –to navigate the two
sub-menus;
– select the required option and then
press button MENU
ESC;
– when accessing the “Time” submenu:
briefly press button MENU
ESC, “hours”
will flash on the display;
– press button
+or –for setting;
– briefly press button MENU
ESC, “min-
utes” will flash on the display;
– press button
+or –for setting.NoteThe setting will increase or decrease
by one unit each time
+or –is pressed.
Hold the button pressed to increase/de-
crease the setting rapidly. Complete the
setting by briefly pressing the button when
you approach the required setting.
– when accessing the “Format” submenu:
briefly press button MENU
ESC: the pre-
viously set display format will flash on the
display;
– press button
+or –to select “24h” or
“12h”.
When you have made the required set-
tings, briefly press button MENU
ESCto
go back to the menu screen or press the
button for long to go back to the standard
screen without storing settings.
– hold MENU
ESCpressed to go back to
the standard screen or main menu ac-
cording to the points of the menu where
you are at.
001-022 ABARTH 500 GB 29-04-2009 9:40 Pagina 16
Page 18 of 170
 17
SAFETY
DEVICES
CORRECT USE
OF THE
CAR
WARNING
LIGHTS AND
MESSAGES
IN AN
EMERGENCY
CAR
MAINTENANCE
TECHNICAL
SPECIFICATIONS
INDEX
YOUR CAR
Set date (Set Date)
This function enables to update the d")
17
SAFETY
DEVICES
CORRECT USE
OF THE
CAR
WARNING
LIGHTS AND
MESSAGES
IN AN
EMERGENCY
CAR
MAINTENANCE
TECHNICAL
SPECIFICATIONS
INDEX
YOUR CAR
Set date (Set Date)
This function enables to update the date
(day - month - year).
To correct the date proceed as follows:
– briefly press button MENU
ESC: “year”
will flash on the display;
– press button
+or –for setting;
– briefly press button MENU
ESC:
“month” will flash on the display;
– press button
+or –for setting;
– briefly press button MENU
ESC: “day”
will flash on the display;
– press button
+or –for setting.
NoteThe setting will increase or decrease
by one unit each time
+or –is pressed.
Hold the button pressed to increase/de-
crease the setting rapidly. Complete the
setting by briefly pressing the button when
you approach the required setting.
– briefly press button MENU
ESCto go
back to the menu screen or press the but-
ton for long to go back to the standard
screen without storing settings.See radio
(Repeat audio information)
With this function the display shows in-
formation relevant to the sound system.
– Radio: tuned radio station frequency or
RDS message, automatic tuning activation
or AutoSTore;
– CD audio, CD MP3: track number;
To activate (On) or to deactivate (Off)
sound system info displaying proceed as
follows:
– briefly press button MENU
ESC: (On)
or (Off) will flash on the display (accord-
ing to previous setting);
– press button
+or –for setting;
– briefly press button MENU
ESCto go
back to the menu screen or press the but-
ton for long to go back to the standard
screen without storing settings.Autoclose (Automatic door lock
operation with car running)
(for versions/markets, where provided)
When activated (On), this function locks
automatically the doors when the car
speed exceeds 20 km/h.
Proceed as follows to switch this function
on or off:
– briefly press button MENU
ESCto dis-
play the three sub-menus;
– briefly press button MENU
ESC: (On)
or (Off) will flash on the display (accord-
ing to previous setting);
– press button
+or –for setting;
– briefly press button MENU
ESCto go
back to the menu screen or press the but-
ton for long to go back to the standard
screen without storing settings;
– hold MENU
ESCpressed to go back to
the standard screen or main menu ac-
cording to the points of the menu where
you are at.
001-022 ABARTH 500 GB 29-04-2009 9:40 Pagina 17
Page 19 of 170
 18
SAFETY
DEVICES
CORRECT USE
OF THE
CAR
WARNING
LIGHTS AND
MESSAGES
IN AN
EMERGENCY
CAR
MAINTENANCE
TECHNICAL
SPECIFICATIONS
INDEX
YOUR CAR
Units (Set units)
This function may be used to set the me")
18
SAFETY
DEVICES
CORRECT USE
OF THE
CAR
WARNING
LIGHTS AND
MESSAGES
IN AN
EMERGENCY
CAR
MAINTENANCE
TECHNICAL
SPECIFICATIONS
INDEX
YOUR CAR
Units (Set units)
This function may be used to set the mea-
surement unit in three submenus: “Dis-
tances”, “Consumption” and “Tempera-
ture”.
To set the required unit proceed as fol-
lows:
– briefly press button MENU
ESCto dis-
play the three sub-menus;
– press button
+or –to navigate the
three sub-menus;
– select the required sub-menu and then
press briefly button MENU
ESC;
– when accessing the “Distance” submenu:
briefly press MENU
ESC: either “km” or
“mi” will appear on the display (accord-
ing to the previous setting);
– press button
+or –for setting;
– when accessing the “Consumption” sub-
menu: briefly press MENU
ESC: either
“km/l ”, “l/100km” or “mpg” will appear
on the display (according to the previous
setting);If the distance unit set is “km” the fuel con-
sumption unit will be displayed in km/l or
l/100km.
If the distance unit set is “mi” the fuel con-
sumption unit will be displayed in “mpg”.
– press button
+or –for setting;
– when accessing the “Temperature” sub-
menu: briefly press MENU
ESC: either
“°C” or “°F” will appear on the display ac-
cording to the previous setting;
– press button
+or –for setting;
When you have made the required set-
tings, briefly press button MENU
ESCto
go back to the menu screen or press the
button for long to go back to the standard
screen without storing settings.
– hold MENU
ESCpressed to go back to
the standard screen or main menu ac-
cording to the points of the menu where
you are at.Language (Selecting the language)
The messages can be displayed in the fol-
lowing languages: Italian, English, German,
Portuguese, Spanish, French, Dutch, Pol-
ish.
To set the required language proceed as
follows:
– briefly press button MENU
ESC: the
previously set “language” will flash on the
display;
– press button
+or –for setting;
– briefly press button MENU
ESCto go
back to the menu screen or press the but-
ton for long to go back to the standard
screen without storing settings.
001-022 ABARTH 500 GB 29-04-2009 9:40 Pagina 18
Page 20 of 170
 19
SAFETY
DEVICES
CORRECT USE
OF THE
CAR
WARNING
LIGHTS AND
MESSAGES
IN AN
EMERGENCY
CAR
MAINTENANCE
TECHNICAL
SPECIFICATIONS
INDEX
YOUR CAR
Buzzer volume
(Adjusting the failure/warning
buzzer volum")
19
SAFETY
DEVICES
CORRECT USE
OF THE
CAR
WARNING
LIGHTS AND
MESSAGES
IN AN
EMERGENCY
CAR
MAINTENANCE
TECHNICAL
SPECIFICATIONS
INDEX
YOUR CAR
Buzzer volume
(Adjusting the failure/warning
buzzer volume)
With this function the volume of the
buzzer accompanying any failure/warning
indication can be adjusted according to 8
levels.
To adjust the volume proceed as follows:
– briefly press button : MENU
ESC; the
previously set volume “level” will flash on
the display;
– press button
+or –for setting;
– briefly press button MENU
ESCto go
back to the menu screen or press the but-
ton for long to go back to the standard
screen without storing settings.Button volume
(Button volume adjustment)
This function may be used to adjust the
volume of the beep accompanying the ac-
tivation of buttons MENU
ESC, +and–can be adjusted according to 8 levels.
To adjust the volume proceed as follows:
– briefly press button : MENU
ESC; the
previously set volume “level” will flash on
the display;
– press button
+or –for setting;
– briefly press button MENU
ESCto go
back to the menu screen or press the but-
ton for long to go back to the standard
screen without storing settings.Belt buzzer (Buzzer activation for
S.B.R. indication)
This function can be only displayed after
Abarth Dealership has deactivated the
S.B.R. system (see paragraph “S.B.R. sys-
tem” in section “Safety devices”).
Service
(Scheduled servicing)
Through this function it is possible to dis-
play information connected to proper car
servicing.
Proceed as follows:
– briefly press button MENU
ESC: ser-
vice in km or mi, according to previous
setting, will be displayed (see paragraph
“Units”);
– briefly press button MENU
ESCto go
back to the menu screen or press the but-
ton for long to go back to the standard
screen.
001-022 ABARTH 500 GB 29-04-2009 9:40 Pagina 19
Page 21 of 170
 20
SAFETY
DEVICES
CORRECT USE
OF THE
CAR
WARNING
LIGHTS AND
MESSAGES
IN AN
EMERGENCY
CAR
MAINTENANCE
TECHNICAL
SPECIFICATIONS
INDEX
YOUR CAR
NoteThe “Service Schedule” requires the
car to be ser")
20
SAFETY
DEVICES
CORRECT USE
OF THE
CAR
WARNING
LIGHTS AND
MESSAGES
IN AN
EMERGENCY
CAR
MAINTENANCE
TECHNICAL
SPECIFICATIONS
INDEX
YOUR CAR
NoteThe “Service Schedule” requires the
car to be serviced every 30,000 km (or
18,000 mi); this indication will appear au-
tomatically with the key on MARwhen
there are 2,000 km left (or equivalent dis-
tance in miles) and will be presented au-
tomatically every 200 km (or equivalent
distance in miles). The indications will ap-
pear more frequently where there are 200
km left. The indication will appear in kilo-
metres or miles according to the settings.
When the next scheduled service opera-
tion is approaching, the message “Service”
will appear on the display followed by the
number of kilometres or miles left when
the key is turned to MAR. Go to the
Abarth Dealership where the “Scheduled
Service” operations will be performed and
the message will be reset.Passenger bag
Front passenger’s airbag and
side bag activation/deactivation
(for versions/markets, where provided)
This function enables to activate/deacti-
vate the front passenger’s air bag.
Proceed as follows:
– press button MENU
ESCand, after dis-
playing the message (Bag pass: Off) (to dis-
able) or (Bag pass: On) (to enable) press-
ing buttons
+and –, press again button
MENU ESC;
- the confirmation request message will be
displayed;
- press buttons
+or –to select (Yes)
(confirming activation/deactivation) or
(No) (to abort);
- briefly press MENU
ESCto confirm set-
ting and go back to the menu screen or
press the button for long to go back to the
standard screen without storing settings.Daylights (D.R.L.)
This function enables to activate/deacti-
vate the daylight light.
Proceed as follows to switch this function
on or off:
– briefly press button MENU
ESCto dis-
play the three sub-menus;
– briefly press button MENU
ESC: (On)
or (Off) will flash on the display (accord-
ing to previous setting);
– press button
+or –for setting;
– briefly press button MENU
ESCto go
back to the menu screen or press the but-
ton for long to go back to the standard
screen without storing settings;
– hold MENU
ESCpressed to go back to
the standard screen or main menu accord-
ing to the points of the menu where you are
at.
Exit Menu
This is the last function that closes the cir-
cular setting cycle listed in the initial menu
screen.
Briefly press button MENU
ESCto go
back to the standard screen without stor-
ing settings.
Press button
–to return to the first menu
option (Speed Beep).
001-022 ABARTH 500 GB 29-04-2009 9:40 Pagina 20
Page 22 of 170
 21
SAFETY
DEVICES
CORRECT USE
OF THE
CAR
WARNING
LIGHTS AND
MESSAGES
IN AN
EMERGENCY
CAR
MAINTENANCE
TECHNICAL
SPECIFICATIONS
INDEX
YOUR CAR
TRIP COMPUTER
General features
The “Trip computer” is")
21
SAFETY
DEVICES
CORRECT USE
OF THE
CAR
WARNING
LIGHTS AND
MESSAGES
IN AN
EMERGENCY
CAR
MAINTENANCE
TECHNICAL
SPECIFICATIONS
INDEX
YOUR CAR
TRIP COMPUTER
General features
The “Trip computer” is used to display in-
formation on car operation when the key
is turned to MAR. This function allows to
define two separate trips called “Trip A”
and “Trip B” for monitoring the car’s
“complete mission” in a reciprocally in-
dependent manner.
Both functions are resettable (reset - start
of new mission).
“Trip A” shall be used to display the fig-
ures relating to:
– Range
– Trip distance
– Average consumption
– Instant consumption
– Average speed
– Travel time (driving time).“Trip B” shall be used to display the fig-
ures relating to:
– Trip distance B
– Average consumption B
– Average speed B
– Travel time B (driving time).
Note“Trip B” functions may be exclud-
ed (see “Trip B on”). “Range” and “In-
stantaneous consumption” cannot be re-
set.
Values displayed
Range
The distance that can be travelled with the
fuel in the tank is displayed, with the the-
ory that driving will continue in the same
conditions. The display will show the read-
ing “----” when the following events take
place:
– value lower than 50 km (or 30 mi)
– the car is parked with the engine run-
ning for a long time.IMPORTANT The range depends on sev-
eral factors: driving style (see “Driving
style” in “Starting and driving”), type of
route (motorway, urban cycle, mountain
roads, etc…), conditions of use of the car
(load, tyre pressure, etc…). Trip planning
must take into account the above notes.
Distance travelled
This value shows the distance covered
from the start of the new mission.
Average consumption
This value shows the approximate aver-
age consumption from the start of the
new mission.
Instant consumption
This indicates the fuel consumption. The val-
ue is constantly updated. The message
“----” will appear on the display if the car is
parked with the engine running.
001-022 ABARTH 500 GB 29-04-2009 9:40 Pagina 21
Page 23 of 170
 22
SAFETY
DEVICES
CORRECT USE
OF THE
CAR
WARNING
LIGHTS AND
MESSAGES
IN AN
EMERGENCY
CAR
MAINTENANCE
TECHNICAL
SPECIFICATIONS
INDEX
YOUR CAR
Average speed
This value shows the car average speed as
a")
22
SAFETY
DEVICES
CORRECT USE
OF THE
CAR
WARNING
LIGHTS AND
MESSAGES
IN AN
EMERGENCY
CAR
MAINTENANCE
TECHNICAL
SPECIFICATIONS
INDEX
YOUR CAR
Average speed
This value shows the car average speed as
a function of the overall time elapsed since
the start of the new mission.
Travel time
This value shows the time elapsed since
the start of the new mission.
TRIP button fig. 15
Button TRIP, set on the right steering
column stalk, shall be used (with ignition
key on MAR) to display and to reset the
previously described values to start a new
mission:
– short push to display the different val-
ues;
– long push to reset and then start a new
mission.New mission
Reset can be:
– “manual” resetting by the user, by press-
ing the relevant button;
– “automatic” resetting, when the “Trip dis-
tance” reaches 9999.9 km or when the
“Travel time” reaches 99.59 (99 hours and
59 minutes);
– after disconnecting/reconnecting the
battery.
IMPORTANT The reset operation in the
presence of the screens concerning the
“Trip A” makes it possible to reset only
the information associated with this func-
tion.
IMPORTANT The reset operation in the
presence of the screens concerning the
“Trip B” makes it possible to reset only
the information associated with this func-
tion.Start of trip procedure
With ignition key on MAR, press and hold
button TRIPpressed for over 2 seconds
to reset.
Exit Trip
The TRIPfunction is over when all the
values have been displayed or holding the
button MENU
ESCpressed for longer
than 1 second.fig. 15F0S015Ab
001-022 ABARTH 500 GB 29-04-2009 9:40 Pagina 22
Page 24 of 170
 23
SAFETY
DEVICES
CORRECT USE
OF THE
CAR
WARNING
LIGHTS AND
MESSAGES
IN AN
EMERGENCY
CAR
MAINTENANCE
TECHNICAL
SPECIFICATIONS
INDEX
YOUR CAR
Seat height adjustment
fig. 18
Operating lever Cit is po")
23
SAFETY
DEVICES
CORRECT USE
OF THE
CAR
WARNING
LIGHTS AND
MESSAGES
IN AN
EMERGENCY
CAR
MAINTENANCE
TECHNICAL
SPECIFICATIONS
INDEX
YOUR CAR
Seat height adjustment
fig. 18
Operating lever Cit is possible to lift or
lower the rear area of the cushion to
achieve the most comfortable driving po-
sition.Backrest tilting fig. 19
To tilt the backrest, operate the lever D
(movement a) and push the backrest for-
ward until it locks (movement b); release
the lever Dand, pushing the backrest,
slide the seat forward (movement c).
SEATS
FRONT SEATS
fig. 16F0S0013m
fig. 17F0S0014m
Fore/aft adjustment fig. 16
Lift lever Aand push the seat forwards and
backwards: your arms should rest on the
steering wheel rim while you are driving.
All adjustments must be
made with the car station-
ary.
WARNING
After releasing the lever, al-
ways check that the seat is
locked on the guides by trying to
move it backwards and forth. If it is
not locked, the seat may move unex-
pectedly and make you lose control
of the car.
WARNING
fig. 18F0S0015m
fig. 19
2
34
6
5
1
DD
F0S0154m
Back rest angle adjustment fig. 17
Turn knob B.
023-045 ABARTH 500 GB 29-04-2009 9:41 Pagina 23
 1
1 2
2 3
3 4
4 5
5 6
6 7
7 8
8 9
9 10
10 11
11 12
12 13
13 14
14 15
15 16
16 17
17 18
18 19
19 20
20 21
21 22
22 23
23 24
24 25
25 26
26 27
27 28
28 29
29 30
30 31
31 32
32 33
33 34
34 35
35 36
36 37
37 38
38 39
39 40
40 41
41 42
42 43
43 44
44 45
45 46
46 47
47 48
48 49
49 50
50 51
51 52
52 53
53 54
54 55
55 56
56 57
57 58
58 59
59 60
60 61
61 62
62 63
63 64
64 65
65 66
66 67
67 68
68 69
69 70
70 71
71 72
72 73
73 74
74 75
75 76
76 77
77 78
78 79
79 80
80 81
81 82
82 83
83 84
84 85
85 86
86 87
87 88
88 89
89 90
90 91
91 92
92 93
93 94
94 95
95 96
96 97
97 98
98 99
99 100
100 101
101 102
102 103
103 104
104 105
105 106
106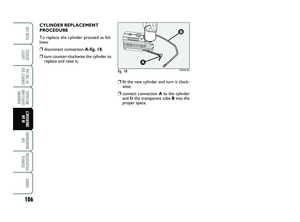 107
107 108
108 109
109 110
110 111
111 112
112 113
113 114
114 115
115 116
116 117
117 118
118 119
119 120
120 121
121 122
122 123
123 124
124 125
125 126
126 127
127 128
128 129
129 130
130 131
131 132
132 133
133 134
134 135
135 136
136 137
137 138
138 139
139 140
140 141
141 142
142 143
143 144
144 145
145 146
146 147
147 148
148 149
149 150
150 151
151 152
152 153
153 154
154 155
155 156
156 157
157 158
158 159
159 160
160 161
161 162
162 163
163 164
164 165
165 166
166 167
167 168
168 169
169