Page 103 of 148

8-20
1
2
3
4
5
6
78
9
10
11
do not use oils labeled “ENERGY CONSERV-
ING II” or higher.
�
Make sure that no foreign material enters the
crankcase.
15. Start the engine, and then let it idle for several
minutes while checking it for oil leakage. If oil
is leaking, immediately turn the engine off and
check for the cause.
16. Turn the engine off, and then check the oil lev-
el and correct it if necessary.
17. Install the engine guard by installing the bolts,
and then tighten them to the specified torque.
CAUTION:
ECB00370
Be sure to apply LOCTITE® to the engine
guard bolts before installing them.
EBU23470
Coolant
The coolant level should be checked before each
ride. In addition, the coolant must be changed atthe intervals specified in the periodic maintenance
and lubrication chart.
EBU23490
To check the coolant level
1. Place the ATV on a level surface.
NOTE:
The coolant level must be checked on a cold en-
gine since the level varies with engine tempera-
ture.
2. Check the coolant level in the coolant reser-
voir.
NOTE:
The coolant should be between the minimum and
maximum level marks. Tightening torque:
Engine guard bolt:
7 Nm (0.7 m·kgf, 5.1 ft·lbf)
Page 109 of 148
8-26
1
2
3
4
5
6
78
9
10
11
7. Wash the sponge material gently but thor-
oughly in solvent.
WARNING
EWB01940
Always use parts cleaning solvent to clean the
sponge material. Never use low-flash-point
solvents or gasoline to clean the sponge mate-
rial because the engine could catch fire or ex-
plode.
8. Squeeze the excess solvent out of the sponge
material and let it dry.CAUTION:
ECB00440
Do not twist the sponge material when squeez-
ing it.
9. Check the sponge material and replace it if
damaged.
10. Apply a quality foam air filter oil to the sponge
material.
NOTE:
The sponge material should be wet but not drip-
ping.
11. Pull the sponge material over the air filter ele-
ment frame.
1. Sponge material
2. Air filter element frame
1 2
Page 118 of 148

8-35
1
2
3
4
5
6
78
9
10
11
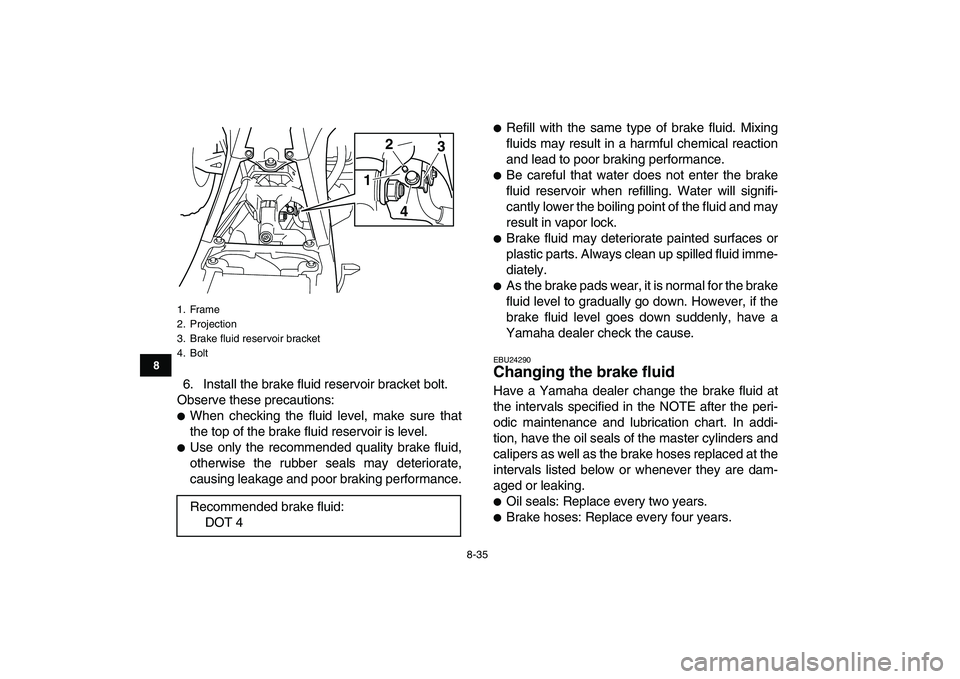
6. Install the brake fluid reservoir bracket bolt.
Observe these precautions:
�
When checking the fluid level, make sure that
the top of the brake fluid reservoir is level.
�
Use only the recommended quality brake fluid,
otherwise the rubber seals may deteriorate,
causing leakage and poor braking performance.
�
Refill with the same type of brake fluid. Mixing
fluids may result in a harmful chemical reaction
and lead to poor braking performance.
�
Be careful that water does not enter the brake
fluid reservoir when refilling. Water will signifi-
cantly lower the boiling point of the fluid and may
result in vapor lock.
�
Brake fluid may deteriorate painted surfaces or
plastic parts. Always clean up spilled fluid imme-
diately.
�
As the brake pads wear, it is normal for the brake
fluid level to gradually go down. However, if the
brake fluid level goes down suddenly, have a
Yamaha dealer check the cause.
EBU24290
Changing the brake fluid
Have a Yamaha dealer change the brake fluid at
the intervals specified in the NOTE after the peri-
odic maintenance and lubrication chart. In addi-
tion, have the oil seals of the master cylinders and
calipers as well as the brake hoses replaced at the
intervals listed below or whenever they are dam-
aged or leaking.
�
Oil seals: Replace every two years.
�
Brake hoses: Replace every four years.
1. Frame
2. Projection
3. Brake fluid reservoir bracket
4. Bolt
Recommended brake fluid:
DOT 4
2
3
1
4
Page 124 of 148

8-41
1
2
3
4
5
6
78
9
10
11
EBU24880
Lubricating the drive chain
The drive chain must be cleaned and lubricated at
the intervals specified in the periodic maintenance
and lubrication chart, otherwise it will quickly wear
out, especially when riding in dusty or wet areas.
Service the drive chain as follows.
CAUTION:
ECB00560
The drive chain must be lubricated after wash-
ing the ATV or riding in the rain.
1. Clean the drive chain with kerosene and asmall soft brush.
CAUTION:
ECB00570
To prevent damaging the O-rings, do not clean
the drive chain with steam cleaners, high-pres-
sure washers or inappropriate solvents.
2. Wipe the drive chain dry.
3. Thoroughly lubricate the drive chain with a
special O-ring chain lubricant.
CAUTION:
ECB00580
Do not use engine oil or any other lubricants
for the drive chain, as they may contain sub-
stances that could damage the O-rings.
EBU24900
Checking and lubricating the cables
The operation and the condition of all control ca-
bles should be checked before each ride, and the
cables and cable ends should be lubricated if nec-
essary. If a cable is damaged or does not move
smoothly, have a Yamaha dealer check or replace
it.
1. O-rings
1
Recommended lubricant:
Engine oil
Page 128 of 148

8-45
1
2
3
4
5
6
78
9
10
11
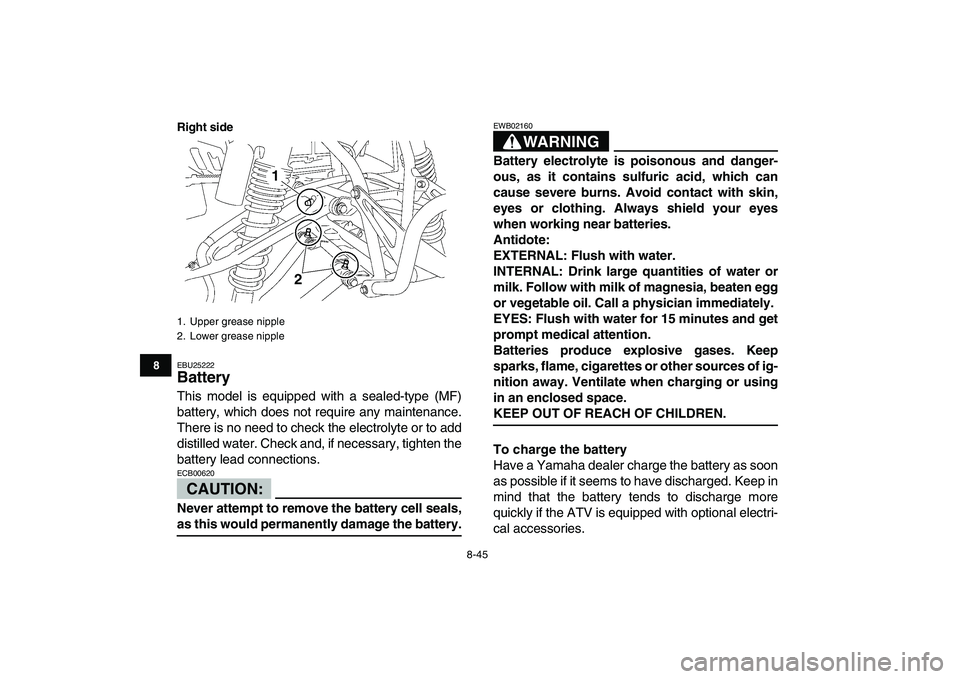
Right side
EBU25222
Battery
This model is equipped with a sealed-type (MF)
battery, which does not require any maintenance.
There is no need to check the electrolyte or to add
distilled water. Check and, if necessary, tighten the
battery lead connections.
CAUTION:
ECB00620
Never attempt to remove the battery cell seals,
as this would permanently damage the battery.WARNING
EWB02160
Battery electrolyte is poisonous and danger-
ous, as it contains sulfuric acid, which can
cause severe burns. Avoid contact with skin,
eyes or clothing. Always shield your eyes
when working near batteries.
Antidote:
EXTERNAL: Flush with water.
INTERNAL: Drink large quantities of water or
milk. Follow with milk of magnesia, beaten egg
or vegetable oil. Call a physician immediately.
EYES: Flush with water for 15 minutes and get
prompt medical attention.
Batteries produce explosive gases. Keep
sparks, flame, cigarettes or other sources of ig-
nition away. Ventilate when charging or using
in an enclosed space.
KEEP OUT OF REACH OF CHILDREN.
To charge the battery
Have a Yamaha dealer charge the battery as soon
as possible if it seems to have discharged. Keep in
mind that the battery tends to discharge more
quickly if the ATV is equipped with optional electri-
cal accessories.
1. Upper grease nipple
2. Lower grease nipple
2 1
Page 132 of 148
8-49
1
2
3
4
5
6
78
9
10
11
CAUTION:
ECB00650
Do not touch the glass part of the headlight
bulb to keep it free from oil, otherwise the
transparency of the glass, the luminosity of the
bulb, and the bulb life will be adversely affect-
ed. Thoroughly clean off any dirt and finger-
prints on the headlight bulb using a cloth
moistened with alcohol or thinner.
6. Install the headlight bulb holder by pushing it
in and turning it clockwise.
7. Install the headlight bulb holder cover.8. Connect the headlight coupler.
9. Install the headlight unit by installing the bolts.
10. Adjust the headlight beam if necessary.
EBU25550
Adjusting a headlight beam
CAUTION:
ECB00690
It is advisable to have a Yamaha dealer make
this adjustment.
To raise a headlight beam, turn the adjusting
screw in direction (a).
To lower a headlight beam, turn the adjusting
screw in direction (b).
1. Do not touch the glass part of the bulb.
1
1. Headlight beam adjusting screw
1(a)
(b)
Page 138 of 148

9-2
1
2
3
4
5
6
7
89
10
11
increasing the chance of an accident. Test the
brakes after washing. Apply the brakes several
times at slow speeds to let friction dry out the
linings.
EBU25932
Storage
Short-term
Always store your ATV in a cool, dry place and, if
necessary, protect it against dust with a porous
cover.
CAUTION:
ECB00720
�
Storing the ATV in a poorly ventilated room
or covering it with a tarp while it is still wet,
will allow water and humidity to seep in and
cause rust.
�
To prevent corrosion, avoid damp cellars,
stables (because of the presence of ammo-
nia) and areas where strong chemicals are
stored.
Long-term
Before storing your ATV for several months:
1. Follow all the instructions in the “Cleaning”section of this chapter.
2. Turn the fuel cock lever to “OFF”.
3. Drain the carburetor float chamber by loosen-
ing the drain bolt; this will prevent fuel deposits
from building up. Pour the drained fuel into the
fuel tank.
4. Fill up the fuel tank and add fuel stabilizer (if
available) to prevent the fuel from deteriorat-
ing.
5. Perform the following steps to protect the cyl-
inder, piston rings, etc. from corrosion.
a. Remove the spark plug cap and spark
plug.
b. Pour a teaspoonful of engine oil into the
spark plug bore.
c. Install the spark plug cap onto the spark
plug, and then place the spark plug on the
cylinder head so that the electrodes are
grounded. (This will limit sparking during
the next step.)
d. Turn the engine over several times with
the starter. (This will coat the cylinder wall Specified amount:
7.5 ml of stabilizer to each liter of fuel (or 1 oz
of stabilizer to each gallon of fuel)
Page 139 of 148
9-3
1
2
3
4
5
6
7
89
10
11
with oil.)
e. Remove the spark plug cap from the spark
plug, and then install the spark plug and
the spark plug cap.
6. Lubricate all control cables and the pivoting
points of all levers and pedals.
7. Check and, if necessary, correct the tire air
pressure, and then block up the ATV so that
all of its wheels are off the ground. Alternative-
ly, turn the wheels a little every month in order
to prevent the tires from becoming degraded
in one spot.
8. Cover the muffler outlet with a plastic bag to
prevent moisture from entering it.
9. Remove the battery and fully charge it. Store
it in a cool, dry place and charge it once a
month. Do not store the battery in an exces-
sively cold or warm place [less than 0 °C (30
°F) or more than 30 °C (90 °F)]. For more in-
formation on storing the battery, see page
8-45.
NOTE:
Make any necessary repairs before storing the
ATV.