Page 69 of 116

8-1
1
2
3
4
5
6
78
9
10
11
EBU28781
PERIODIC MAINTENANCE AND MINOR REPAIR
EBU21670
Safety is an obligation of the owner. Periodic in-
spection, adjustment and lubrication will keep your
ATV in the safest and best operating condition
possible. The most important points of inspection,
adjustment, and lubrication are explained on the
following pages.
The intervals given in the periodic maintenance
and lubrication chart should be considered as a
general guide under normal riding conditions.
However, DEPENDING ON THE WEATHER,
TERRAIN, GEOGRAPHICAL LOCATION, AND
INDIVIDUAL USE, THE MAINTENANCE INTER-
VALS MAY NEED TO BE SHORTENED.
WARNING
EWB01840
Never service an engine while it is running.
Moving parts can catch clothing or parts of the
body, causing injury. Electrical components
can cause shocks or start fires. Turn off the en-
gine when performing maintenance unless
otherwise specified. Have a Yamaha dealer
perform the service if you are not familiar with
maintenance work.
EBU27110
Owner’s manual and tool kit
Be sure to put this owner’s manual in the plastic
bag and to always carry it as well as the owner’s
tool kit and the low-pressure tire gauge in their re-
spective compartments under the seat.
1. Owner’s manual
2. Low-pressure tire gauge
3. Owner’s tool kit
3
1
2
Page 73 of 116

8-5
1
2
3
4
5
6
78
9
10
11
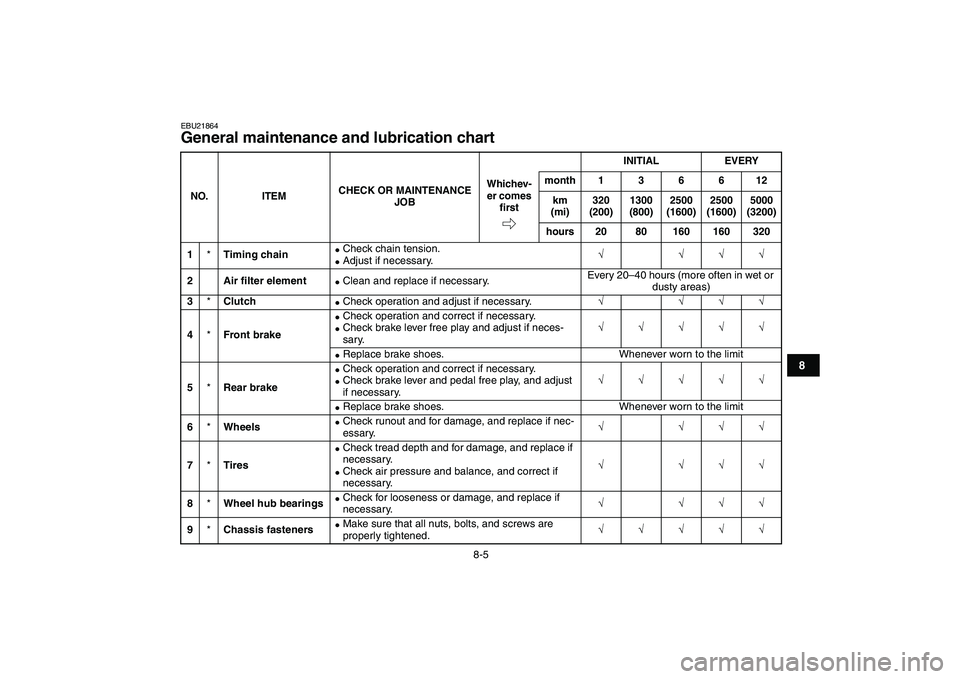
EBU21864
General maintenance and lubrication chart
NO. ITEMCHECK OR MAINTENANCE
JOBINITIAL EVERY
Whichev-
er comes
firstmonth136612
km
(mi)320
(200)1300
(800)2500
(1600)2500
(1600)5000
(3200)
hours 20 80 160 160 3201
*
Timing chain
�
Check chain tension.
�
Adjust if necessary.
√ √√√
2 Air filter element
�
Clean and replace if necessary.Every 20–40 hours (more often in wet or
dusty areas)
3
*
Clutch
�
Check operation and adjust if necessary.
√ √√√
4
*
Front brake
�
Check operation and correct if necessary.
�
Check brake lever free play and adjust if neces-
sary.
√√√√√
�
Replace brake shoes. Whenever worn to the limit
5
*
Rear brake
�
Check operation and correct if necessary.
�
Check brake lever and pedal free play, and adjust
if necessary.
√√√√√
�
Replace brake shoes. Whenever worn to the limit
6
*
Wheels
�
Check runout and for damage, and replace if nec-
essary.
√ √√√
7
*
Tires
�
Check tread depth and for damage, and replace if
necessary.
�
Check air pressure and balance, and correct if
necessary.
√ √√√
8
*
Wheel hub bearings
�
Check for looseness or damage, and replace if
necessary.
√ √√√
9
*
Chassis fasteners
�
Make sure that all nuts, bolts, and screws are
properly tightened.
√√√√√
Page 106 of 116
9-3
1
2
3
4
5
6
7
89
10
11
the spark plug cap.
6. Lubricate all control cables and the pivoting
points of all levers and pedals.
7. Check and, if necessary, correct the tire air
pressure, and then block up the ATV so that
all of its wheels are off the ground. Alternative-
ly, turn the wheels a little every month in order
to prevent the tires from becoming degraded
in one spot.
8. Cover the muffler outlet with a plastic bag to
prevent moisture from entering it.
9. Remove the battery and fully charge it. Store
it in a cool, dry place and charge it once a
month. Do not store the battery in an exces-
sively cold or warm place [less than 0 °C (30
°F) or more than 30 °C (90 °F)]. For more in-
formation on storing the battery, see page
8-29.
NOTE:
Make any necessary repairs before storing the
ATV.
Page 109 of 116
10-3
1
2
3
4
5
6
7
8
910
11
Front tire:
Type:
Tubeless
Size:
AT18 x 7-7
Manufacturer/model:
DUNLOP/KT586
Rear tire:
Type:
Tubeless
Size:
AT18 x 8-7
Manufacturer/model:
DUNLOP/KT587
Loading:
Maximum loading limit:
95.0 kg (209 lb)
(Total weight of rider, cargo, accessories, and tongue)
Tire air pressure (measured on cold tires):
Recommended:
Front:
20 kPa (2.9 psi) (0.20 kgf/cm
2
)
Rear:
20 kPa (2.9 psi) (0.20 kgf/cm
2
)
Minimum:
Front:
17 kPa (2.5 psi) (0.17 kgf/cm
2
)
Rear:
17 kPa (2.5 psi) (0.17 kgf/cm
2
)Maximum:
Front:
23 kPa (3.3 psi) (0.23 kgf/cm
2
)
Rear:
23 kPa (3.3 psi) (0.23 kgf/cm
2
)
Front wheel:
Wheel type:
Panel wheel
Rim size:
7 x 5.5AT
Rear wheel:
Wheel type:
Panel wheel
Rim size:
7 x 6.5AT
Front brake:
Type:
Drum brake
Operation:
Right hand operation
Rear brake:
Type:
Drum brake
Operation:
Left hand and right foot operation
Front suspension:
Type:
Leading arm
Spring/shock absorber type:
Coil spring/oil damper
Page 114 of 116

N
Neutral indicator light ..................................................... 4-1
O
Owner’s manual and tool kit ........................................... 8-1
P
Parking ........................................................................... 6-5
Parking brake ................................................................. 4-6
Parking on a slope ......................................................... 6-6
Part locations ................................................................. 3-1
Pre-operation check list.................................................. 5-1
R
Riding your ATV ............................................................. 7-1
S
Safety information .......................................................... 1-1
Seat .............................................................................. 4-10
Shifting ........................................................................... 6-3
Shift pedal ...................................................................... 4-6
Spark arrester, cleaning ............................................... 8-17
Spark plug, checking ...................................................... 8-8
Specifications ............................................................... 10-1
Speed limiter and air intake restrictor plate .................... 4-3
Start switch..................................................................... 4-2
Steering shaft, lubricating............................................. 8-28
Storage........................................................................... 9-2
T
Throttle cable free play, checking ................................ 8-19
Throttle lever .......................................................... 4-2
,
5-4
Timing chain ................................................................. 8-20
Tire pressure, measuring ............................................... 5-5
Tires ............................................................................... 5-4
Tire wear limit ................................................................. 5-6Troubleshooting ........................................................... 8-33
Troubleshooting chart .................................................. 8-35
V
Valve clearance............................................................ 8-20
Vehicle identification number ....................................... 11-1
W
Wheel hub bearings, checking ..................................... 8-28
Wheel, installing ........................................................... 8-33
Wheel, removing .......................................................... 8-32