Page 25 of 78
INSTRUMENT AND CONTROL FUNCTIONS
3-10
3
EAU13932
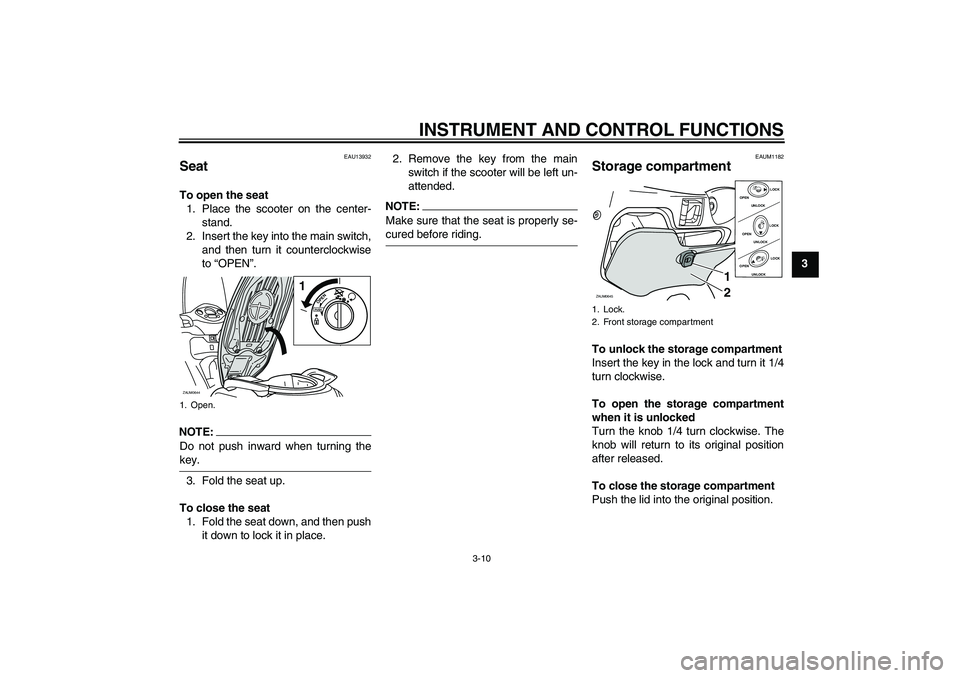
Seat To open the seat
1. Place the scooter on the center-
stand.
2. Insert the key into the main switch,
and then turn it counterclockwise
to “OPEN”.NOTE:Do not push inward when turning thekey.
3. Fold the seat up.
To close the seat
1. Fold the seat down, and then push
it down to lock it in place.2. Remove the key from the main
switch if the scooter will be left un-
attended.
NOTE:Make sure that the seat is properly se-cured before riding.
EAUM1182
Storage compartment To unlock the storage compartment
Insert the key in the lock and turn it 1/4
turn clockwise.
To open the storage compartment
when it is unlocked
Turn the knob 1/4 turn clockwise. The
knob will return to its original position
after released.
To close the storage compartment
Push the lid into the original position.
1. Open.ZAUM0644
PUSHOPEN
1
1. Lock.
2. Front storage compartmentZAUM0645
OPEN
OPEN
UNLOCKLOCK
OPEN
OPEN
UNLOCKLOCK
OPEN
OPEN
UNLOCKLOCK
1
2
Page 26 of 78
INSTRUMENT AND CONTROL FUNCTIONS
3-11
3To lock the storage compartment
Insert the key in the lock and turn it 1/4
turn counterclockwise, and then re-
move the key.
WARNING
EWA10961
�
Do not exceed the load limit of 1
kg (2.2 lb) for the storage com-
partment.
�
Do not exceed the maximum
load of 185 kg (408 lb) for the ve-hicle.
EAUM1191
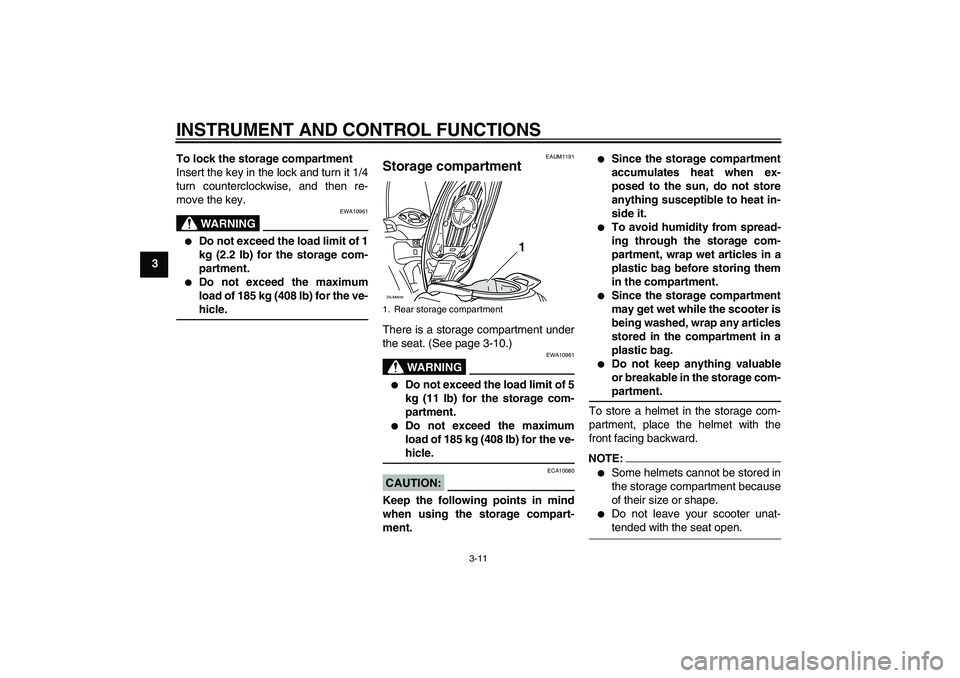
Storage compartment There is a storage compartment under
the seat. (See page 3-10.)
WARNING
EWA10961
�
Do not exceed the load limit of 5
kg (11 lb) for the storage com-
partment.
�
Do not exceed the maximum
load of 185 kg (408 lb) for the ve-hicle.
CAUTION:
ECA10080
Keep the following points in mind
when using the storage compart-
ment.
�
Since the storage compartment
accumulates heat when ex-
posed to the sun, do not store
anything susceptible to heat in-
side it.
�
To avoid humidity from spread-
ing through the storage com-
partment, wrap wet articles in a
plastic bag before storing them
in the compartment.
�
Since the storage compartment
may get wet while the scooter is
being washed, wrap any articles
stored in the compartment in a
plastic bag.
�
Do not keep anything valuable
or breakable in the storage com-partment.
To store a helmet in the storage com-
partment, place the helmet with the
front facing backward.
NOTE:�
Some helmets cannot be stored in
the storage compartment because
of their size or shape.
�
Do not leave your scooter unat-tended with the seat open.
1. Rear storage compartmentZAUM0646
1
Page 29 of 78
INSTRUMENT AND CONTROL FUNCTIONS
3-14
3
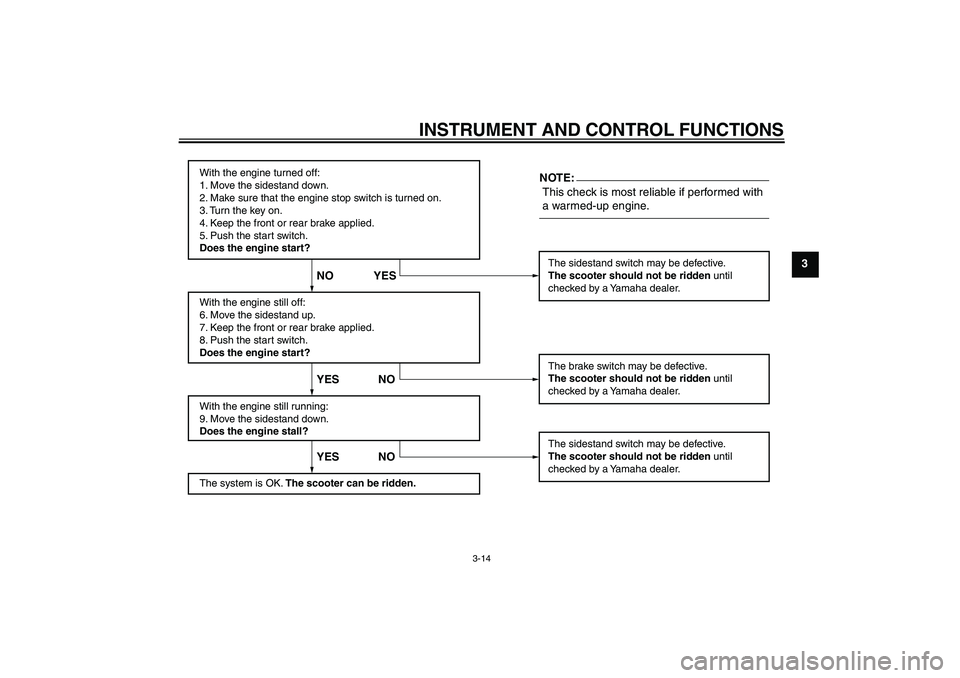
With the engine turned off:
1. Move the sidestand down.
2. Make sure that the engine stop switch is turned on.
3. Turn the key on.
4. Keep the front or rear brake applied.
5. Push the start switch.
Does the engine start?
With the engine still off:
6. Move the sidestand up.
7. Keep the front or rear brake applied.
8. Push the start switch.
Does the engine start?
With the engine still running:
9. Move the sidestand down.
Does the engine stall?
The system is OK. The scooter can be ridden.
This check is most reliable if performed with
a warmed-up engine.The sidestand switch may be defective.
The scooter should not be ridden until
checked by a Yamaha dealer.
The brake switch may be defective.
The scooter should not be ridden until
checked by a Yamaha dealer.
The sidestand switch may be defective.
The scooter should not be ridden until
checked by a Yamaha dealer.
YES NO YES NO NO YESNOTE:
Page 33 of 78

OPERATION AND IMPORTANT RIDING POINTS
5-1
5
EAU15980
WARNING
EWA10870
�
Become thoroughly familiar
with all operating controls and
their functions before riding.
Consult a Yamaha dealer re-
garding any control or function
that you do not thoroughly un-
derstand.
�
Never start the engine or oper-
ate it in a closed area for any
length of time. Exhaust fumes
are poisonous, and inhaling
them can cause loss of con-
sciousness and death within a
short time. Always make sure
that there is adequate ventila-
tion.
�
For safety, always start the en-gine with the centerstand down.
EAUM2170
Starting the engine CAUTION:
ECA10250
See page 5-3 for engine break-in in-
structions prior to operating the ve-hicle for the first time.
In order for the ignition circuit cut-off
system to enable starting, the side-
stand must be up.
WARNING
EWA10290
�
Before starting the engine,
check the function of the igni-
tion circuit cut-off system ac-
cording to the procedure
described on page 3-13.
�
Never ride with the sidestanddown.
1. Turn the key to “”.
2. Close the throttle completely.
3. Start the engine by pushing the
start switch while applying the front
or rear brake.
NOTE:If the engine does not start, release the
start switch, wait a few seconds, and
then try again. Each starting attempt
should be as short as possible to pre-
serve the battery. Do not crank the en-
gine more than 10 seconds on any one
attempt. If the engine does not start, trywith the throttle open 1/8 turn.CAUTION:
ECA11040
For maximum engine life, never ac-
celerate hard when the engine iscold!1. Rear brake lever
2. Start switch
3. Front brake lever
123
ZAUM0649
Page 36 of 78
OPERATION AND IMPORTANT RIDING POINTS
5-4
5
CAUTION:
ECA11660
After 1000 km (600 mi) of operation,
be sure to replace the engine oil andfinal transmission oil.
1600 km (1000 mi) and beyond
The vehicle can now be operated nor-
mally.CAUTION:
ECA10270
If any engine trouble should occur
during the engine break-in period,
immediately have a Yamaha dealercheck the vehicle.
EAU17212
Parking When parking, stop the engine, and
then remove the key from the main
switch.
WARNING
EWA10310
�
Since the engine and exhaust
system can become very hot,
park in a place where pedestri-
ans or children are not likely to
touch them.
�
Do not park on a slope or on soft
ground, otherwise the vehiclemay overturn.
CAUTION:
ECA10380
Never park in an area where there
are fire hazards such as grass orother flammable materials.
Page 58 of 78

PERIODIC MAINTENANCE AND MINOR REPAIR
6-22
6
�
KEEP THIS AND ALL BATTER-
IES OUT OF THE REACH OFCHILDREN.
To store the battery
1. If the model will not be used for
more than one month, remove the
battery, fully charge it, and then
place it in a cool, dry place.
2. If the battery will be stored for more
than two months, check it at least
once a month and fully charge it if
necessary.
3. Fully charge the battery before in-
stallation.
4. After installation, make sure that
the battery leads are properly con-
nected to the battery terminals.
CAUTION:
ECA10630
�
Always keep the battery
charged. Storing a discharged
battery can cause permanent
battery damage.
�
To charge a sealed-type (MF)
battery, a special (constant-volt-
age) battery charger is required.
Using a conventional batterycharger will damage the battery.
If you do not have access to a
sealed-type (MF) battery charg-
er, have a Yamaha dealer
charge your battery.
EAU23525
Replacing the fuses The main fuse and the fuse box, which
contains the fuses for the individual cir-
cuits, are located behind panel A. (See
page 6-5.)
If a fuse is blown, replace it as follows.
1. Turn the key to “” and turn off
the electrical circuit in question.
2. Remove the blown fuse, and then
install a new fuse of the specified
amperage.1. Main fuse
2. Spare fuse
12
ZAUM0672
Page 59 of 78

PERIODIC MAINTENANCE AND MINOR REPAIR
6-23
6
CAUTION:
ECA10640
Do not use a fuse of a higher amper-
age rating than recommended to
avoid causing extensive damage to
the electrical system and possibly afire.
3. Turn the key to “” and turn on
the electrical circuit in question to
check if the device operates.
4. If the fuse immediately blows
again, have a Yamaha dealer
check the electrical system.
EAUM2180
Replacing a headlight bulb This model is equipped with quartz bulb
headlights. If a headlight bulb burns
out, replace it as follows.
To replace a high beam headlight
bulb
1. Remove cowling A. (See page
6-5.)
2. Remove the headlight bulb cover.
3. Unhook the headlight bulb holder
by turning it counterclockwise, and
then remove the defective bulb.
1. Fuse box
2. Radiator fan fuse
3. ECU fuse
4. Backup fuse
5. Signaling system fuse
6. Headlight fuse
7. Ignition fuse
8. Spare fuse
9. Spare fuse
10.Spare fuse
1
ZAUM0673
23
8910456 7
Specified fuses:
Main fuse:
30.0 A
ECU fuse:
5.0 A
Signaling system fuse:
15.0 A
Ignition fuse:
10.0 A
Headlight fuse:
15.0 A
Backup fuse:
5.0 A
Radiator fan fuse:
5.0 A
1. Headlight bulb cover
1
ZAUM0674
Page 73 of 78
CONSUMER INFORMATION
9-1
9
EAU26351
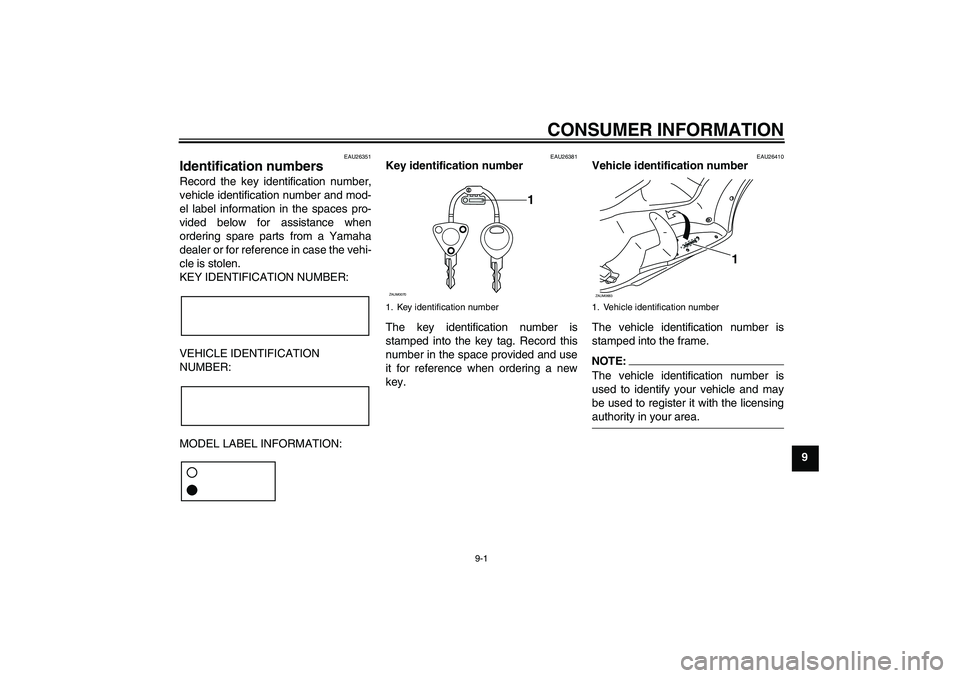
Identification numbers Record the key identification number,
vehicle identification number and mod-
el label information in the spaces pro-
vided below for assistance when
ordering spare parts from a Yamaha
dealer or for reference in case the vehi-
cle is stolen.
KEY IDENTIFICATION NUMBER:
VEHICLE IDENTIFICATION
NUMBER:
MODEL LABEL INFORMATION:
EAU26381
Key identification number
The key identification number is
stamped into the key tag. Record this
number in the space provided and use
it for reference when ordering a new
key.
EAU26410
Vehicle identification number
The vehicle identification number is
stamped into the frame.NOTE:
The vehicle identification number is
used to identify your vehicle and may
be used to register it with the licensingauthority in your area.
1. Key identification number
1
ZAUM0070
1. Vehicle identification numberZAUM0683
1