2008 VOLVO S80 lock
[x] Cancel search: lockPage 111 of 275
NOTE
Press the brake pedal hard and maintain pressure on the pedal - do not pump the brakes.
WARNING
If the fluid level is below the MIN mark in the reservoir or if a brake system message is shown in the information
display: DO NOT DRIVE. Have the vehicle towed to a trained and qualified Volvo service technician and have the
brake system inspected.
Power brakes function only when the engine is running
The power brakes utilize vacuum pressure which is only created when the engine is running. Never let the vehicle roll
to a stop with the engine switched off.
If the power brakes are not working, the brake pedal must be pressed approximately five times harder than usual to
make up for the lack of power assistance. This can happen for example when towing your vehicle or if the engine is
switched off when the vehicle is rolling. The brake pedal feels harder than usual.
Water on brake discs and brake pads affects braking
Driving in rain and slush or passing through an automatic car wash can cause water to collect on the brake discs and
pads. This will cause a delay in braking effect when the pedal is depressed. To avoid such a delay when the brakes are
needed, depress the pedal occasionally when driving through rain, slush, etc. This will remove the water from the
brakes. Check that brake application feels normal. This should also be done after washing or starting in very damp or
cold weather.
Severe strain on the brake system
The brakes will be subject to severe strain when driving in mountains or hilly areas, or when towing a trailer. Vehicle
speed is usually slower, which means that the cooling of the brakes is less efficient than when driving on level roads.
To reduce the strain on the brakes, shift into a lower gear and let the engine help with the braking. Do not forget that if
you are towing a trailer, the brakes will be subjected to a greater than normal load.
Anti-lock braking system
The Anti-lock Braking System (ABS) helps to improve vehicle control (stopping and steering) during severe braking
conditions by limiting brake lockup. When the system "senses" impending lockup, braking pressure is automatically
modulated in order to help prevent lockup that could lead to a skid.
The system performs a self -diagnostic test when the engine is started and when the vehicle first reaches a speed of
approximately 12 mph (20 km/h). The brake pedal will pulsate several times and a sound may be audible from the
ABS control module. This is normal.
114 03 Your driving environment
Brakes
Cleaning the brake discs
Coatings of dirt and water on the brake discs may result in delayed brake function. This delay is minimized by
cleaning the brake linings.
Cleaning the brake pads is advisable in wet weather, prior to long-term parking, and after the vehicle has been washed.
Do this by braking gently for a short period while the vehicle is moving.
Emergency Brake Assistance
Page 119 of 275
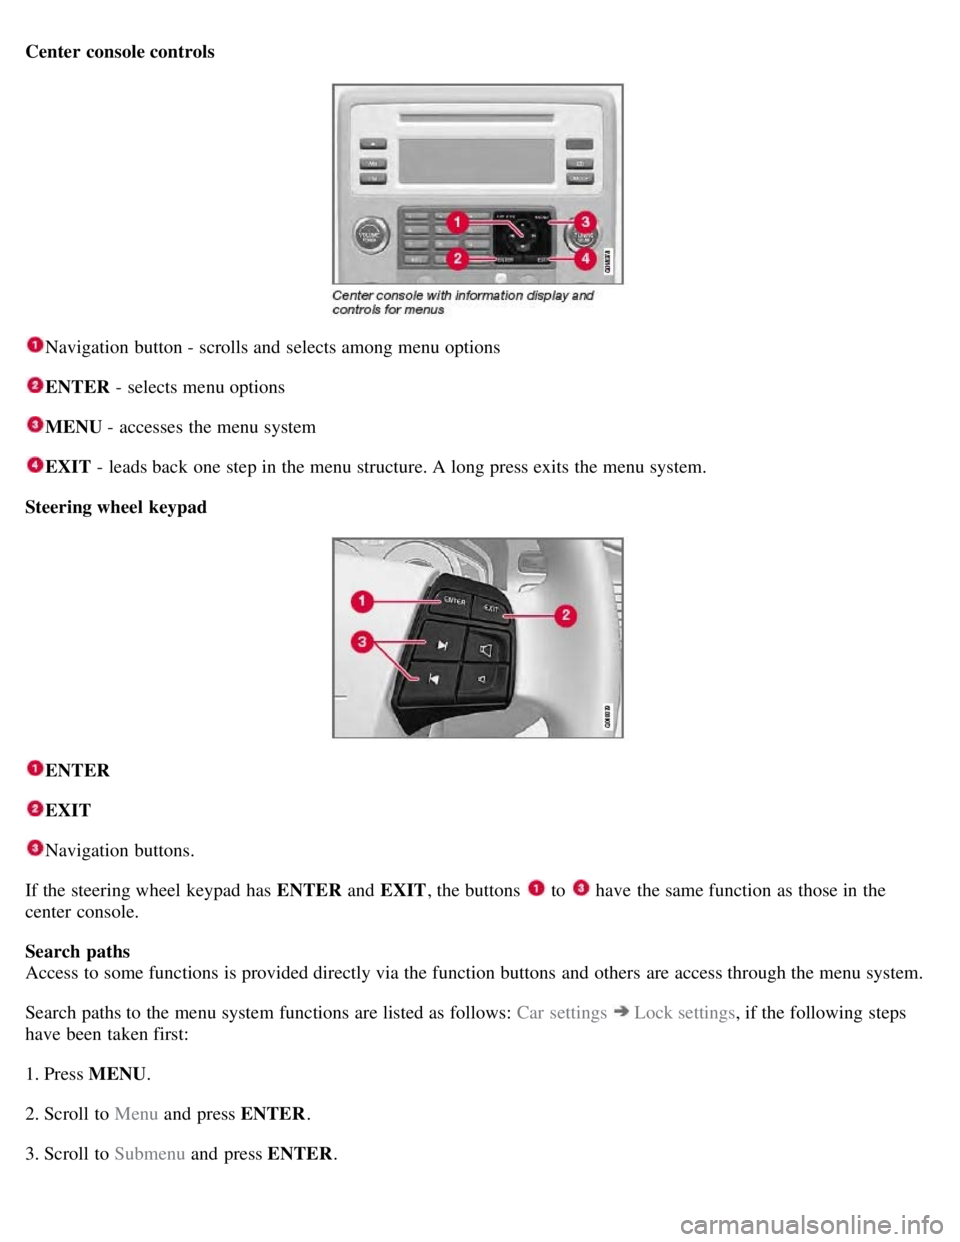
Center console controls
Navigation button - scrolls and selects among menu options
ENTER - selects menu options
MENU - accesses the menu system
EXIT - leads back one step in the menu structure. A long press exits the menu system.
Steering wheel keypad
ENTER
EXIT
Navigation buttons.
If the steering wheel keypad has ENTER and EXIT, the buttons
to have the same function as those in the
center console.
Search paths
Access to some functions is provided directly via the function buttons and others are access through the menu system.
Search paths to the menu system functions are listed as follows: Car settings
Lock settings , if the following steps
have been taken first:
1. Press MENU .
2. Scroll to Menu and press ENTER .
3. Scroll to Submenu and press ENTER.
Page 120 of 275
The navigation button can be used instead of ENTER and EXIT when navigating the menu hierarchy. The right arrow
is equal to ENTER and the left arrow to EXIT .
The menu options are numbered and can also be selected directly with the numerical keypad (1-9 only).
123 04 Comfort and driving pleasure
Menus and messages
Menu overview
Car key memory
Seat & mirror positions
Car settings
Fold mirr. when locking (option on certain markets only)
Collision warning settings (option)
Light settings
Lock settings
Parking camera settings (accessory)
Steering force level (option)
Information
Climate settings
Automatic blower adjust
Recirculation timer
Auto. rear defroster
Reset climate settings
Main menu AM
Audio settings
1
Sound stage
Equalizer, front
Equalizer, rear
Auto. volume control
Resets all audio settings.
Page 124 of 275

The temperature sensor for the passenger compartment is located below the climate control panel.
The outside temperature sensor is located on the door mirror.
The humidity sensor (option) is located in the interior rearview mirror.
NOTE
Do not cover or block the sensors with clothing or other objects.
Side windows and moonroof
To ensure that the air conditioning works optimally, the side windows, and the optional moonroof should be closed.
Fog on the inside of the windows
The defroster function should be used to remove fog or mist from the inside of the windows. Keeping the windows
clean with a commercially available window washing spray will also help prevent fogging or misting.
Vents in the parcel shelf
NOTE
The air vents at the rear of the parcel shelf should never be obstructed.
Temporary shut-off of the air conditioning
The air conditioning is momentarily disengaged during full-throttle acceleration or when driving uphill with a trailer.
This may result in a temporary increase in cabin temperature.
Ice and snow
Always keep the air intake grille at the base of the windshield free of snow.
Climate system maintenance
Special tools and equipment are required to maintain and carry out repairs on the climate system. Work of this type
should only be done by a trained and qualified Volvo service technician.
Refrigerant
Volvo cares about the environment. The air conditioning system in your car contains a CFC-free refrigerant - R134a.
This substance
127 04 Comfort and driving pleasure
Climate system
will not deplete the ozone layer. The air conditioning system contains 1.8 lbs (800 g) of R134a. The systems uses PAG
oil.
Passenger compartment filter
Replace the cabin air filter with a new one at the recommended intervals. Please refer to your Warranty and Service
Records Information booklet, or consult a trained and qualified Volvo service technician for these intervals. The filter
should be replaced more often when driving under dirty and dusty conditions. The filter cannot be cleaned and
therefore should always be replaced with a new one.
NOTE
Page 128 of 275
Turn the control clockwise to increase or counterclockwise to decrease the blower speed. Pressing the AUTO switch
will automatically regulate blower speed and override manual adjustment.
NOTE
If the blower is turned off completely, the air conditioning is disengaged, which may result in fogging on the
windows.
Heated front seats (option)
Press the button once for the highest heat level - three indicator lights come on.
Press the button twice for a lower heat level - two indicator lights come on.
Press the button three times for the lowest heat level - one indicator light comes on.
Press the button four times to switch off the heat - no indicator lights come on.
130 04 Comfort and driving pleasure
Climate system
Heated rear seats (option)
Heat control for the outboard seating positions takes place in the same way as for the front seat.
Air distribution
The figure consists of three buttons. When the buttons are pressed, an indicator light in front of the respective part of
the figure illuminates and shows which air distribution is selected, see page 133
.
Auto
Page 134 of 275
136 04 Comfort and driving pleasure
Audio system
FM Radio text on/off
CD/CD changer
Random
Disc text on/off
Track information on/off
Audio settings
Sound stage (front/driver/rear)
Auto. volume control (off/low/medium/high)
Sirius satellite radio (option)
Add song to memory
Direct channel entry...
Song seek on/off
Sirius settings
Song memory (show memory list)
Car settings
Fold mirror when locking
137 04 Comfort and driving pleasure
Audio system
Audio functions
Page 135 of 275
Internal audio sources: AM, FM and CD
External audio source. For connection, see page 134
Push button and knob controls for making sound settings
Navigation button
Volume and on/off
Audio volume and automatic volume control
The audio system compensates for disrupting noises in the passenger compartment by increasing the volume according
to the speed of the vehicle. The level of sound compensation can be set at low, medium or high. Select the level under
Audio settings
Auto volume control .
External audio source audio volume
External devices such as an MP3 player can be connected to the AUX input, see page 134
. The volume of the external
sound source AUX may be different from the volume of the internal sound sources such as the CD player or the radio.
If the external sound source's volume is too high, the quality of the sound may be impaired. To help prevent this,
adjust the input volume of the external audio source:
1. Set the audio system in AUX mode using MODE and use
to navigate to Volume, AUX input.
2. Turn the control
or press / the navigation button.
Sound settings
Press the control
repeatedly to toggles among the sound settings. Adjustments are made by turning the control .
Bass - Bass level.
Treble - Treble level.
Fader - Balance between the front and rear speakers.
Balance - Balance between the right and left speakers.
Subwoofer (option on certain markets only) - Level for the bass speaker. The subwoofer can be switched off by
turning control
counterclockwise to MIN .
Surround (option) - Surround settings.
Under Surround , 3 channel stereo or Dolby Surround Pro logic II can be activated by selecting 3-ch or Dpl2
respectively. This enables the following options:
Center level1 - Level for the center speaker.
Surround level1 - Level for surround sound.
Equalizer
Sound levels for different frequencies can be adjusted separately using the equalizer
2.
1. Go to Audio settings and select Equalizer Front or Equalizer Rear.
The sound level for the frequency is adjusted with
/ on the navigation button. Press / to select another
frequency.
2. Use ENTER to save or EXIT to close.
Sound stage
1
The sound experience can be optimized for the driver's seat, both front seats or the rear
Page 141 of 275
2. Press the MODE button repeatedly until Sirius 1 or 2 is displayed.
Activating Sirius radio
1. Tune to a satellite channel that has no audio, which means that the channel is unsubscribed and the text "Call 888-
539- SIRIUS TO SUBSCRIBE" is displayed (see also "Selecting a channel".
2. Call Sirius at 1-888-539-SIRIUS (7474).
3. When asked for the Sirius ID number press AUTO to display this number. It is also possible to retrieve the Sirius ID
from the menu.
4. UPDATING SUBSCRIPTION will be displayed while the subscription is being updated, after which the display
will return to the normal view.
SIRIUS ID
The SIRIUS ID is required when contacting the Sirius Call Center. It is used to activate your account and when making
any account transactions. The SIRIUS ID is sometimes referred to as the Electronic Serial Number (ESN).
Selecting a channel category
1. Select Sirius radio mode as described above.
2. Press ENTER .
3. Use the up/down arrow keys to scroll through the list of categories.
4. Press ENTER or the right arrow key to select a category.
The first channel in the selected category will then be played.
NOTE
The category ALL is default, which enables you to scroll through the entire list of available satellite channels.
The channel categories are automatically updated several times a year. This takes approximately two minutes and
will interrupt normal broadcasting. A message will be displayed while updating is in progress. Information on
channel or feature updates is available at www.sirius.com.
Selecting a channel
There are three ways of tuning in a channel:
Using the left and right arrow keys
By turning the tuning control
Through direct channel entry.
NOTE
The numbers of skipped or locked channels will not be displayed.
If a channel is locked, the access code must be entered before the channel can be selected. See "Unlocking a
channel" on page 145
.
144 04 Comfort and driving pleasure
Audio system