2008 VOLVO S80 key
[x] Cancel search: keyPage 138 of 275
Fast-forward/change CD tracks and sound files
Short presses
/ on the navigation button are used to scroll between CD tracks/sound files. Long presses are used
to search within CD tracks/sound files. TUNING (or the steering wheel keypad) can also be used for this purpose.
Scan CD
This function plays the first ten seconds of each CD track/sound file. Press SCAN to activate. Interrupt with EXIT or
SCAN to continue playing the current CD track/sound file.
Random
This function plays the tracks in random order (shuffle). The random CD tracks/sound files can be scrolled through in
the normal way.
NOTE
It is only possible to scroll between random CD tracks on the current disc.
Different messages are displayed depending on which random function has been selected:
RANDOM means that the tracks from only one music CD are played
RND ALL means that all tracks on all music CDs in the optional CD changer are played.
RANDOM FOLDER means that the sound files in a directory on the current CD are played.
CD player
If a normal music CD is being played, activate/deactivate under Random .
If a disc with sound files is being played, activate/deactivate under Random
Folder .
140 04 Comfort and driving pleasure
Audio system
CD changer
If a normal music CD is being played under Random
Single disc or Random All discs. The option All discs only
applies to the music CDs in the changer.
If a CD with sound files is being played, activate/deactivate instead under Random
Folder . If you select another CD
the function is deactivated.
Disc text
If title information is stored on a music CD it can be shown on the display
1. Activate/deactivate in CD mode under CD
settings
Disc text.
1Only applies to the CD changer.
141 04 Comfort and driving pleasure
Audio system
Radio functions
Page 141 of 275
2. Press the MODE button repeatedly until Sirius 1 or 2 is displayed.
Activating Sirius radio
1. Tune to a satellite channel that has no audio, which means that the channel is unsubscribed and the text "Call 888-
539- SIRIUS TO SUBSCRIBE" is displayed (see also "Selecting a channel".
2. Call Sirius at 1-888-539-SIRIUS (7474).
3. When asked for the Sirius ID number press AUTO to display this number. It is also possible to retrieve the Sirius ID
from the menu.
4. UPDATING SUBSCRIPTION will be displayed while the subscription is being updated, after which the display
will return to the normal view.
SIRIUS ID
The SIRIUS ID is required when contacting the Sirius Call Center. It is used to activate your account and when making
any account transactions. The SIRIUS ID is sometimes referred to as the Electronic Serial Number (ESN).
Selecting a channel category
1. Select Sirius radio mode as described above.
2. Press ENTER .
3. Use the up/down arrow keys to scroll through the list of categories.
4. Press ENTER or the right arrow key to select a category.
The first channel in the selected category will then be played.
NOTE
The category ALL is default, which enables you to scroll through the entire list of available satellite channels.
The channel categories are automatically updated several times a year. This takes approximately two minutes and
will interrupt normal broadcasting. A message will be displayed while updating is in progress. Information on
channel or feature updates is available at www.sirius.com.
Selecting a channel
There are three ways of tuning in a channel:
Using the left and right arrow keys
By turning the tuning control
Through direct channel entry.
NOTE
The numbers of skipped or locked channels will not be displayed.
If a channel is locked, the access code must be entered before the channel can be selected. See "Unlocking a
channel" on page 145
.
144 04 Comfort and driving pleasure
Audio system
Page 142 of 275
Direct channel entry
The Sirius satellite channels are in numerical order throughout all of the categories. To access a channel directly:
1. Press MENU and scroll to Direct channel entry .
2. Use the numerical keypad to enter the channel's number.
3. Press ENTER . The radio will tune to this channel, even if it belongs to a category other than the currently selected
one.
Scanning
SCAN automatically searches through the list of satellite channels. The search will only be carried out in the selected
category. See page 141
for more detailed information.
Storing a channel
A total of 20 satellite channels can be stored; 10 channels each for Sirius 1 and 2. See page 141
for detailed
information on storing channels.
A long press on one of the number keys stores the currently tuned channel on that key.
A short press on a number key while the radio is in Sirius 1or 2 mode will tune to the preset satellite channel stored
on that button, regardless of the currently selected channel category.
Song Seek and Song Memory
The Song Seek and Song Memory functions provide both audio and visual notification when Sirius is broadcasting
your favorite songs. Song Seek enables you to store the name of the song for future advance notification when that
song is being played. The Song Memory feature makes it possible to view all of the current songs that are stored in
memory.
Song memory
Up to ten songs can be saved in the system's memory.
1. Press MENU .
2. Scroll to Add song to song mem. and follow the instructions shown in the display.
If a new song is selected when the memory is full, you will be prompted to press ENTER to delete the last song on
the list.
NOTE
The remaining songs in the list will move down one position, and the newly added song will be placed at the top of
the list.
Song seek
When a satellite radio channel plays one of the songs stored in the song memory, the listener will be alerted by a text
message and an audible signal.
Press ENTER to listen to the song or EXIT to cancel.
To activate/deactivate the song seek function:
1. Press MENU
2. Scroll to Song seek
Page 143 of 275
3. Press ENTER to activate or deactivate the function.
NOTE
When the song has ended, the radio will remain tuned to the channel on which the song was played.
Radio text
The text that is displayed about the song that is currently playing can be changed. Use the AUTO button or the menu
to display the Artist, Title, Composer, or switch radio text off.
145 04 Comfort and driving pleasure
Audio system
Advanced settings
This menu function enables you to make settings on certain Sirius satellite radio functions. To access this menu:
1. Press MENU .
2. Scroll to the Sirius menu.
3. Select Advanced Sirius settings .
WARNING
Settings should be made when the vehicle is at a standstill.
The following settings can be made in the Sirius menu:
The list of saved songs can be displayed
Channel skip settings can be made
Channel lock settings can be made
The channel access code can be displayed or changed
Your Sirius ID can be displayed
Skip options
This function is used to remove a channel from the list of available channels.
Skipping a channel
1. Select CHANNEL SKIP LIST and press ENTER.
2. Select a category in the list and press ENTER .
3. Skip channels in the list presented by pressing ENTER or right arrow key.
Unskip all channels
This permanently removes all channels from the skip list and makes them available for selection.
Temp. unskip all ch.
This function will temporarily unskip all channels and make them available for selection. The channels remain on the
skip list and will again be skipped the next time the ignition is switched on.
Page 180 of 275
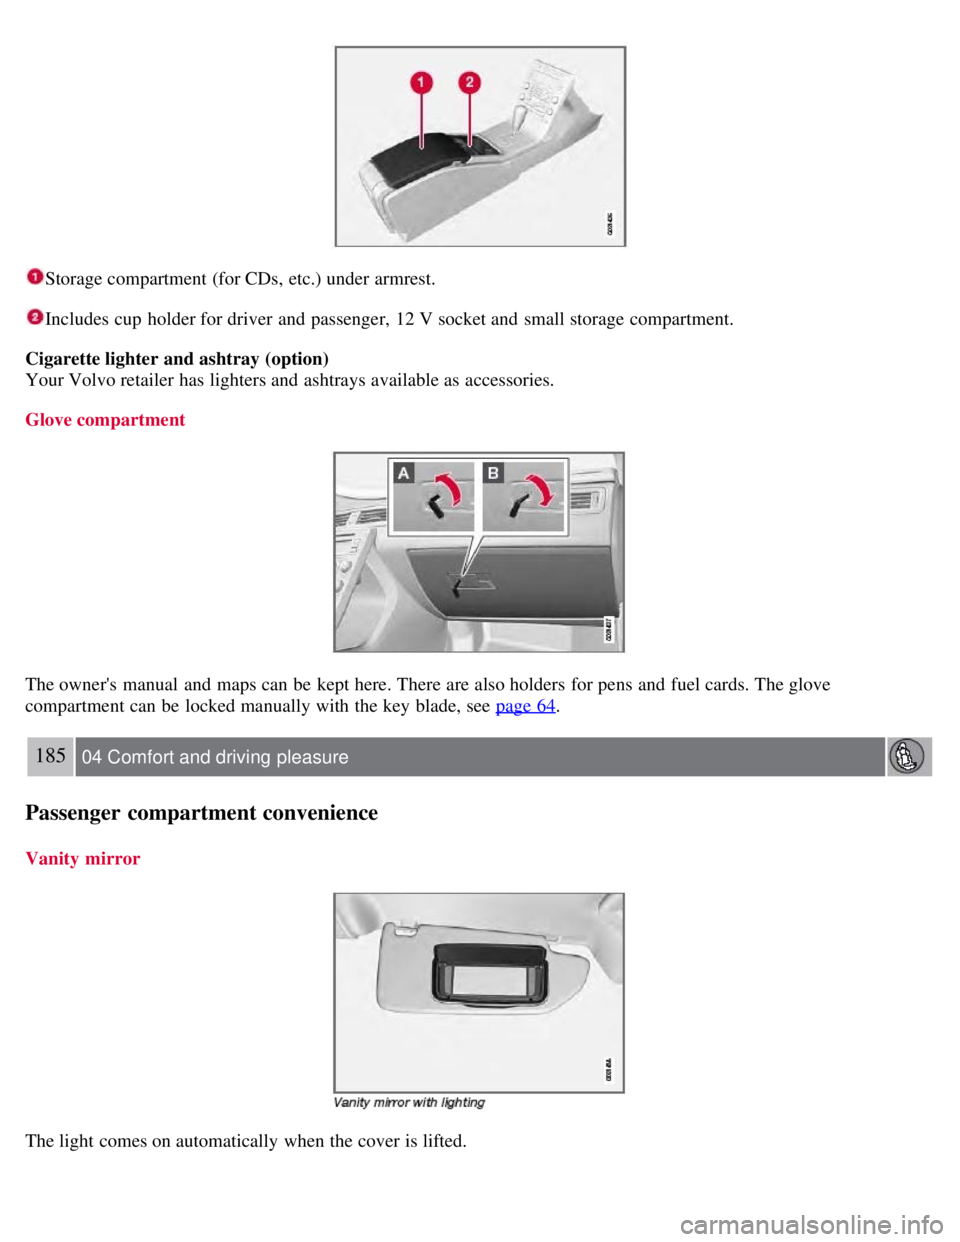
Storage compartment (for CDs, etc.) under armrest.
Includes cup holder for driver and passenger, 12 V socket and small storage compartment.
Cigarette lighter and ashtray (option)
Your Volvo retailer has lighters and ashtrays available as accessories.
Glove compartment
The owner's manual and maps can be kept here. There are also holders for pens and fuel cards. The glove
compartment can be locked manually with the key blade, see page 64
.
185 04 Comfort and driving pleasure
Passenger compartment convenience
Vanity mirror
The light comes on automatically when the cover is lifted.
Page 196 of 275
204 05 During your trip
Emergency towing
Towing eyelet
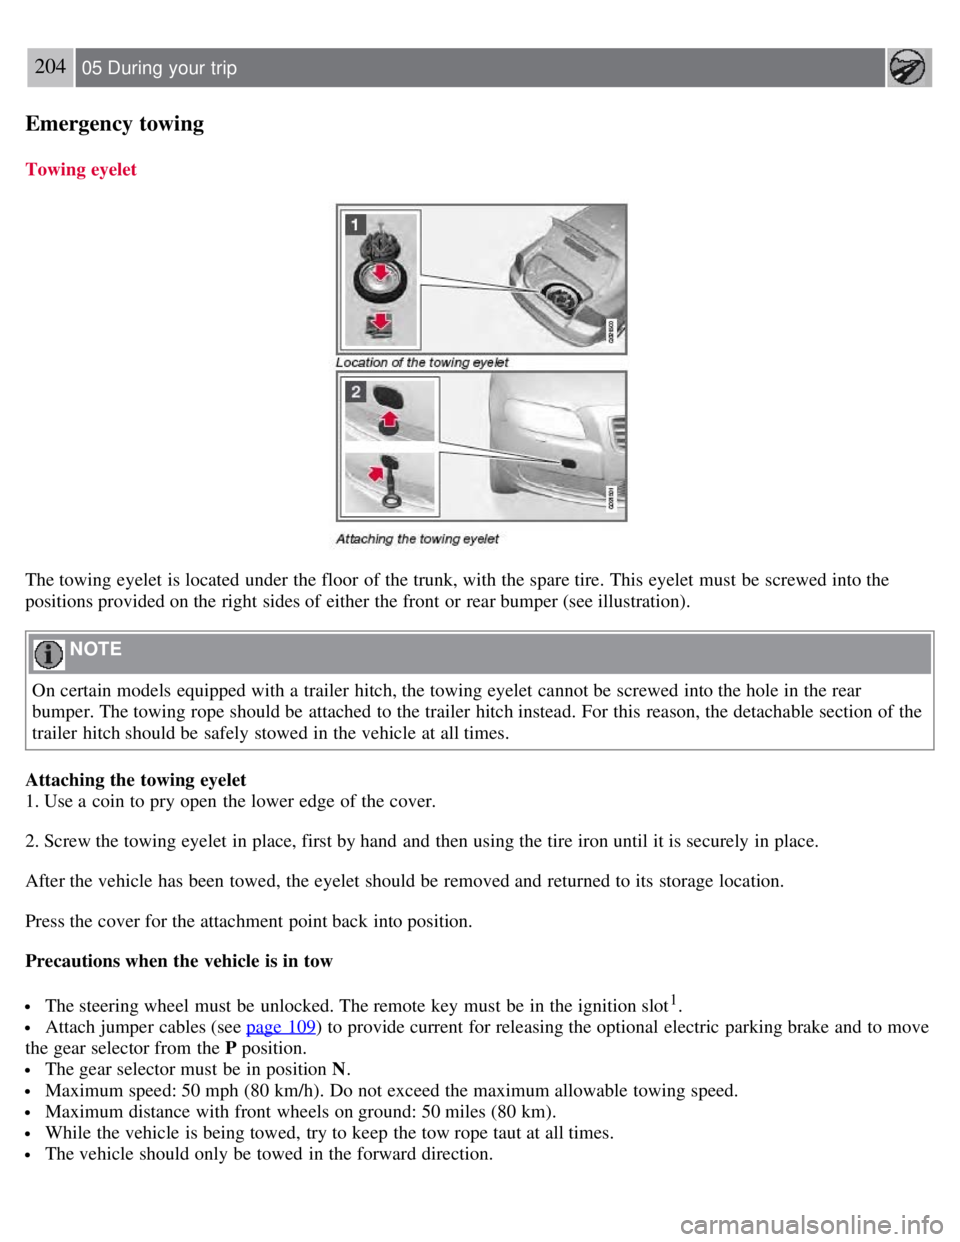
The towing eyelet is located under the floor of the trunk, with the spare tire. This eyelet must be screwed into the
positions provided on the right sides of either the front or rear bumper (see illustration).
NOTE
On certain models equipped with a trailer hitch, the towing eyelet cannot be screwed into the hole in the rear
bumper. The towing rope should be attached to the trailer hitch instead. For this reason, the detachable section of the
trailer hitch should be safely stowed in the vehicle at all times.
Attaching the towing eyelet
1. Use a coin to pry open the lower edge of the cover.
2. Screw the towing eyelet in place, first by hand and then using the tire iron until it is securely in place.
After the vehicle has been towed, the eyelet should be removed and returned to its storage location.
Press the cover for the attachment point back into position.
Precautions when the vehicle is in tow
The steering wheel must be unlocked. The remote key must be in the ignition slot1.
Attach jumper cables (see page 109) to provide current for releasing the optional electric parking brake and to move
the gear selector from the P position.
The gear selector must be in position N .
Maximum speed: 50 mph (80 km/h). Do not exceed the maximum allowable towing speed.
Maximum distance with front wheels on ground: 50 miles (80 km).
While the vehicle is being towed, try to keep the tow rope taut at all times.
The vehicle should only be towed in the forward direction.
Page 197 of 275

1On vehicles with the optional keyless drive, the remote key must be in the passenger compartment.
CAUTION
Please check with state and local authorities before attempting this type of towing, as vehicles being towed are
subject to regulations regarding maximum towing speed, length and type of towing device, lighting, etc.
If the vehicle's battery is dead, do not attempt to start the vehicle by pushing or pulling it as this will damage the
three-way catalytic converter(s). The engine must be jump started using an auxiliary battery (see page 109
).
If the vehicle is being towed on a flat bed truck, the towing eyelets must not be used to secure the vehicle on the
flat bed. Consult the tow truck operator.
205 05 During your trip
Emergency towing
Towing vehicles with front wheel drive/All Wheel Drive
Volvo recommends the use of flat bed equipment.
If wheel lift equipment must be used, please use extreme caution to help avoid damage to the vehicle. In this case,
the vehicle should be towed with the rear wheels on the ground if at all possible .
If it is absolutely necessary to tow the vehicle with the front wheels on the ground, please refer to the towing
information on the page 204
.
CAUTION
Sling-type equipment applied at the front will damage radiator and air conditioning lines.
It is equally important not to use sling -type equipment at the rear or apply lifting equipment inside the rear
wheels; serious damage to the rear axle may result.
If the vehicle is being towed on a flat bed truck, the towing eyelets must not be used to secure the vehicle on the
flat bed. Consult the tow truck operator.
Contents | Top of Page
Page 206 of 275
marks. For capacities and recommended fluid grade, see page 275.
WARNING
If a problem should occur in the power steering system or if the vehicle has no electrical current and must be towed,
it is still possible to steer the vehicle. However, keep in mind that greater effort will be required to turn the steering
wheel.
CAUTION
Keep the area around the power steering fluid reservoir clean when checking.
216 06 Maintenance and specifications
Replacing bulbs
Introduction
All bulb specifications are listed on page 223
. The following bulbs should only be replaced by a trained and qualified
Volvo service technician:
Dome lighting
Reading lights
Glove compartment lighting
Turn signals in the door mirror
Approach lighting in the door mirror
Brake lights
Active Bi -Xenon® and LED bulbs
WARNING
Active Bi -Xenon® headlights (option) - due to the high voltage used by these headlights, these bulbs should only
be replaced by a trained and qualified Volvo service technician.
Turn off the lights and remove the remote key from the ignition before changing any bulbs.
Headlight housing