2008 VOLVO S80 brake
[x] Cancel search: brakePage 196 of 275
204 05 During your trip
Emergency towing
Towing eyelet
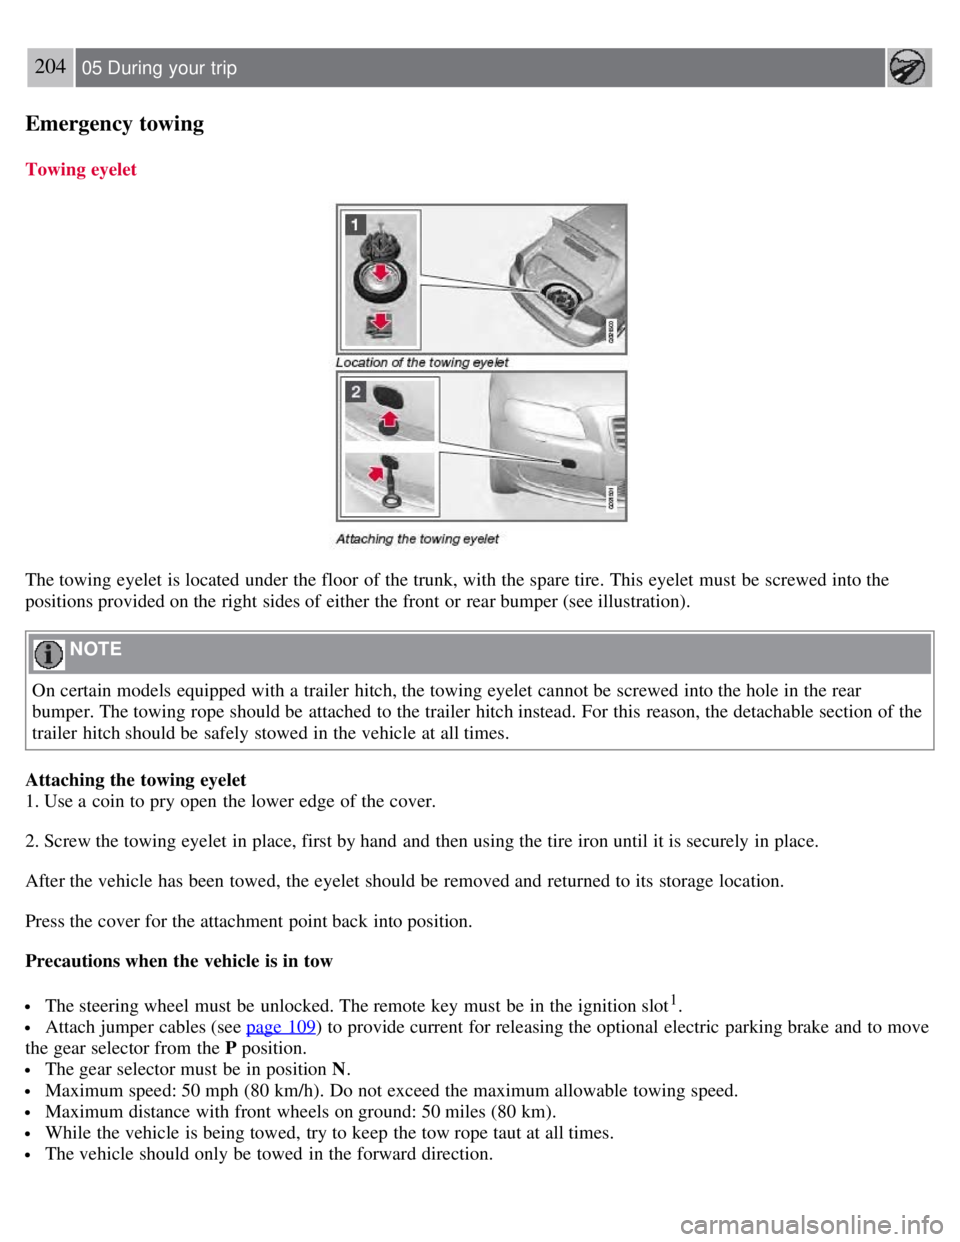
The towing eyelet is located under the floor of the trunk, with the spare tire. This eyelet must be screwed into the
positions provided on the right sides of either the front or rear bumper (see illustration).
NOTE
On certain models equipped with a trailer hitch, the towing eyelet cannot be screwed into the hole in the rear
bumper. The towing rope should be attached to the trailer hitch instead. For this reason, the detachable section of the
trailer hitch should be safely stowed in the vehicle at all times.
Attaching the towing eyelet
1. Use a coin to pry open the lower edge of the cover.
2. Screw the towing eyelet in place, first by hand and then using the tire iron until it is securely in place.
After the vehicle has been towed, the eyelet should be removed and returned to its storage location.
Press the cover for the attachment point back into position.
Precautions when the vehicle is in tow
The steering wheel must be unlocked. The remote key must be in the ignition slot1.
Attach jumper cables (see page 109) to provide current for releasing the optional electric parking brake and to move
the gear selector from the P position.
The gear selector must be in position N .
Maximum speed: 50 mph (80 km/h). Do not exceed the maximum allowable towing speed.
Maximum distance with front wheels on ground: 50 miles (80 km).
While the vehicle is being towed, try to keep the tow rope taut at all times.
The vehicle should only be towed in the forward direction.
Page 202 of 275

The appearance of the engine compartment may vary depending on engine model.
Coolant expansion tank
Power steering fluid reservoir
Engine oil dipstick
Radiator
Filler cap for engine oil
Cover over brake fluid reservoir
Battery
Relay and fuse box
Washer fluid reservoir
Air cleaner
WARNING
The cooling fan may start or continue to operate (for up to 6 minutes) after the engine has been switched off.
WARNING
The ignition should always be completely switched off before performing any operations in the engine compartment.
The distributor ignition system operates at very high voltages. Special safety precautions must be followed to prevent
injury. Always turn the ignition off when:
Replacing distributor ignition components e.g. plugs, coil, etc.
Do not touch any part of the distributor ignition system while the engine is running. This may result in unintended
movements and body injury.
212 06 Maintenance and specifications
Engine oil
Checking the engine oil
The oil level should be checked every time the vehicle is refueled. This is especially important during the period up to
the first scheduled maintenance service.
See page 272 for oil specifications.
Refer to the Warranty and Service Records Information booklet for information on the oil change intervals.
Volvo recommends Castrol.
CAUTION
Not checking the oil level regularly can result in serious engine damage if the oil level becomes too low.
Oil that is lower than the specified quality can damage the engine.
Page 204 of 275
Do not allow oil to spill onto or come into contact with hot exhaust pipe surfaces.
NOTE
Synthetic oil is not used when the oil is changed at the normal maintenance intervals except at owner request and at
additional charge. Please consult your Volvo retailer.
214 06 Maintenance and specifications
Fluids
Coolant
Normally, the coolant does not need to be changed. If the system must be drained, consult a trained and qualified
Volvo service technician.
See page 275
for information on cooling system capacities.
CAUTION
Do not top off with water only. This reduces the rust-protective and antifreeze qualities of the coolant and has a
lower boiling point. It can also cause damage to the cooling system if it should freeze. Top off with Volvo Genuine
Coolant/Antifreeze only (a 50/50 mix of water and antifreeze).
The cooling system must always be kept filled to the correct level, and the level must be between the MIN and
MAX marks. If it is not kept filled, there can be high local temperatures in the engine which could result in damage.
Different types of antifreeze/coolant may not be mixed. Check coolant regularly.
WARNING
Never remove the radiator cap while the engine is warm. Wait until the vehicle cools.
If it is necessary to top off the coolant when the engine is warm, unscrew the expansion tank cap slowly so that
the overpressure dissipates.
215 06 Maintenance and specifications
Fluids
Brake fluid
Page 205 of 275
Checking the level
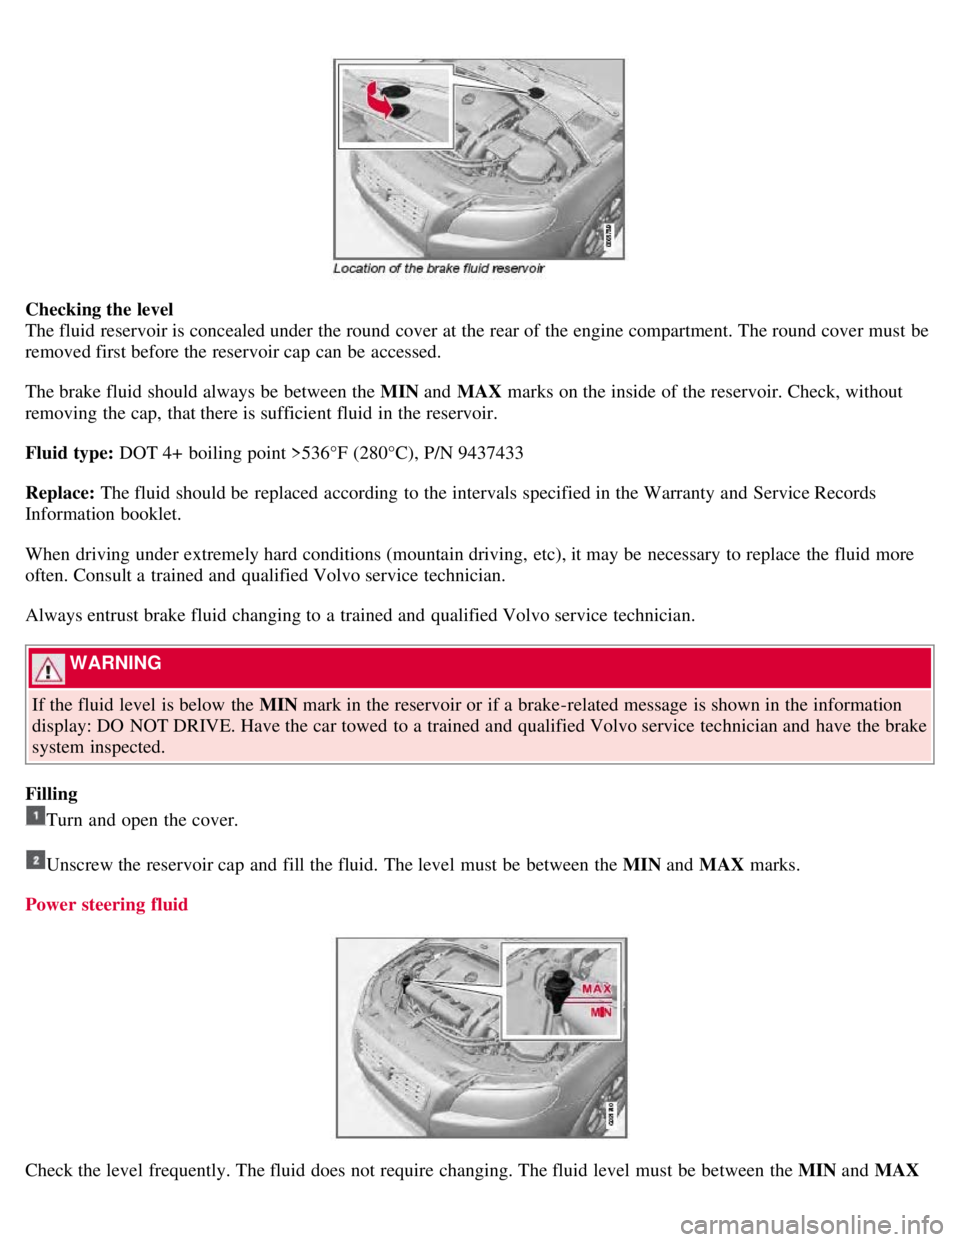
The fluid reservoir is concealed under the round cover at the rear of the engine compartment. The round cover must be
removed first before the reservoir cap can be accessed.
The brake fluid should always be between the MIN and MAX marks on the inside of the reservoir. Check, without
removing the cap, that there is sufficient fluid in the reservoir.
Fluid type: DOT 4+ boiling point >536°F (280°C), P/N 9437433
Replace: The fluid should be replaced according to the intervals specified in the Warranty and Service Records
Information booklet.
When driving under extremely hard conditions (mountain driving, etc), it may be necessary to replace the fluid more
often. Consult a trained and qualified Volvo service technician.
Always entrust brake fluid changing to a trained and qualified Volvo service technician.
WARNING
If the fluid level is below the MIN mark in the reservoir or if a brake-related message is shown in the information
display: DO NOT DRIVE. Have the car towed to a trained and qualified Volvo service technician and have the brake
system inspected.
Filling
Turn and open the cover.
Unscrew the reservoir cap and fill the fluid. The level must be between the MIN and MAX marks.
Power steering fluid
Check the level frequently. The fluid does not require changing. The fluid level must be between the MIN and MAX
Page 206 of 275
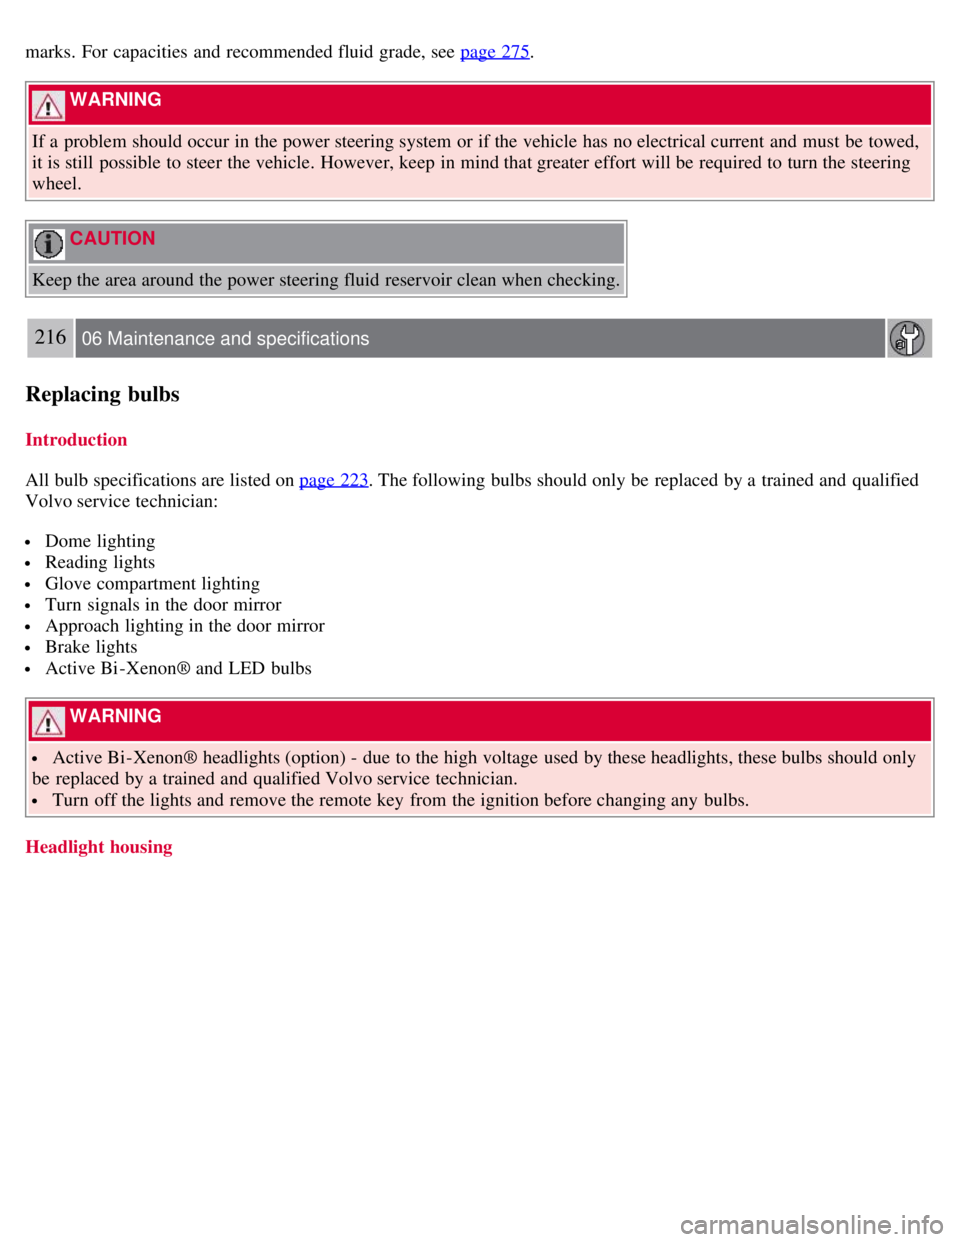
marks. For capacities and recommended fluid grade, see page 275.
WARNING
If a problem should occur in the power steering system or if the vehicle has no electrical current and must be towed,
it is still possible to steer the vehicle. However, keep in mind that greater effort will be required to turn the steering
wheel.
CAUTION
Keep the area around the power steering fluid reservoir clean when checking.
216 06 Maintenance and specifications
Replacing bulbs
Introduction
All bulb specifications are listed on page 223
. The following bulbs should only be replaced by a trained and qualified
Volvo service technician:
Dome lighting
Reading lights
Glove compartment lighting
Turn signals in the door mirror
Approach lighting in the door mirror
Brake lights
Active Bi -Xenon® and LED bulbs
WARNING
Active Bi -Xenon® headlights (option) - due to the high voltage used by these headlights, these bulbs should only
be replaced by a trained and qualified Volvo service technician.
Turn off the lights and remove the remote key from the ignition before changing any bulbs.
Headlight housing
Page 213 of 275
3. Remove the defective bulb by pressing it in slightly and turning it before pulling it out.
4. Plug in the connector.
5. Press the bulb holder until it clicks into place and reinstall the cover.
221 06 Maintenance and specifications
Replacing bulbs
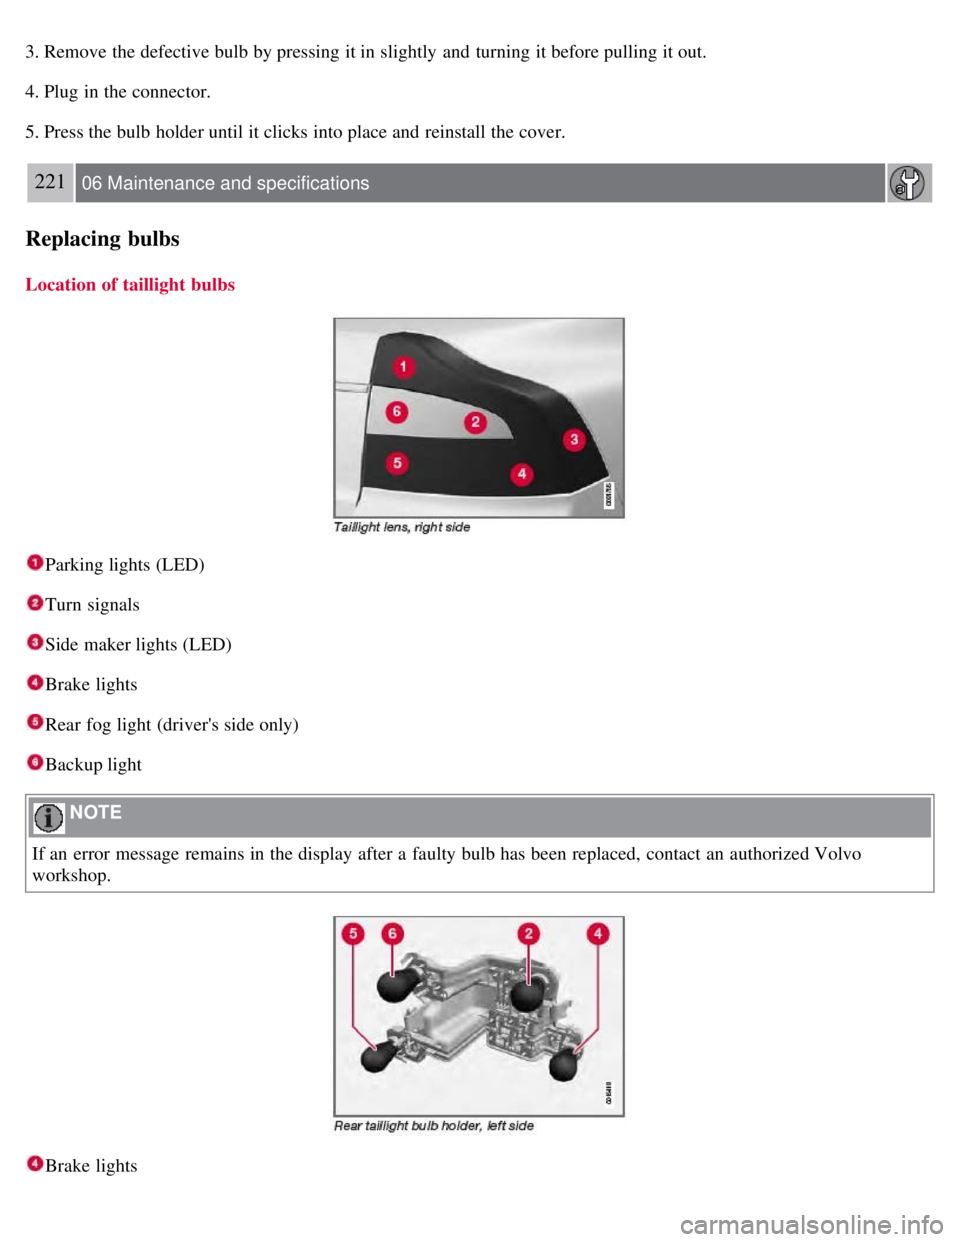
Location of taillight bulbs
Parking lights (LED)
Turn signals
Side maker lights (LED)
Brake lights
Rear fog light (driver's side only)
Backup light
NOTE
If an error message remains in the display after a faulty bulb has been replaced, contact an authorized Volvo
workshop.
Brake lights
Page 241 of 275
If accessory, aftermarket or "custom" tires and wheels are installed and are of a size different than the original tires
and wheels, chains in some cases CANNOT be used. Sufficient clearances between chains and brakes, suspension and
body components must be maintained.
Some strap -on type chains will interfere with brake components and therefore CANNOT be used.
All Wheel Drive models: Snow chains should only be installed on the front wheels. Only chains adapted for AWD
models should be used.
Consult your Volvo retailer for additional snow chain information.
CAUTION
Check local regulations regarding the use of snow chains before installing.
Always follow the chain manufacturer's installation instructions carefully. Install chains as tightly as possible and
retighten periodically.
Never exceed the chain manufacturer's specified maximum speed limit. (Under no circumstances should you
exceed 31 mph (50 km/h).
Avoid bumps, holes or sharp turns when driving with snow chains.
The handling of the vehicle can be adversely affected when driving with chains. Avoid fast or sharp turns as well
as locked wheel braking.
Snow tires, studded tires
1
Tires for winter use:
Owners who live in or regularly commute through areas with sustained periods of snow or icy driving conditions are
strongly advised to fit suitable winter tires to help retain the highest degree of traction.
It is important to install winter tires on all four wheels to help retain traction during cornering, braking, and
accelerating. Failure to do so could reduce traction to an unsafe level or adversely affect handling.
Do not mix tires of different design as this could also negatively affect overall tire road grip.
Winter tires wear more quickly on dry roads in warm weather. They should be removed when the winter driving
season has ended.
Studded tires should be run-in 300-600 miles (500-1000 km) during which the vehicle should be driven as smoothly
as possible to give the studs the opportunity to seat properly in the tires. The tires should have the same rotational
direction throughout their entire lifetime.
1Where permitted
NOTE
Please consult state or provincial regulations restricting the use of studded winter tires before installing such tires.
251 06 Maintenance and specifications
Wheels and tires
Temporary Spare
The spare tire in your vehicle is called a "Temporary Spare".
Recommended tire pressure (see the placard on the B-pillar or on the fuel filler door) should be maintained irrespective
of which position on the vehicle the temporary spare tire is used on.
In the event of damage to this tire, a new one can be purchased from your Volvo retailer.
Page 244 of 275
3. Undo the retaining bolt.
4. Lift out the foam block with tools.
5. Lift out the spare wheel.
The other two blocks can remain in the wheel well.
After use
The foam block and spare wheel must be replaced in the reverse order. Note the arrow on the upper foam block. It
should point forward.
254 06 Maintenance and specifications
Wheels and tires
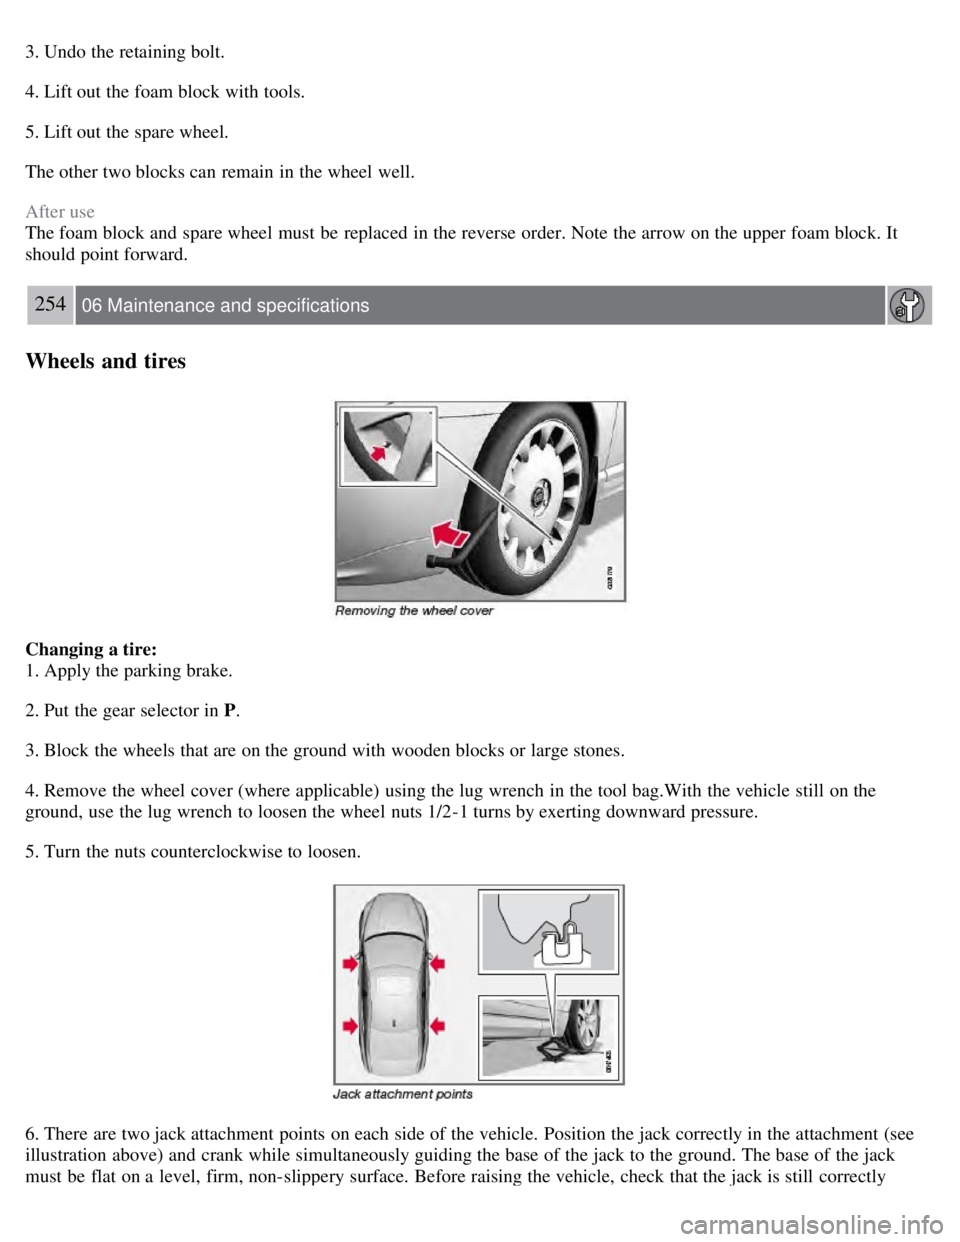
Changing a tire:
1. Apply the parking brake.
2. Put the gear selector in P.
3. Block the wheels that are on the ground with wooden blocks or large stones.
4. Remove the wheel cover (where applicable) using the lug wrench in the tool bag.With the vehicle still on the
ground, use the lug wrench to loosen the wheel nuts 1/2-1 turns by exerting downward pressure.
5. Turn the nuts counterclockwise to loosen.
6. There are two jack attachment points on each side of the vehicle. Position the jack correctly in the attachment (see
illustration above) and crank while simultaneously guiding the base of the jack to the ground. The base of the jack
must be flat on a level, firm, non-slippery surface. Before raising the vehicle, check that the jack is still correctly