2008 VOLVO S80 tire pressure
[x] Cancel search: tire pressurePage 249 of 275
259 06 Maintenance and specifications
Wheels and tires
Tire sealing system-temporarily repairing a flat tire
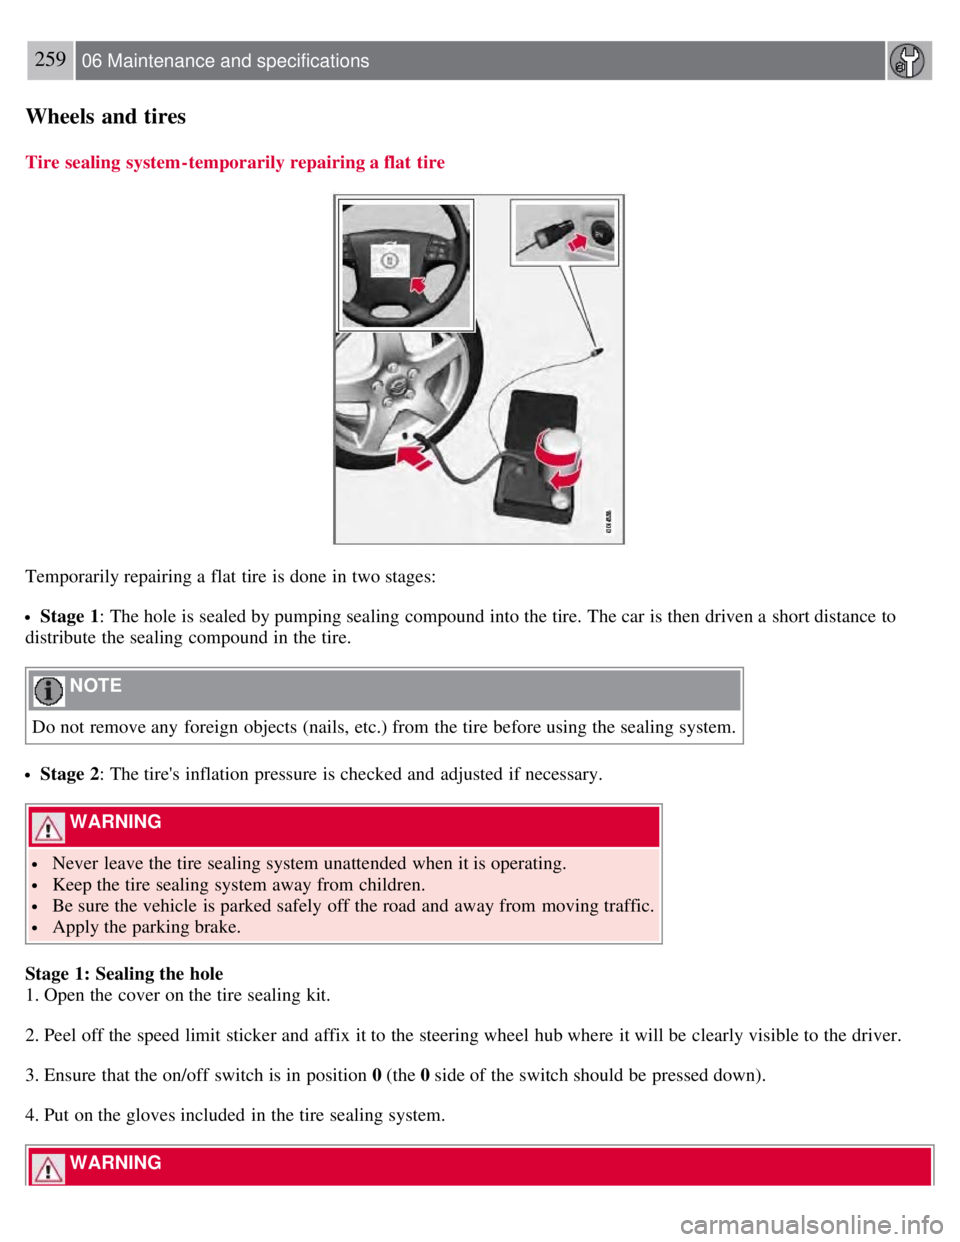
Temporarily repairing a flat tire is done in two stages:
Stage 1: The hole is sealed by pumping sealing compound into the tire. The car is then driven a short distance to
distribute the sealing compound in the tire.
NOTE
Do not remove any foreign objects (nails, etc.) from the tire before using the sealing system.
Stage 2: The tire's inflation pressure is checked and adjusted if necessary.
WARNING
Never leave the tire sealing system unattended when it is operating.
Keep the tire sealing system away from children.
Be sure the vehicle is parked safely off the road and away from moving traffic.
Apply the parking brake.
Stage 1: Sealing the hole
1. Open the cover on the tire sealing kit.
2. Peel off the speed limit sticker and affix it to the steering wheel hub where it will be clearly visible to the driver.
3. Ensure that the on/off switch is in position 0 (the 0 side of the switch should be pressed down).
4. Put on the gloves included in the tire sealing system.
WARNING
Page 250 of 275
Contact with the sealing compound may cause skin irritation. If contact occurs, wash the affected area immediately
with soap and water.
5. Unscrew the orange cover over the bottle holder and unscrew the cap on the bottle of sealing compound.
NOTE
Do not break the seal on the bottle. This occurs automatically when the bottle is screwed into the holder.
6. Screw the bottle into the bottle holder.
WARNING
The bottle is equipped with a catch to keep it securely in place and help prevent sealing compound leakage. Once in
place, the bottle cannot be unscrewed. This must be done by a trained and qualified Volvo service technician.
7. Remove the valve cap from the tire's inflation valve and screw the tire sealing system's hose connector onto the
valve as tightly as possible by hand.
260 06 Maintenance and specifications
Wheels and tires
8. Connect the electrical wire to the nearest 12-volt socket in the vehicle.
9. Start the vehicle's engine.
WARNING
The vehicle's engine should be running when the tire sealing system is used to avoid battery drain. Therefore, be sure
the vehicle is parked in a well ventilated place, or outdoors, before using the system.
10. Start the tire sealing system's compressor by pressing the on/off switch to position I .
WARNING
Never stand next to the tire being inflated when the compressor is in operation.
If cracks, bubbles, etc. form on the tire, switch off the compressor immediately.
If there is visible damage to the sidewall or the rim, the tire cannot be repaired. The vehicle should not be driven if
this occurs. Contact a towing service or Volvo On Call Roadside Assistance if applicable.
NOTE
The air pressure gauge will temporarily show an increase in pressure to approximately 88 psi (6 bar) while the
sealing compound is being pumped into the tire. The pressure should return to a normal level after approximately 30
seconds.
11. Within seven minutes, inflate the tire to between 22-44 psi (1.8-3.0 bar). Switch off the compressor briefly to get a
clear reading from the pressure gauge.
Page 251 of 275
CAUTION
The compressor should not be used for more than 10 minutes at a time to avoid overheating.
WARNING
If the pressure remains below 22 psi (1.8 bar) after approximately seven minutes, turn off the compressor. In this
case, the hole is too large to be sealed and the vehicle should not be driven.
12. Switch off the compressor and disconnect the electrical wire from the 12-volt socket.
13. Unscrew the hose from the tire's inflation valve and reinstall the valve cap.
14. Immediately drive the vehicle for approximately 2 miles (3 km) at a maximum speed of 50 mph (80 km/h) to
distribute the sealing compound in the tire.
NOTE
Safely stow the tire sealing system in a convenient place as it will soon be used again to check the tire's inflation
pressure.
The empty bottle of sealing compound cannot be removed from the bottle holder. Consult a trained and qualified
Volvo service technician to have the bottle removed and properly disposed of.
WARNING
If heavy vibrations, unsteady steering behavior, or noises should occur while driving, reduce speed and park the
vehicle in a safe place. Recheck the tire for bumps, cracks, or other visible damage, and recheck its inflation
pressure. If the pressure is below 19 psi (1.3 bar), do not continue driving. Have the vehicle towed to a trained and
qualified Volvo service technician.
261 06 Maintenance and specifications
Wheels and tires
Stage 2: Checking inflation pressure
1. Connect the tire sealing system as described in stage 1.
2. Refer to the tables on pages 240 and 241
for the correct tire inflation pressure. If the tire needs to be inflated, start
the tire sealing system's compressor. If necessary, release air from the tire by turning the air release knob
counterclockwise.
CAUTION
The compressor should not be used for more than 10 minutes at a time to avoid overheating.
WARNING
If you interrupt your trip for more than 1 hour, check the inflation pressure in the damaged tire again before
continuing.
Page 252 of 275
Replacing the sealing compound container
The sealing compound container must be replaced if:
the tire sealing system has been used to repair a tire
the container's expiration date has passed (see the date on decal).
NOTE
After use, the sealing compound bottle, the hose, and certain other system components must be replaced. Please
consult your Volvo retailer for replacement parts.
If the sealing compound bottle's expiration date has passed, please take it to a Volvo retailer or a recycling station
that can properly dispose of harmful substances.
262 06 Maintenance and specifications
Vehicle care
Washing the car
WARNING
Be sure that the compressor is not connected to a 12-volt socket while replacing the container.
The following points should be kept in mind when washing and cleaning the car:
The car should be washed at regular intervals since dirt, dust, insects and tar spots adhere to the paint and may cause
damage. To help prevent corrosion, it is particularly important to wash the car frequently in the wintertime.
Avoid washing your car in direct sunlight. Doing so may cause detergents and wax to dry out and become abrasive.
To avoid scratching, use lukewarm water to soften the dirt before you wash with a soft sponge, and plenty of sudsy
water.
Bird droppings : Remove from paintwork as soon as possible. Otherwise the finish may be permanently damaged.
A detergent can be used to facilitate the softening of dirt and oil.
A water-soluble grease solvent may be used in cases of sticky dirt. However, use a wash place equipped with a
drainage separator.
Dry the car with a clean chamois and remember to clean the drain holes in the doors and rocker panels.
Tar spots can be removed with kerosene or tar remover after the car has been washed.
A stiff-bristle brush and lukewarm soapy water can be used to clean the wiper blades. Frequent cleaning of the
windshield and wiper blades improves visibility considerably and also helps prolong the service life of the wiper
blades.
Wash off the dirt from the underside (wheel housings, fenders, etc).
In areas of high industrial fallout, more frequent washing is recommended.
After cleaning the engine, the spark plug wells should be inspected for water and blown dry if necessary.
NOTE
When washing the car, remember to remove dirt from the drain holes in the doors and sills.
CAUTION
During high pressure washing, the spray mouthpiece must never be closer to the vehicle than 13" (30 cm). Do not
spray into the locks.
Page 258 of 275
Federal Motor Vehicle Safety Standards (FMVSS) specifications (USA) and Ministry of Transport (CMVSS)
standards (Canada)
Your Volvo is designed to meet all applicable safety standards, as evidenced by the certification label on the facing
side of the driver's door. For further information regarding these regulations, please consult your Volvo retailer.
Loads and Tire Pressures
The appearance of the decal will vary, depending on the market for which the vehicle is intended. See also page 237
.
Vehicle Identification Number (VIN)
The VIN plate is located on the top left surface of the dashboard. The Vehicle Identification Number (VIN) should
always be quoted in all correspondence concerning your vehicle with the retailer and when ordering parts.
Vehicle Emission Control Information
Your Volvo is designed to meet all applicable emission standards, as evidenced by the certification label on the
underside of the hood. For further information regarding these regulations, please consult your Volvo retailer.
269 06 Maintenance and specifications
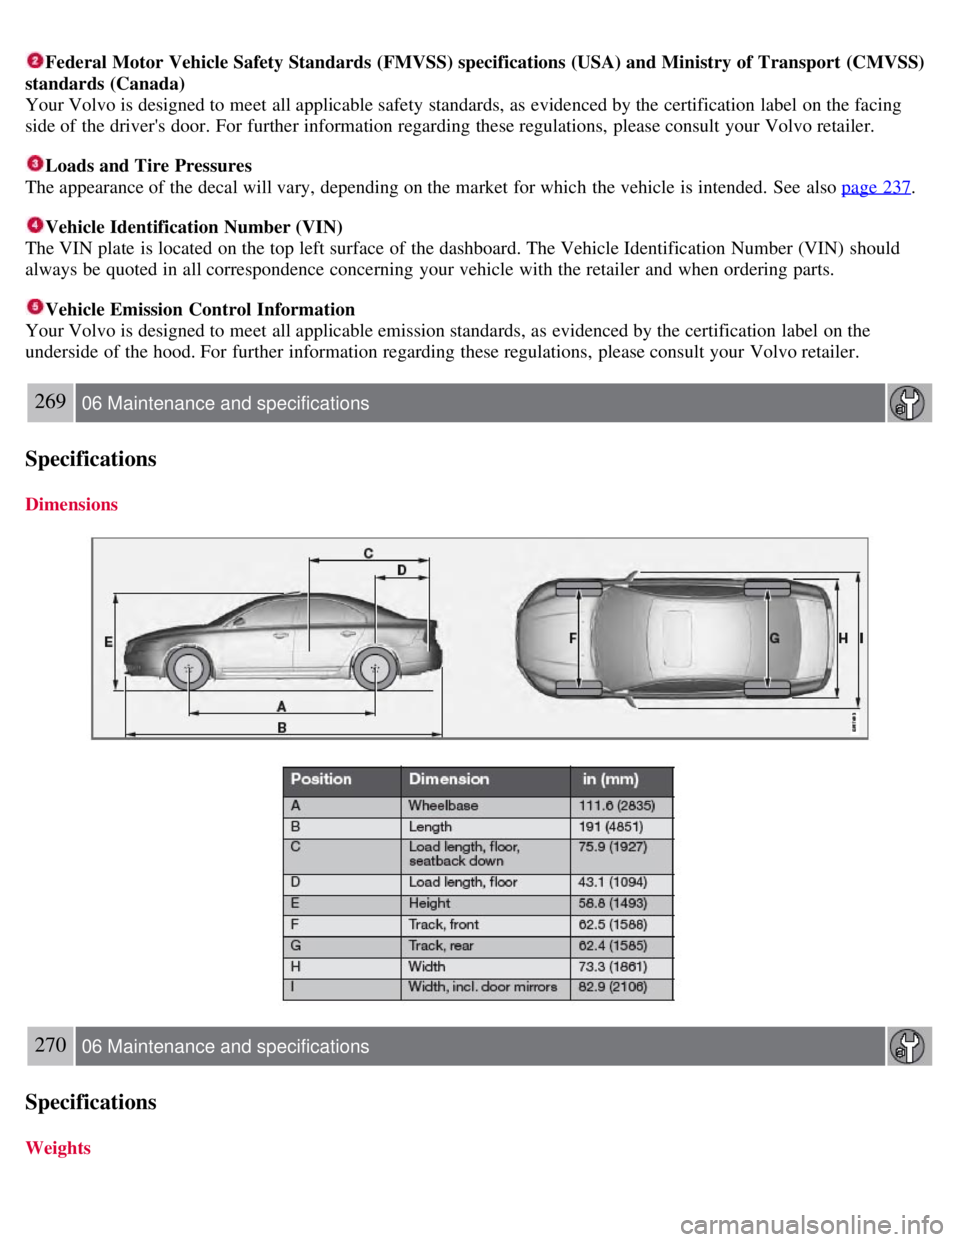
Specifications
Dimensions
270 06 Maintenance and specifications
Specifications
Weights
Page 267 of 275

Driving through water189
E
ECC128-133
Economical driving188
Electric parking brake116
Electronic Climate Control128-131
air distribution table133
Interior Air Quality System131
ventilated seats129
Emergency brake lights 91
Emergency locking retractor33
Emergency starting109
Emergency towing204-205
Emission inspection readiness210
Engine
overheating 77
specifications271
starting107
starting with keyless drive108
Engine compartment overview 211
Engine oil
checking 212
low pressure warning light76
specifications272
volumes274
Environment 9
Eyelets for anchoring loads198
F
Federal Clean Air Act208
Flat tires
tire sealing system 256
Fluid specifications 275
Fog lights
front 76
front, changing bulbs219
front/rear91
Four C (active chassis system) 153
Front airbags19-21
disconnecting passenger's side airbag22- 24
Front fog lights76, 91
changing bulbs219
Front park assist 176-178
Front seats84
heated129
Page 273 of 275
Spare tire251
Speed -dependent steering153
Spin control151
SRS18
Stability system152
indicator light76
overview151
Start inhibitor (immobilizer) 53
Starting the engine107
with keyless drive108
Starting the vehicle 107
after a crash (crash mode)30
Steering wheel
adjusting 87
horn88
keypad87, 122, 134
lock108
Storage spaces 183
Studded tires250
Sunroof (moonroof)101-102
Supplemental restraint system18
warning light77
T
Taillights, changing bulbs 221
Temporary spare tire251
Three-way catalytic converter196
Tire pressure monitoring system242
indicator light76
Tires
age 236
changing from summer to winter252
designations245
glossary of terms246
improving economy236
inflation pressure237- 238
inflation pressure tables240- 241
self supporting run flat tires244
snow250
spare251
specifications239
storing235
studded250
tire pressure monitoring system242- 243
tire sealing system256