2008 VOLVO S80 ECU
[x] Cancel search: ECUPage 209 of 275
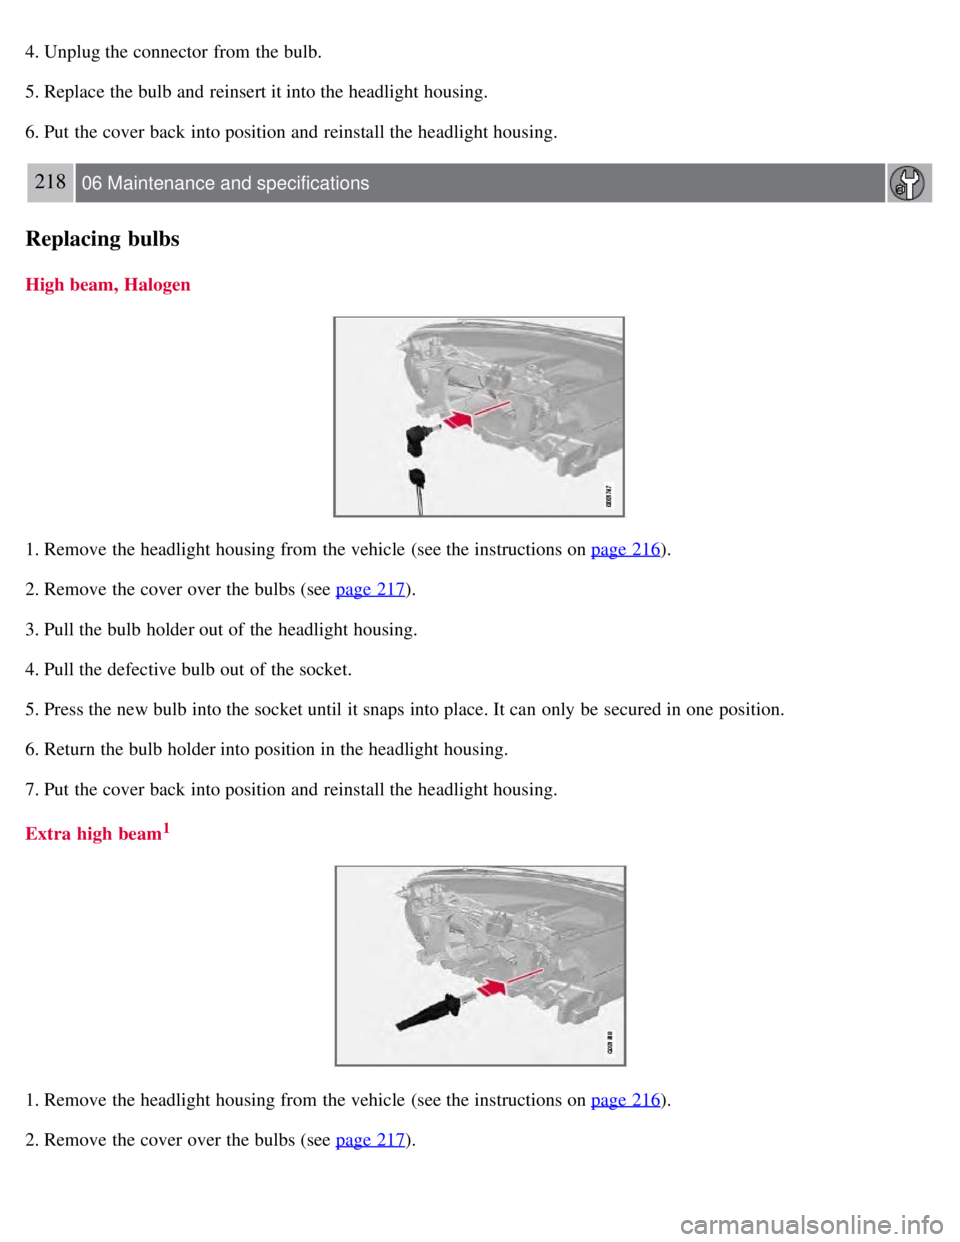
4. Unplug the connector from the bulb.
5. Replace the bulb and reinsert it into the headlight housing.
6. Put the cover back into position and reinstall the headlight housing.
218 06 Maintenance and specifications
Replacing bulbs
High beam, Halogen
1. Remove the headlight housing from the vehicle (see the instructions on page 216).
2. Remove the cover over the bulbs (see page 217
).
3. Pull the bulb holder out of the headlight housing.
4. Pull the defective bulb out of the socket.
5. Press the new bulb into the socket until it snaps into place. It can only be secured in one position.
6. Return the bulb holder into position in the headlight housing.
7. Put the cover back into position and reinstall the headlight housing.
Extra high beam
1
1. Remove the headlight housing from the vehicle (see the instructions on page 216).
2. Remove the cover over the bulbs (see page 217
).
Page 210 of 275
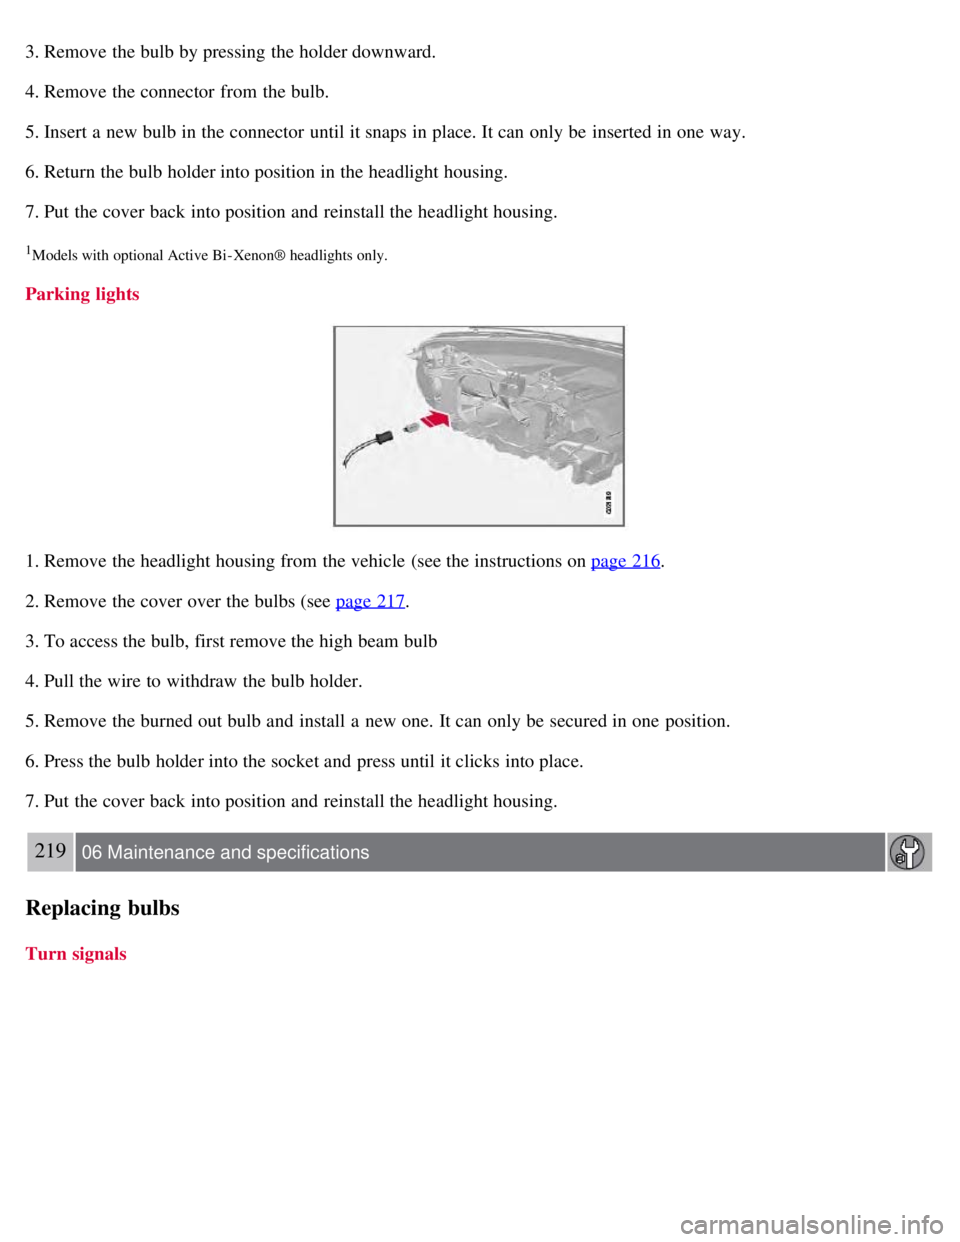
3. Remove the bulb by pressing the holder downward.
4. Remove the connector from the bulb.
5. Insert a new bulb in the connector until it snaps in place. It can only be inserted in one way.
6. Return the bulb holder into position in the headlight housing.
7. Put the cover back into position and reinstall the headlight housing.
1Models with optional Active Bi - Xenon® headlights only.
Parking lights
1. Remove the headlight housing from the vehicle (see the instructions on page 216.
2. Remove the cover over the bulbs (see page 217
.
3. To access the bulb, first remove the high beam bulb
4. Pull the wire to withdraw the bulb holder.
5. Remove the burned out bulb and install a new one. It can only be secured in one position.
6. Press the bulb holder into the socket and press until it clicks into place.
7. Put the cover back into position and reinstall the headlight housing.
219 06 Maintenance and specifications
Replacing bulbs
Turn signals
Page 211 of 275
1. Remove the headlight housing from the vehicle (see the instructions on page 216).
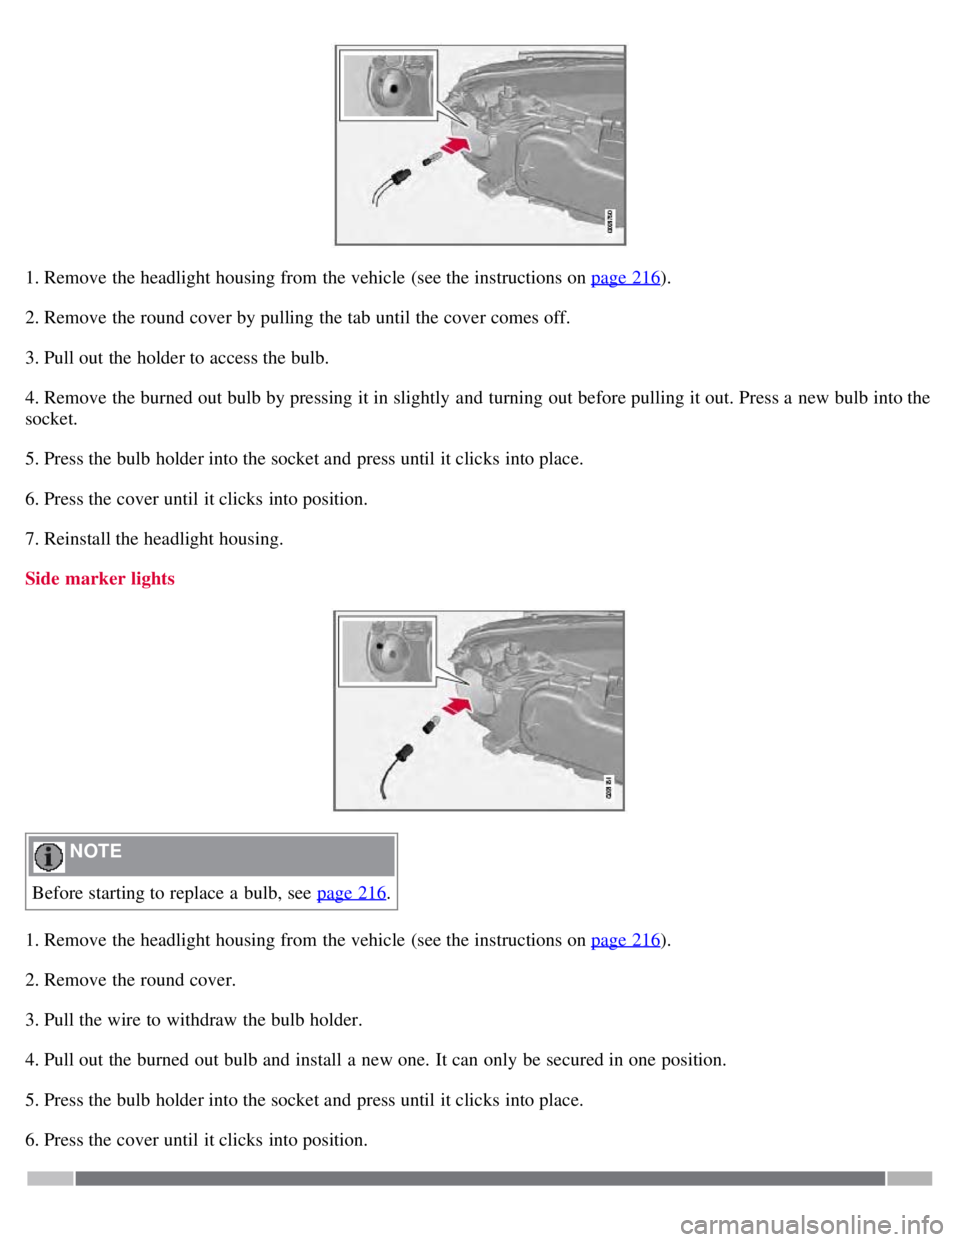
2. Remove the round cover by pulling the tab until the cover comes off.
3. Pull out the holder to access the bulb.
4. Remove the burned out bulb by pressing it in slightly and turning out before pulling it out. Press a new bulb into the
socket.
5. Press the bulb holder into the socket and press until it clicks into place.
6. Press the cover until it clicks into position.
7. Reinstall the headlight housing.
Side marker lights
NOTE
Before starting to replace a bulb, see page 216
.
1. Remove the headlight housing from the vehicle (see the instructions on page 216
).
2. Remove the round cover.
3. Pull the wire to withdraw the bulb holder.
4. Pull out the burned out bulb and install a new one. It can only be secured in one position.
5. Press the bulb holder into the socket and press until it clicks into place.
6. Press the cover until it clicks into position.
Page 217 of 275
The wipers will return to the normal position when the vehicle is started.
1Does not apply to vehicles with the optional keyless drive.
Replacing the wiper blades
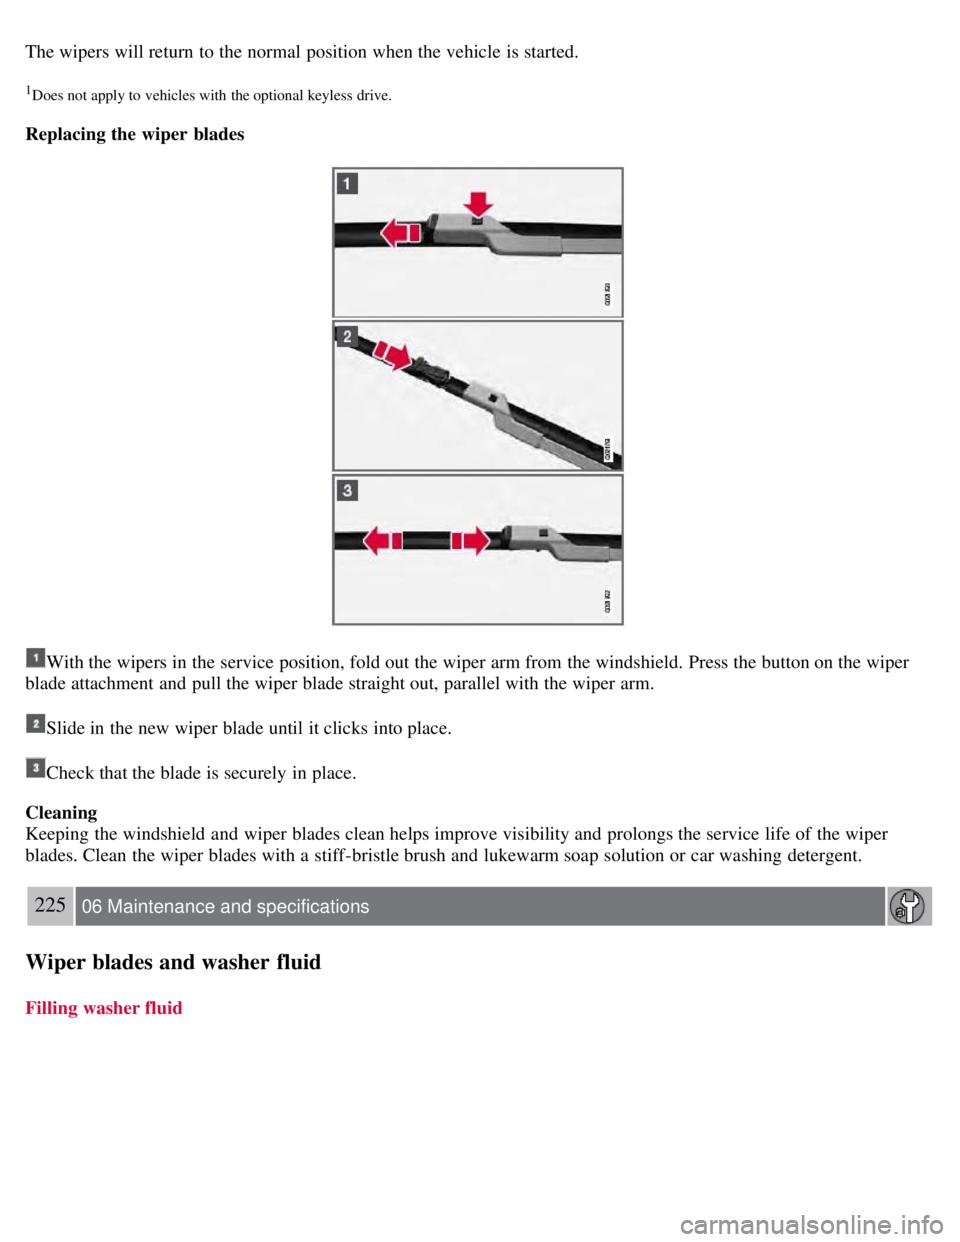
With the wipers in the service position, fold out the wiper arm from the windshield. Press the button on the wiper
blade attachment and pull the wiper blade straight out, parallel with the wiper arm.
Slide in the new wiper blade until it clicks into place.
Check that the blade is securely in place.
Cleaning
Keeping the windshield and wiper blades clean helps improve visibility and prolongs the service life of the wiper
blades. Clean the wiper blades with a stiff-bristle brush and lukewarm soap solution or car washing detergent.
225 06 Maintenance and specifications
Wiper blades and washer fluid
Filling washer fluid
Page 221 of 275
Detach the black negative cable
Detach the black negative cable
Detach the red positive cable
Detach the ventilation hose
Loosen the screw holding the battery clamp.
Move the battery to the side and lift it up.
WARNING
PROPOSITION 65 WARNING!
Battery posts, terminals, and related accessories contain lead and lead compounds, chemicals known to the state of
California to cause cancer and reproductive harm. Wash hands after handling.
229 06 Maintenance and specifications
Battery
Installation
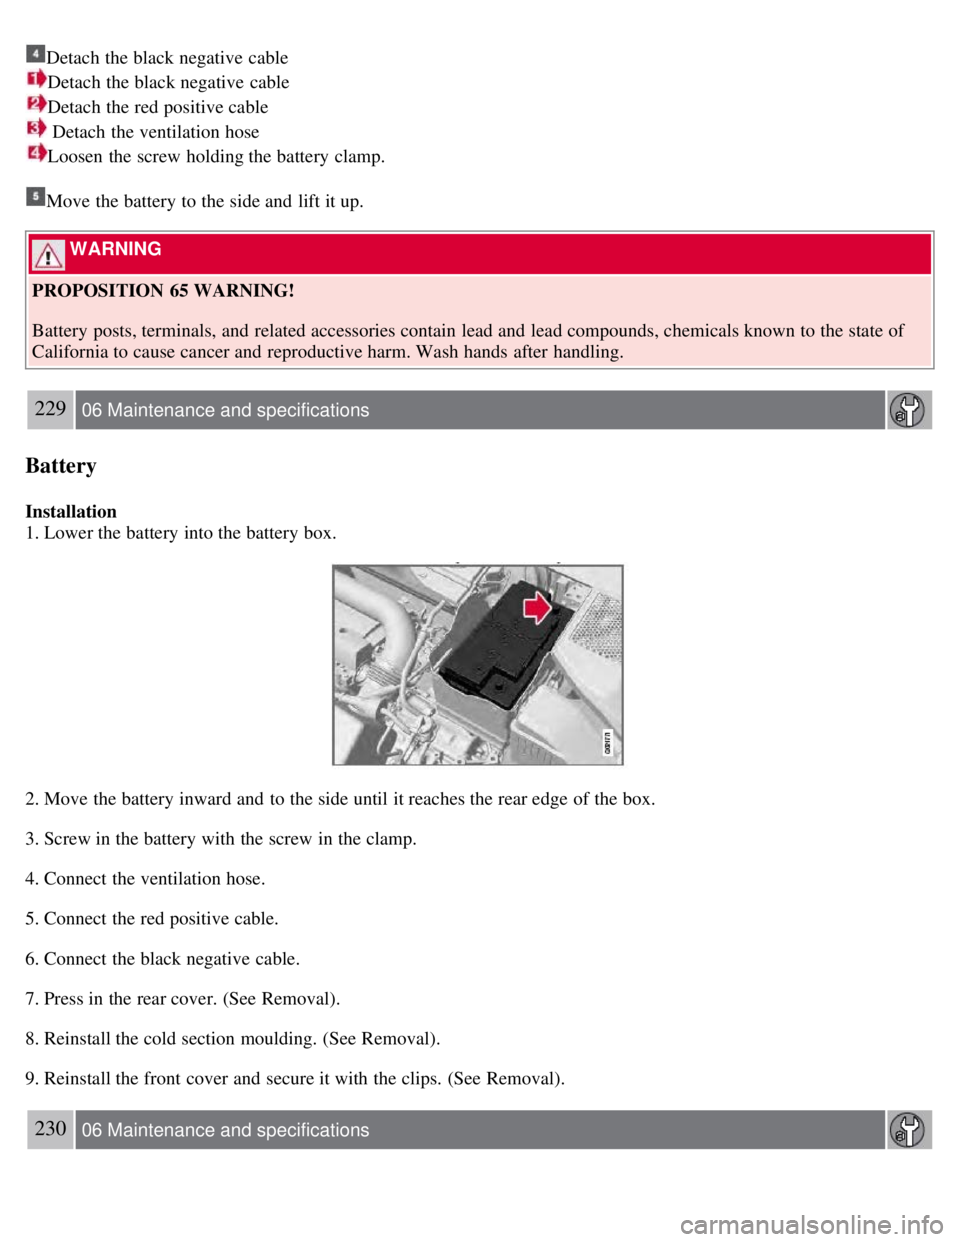
1. Lower the battery into the battery box.
2. Move the battery inward and to the side until it reaches the rear edge of the box.
3. Screw in the battery with the screw in the clamp.
4. Connect the ventilation hose.
5. Connect the red positive cable.
6. Connect the black negative cable.
7. Press in the rear cover. (See Removal).
8. Reinstall the cold section moulding. (See Removal).
9. Reinstall the front cover and secure it with the clips. (See Removal).
230 06 Maintenance and specifications
Page 243 of 275

Suspension wear diagnostics
Every suspension needs periodic inspection and maintenance. A tire's wear pattern can be an aid in detecting a
suspension problem. Each tire, if left in place, tells a story about the suspension. Tire rotation, on the other hand, could
make suspension wear harder to detect. Early detection is very important, because suspension problems can make tire
wear worse.
If you do rotate your tires...
Please follow the tire manufacturer's recommendations, as outlined in the tire manufacturers tire warranty pamphlet.
253 06 Maintenance and specifications
Wheels and tires
Changing a wheel
Spare wheel
The spare wheel (Temporary spare) is only intended for temporary use. Replace the spare wheel with a normal wheel
as soon as possible. The car's handling may be altered by the use of the spare wheel. The correct tire pressure for the
spare wheel is stated in the tire pressure tables, see pages 240 and 241
.
WARNING
Current legislation prohibits the use of the "Temporary Spare" tire other than as a temporary replacement for a
punctured tire. It must be replaced as soon as possible by a standard tire. Road holding and handling may be affected
with the "Temporary Spare" in use.
CAUTION
The vehicle must never be driven with more than one temporary spare wheel.
The spare wheel is located in the spare wheel well with the rim side down. There are two foam blocks, one under the
spare wheel and one over/inside. The upper one contains all tools.
The same bolt runs through to secure the spare wheel and the foam blocks.
Taking out the spare wheel
1. Fold the rear edge of the floor mat forward.
2. Open the floor hatch.
Page 250 of 275
Contact with the sealing compound may cause skin irritation. If contact occurs, wash the affected area immediately
with soap and water.
5. Unscrew the orange cover over the bottle holder and unscrew the cap on the bottle of sealing compound.
NOTE
Do not break the seal on the bottle. This occurs automatically when the bottle is screwed into the holder.
6. Screw the bottle into the bottle holder.
WARNING
The bottle is equipped with a catch to keep it securely in place and help prevent sealing compound leakage. Once in
place, the bottle cannot be unscrewed. This must be done by a trained and qualified Volvo service technician.
7. Remove the valve cap from the tire's inflation valve and screw the tire sealing system's hose connector onto the
valve as tightly as possible by hand.
260 06 Maintenance and specifications
Wheels and tires
8. Connect the electrical wire to the nearest 12-volt socket in the vehicle.
9. Start the vehicle's engine.
WARNING
The vehicle's engine should be running when the tire sealing system is used to avoid battery drain. Therefore, be sure
the vehicle is parked in a well ventilated place, or outdoors, before using the system.
10. Start the tire sealing system's compressor by pressing the on/off switch to position I .
WARNING
Never stand next to the tire being inflated when the compressor is in operation.
If cracks, bubbles, etc. form on the tire, switch off the compressor immediately.
If there is visible damage to the sidewall or the rim, the tire cannot be repaired. The vehicle should not be driven if
this occurs. Contact a towing service or Volvo On Call Roadside Assistance if applicable.
NOTE
The air pressure gauge will temporarily show an increase in pressure to approximately 88 psi (6 bar) while the
sealing compound is being pumped into the tire. The pressure should return to a normal level after approximately 30
seconds.
11. Within seven minutes, inflate the tire to between 22-44 psi (1.8-3.0 bar). Switch off the compressor briefly to get a
clear reading from the pressure gauge.
Page 253 of 275

Dirt, snow, etc., on the headlights can reduce lighting capacity considerably. Clean the headlights regularly, for
example when refueling.
When washing or steam cleaning the engine, avoid spraying water or steam directly on the electrical components
or toward the rear side of the engine. Special moonroof cautions:
Always close the moonroof and sun shade before washing your vehicle.
Never use abrasive cleaning agents on the moonroof.
Never use wax on the rubber seals around the moonroof.
Exterior components
Volvo recommends the use of special cleaning products, available at your Volvo retailer, for cleaning colored plastic,
rubber, or ornamental components such as chromed strips on the exterior of your vehicle. The instructions for using
these products should be followed
263 06 Maintenance and specifications
Vehicle care
carefully. Solvents or stain removers should not be used.
CAUTION
Avoid waxing or polishing plastic or rubber components
Polishing chromed strips can wear away or damage the surface
Polishes containing abrasive substances should not be used
Automatic car wash
We do NOT recommend washing your car in an automatic wash during the first six months (because the paint will
not have hardened sufficiently).
An automatic wash is a simple and quick way to clean your car, but it is worth remembering that it may not be as
thorough as when you yourself go over the car with sponge and water. Keeping the underbody clean is most important,
especially in the winter. Some automatic washers do not have facilities for washing the underbody.
CAUTION
Before driving into an automatic car wash, turn off the optional rain sensor to avoid damaging the windshield
wipers.
Make sure that side view mirrors, auxiliary lamps, etc, are secure, and that any antenna(s) are retracted or
removed. Otherwise there is risk of the machine dislodging them.
Chromed wheels : Clean chrome-plated wheels using the same detergents used for the body of the vehicle.
Aggressive wheel-cleaning agents can permanently stain chrome-plated wheels.
WARNING
When the vehicle is driven immediately after being washed, apply the brakes, including the parking brake, several
times in order to remove any moisture from the brake linings.
Engine cleaning agents should not be used when the engine is warm. This constitutes a fire risk.
Exterior lighting
Condensation may form temporarily on the inside of the lenses of exterior lights such as headlights, fog lights, or
taillights. This is normal and the lights are designed to withstand moisture. Normally, condensation will dissipate after