Page 107 of 275

remote control is in the passenger's compartment). It is activated when the ignition is switched off and the driver's door is opened.
109 03 Your driving environment
Starting the engine
Jump starting
Follow these instructions to jump start your vehicle's dead battery or to jump start another vehicle's dead battery using
your vehicle. If the 12-volt auxiliary battery to be used is in another vehicle, check that the vehicles are not touching to
prevent premature completion of a circuit. Be sure to follow jump starting instructions provided for the other vehicle.
To jump start your vehicle:
1. Switch off the ignition (set the ignition to mode 0, see page 80
).
2. First connect the red jumper cable to the auxiliary battery's positive (+) terminal
.
3. Fold back the cover over the positive (+) terminal on your vehicle's battery
, marked with a "+" sign, located
under a folding cover.
4. Connect the black jumper cable to the auxiliary battery's negative (-) terminal
and to the ground point in your
vehicle's engine compartment (right engine mount at the top, on the outer screw)
.
5. Start the engine in the assisting vehicle, then start the engine in the vehicle with dead battery.
6. After the engine has started, first remove the negative (-) terminal jumper cable (black). Then remove the positive
(+) terminal jumper cable (red).
WARNING
PROPOSITION 65 WARNING!
Battery posts, terminals, and related accessories contain lead and lead compounds, chemicals known to the state of
California to cause cancer and reproductive harm. Wash hands after handling.
CAUTION
Connect the jumper cables carefully to avoid short circuits with other components in the engine compartment.
WARNING
Page 108 of 275

Do not connect the jumper cable to any part of the fuel system or to any moving parts. Avoid touching hot
manifolds.
Batteries generate hydrogen gas, which is flammable and explosive.
Battery fluid contains sulfuric acid. Do not allow battery fluid to contact eyes, skin, fabrics or painted surfaces. If
contact occurs, flush the affected area immediately with water. Obtain medical help immediately if eyes are affected.
Never expose the battery to open flame or electric spark.
Do not smoke near the battery.
Failure to follow the instructions for jump starting can lead to injury.
110 03 Your driving environment
Transmission
Automatic transmission
Depress the button on the front of the gear selector knob to move the gear selector between the R , N, D, and P
positions.
The gear selector can be moved freely between the Geartronic (manual shifting) and Drive ( D) positions while driving.
Park position (P)
Select the P position when starting or parking.
1The information display (see page 74) shows the gear selector's position or the selected gear by displaying the following: P, R, N, D, 1, 2, 3, 4, 5,
or 6.
Keylock
To remove the remote key from the ignition slot, the gear selector must be in the P position. The remote key is locked
in the slot in all other positions.
Shiftlock
When P has been selected, the transmission is mechanically blocked in this position. The brake pedal must be
depressed before the gear lever can be moved from the P position.
Always apply the parking brake when the vehicle is parked, see page 116
. If the vehicle is equipped with the optional
electric parking brake, press the control to apply the brake, see page 116
.
CAUTION
Page 115 of 275

Manual release
1. Fasten the seat belt.
2. Insert the remote key in the ignition slot.
3. Press firmly on the brake pedal.
4. Pull the parking brake control.
Vehicles with Keyless drive (option)
1. Press the START/STOP ENGINE button.
2. Press firmly on the brake pedal.
3. Pull the parking brake control.
Automatic release
1. Start the engine.
2. Fasten the seat belt.
NOTE
For safety reasons, the parking brake is only released automatically if the engine is running and the driver is
wearing a seat belt.
The electric parking brake will be released immediately when the accelerator pedal is pressed and the gear selector
is in position D or P.
3. Move the gear selector to position D or R and press the accelerator pedal. The parking brake will release when the
vehicle begins to move.
Heavy load uphill
A heavy load, such as a trailer, can cause the vehicle to roll backward when the parking brake is released
automatically on a steep incline. To help avoid this:
1. Keep the electric parking brake lever pushed in with the left hand while shifting into Drive with the right.
2. While pressing the throttle pedal to pull away, release the parking brake lever only after the vehicle begins to move.
Symbols
Page 197 of 275

1On vehicles with the optional keyless drive, the remote key must be in the passenger compartment.
CAUTION
Please check with state and local authorities before attempting this type of towing, as vehicles being towed are
subject to regulations regarding maximum towing speed, length and type of towing device, lighting, etc.
If the vehicle's battery is dead, do not attempt to start the vehicle by pushing or pulling it as this will damage the
three-way catalytic converter(s). The engine must be jump started using an auxiliary battery (see page 109
).
If the vehicle is being towed on a flat bed truck, the towing eyelets must not be used to secure the vehicle on the
flat bed. Consult the tow truck operator.
205 05 During your trip
Emergency towing
Towing vehicles with front wheel drive/All Wheel Drive
Volvo recommends the use of flat bed equipment.
If wheel lift equipment must be used, please use extreme caution to help avoid damage to the vehicle. In this case,
the vehicle should be towed with the rear wheels on the ground if at all possible .
If it is absolutely necessary to tow the vehicle with the front wheels on the ground, please refer to the towing
information on the page 204
.
CAUTION
Sling-type equipment applied at the front will damage radiator and air conditioning lines.
It is equally important not to use sling -type equipment at the rear or apply lifting equipment inside the rear
wheels; serious damage to the rear axle may result.
If the vehicle is being towed on a flat bed truck, the towing eyelets must not be used to secure the vehicle on the
flat bed. Consult the tow truck operator.
Contents | Top of Page
Page 207 of 275

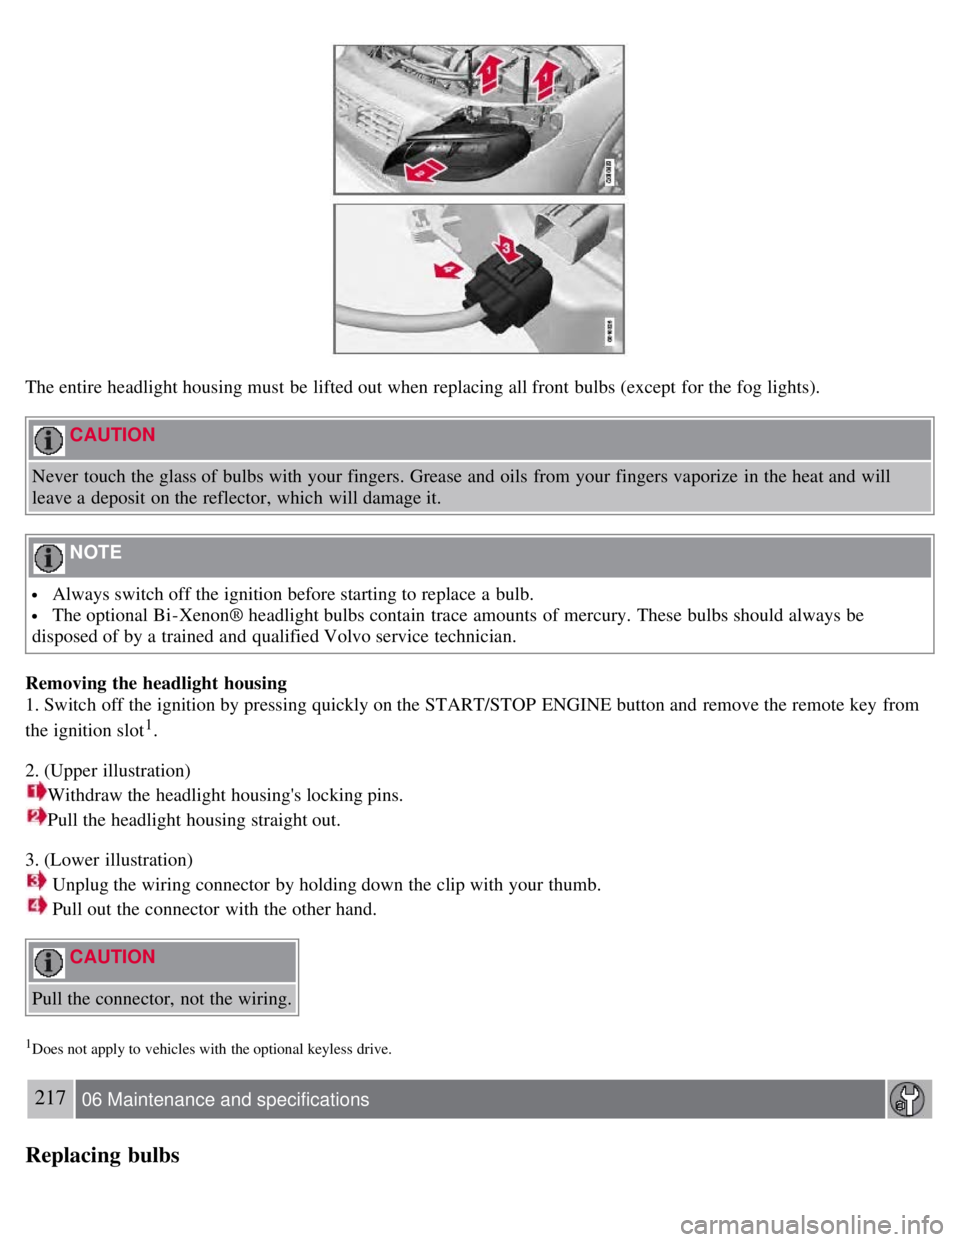
The entire headlight housing must be lifted out when replacing all front bulbs (except for the fog lights).
CAUTION
Never touch the glass of bulbs with your fingers. Grease and oils from your fingers vaporize in the heat and will
leave a deposit on the reflector, which will damage it.
NOTE
Always switch off the ignition before starting to replace a bulb.
The optional Bi -Xenon® headlight bulbs contain trace amounts of mercury. These bulbs should always be
disposed of by a trained and qualified Volvo service technician.
Removing the headlight housing
1. Switch off the ignition by pressing quickly on the START/STOP ENGINE button and remove the remote key from
the ignition slot
1.
2. (Upper illustration)
Withdraw the headlight housing's locking pins.
Pull the headlight housing straight out.
3. (Lower illustration)
Unplug the wiring connector by holding down the clip with your thumb.
Pull out the connector with the other hand.
CAUTION
Pull the connector, not the wiring.
1Does not apply to vehicles with the optional keyless drive.
217 06 Maintenance and specifications
Replacing bulbs
Page 208 of 275

4. Lift out the housing and place it on a soft surface to avoid scratching the lens.
5. Replace the defective bulb(s), see page 223
.
Reinserting the headlight housing
1. Plug in the connector until it clicks into place.
2. Reinstall the headlight housing and locking pins. Check that they are correctly inserted. The headlight housing must
be properly inserted and secured in place before the lighting is switched on or the remote key is inserted into the
ignition slot.
3. Check that the lights function properly.
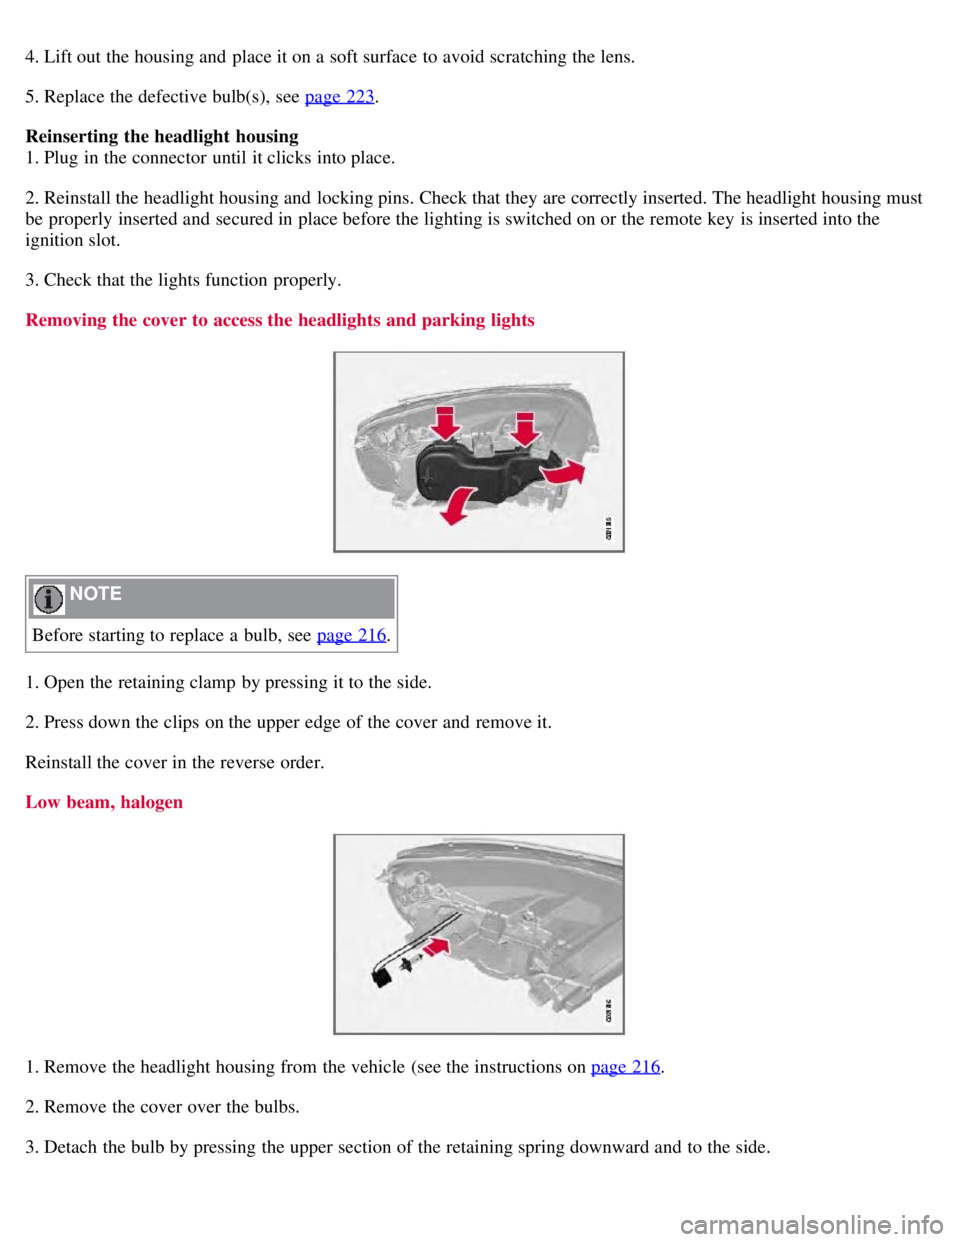
Removing the cover to access the headlights and parking lights
NOTE
Before starting to replace a bulb, see page 216
.
1. Open the retaining clamp by pressing it to the side.
2. Press down the clips on the upper edge of the cover and remove it.
Reinstall the cover in the reverse order.
Low beam, halogen
1. Remove the headlight housing from the vehicle (see the instructions on page 216.
2. Remove the cover over the bulbs.
3. Detach the bulb by pressing the upper section of the retaining spring downward and to the side.
Page:
< prev 1-8 9-16 17-24