2008 VOLVO S80 ESP
[x] Cancel search: ESPPage 98 of 275

The door mirror will reset to its normal position:
after 10 seconds when reverse is disengaged and the car remains stopped.
immediately when reverse is disengaged and the vehicle's forward speed exceeds approximately 6 mph (10 km/h).
immediately if you press the corresponding L or R button again.
when the engine is turned off.
when the side mirrors are folded in.
NOTE
Only one mirror can be tilted down at a time.
Automatic retraction when locking
When the vehicle is locked/unlocked with the remote key the door mirrors are automatically retracted/extended.
The function can be activated/deactivated under Car settings
Retract mirrors
100 03 Your driving environment
Mirrors
when locking. For a description of the menu system, see page 123.
Resetting to neutral
Mirrors that have been moved out of position by an external force must be electrically reset to the neutral position for
electric retracting/extending to work.
Retract the mirrors with the L and R buttons.
Fold them out again with the L and R buttons.
The mirrors are now reset in neutral position.
Home safe and approach lighting
The light on the door mirrors comes on when approach lighting or home safe lighting is selected, see page 94
.
Rear window and door mirror defrosters
Use the defroster to quickly remove misting and ice from the rear window and the door mirrors.
Press the button once to start simultaneous rear window and door mirror defrosting. The light in the button indicates
that the function is active. Defrosting is deactivated automatically and its duration is controlled by the outside
Page 105 of 275

107 03 Your driving environment
Starting the engine
Starting the engine
Ignition switch with remote key inserted (see page 80
for more information)
1. Fasten the seat belt.
WARNING
Before starting the engine, check that the seat, steering wheel and mirrors are adjusted properly. Make sure the brake
pedal can be depressed completely. Adjust the seat if necessary.
2. Insert the remote key into the ignition slot. Press the key until it is drawn into the slot
1.
NOTE
The remote key should be inserted into the ignition slot with the key blade end of the remote pointing out and the
key pad facing up. See the illustration on page 80
.
3. Depress the brake pedal
2.
WARNING
An extra mat on the driver's floor can cause the accelerator and/or brake pedal to catch. Check that the movement of
these pedals is not impeded. Not more than one protective floor covering may be used at one time.
4. Press and release the START/STOP ENGINE button. The autostart function will operate the starter motor until the
engine starts.
The starter motor operates for a maximum of 10 seconds. If the engine has not started, repeat the procedure.
1On vehicles with the optional keyless drive, it is only necessary to have a remote control in the passenger's compartment.
2 If the vehicle is moving, it is only necessary to press the START/STOP ENGINE button to start the vehicle.
WARNING
Always remove the remote key from the ignition slot when leaving the vehicle, especially if there are children in
Page 109 of 275
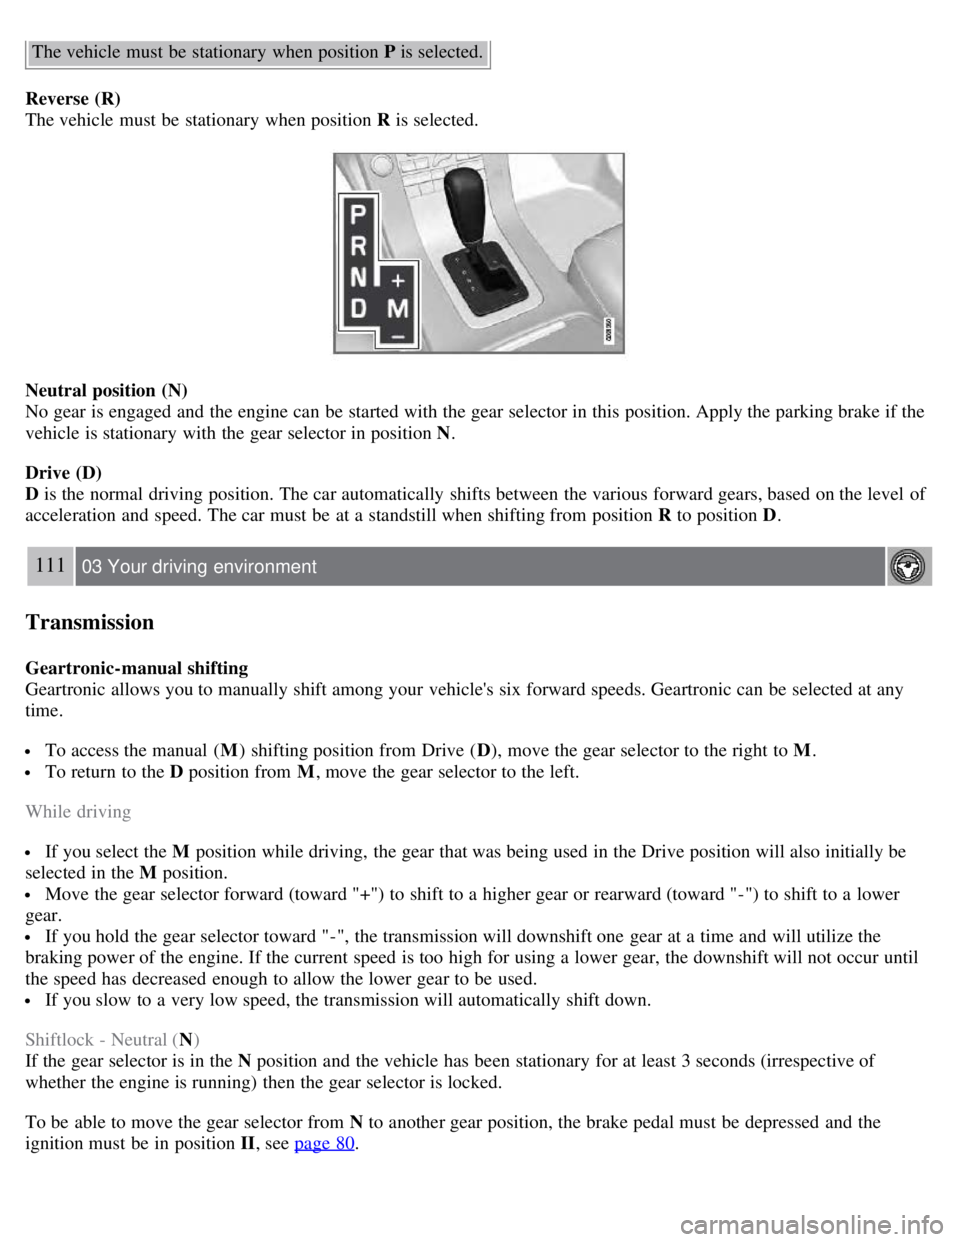
The vehicle must be stationary when position P is selected.
Reverse (R)
The vehicle must be stationary when position R is selected.
Neutral position (N)
No gear is engaged and the engine can be started with the gear selector in this position. Apply the parking brake if the
vehicle is stationary with the gear selector in position N .
Drive (D)
D is the normal driving position. The car automatically shifts between the various forward gears, based on the level of
acceleration and speed. The car must be at a standstill when shifting from position R to position D.
111 03 Your driving environment
Transmission
Geartronic-manual shifting
Geartronic allows you to manually shift among your vehicle's six forward speeds. Geartronic can be selected at any
time.
To access the manual ( M) shifting position from Drive ( D), move the gear selector to the right to M .
To return to the D position from M, move the gear selector to the left.
While driving
If you select the M position while driving, the gear that was being used in the Drive position will also initially be
selected in the M position.
Move the gear selector forward (toward "+") to shift to a higher gear or rearward (toward "-") to shift to a lower
gear.
If you hold the gear selector toward "-", the transmission will downshift one gear at a time and will utilize the
braking power of the engine. If the current speed is too high for using a lower gear, the downshift will not occur until
the speed has decreased enough to allow the lower gear to be used.
If you slow to a very low speed, the transmission will automatically shift down.
Shiftlock - Neutral ( N)
If the gear selector is in the N position and the vehicle has been stationary for at least 3 seconds (irrespective of
whether the engine is running) then the gear selector is locked.
To be able to move the gear selector from N to another gear position, the brake pedal must be depressed and the
ignition must be in position II , see page 80
.
Page 118 of 275
2 0 0 8
VOLVO S80
120 04 Comfort and driving pleasure
Menus and messages 122
Climate system126
Audio system134
Trip computer147
Compass149
Stability system151
Active chassis system-Four C153
Cruise control154
Adaptive Cruise Control-ACC156
Distance Alert163
Collision Warning with Auto-brake (option)166
Driver Alert System -option171
Park assist (option)176
Blind Spot Information System (option)179
Passenger compartment convenience183
121 04 Comfort and driving pleasure
122 04 Comfort and driving pleasure
Menus and messages
Center console
Certain functions are controlled from the center console via the menu system or from the optional keypad in the
steering wheel. Each function is described under its respective section.
The current menu level is shown at the top right of display in the center console.
Page 122 of 275
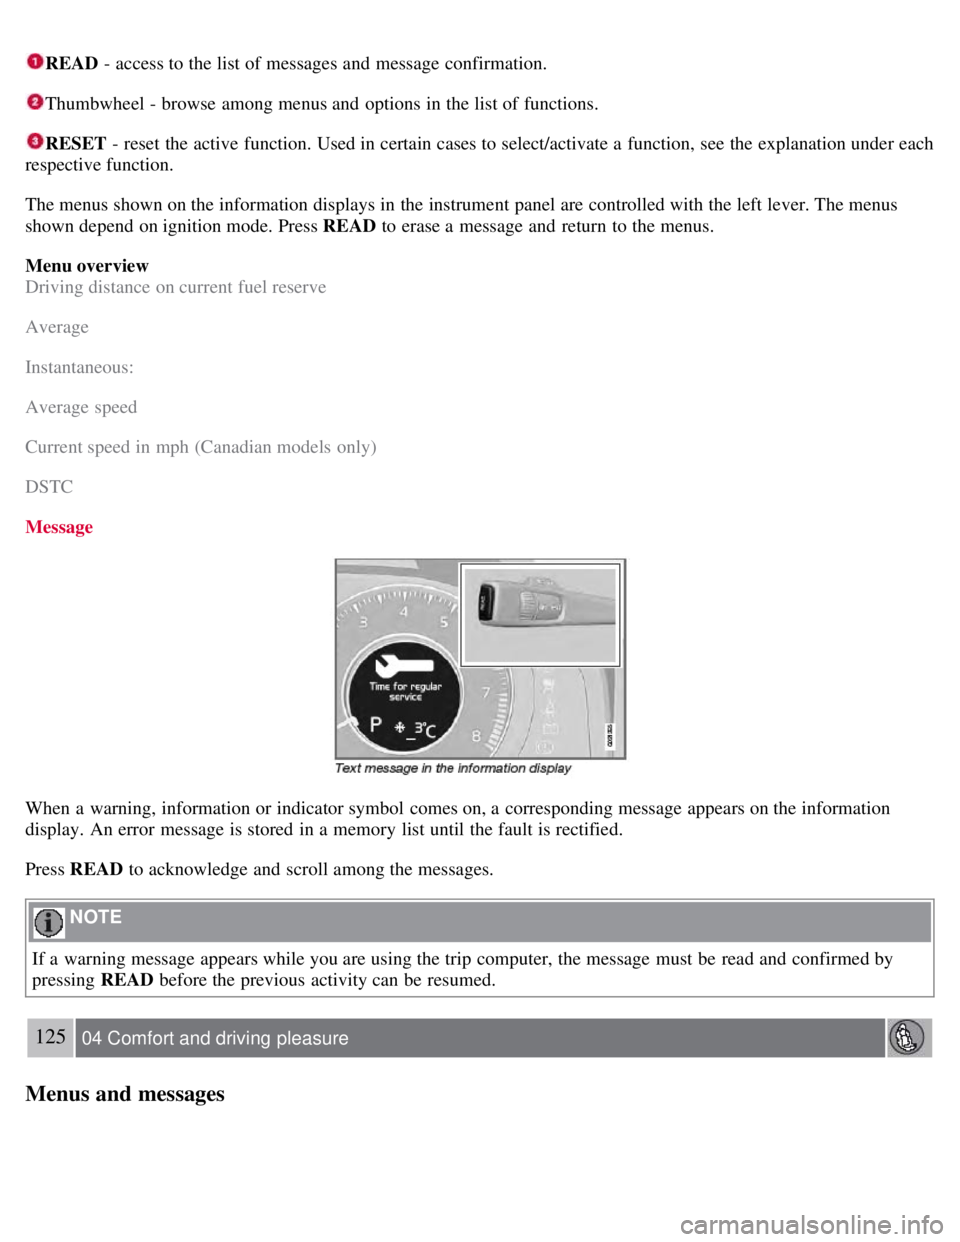
READ - access to the list of messages and message confirmation.
Thumbwheel - browse among menus and options in the list of functions.
RESET - reset the active function. Used in certain cases to select/activate a function, see the explanation under each
respective function.
The menus shown on the information displays in the instrument panel are controlled with the left lever. The menus
shown depend on ignition mode. Press READ to erase a message and return to the menus.
Menu overview
Driving distance on current fuel reserve
Average
Instantaneous:
Average speed
Current speed in mph (Canadian models only)
DSTC
Message
When a warning, information or indicator symbol comes on, a corresponding message appears on the information
display. An error message is stored in a memory list until the fault is rectified.
Press READ to acknowledge and scroll among the messages.
NOTE
If a warning message appears while you are using the trip computer, the message must be read and confirmed by
pressing READ before the previous activity can be resumed.
125 04 Comfort and driving pleasure
Menus and messages
Page 128 of 275
Turn the control clockwise to increase or counterclockwise to decrease the blower speed. Pressing the AUTO switch
will automatically regulate blower speed and override manual adjustment.
NOTE
If the blower is turned off completely, the air conditioning is disengaged, which may result in fogging on the
windows.
Heated front seats (option)
Press the button once for the highest heat level - three indicator lights come on.
Press the button twice for a lower heat level - two indicator lights come on.
Press the button three times for the lowest heat level - one indicator light comes on.
Press the button four times to switch off the heat - no indicator lights come on.
130 04 Comfort and driving pleasure
Climate system
Heated rear seats (option)
Heat control for the outboard seating positions takes place in the same way as for the front seat.
Air distribution
The figure consists of three buttons. When the buttons are pressed, an indicator light in front of the respective part of
the figure illuminates and shows which air distribution is selected, see page 133
.
Auto
Page 130 of 275

Recirculation/air quality system
Recirculation
This function can be used to shut out exhaust fumes, smoke, etc from the passenger compartment. The air in the
passenger compartment is then recirculated, i.e., no air from outside the car is taken into the car when this function is
activated. The indicator light in the button will illuminate when recirculation is selected.
If the air in the car recirculates for too long, there is a risk of condensation forming on the insides of the windows,
especially in winter.
Timer
The timer function minimizes the risk of fogging, or stale air when the recirculation function is selected by
automatically switching off the function after a certain length of time, depending on the ambient temperature.
Activate/deactivate the function under Climate control settings
Recirculation timer .
For a description of the menu system, see page 123
.
NOTE
When Defroster is selected, recirculation is always deactivated.
Interior Air Quality System -IAQS (option)
This system consists of a multifilter and an air quality sensor. The filter helps remove gases and particles from the
incoming air, thereby reducing the amounts of odors and contaminants entering the vehicle. The air quality sensor
detects increased levels of contaminants in the outside air. When the air quality sensor detects contaminated outside
air, the air intake closes and the air inside the passenger compartment is recirculated, i.e., no outside air enters the
vehicle. The filter also cleans recirculated passenger compartment air. When the AUTO button is depressed the air
quality sensor is always engaged.
Activating the air quality sensor
Switch between the three functions by pressing the button repeatedly.
The left orange light comes on - the air quality sensor is disengaged.
The center green light comes on - recirculation not engaged, providing it is not required for cooling in hot weather.
The right orange light comes on - recirculation is engaged.
132 04 Comfort and driving pleasure
Climate system
NOTE
The air quality sensor should always be engaged in order to obtain the best air in the passenger compartment.
Recirculation is limited in cold weather to avoid fogging.
If the insides of the windows start fogging, disengage the air quality sensor. Use the defroster function to increase
airflow to the front, side, and rear windows.
Page 135 of 275
Internal audio sources: AM, FM and CD
External audio source. For connection, see page 134
Push button and knob controls for making sound settings
Navigation button
Volume and on/off
Audio volume and automatic volume control
The audio system compensates for disrupting noises in the passenger compartment by increasing the volume according
to the speed of the vehicle. The level of sound compensation can be set at low, medium or high. Select the level under
Audio settings
Auto volume control .
External audio source audio volume
External devices such as an MP3 player can be connected to the AUX input, see page 134
. The volume of the external
sound source AUX may be different from the volume of the internal sound sources such as the CD player or the radio.
If the external sound source's volume is too high, the quality of the sound may be impaired. To help prevent this,
adjust the input volume of the external audio source:
1. Set the audio system in AUX mode using MODE and use
to navigate to Volume, AUX input.
2. Turn the control
or press / the navigation button.
Sound settings
Press the control
repeatedly to toggles among the sound settings. Adjustments are made by turning the control .
Bass - Bass level.
Treble - Treble level.
Fader - Balance between the front and rear speakers.
Balance - Balance between the right and left speakers.
Subwoofer (option on certain markets only) - Level for the bass speaker. The subwoofer can be switched off by
turning control
counterclockwise to MIN .
Surround (option) - Surround settings.
Under Surround , 3 channel stereo or Dolby Surround Pro logic II can be activated by selecting 3-ch or Dpl2
respectively. This enables the following options:
Center level1 - Level for the center speaker.
Surround level1 - Level for surround sound.
Equalizer
Sound levels for different frequencies can be adjusted separately using the equalizer
2.
1. Go to Audio settings and select Equalizer Front or Equalizer Rear.
The sound level for the frequency is adjusted with
/ on the navigation button. Press / to select another
frequency.
2. Use ENTER to save or EXIT to close.
Sound stage
1
The sound experience can be optimized for the driver's seat, both front seats or the rear