2008 VOLVO S60 height
[x] Cancel search: heightPage 17 of 230

inform Transport Canada in addition to notifying Volvo Cars of Canada Corp.
To contact Transport Canada, call (800) 333-0510, or (613) 993-9851 if you are calling from the Ottawa region.
14 01 Safety
Seat belts
Using seat belts
Seat belts should always be worn by all occupants of your vehicle. Children should be properly restrained, using an
infant, car, or booster seat determined by age, weight and height.
Volvo also believes that no child should sit in the front seat of a vehicle.
Most states and provinces make it mandatory for occupants of a vehicle to use seat belts.
Seat belt pretensioners
The seat belts are equipped with pretensioners that reduce slack in the belts. These pretensioners are triggered in
situations where the airbags deploy. The front seat belts also include a tension reducing device which, in the event of a
collision, limits the peak forces exerted by the seat belt on the occupant.
Buckling a seat belt
Pull the belt out far enough to insert the latch plate into the receptacle until a distinct click is heard. The seat belt
retractor is normally "unlocked" and you can move freely, provided that the shoulder belt is not pulled out too far.
The retractor will lock up as follows:
if the belt is pulled out rapidly
during braking and acceleration
if the vehicle is leaning excessively
when driving in turns
When wearing the seat belt remember:
The belt should not be twisted or turned.
The lap section of the belt must be positioned low on the hips (not pressing against the abdomen).
Make sure that the shoulder belt is rolled up into its retractor and that the shoulder and lap belts are taut.
Unbuckling the seat belt
To remove the seat belt, press the red section on the seat belt receptacle. Before exiting the vehicle, check that the seat
ProCarManuals.com
Page 22 of 230

1-800-458-1552
www.volvocars.us
In Canada
Volvo Cars of Canada Corp.
National Customer Service
175 Gordon Baker Road
North York, Ontario M2H 2N7
1-800-663-8255
www.volvocanada.com
WARNING
Do not use child safety seats or child booster cushions/backrests in the front passenger's seat. We also recommend
that occupants under 4 feet 7 inches (140 cm) in height who have outgrown these devices sit in the rear seat with the
seat belt fastened
1.
Never drive with the airbags deployed. The fact that they hang out can impair the steering of your vehicle. Other
safety systems can also be damaged.
The smoke and dust formed when the airbags are deployed can cause skin and eye irritation in the event of
prolonged exposure.
1See also the Occupant Weight Sensor information on page 21.
19 01 Safety
Front airbags
ProCarManuals.com
Page 31 of 230

in a vehicle. Here's what to look for when selecting a child restraint system:
It should have a label certifying that it meets applicable Federal Motor Vehicle Safety Standards (FMVSS 213) - or
in Canada, CMVSS 213.
Make sure the child restraint system is approved for the child's height, weight and development - the label required
by the standard or regulation, or instructions for infant restraints, typically provide this information.
In using any child restraint system, we urge you to carefully look over the instructions that are provided with the
restraint. Be sure you understand them and can use the device properly and safely in this vehicle. A misused child
restraint system can result in increased injuries for both the infant or child and other occupants in the vehicle.
When a child has outgrown the child safety seat, you should use the rear seat with the standard seat belt fastened. The
best way to help protect the child here is to place the child on a cushion so that the seat belt is properly located on the
hips (see the illustrations on page 32
). Legislation in your state or province may mandate the use of a child seat or
cushion in combination with the seat belt, depending on the child's age and/or size. Please check local regulations.
A specially designed and tested booster cushion (not available in Canada) can be obtained from your Volvo retailer for
children weighing 33-80 lb. (15-36 kg) and 38-54 inches (97-137 cm) in height.
31 01 Safety
Child safety
WARNING
Do not use child safety seats or child booster cushions/backrests in the front passenger's seat. We also recommend
that children under 4 feet 7 inches (140 cm) in height who have outgrown these devices sit in the rear seat with the
seat belt fastened.
Keep vehicle doors and trunk locked and keep keys out of a child's reach. Unsupervised children could lock
themselves in an open trunk and risk injury. Children should be taught not to play in vehicles.
On hot days, the temperature in the vehicle interior can rise very quickly. Exposure to these high temperatures for
even a short period of time can cause heat-related injury or death. Small children are particularly at risk.
Automatic Locking Retractor/Emergency Locking Retractor (ALR/ELR)
To make child seat installation easier, each seat belt (except for the driver's belt) is equipped with a locking mechanism
to help keep the seat belt taut.
When attaching the seat belt to a child seat:
Attach the seat belt to the child seat according to the child seat manufacturer's instructions.
Pull the seat belt out as far as possible.
Insert the seat belt latch plate into the buckle (lock) in the usual way.
Release the seat belt and pull it taut around the child seat.
A sound from the seat belt retractor will be audible at this time and is normal.
The belt will now be locked in place.
This function is automatically disabled when the seat belt is unlocked and the belt is fully retracted.
WARNING
Do not use child safety seats or child booster cushions/backrests in the front passenger's seat. We also recommend
that children who have outgrown these devices sit in the rear seat with the seat belt properly fastened.
ProCarManuals.com
Page 53 of 230

The beams of ABL headlights adjust laterally to help light up a curve according to movements of the steering wheel
when the vehicle is turning. This function is activated automatically when the engine is started and can be
deactivated/reactivated by pressing the button. The indicator light in the button is on when the function is activated. See
also page 57
.
56 02 Instruments and controls
Steering wheel adjustment
Both the height and the reach of the steering wheel can be adjusted to a comfortable position for the driver. Pull down
the lever on the left of the steering column. Adjust the steering wheel to a suitable position and press the lever back into
place to lock the steering wheel in the new position. Check that the steering wheel is locked in the new position.
WARNING
Never adjust the steering wheel while driving.
57 02 Instruments and controls
Lighting panel
1. Headlight/parking light switch
ProCarManuals.com
Page 86 of 230

3. Raise/lower seat height: pump the seat up or down.
4. Lumbar support: turn the control for firmer or softer lumbar support.
5. Backrest tilt: turn the control to adjust the angle of the backrest.
6. Control panel for optional power seat (see page 94
for more information).
WARNING
Do not adjust the seat while driving. The seat should be adjusted so that the brake pedal can be depressed fully. In
addition, position the seat as far rearward as comfort and control allow.
Check that the seat is securely locked into position after adjusting.
93 04 Interior
Front seats
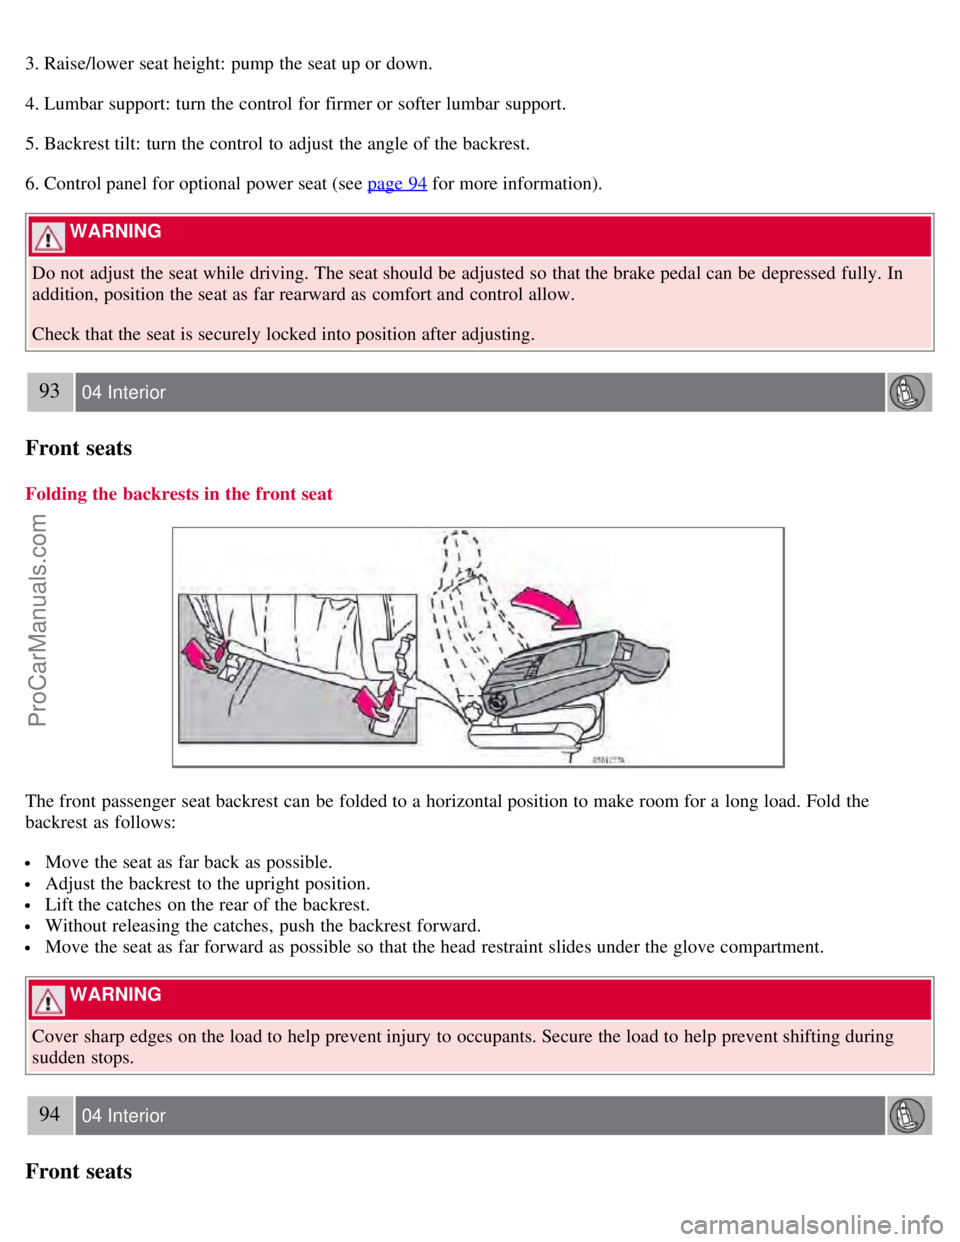
Folding the backrests in the front seat
The front passenger seat backrest can be folded to a horizontal position to make room for a long load. Fold the
backrest as follows:
Move the seat as far back as possible.
Adjust the backrest to the upright position.
Lift the catches on the rear of the backrest.
Without releasing the catches, push the backrest forward.
Move the seat as far forward as possible so that the head restraint slides under the glove compartment.
WARNING
Cover sharp edges on the load to help prevent injury to occupants. Secure the load to help prevent shifting during
sudden stops.
94 04 Interior
Front seats
ProCarManuals.com
Page 97 of 230

Rear seat and trunk
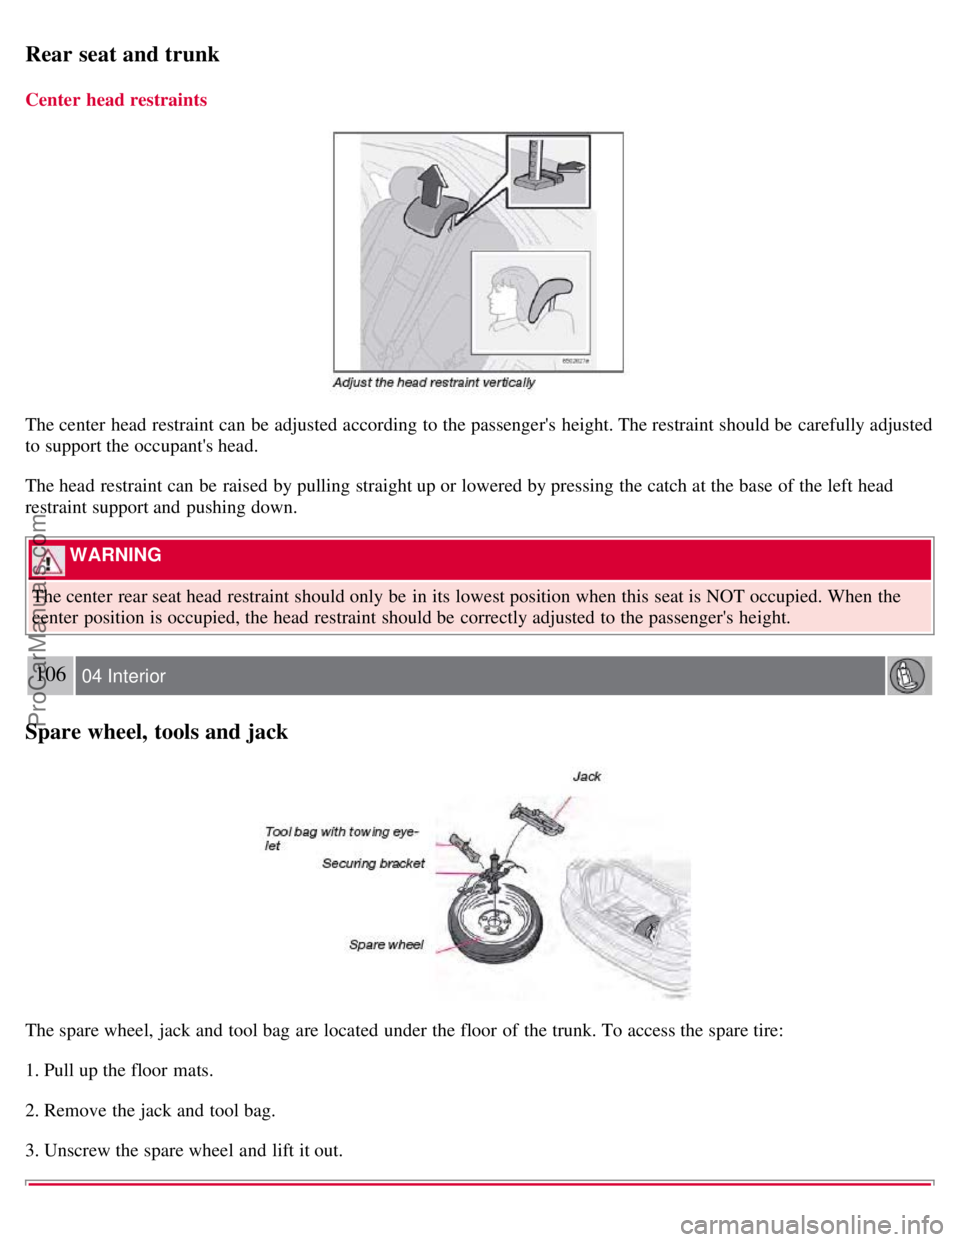
Center head restraints
The center head restraint can be adjusted according to the passenger's height. The restraint should be carefully adjusted
to support the occupant's head.
The head restraint can be raised by pulling straight up or lowered by pressing the catch at the base of the left head
restraint support and pushing down.
WARNING
The center rear seat head restraint should only be in its lowest position when this seat is NOT occupied. When the
center position is occupied, the head restraint should be correctly adjusted to the passenger's height.
106 04 Interior
Spare wheel, tools and jack
The spare wheel, jack and tool bag are located under the floor of the trunk. To access the spare tire:
1. Pull up the floor mats.
2. Remove the jack and tool bag.
3. Unscrew the spare wheel and lift it out.
ProCarManuals.com
Page 135 of 230

If your vehicle is equipped with automatic leveling, the rear suspension always retains the correct ride height
regardless of the load. When the vehicle is stationary, the rear suspension lowers, which is normal.
146 06 Starting and driving
Detachable trailer hitch
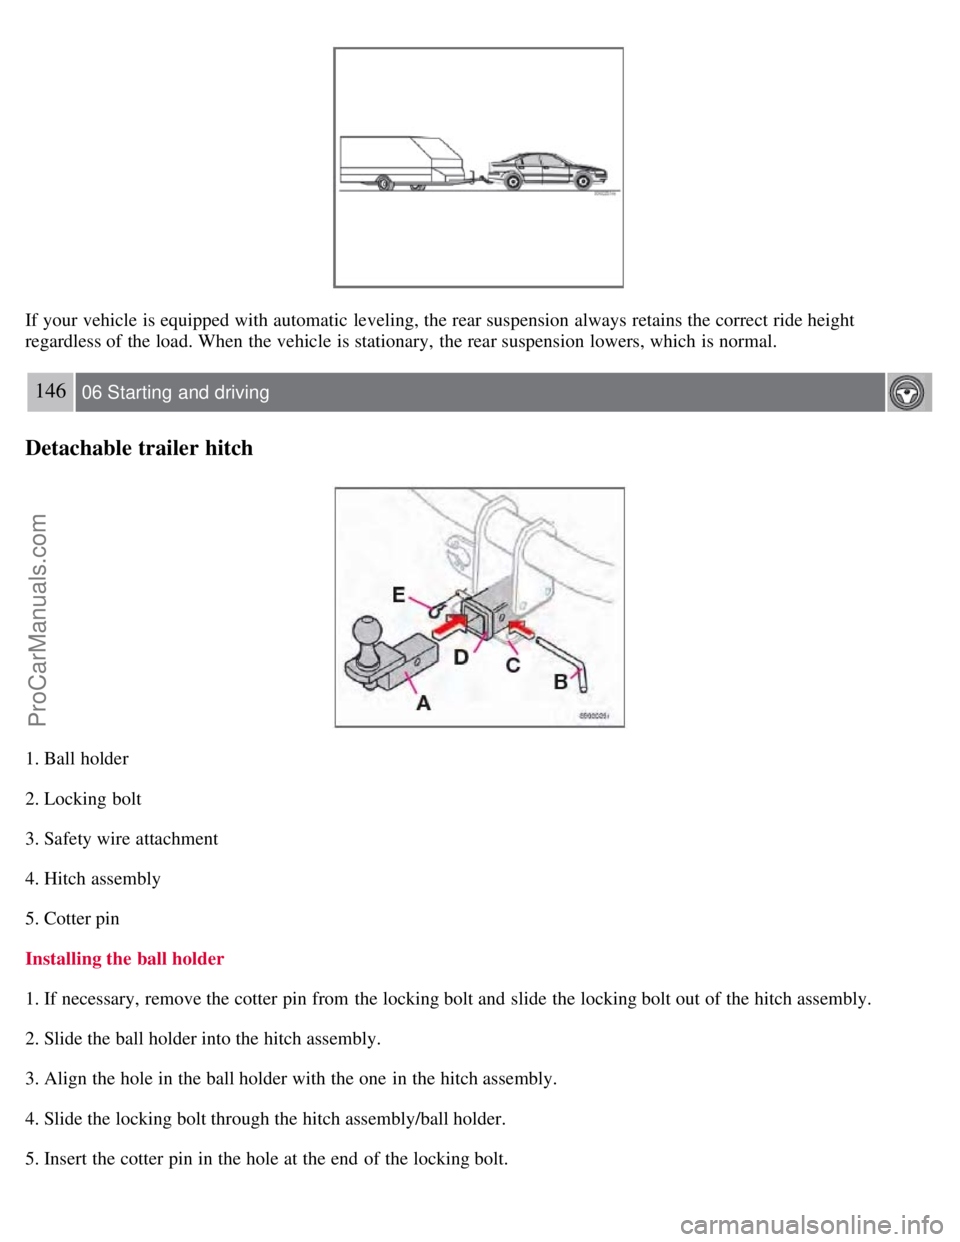
1. Ball holder
2. Locking bolt
3. Safety wire attachment
4. Hitch assembly
5. Cotter pin
Installing the ball holder
1. If necessary, remove the cotter pin from the locking bolt and slide the locking bolt out of the hitch assembly.
2. Slide the ball holder into the hitch assembly.
3. Align the hole in the ball holder with the one in the hitch assembly.
4. Slide the locking bolt through the hitch assembly/ball holder.
5. Insert the cotter pin in the hole at the end of the locking bolt.
ProCarManuals.com
Page 150 of 230

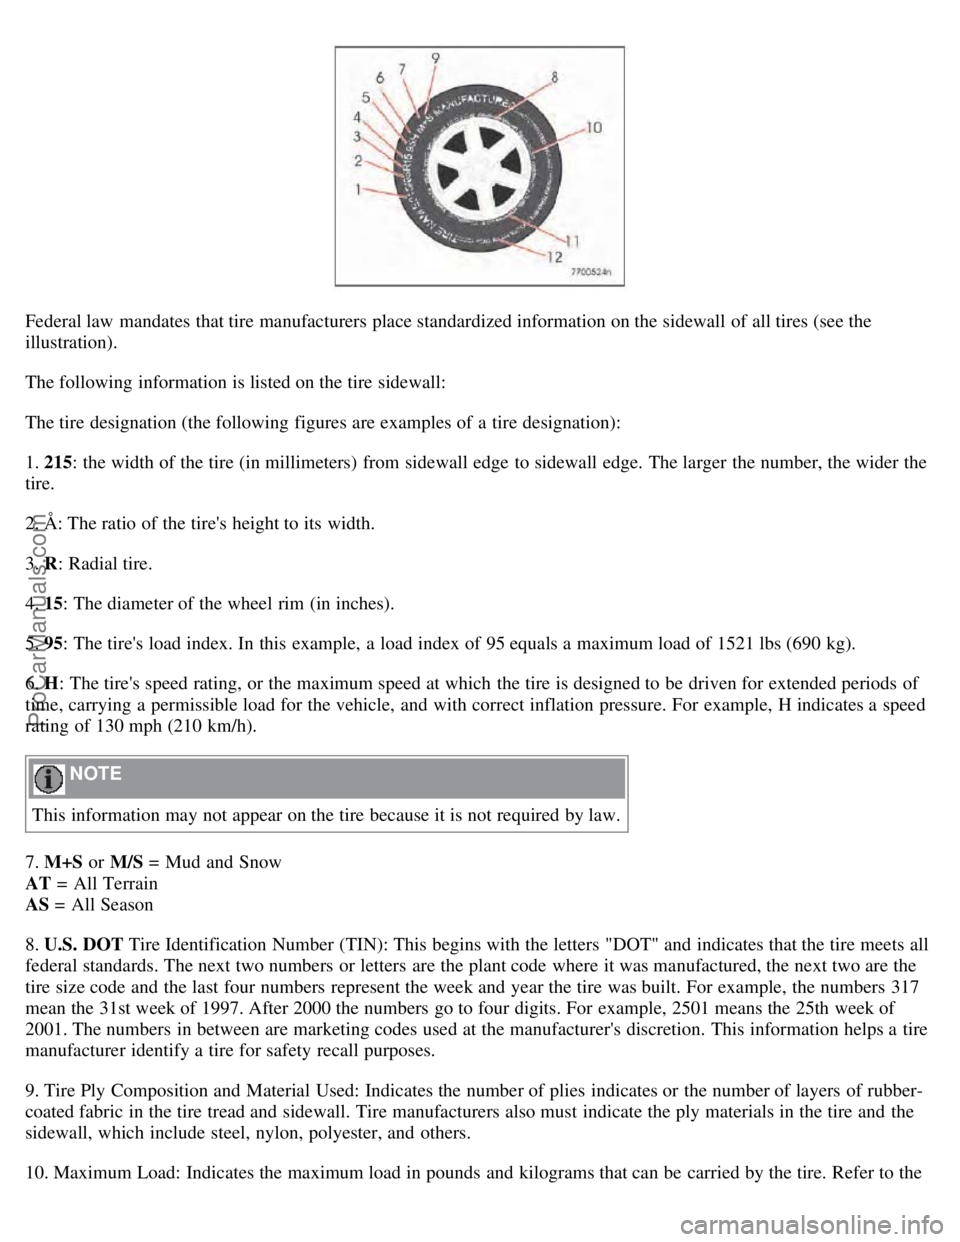
Federal law mandates that tire manufacturers place standardized information on the sidewall of all tires (see the
illustration).
The following information is listed on the tire sidewall:
The tire designation (the following figures are examples of a tire designation):
1. 215: the width of the tire (in millimeters) from sidewall edge to sidewall edge. The larger the number, the wider the
tire.
2. Å: The ratio of the tire's height to its width.
3. R: Radial tire.
4. 15: The diameter of the wheel rim (in inches).
5. 95: The tire's load index. In this example, a load index of 95 equals a maximum load of 1521 lbs (690 kg).
6. H : The tire's speed rating, or the maximum speed at which the tire is designed to be driven for extended periods of
time, carrying a permissible load for the vehicle, and with correct inflation pressure. For example, H indicates a speed
rating of 130 mph (210 km/h).
NOTE
This information may not appear on the tire because it is not required by law.
7. M+S or M/S = Mud and Snow
AT = All Terrain
AS = All Season
8. U.S. DOT Tire Identification Number (TIN): This begins with the letters "DOT" and indicates that the tire meets all
federal standards. The next two numbers or letters are the plant code where it was manufactured, the next two are the
tire size code and the last four numbers represent the week and year the tire was built. For example, the numbers 317
mean the 31st week of 1997. After 2000 the numbers go to four digits. For example, 2501 means the 25th week of
2001. The numbers in between are marketing codes used at the manufacturer's discretion. This information helps a tire
manufacturer identify a tire for safety recall purposes.
9. Tire Ply Composition and Material Used: Indicates the number of plies indicates or the number of layers of rubber-
coated fabric in the tire tread and sidewall. Tire manufacturers also must indicate the ply materials in the tire and the
sidewall, which include steel, nylon, polyester, and others.
10. Maximum Load: Indicates the maximum load in pounds and kilograms that can be carried by the tire. Refer to the
ProCarManuals.com