2008 VOLVO S60 suspension
[x] Cancel search: suspensionPage 4 of 230

09 Maintenance and servicing
Volvo service186
Maintaining your vehicle187
Emission inspection readiness188
Working on your vehicle189
Hood and engine compartment191
Engine oil192
Fluids195
Wiper blades197
Battery198
Replacing bulbs201
Fuses211
10 Audio
Introduction 222
Audio system HU -650 - overview223
Audio system HU -850 - overview224
Radio functions HU -650/HU-850225
RBDS functions HU -650/HU-850231
HU -650 - CD player234
HU -850 - internal CD changer235
External CD changer (option)236
Dolby Surround Pro Logic II -
HU -850 only237
Audio systems - specifications
239
11 Specifications
Label information242
Dimensions and weights244
Capacities246
Engine specifications247
Bulbs248
Electrical system249
Three-way catalytic converter250
Suspension251
Volvo programs252
5 -
cont. Contents
12 Index
Index 254
6 Introduction
General information
Shiftlock
When your vehicle is parked, the gear selector is locked in the (P)ark position. To release the selector from this
position, turn the ignition key to position II (or start the engine), depress the brake pedal, press the button on the front
side of the gear selector and move the selector from (P)ark.
Keylock (automatic transmission)
When you switch off the ignition, the gear selector must be in the ( P)ark position before the key can be removed from
the ignition switch.
Anti-lock Brake System (ABS)
The ABS system in your vehicle performs a self -diagnostic test when the vehicle first reaches the speed of
approximately 12 mph (20 km/h). The brake pedal will pulsate several times and a sound may be audible from the
ABS control module. This is normal.
Fuel filler door
Press the button on the light switch panel when the car is at a standstill to open the fuel filler door.
Fuel filler cap
The fuel filler door, located on the right rear fender, is connected to your vehicle's central locking system. Press the
button on the light switch panel (see illustration on page 57
) when the vehicle is at a standstill to unlock the fuel filler
door. Please note that the fuel filler door will remain unlocked until the vehicle begins to move forward. An audible
ProCarManuals.com
Page 11 of 230

09 Maintenance and servicing
Volvo service186
Maintaining your vehicle187
Emission inspection readiness188
Working on your vehicle189
Hood and engine compartment191
Engine oil192
Fluids195
Wiper blades197
Battery198
Replacing bulbs201
Fuses211
10 Audio
Introduction 222
Audio system HU -650 - overview223
Audio system HU -850 - overview224
Radio functions HU -650/HU-850225
RBDS functions HU -650/HU-850231
HU -650 - CD player234
HU -850 - internal CD changer235
External CD changer (option)236
Dolby Surround Pro Logic II -
HU -850 only237
Audio systems - specifications
239
11 Specifications
Label information242
Dimensions and weights244
Capacities246
Engine specifications247
Bulbs248
Electrical system249
Three-way catalytic converter250
Suspension251
Volvo programs252
5 -
cont. Contents
12 Index
Index 254
6 Introduction
General information
Shiftlock
When your vehicle is parked, the gear selector is locked in the (P)ark position. To release the selector from this
position, turn the ignition key to position II (or start the engine), depress the brake pedal, press the button on the front
side of the gear selector and move the selector from (P)ark.
Keylock (automatic transmission)
When you switch off the ignition, the gear selector must be in the ( P)ark position before the key can be removed from
the ignition switch.
Anti-lock Brake System (ABS)
The ABS system in your vehicle performs a self -diagnostic test when the vehicle first reaches the speed of
approximately 12 mph (20 km/h). The brake pedal will pulsate several times and a sound may be audible from the
ABS control module. This is normal.
Fuel filler door
Press the button on the light switch panel when the car is at a standstill to open the fuel filler door.
Fuel filler cap
The fuel filler door, located on the right rear fender, is connected to your vehicle's central locking system. Press the
button on the light switch panel (see illustration on page 57
) when the vehicle is at a standstill to unlock the fuel filler
door. Please note that the fuel filler door will remain unlocked until the vehicle begins to move forward. An audible
ProCarManuals.com
Page 135 of 230

If your vehicle is equipped with automatic leveling, the rear suspension always retains the correct ride height
regardless of the load. When the vehicle is stationary, the rear suspension lowers, which is normal.
146 06 Starting and driving
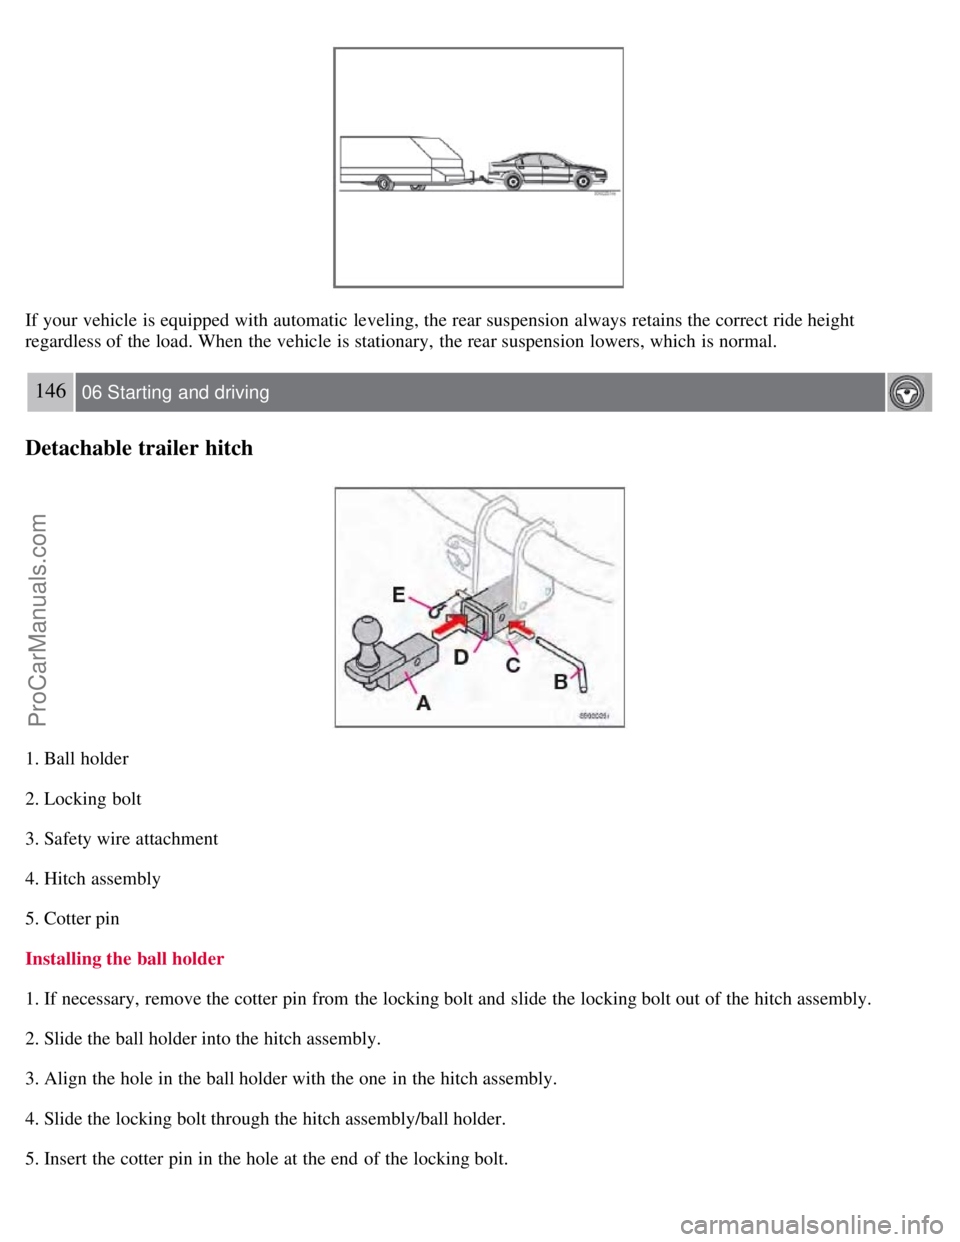
Detachable trailer hitch
1. Ball holder
2. Locking bolt
3. Safety wire attachment
4. Hitch assembly
5. Cotter pin
Installing the ball holder
1. If necessary, remove the cotter pin from the locking bolt and slide the locking bolt out of the hitch assembly.
2. Slide the ball holder into the hitch assembly.
3. Align the hole in the ball holder with the one in the hitch assembly.
4. Slide the locking bolt through the hitch assembly/ball holder.
5. Insert the cotter pin in the hole at the end of the locking bolt.
ProCarManuals.com
Page 154 of 230

The temperature grade for this tire is established for a tire that is properly inflated and not overloaded. Excessive
speed, under-inflation, or excessive loading, either separately or in combination, can cause heat buildup and tire
failure.
169 07 Wheels and tires
Snow chains, snow tires, studded tires
Snow chains
Snow chains can be used on your Volvo with the following restrictions:
Snow chains should be installed on front wheels only. Use only Volvo approved snow chains.
If accessory, aftermarket or "custom" tires and wheels are installed and are of a size different than the original tires
and wheels, chains in some cases CANNOT be used. Sufficient clearances between chains and brakes, suspension and
body components must be maintained.
Some strap -on type chains will interfere with brake components and therefore CANNOT be used.
All Wheel Drive models: Snow chains should only be installed on the front wheels. Only chains adapted for AWD
models should be used.
Consult your Volvo retailer for additional snow chain information.
CAUTION
Check local regulations regarding the use of snow chains before installing.
Always follow the chain manufacturer's installation instructions carefully. Install chains as tightly as possible and
retighten periodically.
Never exceed the chain manufacturer's specified maximum speed limit. (Under no circumstances should you
exceed 31 mph (50 km/h)).
Avoid bumps, holes or sharp turns when driving with snow chains.
The handling of the vehicle can be adversely affected when driving with chains. Avoid fast or sharp turns as well
as locked wheel braking.
Snow tires, studded tires
1
Tires for winter use:
Owners who live in or regularly commute through areas with sustained periods of snow or icy driving conditions are
strongly advised to fit suitable winter tires to help retain the highest degree of traction.
It is important to install winter tires on all four wheels to help retain traction during cornering, braking, and
accelerating. Failure to do so could reduce traction to an unsafe level or adversely affect handling.
Do not mix tires of different design as this could also negatively affect overall tire road grip.
Winter tires wear more quickly on dry roads in warm weather. They should be removed when the winter driving
season has ended.
Studded tires should be run-in 300-600 miles (500-1000 km) during which the vehicle should be driven as smoothly
as possible to give the studs the opportunity to seat properly in the tires. The tires should have the same rotational
direction throughout their entire lifetime.
1Where permitted
NOTE
ProCarManuals.com
Page 159 of 230

dynamic forces on its suspension.
Suspension wear diagnostics
Every suspension needs periodic inspection and maintenance. A tire's wear pattern can be an aid in detecting a
suspension problem. Each tire, if left in place, tells a story about the suspension. Tire rotation, on the other hand, could
make suspension wear harder to detect. Early detection is very important, because suspension problems can make tire
wear worse.
If you do rotate your tires...
Please follow the tire manufacturer's recommendations, as outlined in the tire manufacturers tire warranty pamphlet.
175 07 Wheels and tires
This page left intentionally blank.
Contents | Top of Page
ProCarManuals.com
Page 214 of 230

2 0 0 8
VOLVO S60
240 11 Specifications
Label information 242
Dimensions and weights244
Capacities246
Engine specifications247
Bulbs248
Electrical system249
Three-way catalytic converter250
Suspension251
Volvo programs252
241 11 Specifications
242 11 Specifications
Label information
ProCarManuals.com
Page 221 of 230

Remember that tampering or unauthorized modifications to the engine, the Electronic Control Module, or the vehicle
may be illegal and can cause three-way catalytic converter or exhaust system overheating.
This includes:
- Altering fuel injection setting or components.
- Altering emission system components or location or removing components.
- Repeated use of leaded fuel.
NOTE
Unleaded fuel is required for vehicles with three-way catalytic converters.
251 11 Specifications
Suspension
Rear suspension
Individual rear wheel suspension with longitudinal support arms, double link arms and track rods.
Front suspension
Spring strut suspension with integrated shock absorbers and control arms linked to the support frame. Power-assisted
rack and pinion steering. Safety type steering column.
252 11 Specifications
Volvo programs
Volvo On Call Roadside Assistance
Your new Volvo comes with a four year ON CALL roadside assistance. Additional information, features, and benefits are
described in a separate information package in your glove compartment.
If you have misplaced your package, dial:
In the U.S.A.:
1-800-638-6586 (1-800-63-VOLVO)
In Canada:
1-800-263-0475
Technician certification
In addition to Volvo factory training, Volvo supports certification by the National Institute for Automotive Service
Excellence (A.S.E.). Certified technicians have demonstrated a high degree of competence in specific areas. Besides
passing exams, each technician must also have worked in the field for two or more years before a certificate is issued.
These professional technicians are best able to analyze vehicle problems and perform the necessary service procedures to
keep your Volvo at peak operating condition.
253 11 Specifications
This page left intentionally blank.
ProCarManuals.com
Page 225 of 230

Current fuel consumption64
D
Defroster87
Detachable trailer hitch146
Dimensions244
Disabling the passenger's side front
airbag21
Door mirrors
defroster63
Driver distraction9
Driving economically129
Driving through water130
Dynamic Stability and Traction
Control (DSTC)139
E
Economical driving129
Electrical system249
Electrically operated moonroof76
Emission inspection188
Engine
specifications247
starting127
Engine compartment191
Engine oil192
Environment7
F
Federal Clean Air Act186
FIX NEXT SERVICE53
Fog lights
front58
rear58
Folding head restraints54
Front airbags17, 18, 21
Front park assist151
Front seats
folding backrests93
manually operated92
power operated94
Front suspension251
Fuel122
Fuel filler cap6, 125
Fuel filler door125
Fuel Formulations124
Fuel gauge48
ProCarManuals.com