2008 VOLVO S40 AUX
[x] Cancel search: AUXPage 42 of 239

1. Speedometer
2. Turn signal, left
3. Warning symbol - See the following pages for additional information.
4. Information display - The display presents information and warning messages, the ambient temperature, and the
clock, etc. When the ambient temperature is between 23° and 36°F (-5° and +2°C), a snowflake symbol is shown in
the display. This symbol serves as a warning for possible slippery road surfaces. Please note that this symbol does not
indicate a fault with your car. At low speeds, or when the car is not moving, the temperature readings may be slightly
higher than the actual ambient temperature.
5. Information symbol - See the following pages for additional information.
6. Turn signal, right
7. Tachometer - Shows engine speed in thousands of revolutions per minute (rpm). Do not drive continuously with the
needle in the red area of the dial, which indicates maximum allowable engine rpm range. Instead, shift to a higher gear
or slow the vehicle down. The engine management system will automatically prevent excessively high engines speeds.
This will be noticeable as a pronounced unevenness in engine speed.
8. Indicator and warning symbols
9. Fuel gauge (see page 252
for fuel tank volume). When a warning light in the gauge comes on, there are
approximately 2.1 US gallons (8 liters) of fuel remaining in the tank. For more information on fuel level and
consumption, see "Trip computer" on page 63
.
50 02 Instruments and controls
Instrument panel
10. Trip odometer reset button - The trip odometers are used to measure short distances. Press the button briefly to
switch between the odometer for the car's total mileage and the two trip odometers, T1 and T2. A long press (more
than 2 seconds) resets the currently selected trip odometer.
11. Function display - This window displays information on functions such as the odometer, trip odometers, optional
rain sensor, and cruise control.
12. High beam indicator
13. Temperature gauge - The gauge indicates the temperature of the engine cooling system. If the temperature is
abnormally high and the needle enters the red zone, a message is shown in the display. Bear in mind that auxiliary
lamps in front of the air intake reduce the cooling capacity at high outside temperatures and high engine loads.
ProCarManuals.com
Page 49 of 239

Information display
58 02 Instruments and controls
12-volt sockets
12-volt socket (front seat)
The 12-volt socket can be used to plug in certain accessories such as cellular telephones, etc. The maximum current is
10A. The key must be in position I (or higher) for the auxiliary socket to function.
Ashtrays/cigarette lighter
The auxiliary socket can also be used for a cigarette lighter
1, and ashtrays1 are also available. Please contact your
Volvo retailer.
1Accessory.
ProCarManuals.com
Page 50 of 239

NOTE
The cover should be kept on when the auxiliary socket is not in use.
Auxiliary equipment
The buttons to the right of the 12-volt socket can be used for Volvo-installed optional or auxiliary equipment.
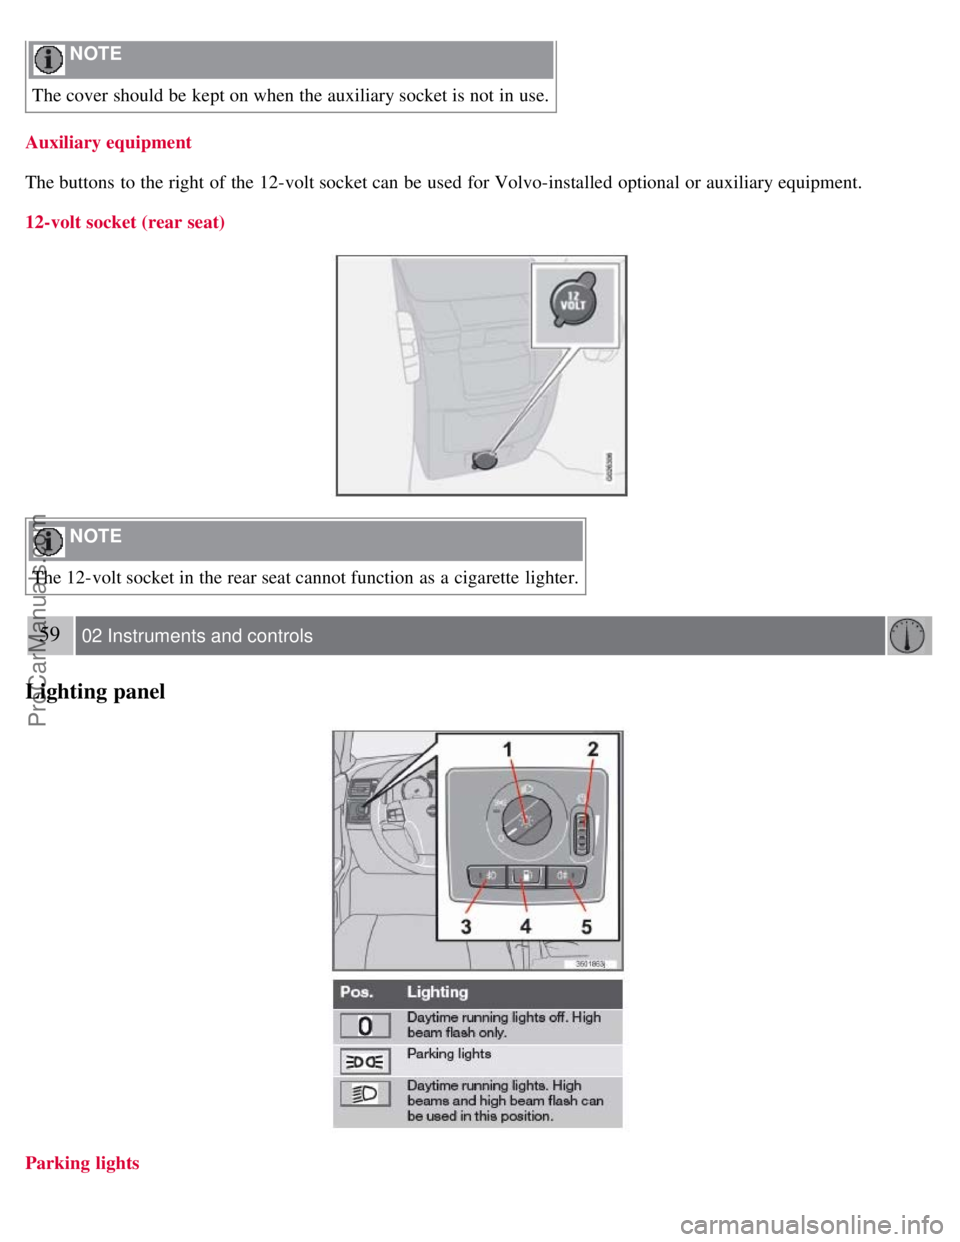
12-volt socket (rear seat)
NOTE
The 12-volt socket in the rear seat cannot function as a cigarette lighter.
59 02 Instruments and controls
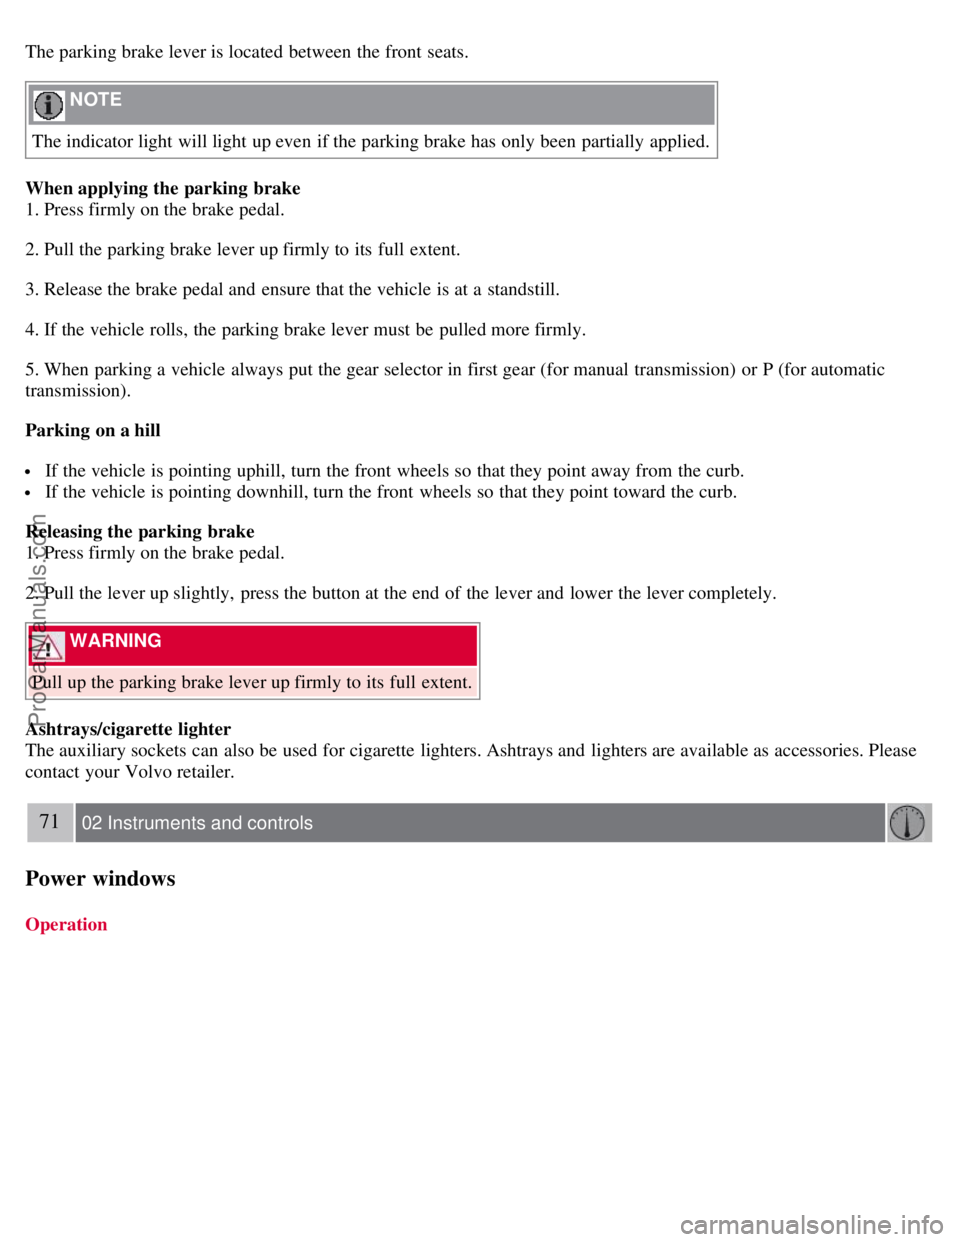
Lighting panel
Parking lights
ProCarManuals.com
Page 62 of 239

The parking brake lever is located between the front seats.
NOTE
The indicator light will light up even if the parking brake has only been partially applied.
When applying the parking brake
1. Press firmly on the brake pedal.
2. Pull the parking brake lever up firmly to its full extent.
3. Release the brake pedal and ensure that the vehicle is at a standstill.
4. If the vehicle rolls, the parking brake lever must be pulled more firmly.
5. When parking a vehicle always put the gear selector in first gear (for manual transmission) or P (for automatic
transmission).
Parking on a hill
If the vehicle is pointing uphill, turn the front wheels so that they point away from the curb.
If the vehicle is pointing downhill, turn the front wheels so that they point toward the curb.
Releasing the parking brake
1. Press firmly on the brake pedal.
2. Pull the lever up slightly, press the button at the end of the lever and lower the lever completely.
WARNING
Pull up the parking brake lever up firmly to its full extent.
Ashtrays/cigarette lighter
The auxiliary sockets can also be used for cigarette lighters. Ashtrays and lighters are available as accessories. Please
contact your Volvo retailer.
71 02 Instruments and controls
Power windows
Operation
ProCarManuals.com
Page 142 of 239

WARNING
Remember that the power brakes and power steering will not function when engine is not running. The braking
and steering systems will function but the brake pedal pressure required is 3 - 5 times above normal and greater
steering effort must be exerted.
The towing eyelets must not be used for pulling the vehicle out of a ditch or for any similar purpose involving
severe strain. Do not use the towing eyelets to pull the vehicle up onto a flat bed tow truck.
153 06 Starting and driving
Jump starting
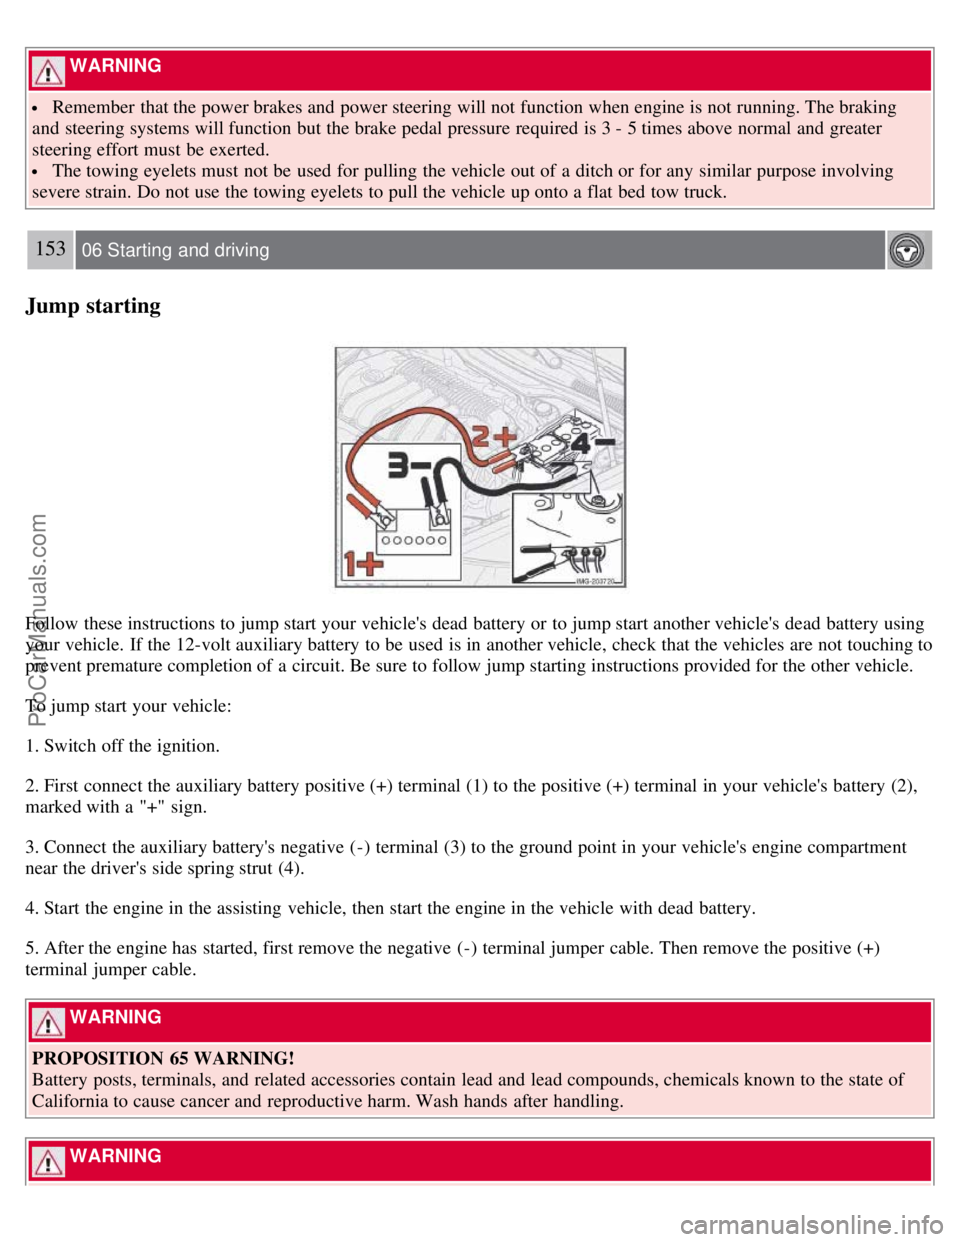
Follow these instructions to jump start your vehicle's dead battery or to jump start another vehicle's dead battery using
your vehicle. If the 12-volt auxiliary battery to be used is in another vehicle, check that the vehicles are not touching to
prevent premature completion of a circuit. Be sure to follow jump starting instructions provided for the other vehicle.
To jump start your vehicle:
1. Switch off the ignition.
2. First connect the auxiliary battery positive (+) terminal (1) to the positive (+) terminal in your vehicle's battery (2),
marked with a "+" sign.
3. Connect the auxiliary battery's negative (-) terminal (3) to the ground point in your vehicle's engine compartment
near the driver's side spring strut (4).
4. Start the engine in the assisting vehicle, then start the engine in the vehicle with dead battery.
5. After the engine has started, first remove the negative (-) terminal jumper cable. Then remove the positive (+)
terminal jumper cable.
WARNING
PROPOSITION 65 WARNING!
Battery posts, terminals, and related accessories contain lead and lead compounds, chemicals known to the state of
California to cause cancer and reproductive harm. Wash hands after handling.
WARNING
ProCarManuals.com
Page 151 of 239

The system is activated automatically when the vehicle is started. The indicator light in the button in the center console
illuminates.
The front park assist system is active from the time the engine is started until the vehicle exceeds a speed of
approximately 10 mph (15 km/h). It is also active when the vehicle is backing up.
Rear park assist is active when the engine is running and reverse gear has been selected.
Rear park assist
The distance monitored behind the vehicle is approximately 5 ft (1.5 m). The signal comes from the rear speakers.
The system must be deactivated when towing a trailer, carrying bicycles in a rear-mounted carrier, etc, which could
trigger the rear park assist system's sensors.
NOTE
Rear park assist is deactivated automatically when towing a trailer if Volvo genuine trailer wiring is used.
Front park assist
The distance monitored in front of the vehicle is approximately 2.5 ft (0.8 m). The audible signal comes from the audio
system's front speakers.
It may not be possible to combine auxiliary headlights and front park assist since these lights could trigger the system's
sensors.
163 06 Starting and driving
Park assist (option/accessory)
Activating/deactivating park assist
The system is activated automatically when the vehicle is started.
If the vehicle is equipped with both front and rear park assist , press the park assist button on the center console
(see the illustration) to temporarily turn off (deactivate) the systems. The indicator light in the button will go out when
the system has been switched off.
If the vehicle is equipped with rear park assist only , a message will be displayed when reverse gear is selected
showing if the system is on or off. Press EXIT to turn rear park assist off, or ENTER to turn the system on.
Park assist will be automatically reactivated the next time the engine is started, or if the button is pressed (the
indicator light in the button will illuminate).
ProCarManuals.com
Page 174 of 239

NOTE
When washing the car, remember to remove dirt from the drain holes in the doors and sills.
Exterior components
Volvo recommends the use of special cleaning products, available at your Volvo retailer, for cleaning colored plastic,
rubber, or ornamental components such as chromed strips on the exterior of your vehicle. The instructions for using
these products should be followed carefully.Solvents or stain removers should not be used.
CAUTION
Avoid waxing or polishing plastic or rubber components
Polishing chromed strips can wear away or damage the surface
Polishes containing abrasive substances should not be used
193 08 Car care
Washing and cleaning the car
NOTE
During high pressure washing, the spray mouthpiece must never be closer to the vehicle than 13" (30 cm). Do not
spray into the locks.
Dirt, snow, etc., on the headlights can reduce lighting capacity considerably. Clean the headlights regularly, for
example when refueling.
When washing or steam cleaning the engine, avoid spraying water or steam directly on the electrical components
or toward the rear side of the engine. Special moonroof cautions:
Always close the moonroof and sun shade before washing your vehicle.
Never use abrasive cleaning agents on the moonroof.
Never use wax on the rubber seals around the moonroof
Automatic washing - simple and quick
We do NOT recommend washing your car in an automatic wash during the first six months (because the paint will not
have hardened sufficiently). An automatic wash is a simple and quick way to clean your car, but it is worth
remembering that it may not be as thorough as when you yourself go over the car with sponge and water. Keeping the
underbody clean is most important, especially in the winter. Some automatic washers do not have facilities for washing
the underbody.
CAUTION
Before driving into an automatic car wash, turn off the optional rain sensor to avoid damaging the windshield
wipers.
Make sure that side view mirrors, auxiliary lamps, etc, are secure, and that any antenna(s) are retracted or
removed. Otherwise there is risk of the machine dislodging them.
Chromed wheels : Clean chrome-plated wheels using the same detergents used for the body of the vehicle.
Aggressive wheel-cleaning agents can permanently stain chrome-plated wheels.
WARNING
When the car is driven immediately after being washed, apply the brakes several times in order to remove any
ProCarManuals.com
Page 206 of 239

3. MODE - select a sound source
4. TUNING dial
5. SOUND button
Selecting a sound source
Press AM/FM (2) repeatedly to toggle between FM1, FM2, and AM.
Press MODE (3) repeatedly to toggle between the CD player and the optional external sound source AUX or the
optional Sirius satellite radio.
The currently selected sound source will be shown in the display.
AUX (option)
The AUX (auxiliary) port, located under the center armrest, can be used to connect for example, an mp3 player.
If the player is being charged through a 12-volt socket while it is connect to the AUX port, sound quality may be
impaired.
The volume of the external sound source AUX may be different from the volume of the internal sound sources such as
the CD player or the radio. If the external sound source's volume is too high, the quality of the sound may be
impaired.
This can be prevented by adjusting the external sound source's input volume.
1. While playing the radio or a CD, lower the audio volume to about one -quarter.
2. Switch to AUX mode on the audio system.
3. Connect the headphone output from your music player to the AUX input using a cable with a stereo 3.5mm
miniplug at both ends.
4. Set your music player's headphone volume to three-quarters using the player's volume controls.
5. Press Menu on the audio system, and navigate to AUX Volume or AUX Input Volume.
6. Turn the volume knob to raise or lower the AUX Input Volume until you hear music at a comfortable level.
231 10 Audio
ProCarManuals.com