2008 VOLVO S40 ESP
[x] Cancel search: ESPPage 170 of 239

data to a receiver located in the vehicle.
NOTE
USA - FCC ID: KR5S122780002
This device complies with part 15 of the FCC rules. Operation is subject to the following conditions: (1) This device
may not cause harmful interference, and (2) this device must accept any interference received, including interference
that may cause undesired operation.
When low inflation pressure is detected, TPMS will light up the tire pressure warning light (
) (also referred to as a
telltale) in the instrument panel, and will display a message in the text window. The wording of this message is
determined by the degree of inflation pressure loss.
NOTE
If a fault occurs in TPMS, the tire pressure warning light will flash for approximately 1 minute and TIRE PRESS
SYST SERVICE REQUIRED will be displayed.
Each tire, including the spare (if provided), should be checked monthly when cold and inflated to the inflation pressure
recommended by the vehicle manufacturer on the vehicle placard or tire inflation pressure label. (If your vehicle has
tires of a different size than the size indicated on the vehicle placard or tire inflation pressure label, you should
determine the proper tire inflation pressure for those tires.)
As an added safety feature, your vehicle has been equipped with a tire pressure monitoring system (TPMS) that
illuminates a low tire pressure telltale when one or more of your tires is significantly under-inflated. Accordingly,
when the low tire pressure telltale illuminates, you should stop and check your tires as soon as possible, and inflate
them to the proper pressure. Driving on a significantly under-inflated tire causes the tire to overheat and can lead to
tire failure. Under-inflation also reduces fuel efficiency and tire tread life, and may affect the vehicle's handling and
stopping ability.
Please note that the TPMS is not a substitute for proper tire maintenance, and it is the driver's responsibility to
maintain correct tire pressure, even if under-inflation has not reached the level to trigger illumination of the TPMS low
tire pressure telltale.
Your vehicle has also been equipped with a TPMS malfunction indicator to indicate when the system is not operating
properly. The TPMS malfunction indicator is combined with the low tire pressure telltale. When the system detects a
malfunction, the telltale will flash for approximately one minute and then remain continuously illuminated. This
sequence will continue upon subsequent vehicle start-ups as long as the malfunction exists. When the malfunction
indicator is illuminated, the system may not be able to detect or signal low tire pressure as intended. TPMS
malfunctions may occur for a variety of reasons, including the installation of replacement or alternate tires or wheels
on the vehicle that prevent the TPMS from functioning properly. Always check the TPMS malfunction telltale after
replacing one or more tires or wheels on your vehicle to ensure that the replacement or alternate tires and wheels allow
the TPMS to continue to function properly.
188 07 Wheels and tires
Tire Pressure Monitoring System (TPMS)
NOTE
TPMS indicates low tire pressure but does not replace normal tire maintenance. For information on correct tire
ProCarManuals.com
Page 174 of 239

NOTE
When washing the car, remember to remove dirt from the drain holes in the doors and sills.
Exterior components
Volvo recommends the use of special cleaning products, available at your Volvo retailer, for cleaning colored plastic,
rubber, or ornamental components such as chromed strips on the exterior of your vehicle. The instructions for using
these products should be followed carefully.Solvents or stain removers should not be used.
CAUTION
Avoid waxing or polishing plastic or rubber components
Polishing chromed strips can wear away or damage the surface
Polishes containing abrasive substances should not be used
193 08 Car care
Washing and cleaning the car
NOTE
During high pressure washing, the spray mouthpiece must never be closer to the vehicle than 13" (30 cm). Do not
spray into the locks.
Dirt, snow, etc., on the headlights can reduce lighting capacity considerably. Clean the headlights regularly, for
example when refueling.
When washing or steam cleaning the engine, avoid spraying water or steam directly on the electrical components
or toward the rear side of the engine. Special moonroof cautions:
Always close the moonroof and sun shade before washing your vehicle.
Never use abrasive cleaning agents on the moonroof.
Never use wax on the rubber seals around the moonroof
Automatic washing - simple and quick
We do NOT recommend washing your car in an automatic wash during the first six months (because the paint will not
have hardened sufficiently). An automatic wash is a simple and quick way to clean your car, but it is worth
remembering that it may not be as thorough as when you yourself go over the car with sponge and water. Keeping the
underbody clean is most important, especially in the winter. Some automatic washers do not have facilities for washing
the underbody.
CAUTION
Before driving into an automatic car wash, turn off the optional rain sensor to avoid damaging the windshield
wipers.
Make sure that side view mirrors, auxiliary lamps, etc, are secure, and that any antenna(s) are retracted or
removed. Otherwise there is risk of the machine dislodging them.
Chromed wheels : Clean chrome-plated wheels using the same detergents used for the body of the vehicle.
Aggressive wheel-cleaning agents can permanently stain chrome-plated wheels.
WARNING
When the car is driven immediately after being washed, apply the brakes several times in order to remove any
ProCarManuals.com
Page 176 of 239

Volvo also offers a special leather softener that should be applied after the cleaner and protectant. It leaves leather soft
and smooth, and reduces friction between leather and other finishes in the vehicle.
Volvo recommends cleaning, protecting and conditioning your vehicle's leather two to four times a year. Ask your
Volvo retailer about Leather Care Kit 951 0251 and Leather Softener 943 7429.
Cleaning leather upholstery
1. Pour leather cleaner on a damp sponge and squeeze it until the cleaner foams.
2. Apply the foam to the stain by moving the sponge with circular movements.
3. Dampen the stain thoroughly with the sponge. Let the sponge absorb the stain, do not rub.
4. Dry the stain with soft paper towels or a towel, and allow the leather to dry completely.
Protecting leather upholstery
1. Put a small amount of protectant cream on a cloth and apply a thin coating of cream to the upholstery with light
circular movements.
2. Allow the leather to dry for 20 minutes.
195 08 Car care
Washing and cleaning the car
This will help the leather resist staining and protect against sunlight's harmful UV rays.
CAUTION
Under no circumstances should gasoline, naphtha or similar cleaning agents be used on the plastic or the leather
since these can cause damage.
Take extra care when removing stains such as ink or lipstick since the coloring can spread.
Use solvents sparingly. Too much solvent can damage the seat padding.
Start from the outside of the stain and work toward the center.
Sharp objects (e.g. pencils or pens in a pocket) or Velcro fasteners on clothing may damage the textile upholstery.
Clothing that is not colorfast, such as new jeans or suede garments, may stain the upholstery.
Cleaning the seat belts
Clean only with lukewarm water and a mild soap solution.
Cleaning floor mats
The floor mats should be vacuumed or brushed clean regularly, especially during winter when they should be taken out
for drying. Spots on textile mats can be removed with a mild detergent. For best protection in winter, Volvo
recommends the use of Volvo rubber floor mats. Consult your Volvo retailer.
196 08 Car care
Paint touch up
ProCarManuals.com
Page 184 of 239

Synthetic oil is not used when the oil is changed at the normal maintenance intervals except at owner request and
at additional charge. Please consult a trained and qualified Volvo service technician.
Checking and adding oil
The oil level should be checked every time the vehicle is refueled. This is especially important during the period up to
the first scheduled maintenance service
The car should be parked on a level surface when the oil is checked.
If the engine is warm , wait for at least 10-15 minutes after the engine has been switched off before checking the oil.
Checking the oil
1. Pull out the dipstick and wipe it with a lint-free rag.
2. Reinsert the dipstick, pull it out, and check the oil level.
3. Add oil if necessary. If the level is close to the MIN mark, add approximately 1 US quart (1 liter) of oil.
4. Run the engine until it reaches normal operating temperature.
5. Switch off the engine and wait for at least 10-15 minutes and recheck the oil level. If necessary, add oil until the
level is near the MAX mark.
NOTE
Not checking the oil level regularly can result in serious engine damage if the oil level becomes too low.
Oil that is lower than the specified quality can damage the engine.
Always add oil of the same type and viscosity as already used.
Never fill oil above the MAX mark. This could cause an increase in oil consumption.
ProCarManuals.com
Page 197 of 239

3. Grasp the edge of the panel and pull it straight out.
4. Unscrew the screw in the fog light housing and remove it.
5. Turn the bulb counterclockwise and remove it.
6. Insert a new bulb by turning it clockwise (the profile on the bulb holder will correspond with the profile in the base
of the bulb).
7. Reinsert the bulb holder. The mark TOP should be upward.
217 09 Maintenance and servicing
Replacing bulbs
Removing the taillight bulb holder
All bulbs in the taillight cluster can be replaced from the cargo area. To access the bulb holders:
1. Switch off all lights and turn the key to position 0.
2. Remove the covers in the left/right panels to access the bulb holders.
3. Disconnect the wiring connector from the affected bulb holder.
4. Press the catches together and pull out the bulb holder.
5. Replace the defective bulb.
6. Press the wiring connector back into position.
7. Press the bulb holder into place and reinstall the cover.
NOTE
If the message indicating a burned out bulb remains in the information display after the bulb has been replaced,
consult a trained and qualified Volvo service technician.
Location of taillight bulbs
ProCarManuals.com
Page 212 of 239

NOTE
A total of 30 stations can be stored; 10 stations each in AM, FM1 and FM2.
Automatically storing a station
Pressing AUTO (7) automatically searches for and stores up to ten strong AM or FM stations in a separate memory. If
more than ten stations are found, the ten strongest ones are stored. This function is especially useful in areas in which
you are not familiar with radio stations or their frequencies.
To use the AUTO function:
1. Select a waveband using the AM/FM button (1).
2. Start the search by pressing AUTO until AUTO STORING appears in the display.
When the search is completed, AUTO STORING will no longer be displayed. If there are no stations with sufficient
signal strength, NO AST FOUND is displayed.
The auto-stored stations can be selected using the preset buttons (2).
Press EXIT (6) to terminate the automatic storing function.
When the radio is in auto-store mode, AUTO is shown in the display. AUTO disappears when you return to normal
radio mode, which can be done by briefly pressing AM/FM (1), EXIT (6), or AUTO (7).
236 10 Audio
Radio functions
To return to the Auto-store mode, press the AUTO button briefly and select a stored station by pressing one of the
preset buttons (2).
Saving auto-stored stations in the preset memory
An auto-stored station can be saved in the memory for manually preset stations.
1. Press AUTO (7) briefly.
2. Auto is displayed.
3. Press one of the preset buttons (2) under which the station is to be stored. Hold down the button until STATION
STORED is displayed.
The radio will then exit auto-store mode and the stored station can be selected by pressing the preset button.
Scanning
SCAN (4) automatically searches through the selected waveband for strong AM or FM stations. When the radio finds a
station, that station will be played for approximately 8 seconds, after which scanning resumes.
Activating/deactivating SCAN
1. Select radio mode using the AM/FM button (2).
2. Press SCAN to activate the function. SCAN is shown in the display.
ProCarManuals.com
Page 220 of 239

Changing tracks
Briefly press the left or right arrow keys on the MENU NAVIGATION CONTROL to skip to the previous or next
track/file.
NOTE
The TUNING dial (6) (turn clockwise to go to the next track/file, or counterclockwise to go to the previous
track/file) or the optional steering wheel keypad can also be used for this purpose.
Fast forward/back
Press and hold down the left or right arrows keys in the MENU NAVIGATION CONTROL (or the corresponding
keys on the optional steering wheel keypad) to search within a track/file or the whole disc. The search continues for as
long as the buttons are held down.
Random play
This function plays the tracks/files on a CD (or on all of the CDs if the vehicle is equipped with the optional CD
changer) in random order (shuffle).
243 10 Audio
CD player/CD changer (option)
Activating/deactivating the random function-CD player
If a normal CD is being played:
1. Press MENU followed by ENTER .
2. Select Random and press ENTER .
If a CD with audio files is being played:
1. Press MENU followed by ENTER .
2. Select RANDOM and press ENTER.
3. Select DISC or FOLDER and press ENTER .
Activating/deactivating the random function-CD changer
If a normal CD is being played:
1. Press MENU followed by ENTER .
2. Select RANDOM and press ENTER.
3. Select SINGLE DISC or ALL DISCS and press ENTER .
If a CD with audio files is being played:
1. Press MENU followed by ENTER .
2. Select RANDOM and press ENTER.
3. Select SINGLE DISC or FOLDER and press ENTER .
NOTE
ProCarManuals.com
Page 224 of 239

249 11 Specifications
Label information
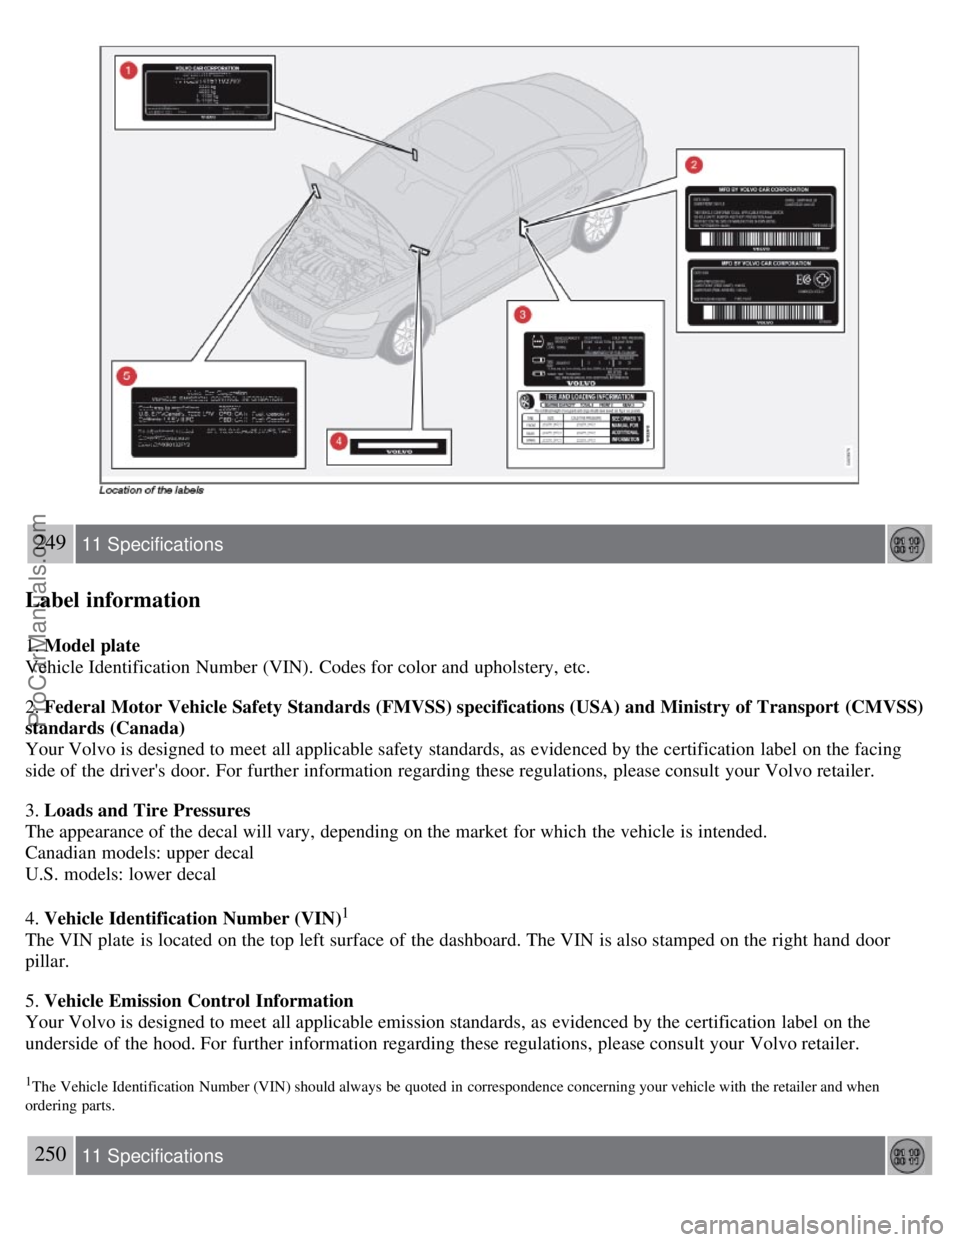
1. Model plate
Vehicle Identification Number (VIN). Codes for color and upholstery, etc.
2. Federal Motor Vehicle Safety Standards (FMVSS) specifications (USA) and Ministry of Transport (CMVSS)
standards (Canada)
Your Volvo is designed to meet all applicable safety standards, as evidenced by the certification label on the facing
side of the driver's door. For further information regarding these regulations, please consult your Volvo retailer.
3. Loads and Tire Pressures
The appearance of the decal will vary, depending on the market for which the vehicle is intended.
Canadian models: upper decal
U.S. models: lower decal
4. Vehicle Identification Number (VIN)
1
The VIN plate is located on the top left surface of the dashboard. The VIN is also stamped on the right hand door
pillar.
5. Vehicle Emission Control Information
Your Volvo is designed to meet all applicable emission standards, as evidenced by the certification label on the
underside of the hood. For further information regarding these regulations, please consult your Volvo retailer.
1The Vehicle Identification Number (VIN) should always be quoted in correspondence concerning your vehicle with the retailer and when
ordering parts.
250 11 Specifications
ProCarManuals.com