Page 169 of 239

Installing the wheel
1. Clean the contact surfaces on the wheel and hub.
2. Lift the wheel and place it on the hub.
3. Install the wheel nuts and tighten handtight. Using the lug wrench, tighten crosswise until all nuts are snug.
4. Lower the vehicle to the ground and alternately tighten the bolts crosswise to 96 ft. lbs. (130 Nm).
5. Install the wheel cap (where applicable).
186 07 Wheels and tires
Changing a wheel
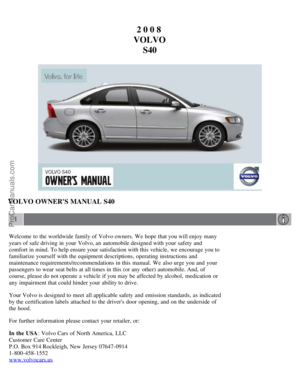
Returning the jack and spare wheel to the storage space
1. Crank the jack (1) down approximately halfway until the mark on the washer (2) aligns with the mark on the jack's
arm (3).
2. Place the jack in the storage space. Fold in the jack's crank (4) and place the lug wrench (5) on the jack.
3. Screw the jack's retaining pin into hole 6 so that it holds the jack securely in place.
4. Place the spare wheel (7) over the jack.
5. Insert the spare wheel's retaining pin through the center hole in the spare wheel so that it aligns with hole 8.
Screw the retaining pin into hole 8 so that it holds the spare wheel securely in place.
187 07 Wheels and tires
Tire Pressure Monitoring System (TPMS)
Introduction
The tire pressure monitoring system uses sensors mounted in the tire valves to check inflation pressure levels. When
the vehicle is moving at a speed of approximately 20 mph (30 km/h) or faster, these sensors transmit inflation pressure
ProCarManuals.com
Page 170 of 239
 This device")
data to a receiver located in the vehicle.
NOTE
USA - FCC ID: KR5S122780002
This device complies with part 15 of the FCC rules. Operation is subject to the following conditions: (1) This device
may not cause harmful interference, and (2) this device must accept any interference received, including interference
that may cause undesired operation.
When low inflation pressure is detected, TPMS will light up the tire pressure warning light (
) (also referred to as a
telltale) in the instrument panel, and will display a message in the text window. The wording of this message is
determined by the degree of inflation pressure loss.
NOTE
If a fault occurs in TPMS, the tire pressure warning light will flash for approximately 1 minute and TIRE PRESS
SYST SERVICE REQUIRED will be displayed.
Each tire, including the spare (if provided), should be checked monthly when cold and inflated to the inflation pressure
recommended by the vehicle manufacturer on the vehicle placard or tire inflation pressure label. (If your vehicle has
tires of a different size than the size indicated on the vehicle placard or tire inflation pressure label, you should
determine the proper tire inflation pressure for those tires.)
As an added safety feature, your vehicle has been equipped with a tire pressure monitoring system (TPMS) that
illuminates a low tire pressure telltale when one or more of your tires is significantly under-inflated. Accordingly,
when the low tire pressure telltale illuminates, you should stop and check your tires as soon as possible, and inflate
them to the proper pressure. Driving on a significantly under-inflated tire causes the tire to overheat and can lead to
tire failure. Under-inflation also reduces fuel efficiency and tire tread life, and may affect the vehicle's handling and
stopping ability.
Please note that the TPMS is not a substitute for proper tire maintenance, and it is the driver's responsibility to
maintain correct tire pressure, even if under-inflation has not reached the level to trigger illumination of the TPMS low
tire pressure telltale.
Your vehicle has also been equipped with a TPMS malfunction indicator to indicate when the system is not operating
properly. The TPMS malfunction indicator is combined with the low tire pressure telltale. When the system detects a
malfunction, the telltale will flash for approximately one minute and then remain continuously illuminated. This
sequence will continue upon subsequent vehicle start-ups as long as the malfunction exists. When the malfunction
indicator is illuminated, the system may not be able to detect or signal low tire pressure as intended. TPMS
malfunctions may occur for a variety of reasons, including the installation of replacement or alternate tires or wheels
on the vehicle that prevent the TPMS from functioning properly. Always check the TPMS malfunction telltale after
replacing one or more tires or wheels on your vehicle to ensure that the replacement or alternate tires and wheels allow
the TPMS to continue to function properly.
188 07 Wheels and tires
Tire Pressure Monitoring System (TPMS)
NOTE
TPMS indicates low tire pressure but does not replace normal tire maintenance. For information on correct tire
ProCarManuals.com
Page 171 of 239

pressure, please refer to the tables beginning on page 172.
The tire pressure warning light will not identify which tire is under-inflated. Be sure to check all four tires.
A certain amount of air seepage from the tires occurs naturally and tire pressure fluctuates with seasonal changes
in temperature. Always check tire pressure regularly.
Erasing warning messages
When a low tire pressure warning message has been displayed, and the tire pressure warning light has come on:
1. Use a tire pressure gauge to check the inflation pressure of all four tires.
2. Re-inflate the tire(s) to the correct pressure (consult the tire pressure placard or the tables beginning on page 172
).
3. In certain cases, it may be necessary to drive the vehicle for several minutes at a speed of 20 mph (30 km/h) or
faster. This will erase the warning text and the warning light will go out.
WARNING
Incorrect inflation pressure could lead to tire failure, resulting in a loss of control of the vehicle.
Changing wheels with TPMS
Please note the following when changing or replacing the factory installed TPMS wheels/tires on the vehicle:
Only the factory-mounted wheels are equipped with TPMS sensors in the valves.
If the vehicle is equipped with a temporary spare tire, this tire does not have a TPMS sensor.
If wheels without TPMS sensors are mounted on the vehicle, TIRE PRESS SYST SERVICE REQUIRED will be
displayed each time the vehicle is driven above 25 mph (40 km/h) for 10 minutes or more.
Once TPMS sensors are properly installed, the warning message should not reappear. If the message is still
displayed, drive the vehicle for several minutes at a speed of 20 mph (30 km/h) or faster to erase the message.
Volvo recommends that TPMS sensors be fitted on all wheels used on the vehicle. Volvo does not recommend
moving sensors back and forth between sets of wheels.
NOTE
If you change to tires with a different recommended inflation pressure, the TPMS system must be recalibrated to
these tires. This must be done by a trained and qualified Volvo service technician.
If a tire is changed, or if the TPMS sensor is moved to another wheel, the sensor's seal, nut, and valve core should
be replaced.
When installing TPMS sensors, the vehicle must be parked for at least 15 minutes with the ignition off. if the
vehicle is driven within 15 minutes, a TPMS error message will be displayed.
CAUTION
When inflating tires with TPMS valves, press the pump's mouthpiece straight onto the valve to help avoid bending or
otherwise damaging the valve.
189 07 Wheels and tires
This page left intentionally blank.
ProCarManuals.com
Page 172 of 239
Contents | Top of Page
ProCarManuals.com
Page 173 of 239

2 0 0 8
VOLVO S40
190 08 Car care
Washing and cleaning the car 192
Paint touch up196
191 08 Car care
192 08 Car care
Washing and cleaning the car
Washing the car
The following points should be kept in mind when washing and cleaning the car:
The car should be washed at regular intervals since dirt, dust, insects and tar spots adhere to the paint and may cause
damage. To help prevent corrosion, it is particularly important to wash the car frequently in the wintertime when salt
has been used on the roads.
Avoid washing your car in direct sunlight. Doing so may cause detergents and wax to dry out and become abrasive.
To avoid scratching, use lukewarm water to soften the dirt before you wash with a soft sponge, and plenty of sudsy
water.
Bird droppings : Remove from paintwork as soon as possible. Otherwise the finish may be permanently damaged.
A detergent can be used to facilitate the softening of dirt and oil.
A water-soluble grease solvent may be used in cases of sticky dirt. However, use a wash place equipped with a
drainage separator.
Dry the car with a clean chamois and remember to clean the drain holes in the doors and rocker panels.
Tar spots can be removed with kerosene or tar remover after the car has been washed.
A stiff-bristle brush and lukewarm soapy water can be used to clean the wiper blades. Frequent cleaning of the
windshield and wiper blades improves visibility considerably and also helps prolong the service life of the wiper
blades.
Wash off the dirt from the underside (wheel housings, fenders, etc).
In areas of high industrial fallout, more frequent washing is recommended.
After cleaning the engine, the spark plug wells should be inspected for water and blown dry if necessary.
ProCarManuals.com
Page 174 of 239

NOTE
When washing the car, remember to remove dirt from the drain holes in the doors and sills.
Exterior components
Volvo recommends the use of special cleaning products, available at your Volvo retailer, for cleaning colored plastic,
rubber, or ornamental components such as chromed strips on the exterior of your vehicle. The instructions for using
these products should be followed carefully.Solvents or stain removers should not be used.
CAUTION
Avoid waxing or polishing plastic or rubber components
Polishing chromed strips can wear away or damage the surface
Polishes containing abrasive substances should not be used
193 08 Car care
Washing and cleaning the car
NOTE
During high pressure washing, the spray mouthpiece must never be closer to the vehicle than 13" (30 cm). Do not
spray into the locks.
Dirt, snow, etc., on the headlights can reduce lighting capacity considerably. Clean the headlights regularly, for
example when refueling.
When washing or steam cleaning the engine, avoid spraying water or steam directly on the electrical components
or toward the rear side of the engine. Special moonroof cautions:
Always close the moonroof and sun shade before washing your vehicle.
Never use abrasive cleaning agents on the moonroof.
Never use wax on the rubber seals around the moonroof
Automatic washing - simple and quick
We do NOT recommend washing your car in an automatic wash during the first six months (because the paint will not
have hardened sufficiently). An automatic wash is a simple and quick way to clean your car, but it is worth
remembering that it may not be as thorough as when you yourself go over the car with sponge and water. Keeping the
underbody clean is most important, especially in the winter. Some automatic washers do not have facilities for washing
the underbody.
CAUTION
Before driving into an automatic car wash, turn off the optional rain sensor to avoid damaging the windshield
wipers.
Make sure that side view mirrors, auxiliary lamps, etc, are secure, and that any antenna(s) are retracted or
removed. Otherwise there is risk of the machine dislodging them.
Chromed wheels : Clean chrome-plated wheels using the same detergents used for the body of the vehicle.
Aggressive wheel-cleaning agents can permanently stain chrome-plated wheels.
WARNING
When the car is driven immediately after being washed, apply the brakes several times in order to remove any
ProCarManuals.com
Page 175 of 239

moisture from the brake linings.
Engine cleaning agents should not be used when the engine is warm. This constitutes a fire risk.
Exterior lighting
Condensation may form temporarily on the inside of the lenses of exterior lights such as headlights, fog lights, or
taillights. This is normal and the lights are designed to withstand moisture. Normally, condensation will dissipate after
the lights have been on for a short time.
Polishing and Waxing
Normally, polishing is not required during the first year after delivery, however, waxing may be beneficial.
Before applying polish or wax the vehicle must be washed and dried. Tar spots can be removed with kerosene or tar
remover. Difficult spots may require a fine rubbing compound.
After polishing use liquid or paste wax.
Several commercially available products contain both polish and wax.
Waxing alone does not substitute for polishing a dull surface.
A wide range of polymer-based waxes can be purchased today. These waxes are easy to use and produce a long-
lasting, high-gloss finish that protects the bodywork against oxidation, road dirt and fading.
194 08 Car care
Washing and cleaning the car
Do not polish or wax your vehicle in direct sunlight (the surface of the vehicle should not be warmer than 113° F
(45° C).
CAUTION
Volvo does not recommend the use of long-life or durable paint protection coatings, some of which may claim to
prevent pitting, fading, oxidation, etc. These coatings have not been tested by Volvo for compatibility with your
vehicle's clear coat. Some of them may cause the clear coat to soften, crack, or cloud. Damage caused by application
of paint protection coatings may not be covered under your vehicle's paint warranty.
Upholstery care
Fabric
Clean with soapy water or a detergent. For more difficult spots caused by oil, ice cream, shoe polish, grease, etc., use a
clothing/fabric stain remover. Consult your Volvo retailer.
Interior plastic components
Cleaning interior plastic components should be done with a cleaning agent specially designed for this purpose. Consult
your Volvo retailer.
Alcantera™ suede-like material
Suede -like upholstery can be cleaned with a soft cloth and mild soap solution.
Leather care
Volvo's leather upholstery is manufactured with a protectant to repel soiling. Over time, sunlight, grease and dirt can
break down the protection. Staining, cracking, scuffing, and fading can result.
Volvo offers an easy-to-use, non-greasy leather care kit formulated to clean and beautify your vehicle's leather, and to
renew the protective qualities of its finish. The cleaner removes dirt and oil buildup. The light cream protectant
restores a barrier against soil and sunlight.
ProCarManuals.com
Page 176 of 239

Volvo also offers a special leather softener that should be applied after the cleaner and protectant. It leaves leather soft
and smooth, and reduces friction between leather and other finishes in the vehicle.
Volvo recommends cleaning, protecting and conditioning your vehicle's leather two to four times a year. Ask your
Volvo retailer about Leather Care Kit 951 0251 and Leather Softener 943 7429.
Cleaning leather upholstery
1. Pour leather cleaner on a damp sponge and squeeze it until the cleaner foams.
2. Apply the foam to the stain by moving the sponge with circular movements.
3. Dampen the stain thoroughly with the sponge. Let the sponge absorb the stain, do not rub.
4. Dry the stain with soft paper towels or a towel, and allow the leather to dry completely.
Protecting leather upholstery
1. Put a small amount of protectant cream on a cloth and apply a thin coating of cream to the upholstery with light
circular movements.
2. Allow the leather to dry for 20 minutes.
195 08 Car care
Washing and cleaning the car
This will help the leather resist staining and protect against sunlight's harmful UV rays.
CAUTION
Under no circumstances should gasoline, naphtha or similar cleaning agents be used on the plastic or the leather
since these can cause damage.
Take extra care when removing stains such as ink or lipstick since the coloring can spread.
Use solvents sparingly. Too much solvent can damage the seat padding.
Start from the outside of the stain and work toward the center.
Sharp objects (e.g. pencils or pens in a pocket) or Velcro fasteners on clothing may damage the textile upholstery.
Clothing that is not colorfast, such as new jeans or suede garments, may stain the upholstery.
Cleaning the seat belts
Clean only with lukewarm water and a mild soap solution.
Cleaning floor mats
The floor mats should be vacuumed or brushed clean regularly, especially during winter when they should be taken out
for drying. Spots on textile mats can be removed with a mild detergent. For best protection in winter, Volvo
recommends the use of Volvo rubber floor mats. Consult your Volvo retailer.
196 08 Car care
Paint touch up
ProCarManuals.com
 1
1 2
2 3
3 4
4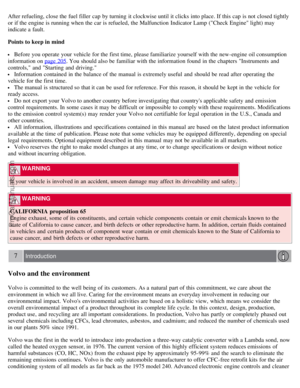 5
5 6
6 7
7 8
8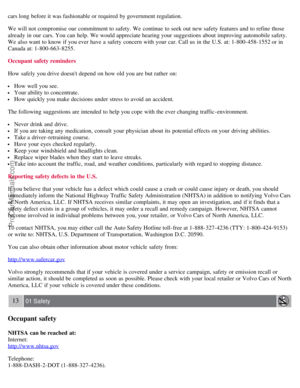 9
9 10
10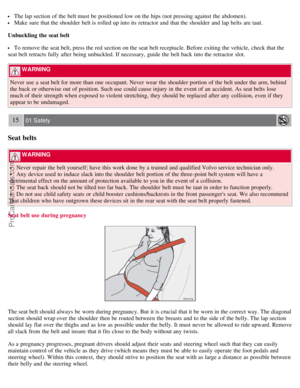 11
11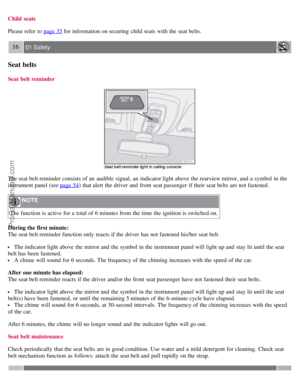 12
12 13
13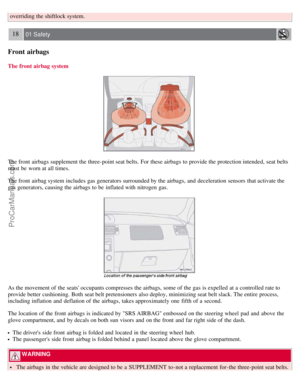 14
14 15
15 16
16 17
17 18
18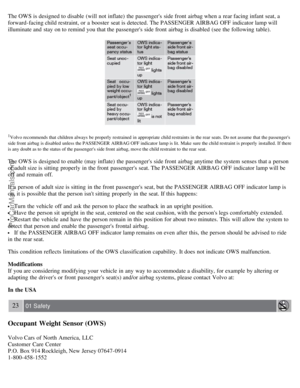 19
19 20
20 21
21 22
22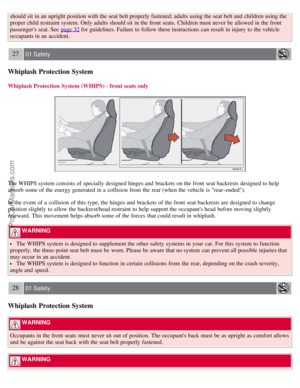 23
23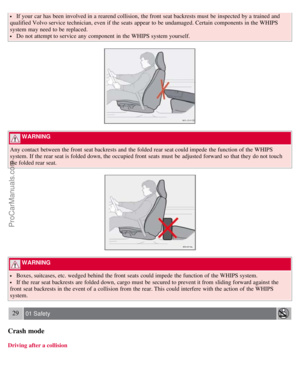 24
24 25
25 26
26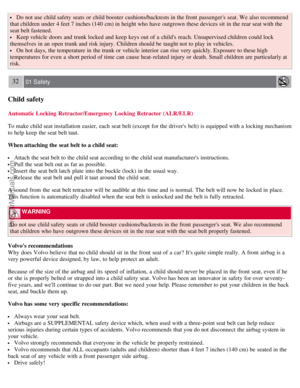 27
27 28
28 29
29 30
30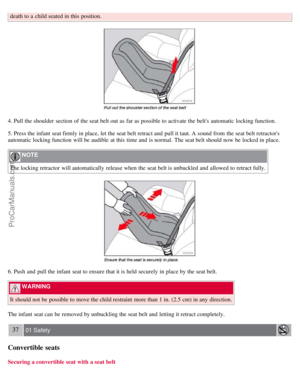 31
31 32
32 33
33 34
34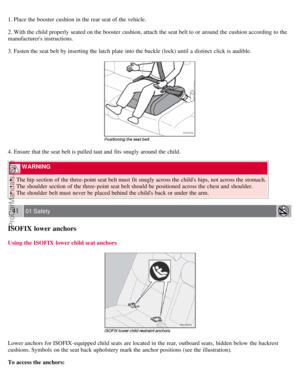 35
35 36
36 37
37 38
38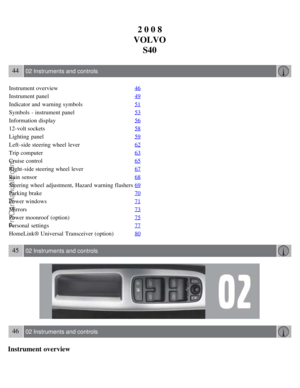 39
39 40
40 41
41 42
42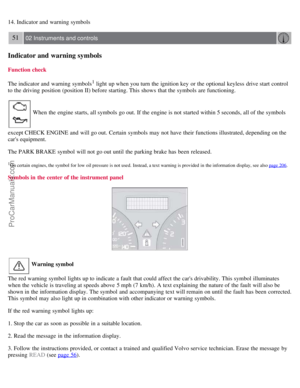 43
43 44
44 45
45 46
46 47
47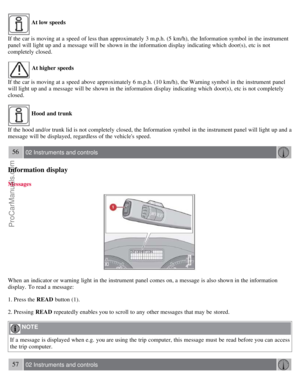 48
48 49
49 50
50 51
51 52
52 53
53 54
54 55
55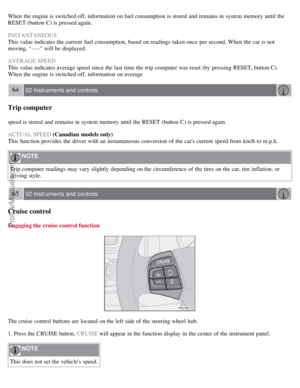 56
56 57
57 58
58 59
59 60
60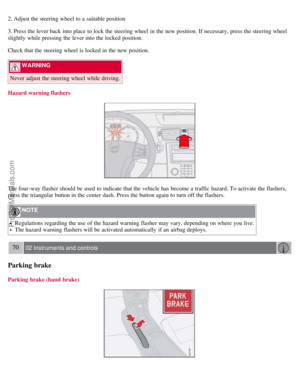 61
61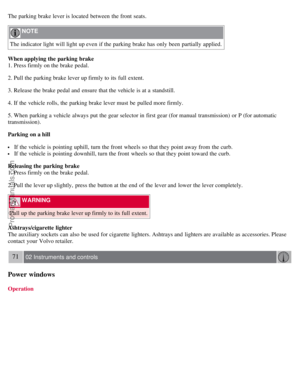 62
62 63
63 64
64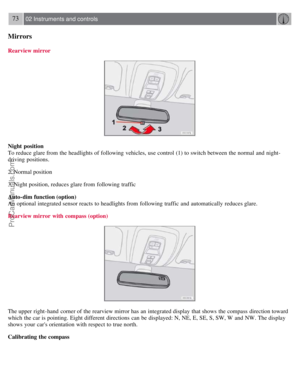 65
65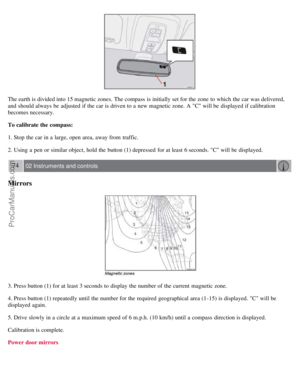 66
66 67
67 68
68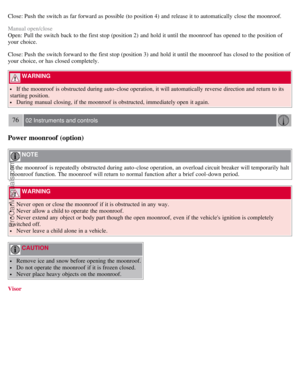 69
69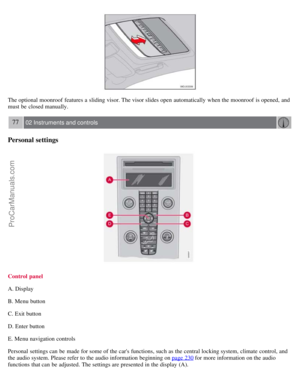 70
70 71
71 72
72 73
73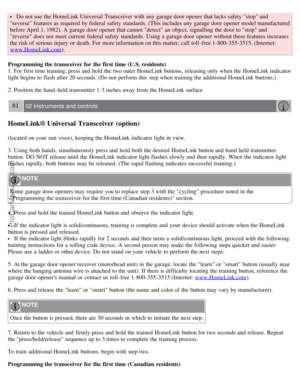 74
74 75
75 76
76 77
77 78
78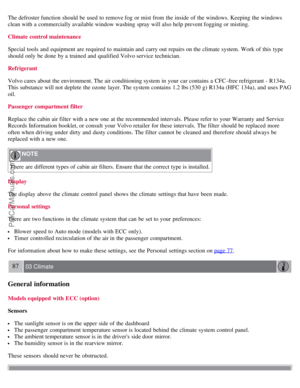 79
79 80
80 81
81 82
82 83
83 84
84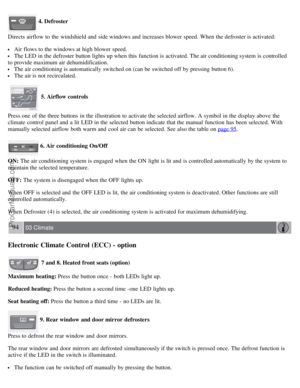 85
85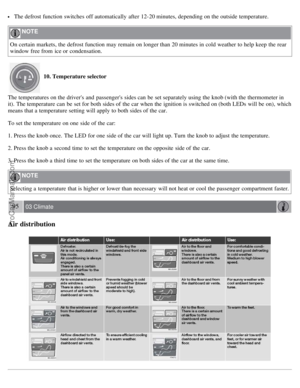 86
86 87
87 88
88 89
89 90
90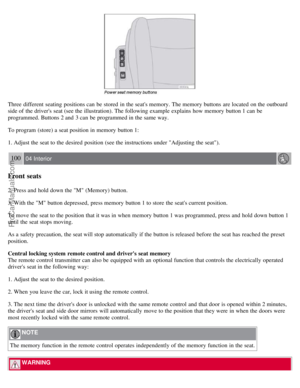 91
91 92
92 93
93 94
94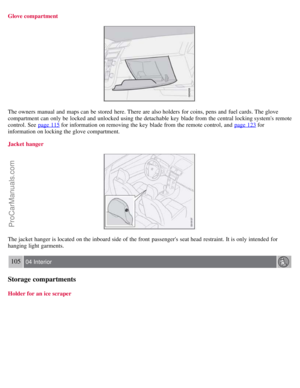 95
95 96
96 97
97 98
98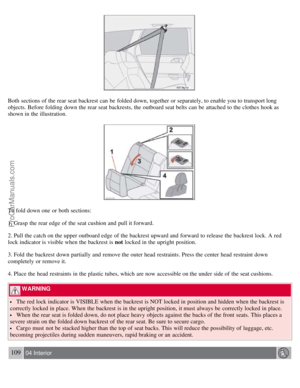 99
99 100
100 101
101 102
102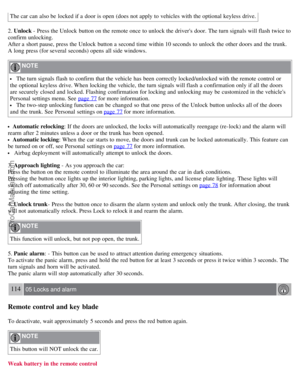 103
103 104
104 105
105 106
106 107
107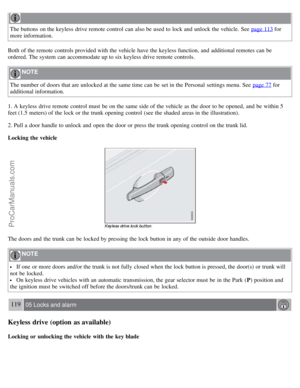 108
108 109
109 110
110 111
111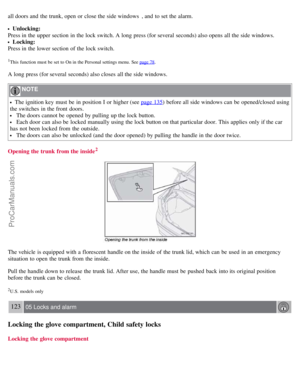 112
112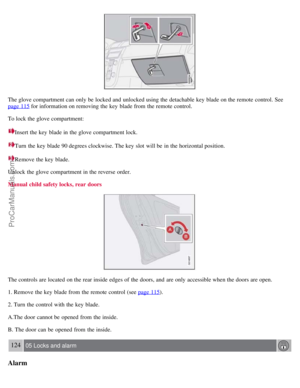 113
113 114
114 115
115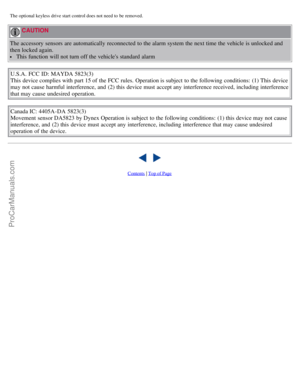 116
116 117
117 118
118 119
119 120
120 121
121 122
122 123
123 124
124 125
125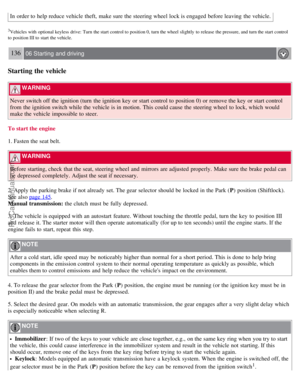 126
126 127
127 128
128 129
129 130
130 131
131 132
132 133
133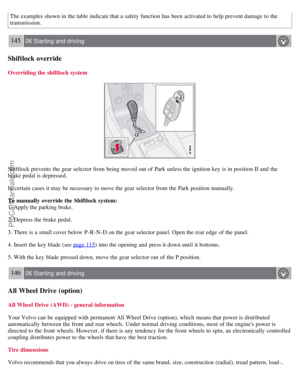 134
134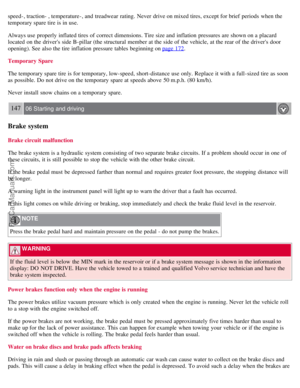 135
135 136
136 137
137 138
138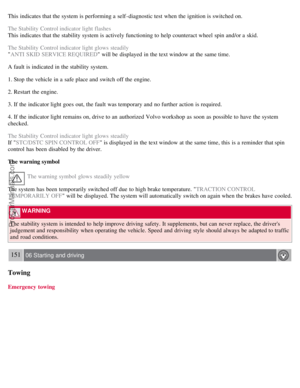 139
139 140
140 141
141 142
142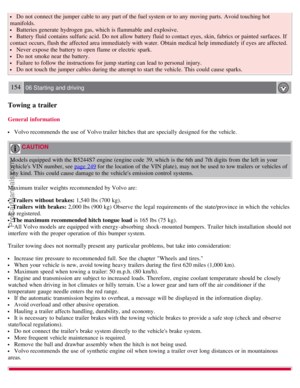 143
143 144
144 145
145 146
146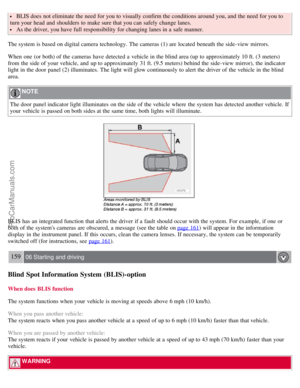 147
147 148
148 149
149 150
150 151
151 152
152 153
153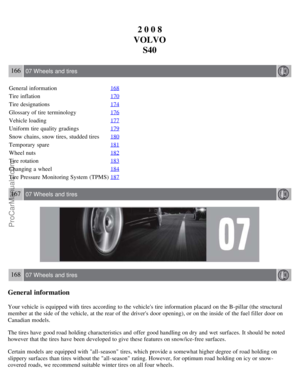 154
154 155
155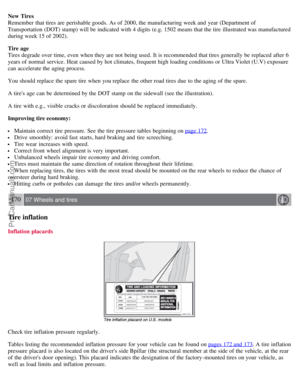 156
156 157
157 158
158 159
159 160
160 161
161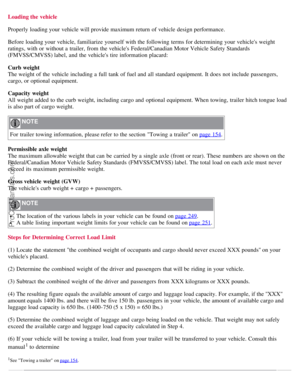 162
162 163
163 164
164 165
165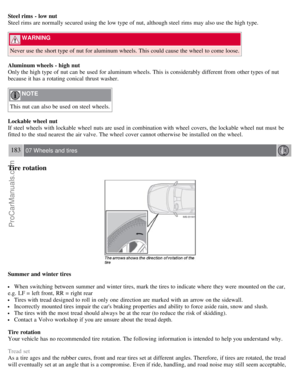 166
166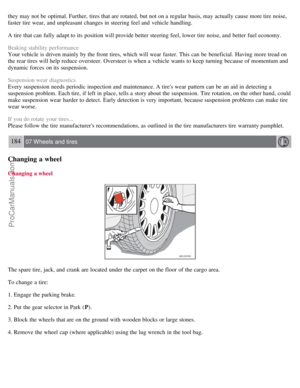 167
167 168
168 169
169 170
170 171
171 172
172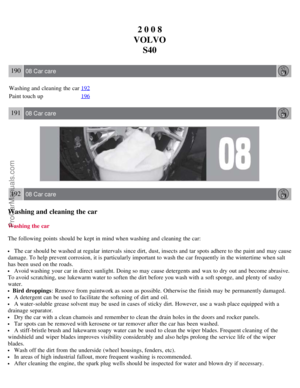 173
173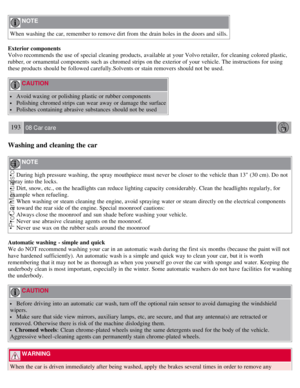 174
174 175
175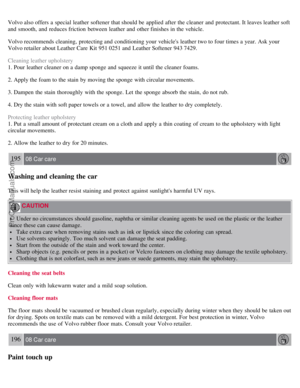 176
176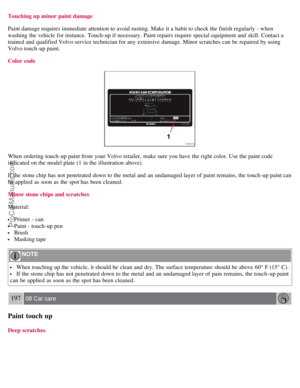 177
177 178
178 179
179 180
180 181
181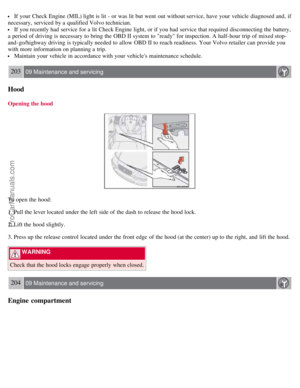 182
182 183
183 184
184 185
185 186
186 187
187 188
188 189
189 190
190 191
191 192
192 193
193 194
194 195
195 196
196 197
197 198
198 199
199 200
200 201
201 202
202 203
203 204
204 205
205 206
206 207
207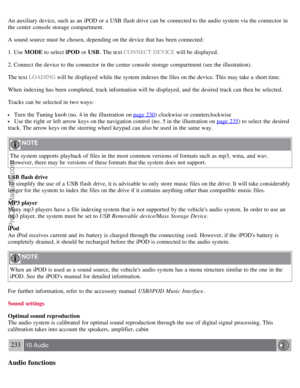 208
208 209
209 210
210 211
211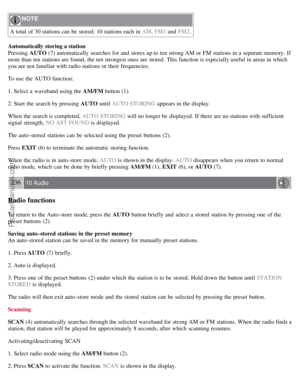 212
212 213
213 214
214 215
215 216
216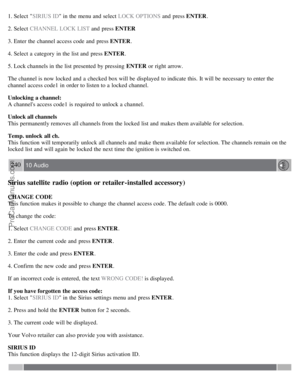 217
217 218
218 219
219 220
220 221
221 222
222 223
223 224
224 225
225 226
226 227
227 228
228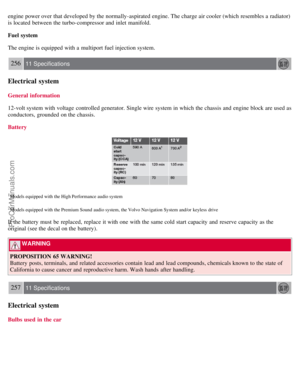 229
229 230
230 231
231 232
232 233
233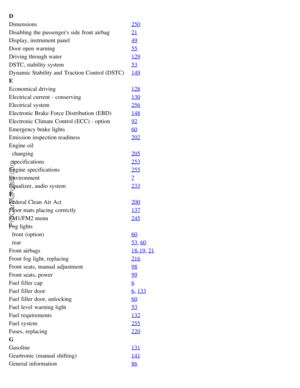 234
234 235
235 236
236 237
237 238
238