2008 VOLKSWAGEN JETTA wheel
[x] Cancel search: wheelPage 391 of 477

Booklet 3.2 Tips and Advice
Applies lo vehicles: wi th spore whee l
Removing the spare wheel
The spar e wheel is located und ern eath the floor covering in the luggag e compart
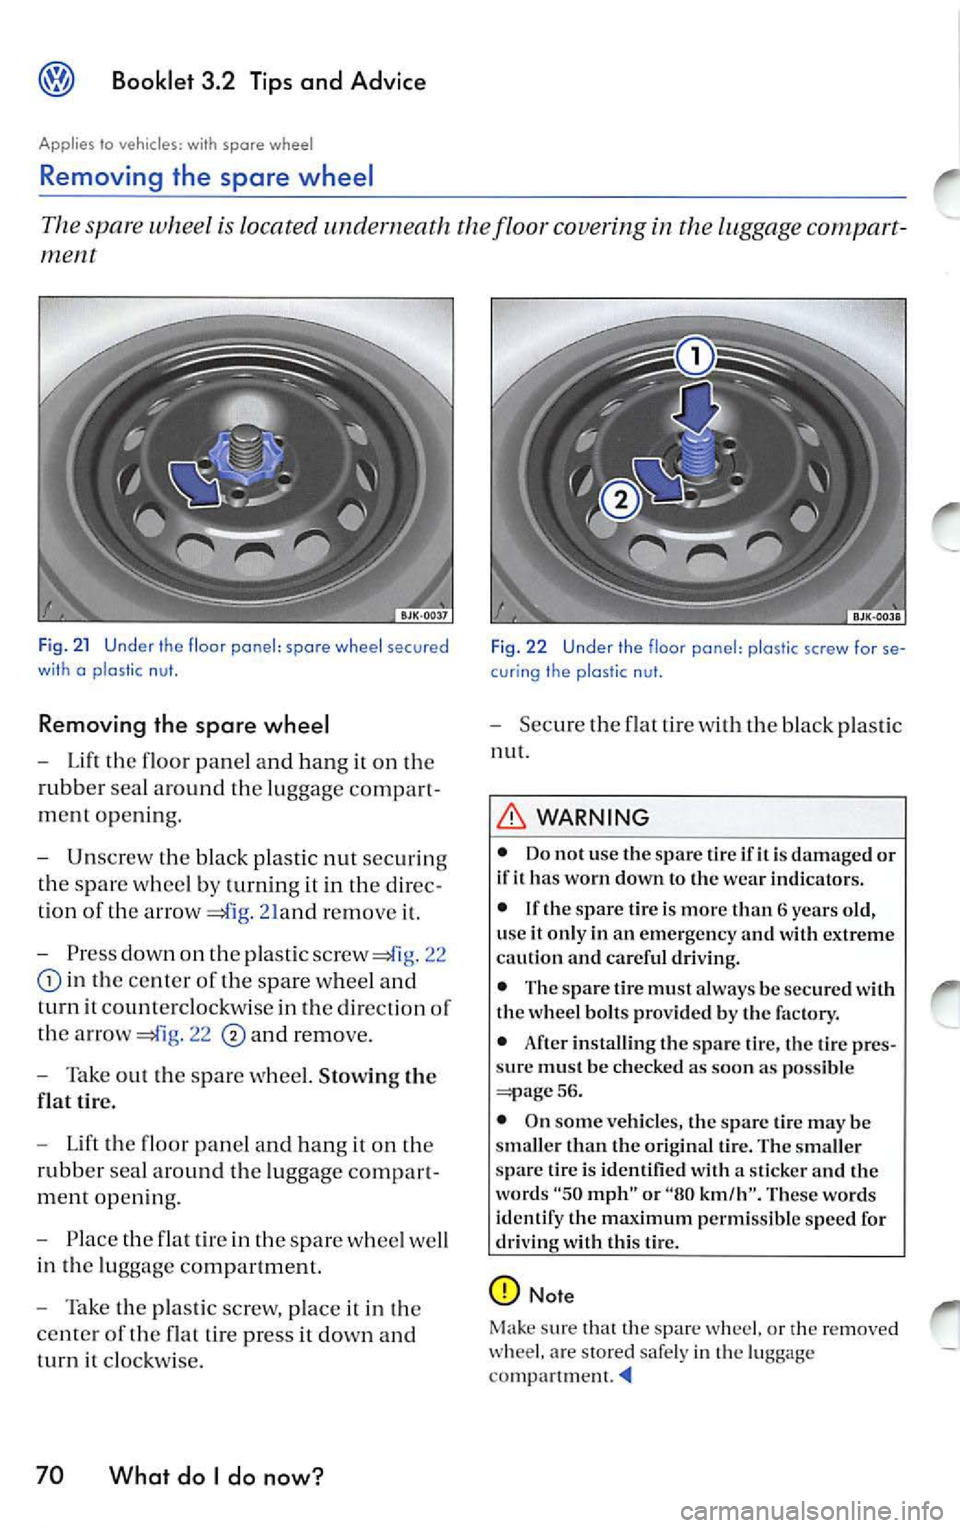
Fig. 21 Under th e floor ponel: spore wheel secured
wi th o p las tic nut.
Removing the spare wheel
-Lift floor panel and hang on
rubb er sea l aro und the luggage compart
ment openin g.
- Unscrew the black plastic nut securin g
th e s par e whee l by turning it in
direc
tion of th e arrow
21and remo ve
-Press dow n on pla stic screw 22
in the ce nter of the spare wheel and
turn it co unt erclo ckw ise in th e direction of
the arro w
22 and remove.
- Tak e out the s pare whee l. Stowing the
flat tir e.
- Lift the fl oor pan el a nd h ang i t on the
rubb er sea l around the luggage compart
m en t open ing.
- Pla ce the flat tir e in the spar e whee l we ll
in the lu ggage co mpartment.
- Take the pla stic scr ew, place it in the
c ente r of th e flat tire pre ss
dow n and
t urn
clockw ise.
70 What do I do now?
Fi g. 2 2 Under th e floor pone!: plo stic screw for se
cur ing the plostic n ut.
- Secu re the flat tire w ith bla ck pl astic
nut.
WARNING
• Do not use the spar e tir e ifit i s damaged or
if it ha s worn down to the wear indicators.
• If th e s pare lire i s more than 6 years old,
u se
it only in an em ergen cy and with extreme
cau tion and careful dri vin g.
• The spare tire mu st alwa ys be se cur ed w ith
the wheel bolt s provided b y the factory.
• After installin g the spare tire, the tire pr es
s ur e must be c hecked as soon as p ossible
56.
• On some ve hicles, the spare tire ma y be
sma ller th an th e original tire. The smaller
spar e tir e is identified with a sticker and th e
word s
"50 mph" or "80 km/h". These words
identify the max imum permissible sp ee d for
driving with this tire.
Not e
Mak e sure that the spare w heel. or
re mo ved ar e stored safe ly i n luggag e
Page 392 of 477

Booklet 3.2 Tips and Advice
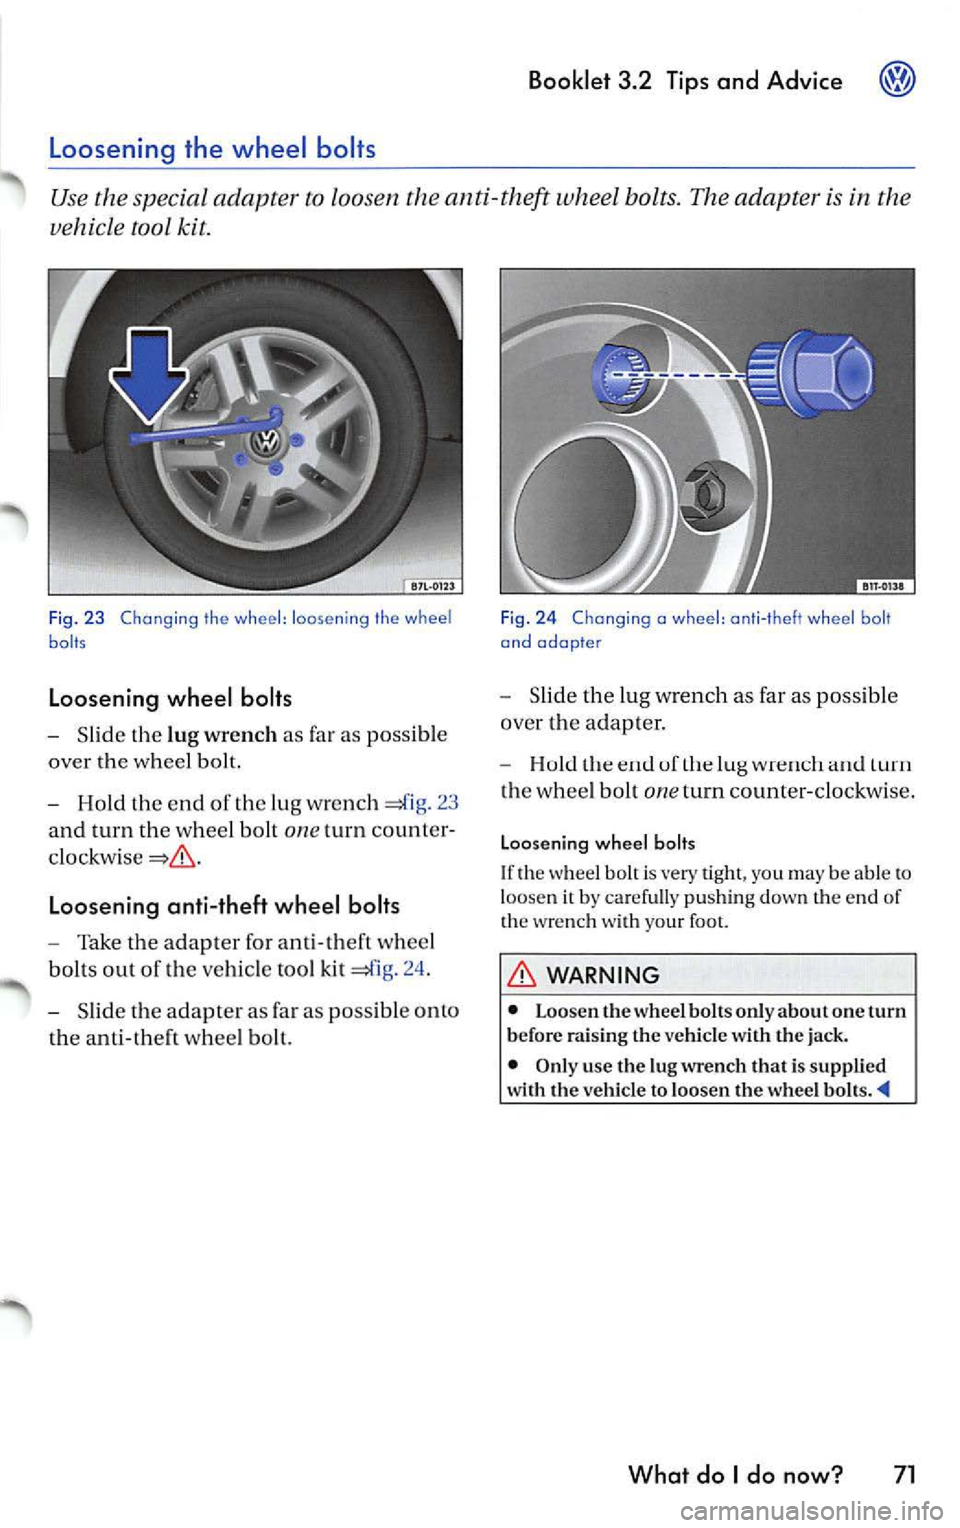
Slid e th e lu g wrench as far as possib le
over the whee l bolt.
Hold the end of the lug wre n ch 23
and turn the whee l bolt
one turn count er
Loosening anti-theft wheel bolts
Take the adapter for ant i- th eft w hee l
bol ts out of the ve hicle tool kit =£lg. 24 .
Slid e the adap ter as far as pos sib le o nto
th e a nti -theft w hee l b olt.
Fig . 2 4 Chang ing a wheel : ant i- t h eft whe el b olt
and adopte r
Slid e the lug w rench as far as possib le
ove r the adapter.
uf turn
th e whee l bolt one turn counter-clockwi se.
Loosen ing wheel bolts
If th e w hee l b olt is very tigh t, yo u may be able t o loose n it by carefu lly pu shin g down the end of
th e wre nch with your foo t.
WARNING
• Loo sen th e whee l bolt s onl y about one turn
b efor e rai sing th e vehicle w ith the jack.
• Only use the lu g wrench that is suppli ed
w ith th e ve hicl e to loosen the wheel
What do I do now? 71
Page 393 of 477

Booklet 3 .2 Tips and Advic e
Raising the vehicle
Raise the vehicle only on the appropriate jack points for vehicle jack.
Fig. 25 The jock points fo r the vehicle jock
Do not jack up th e vehicle until all the
w heel bolt s on t he w he el be ing changed
ha ve been loo sened
71
Jacking up the vehicle
1. Locate the jack point 25 (arrow )
closest to the whee l that has to b e
c h anged.
2 . Ra ise the jack u nder the jack point until
it fits under the ve hicle.
3. Make sur e th at the stand of the jack is in
full contact with th e gro und.
4. A djust th e jack and cont inue cranking
up the handle until i t is in position around
th e vertica l rib und ern eat h the vehicle
5. Cra nk up the jack until the whee l is off
th e gro und.
T he jack must be po sitioned only at th e jack
po ints fo r th e ve hicle jack sh ow n 25 . A l
ways use the jack p oin t closest to the wheel you
are wo rking on.
WARNING
Improp er use of yo ur vehicle jack ca n ca use
th e ve hicle to fa ll th e jack lea ding to se riou s
72 What do I do now?
Fig . 2 6 Jock ot le ft reor
WARNING (continued)
p erso nal inju ry. To r edu ce the risk of in jur y
caused by the ve hicle fa lling off the jac k:
• Always set up the jack o n firm , leve l
grou nd. Soft ground under the jac k m ay cause
th e ve hicle to s lip
the jack. If nece ssary use
a large , stron g board or sim ilar su pport. On a
h ard , slipp ery su rface (such as tile s) use a
ru bber mat or something simil ar to pre vent
th e jack from slippi ng.
• Always position the jack on ly at the jack
p oin ts for t he ve hicle jack
25 .
• Before you
your vehicl e, always make
s ur e th e jack claw properl y grasps the ver tica l
rib und er th e s ill so that the jack docs no t slip
ofTw hen yo u are ra is in g th e ve hicl e
26 .
• If yo u are tow ing a tra iler, unhit ch it from
yo ur vehicle before ra is ing the veh icle. Always
appl y the tra iler brakes firml y and make s ure
th e tra iler ca nn ot mo ve unint enti ona lly.
• Alw ays keep children at a safe di stanc e
wh ile usin g th e veh icle jac k an d also make
s ure there are no per sons under the ve hicl e.
Children at p lay cou ld knock the ve hicle off
the jack or hide un der a veh icle.
• Never supp ort yo ur body we ig ht on the ve
hi cle w hen it is up on t he jac k.
• Never allow a nyone to sta y in the veh icle
whe n raising the ve hicle
the jac k or when
it is up on th e jack.
Page 394 of 477

WARNING {continu ed)
• Never let anyone place any part of their
body underneath the vehicle when support ed
by the jack.
• Never support your vehicl e on cinder
blocks, bricks or other obje cts . These may not
Changing a wheel
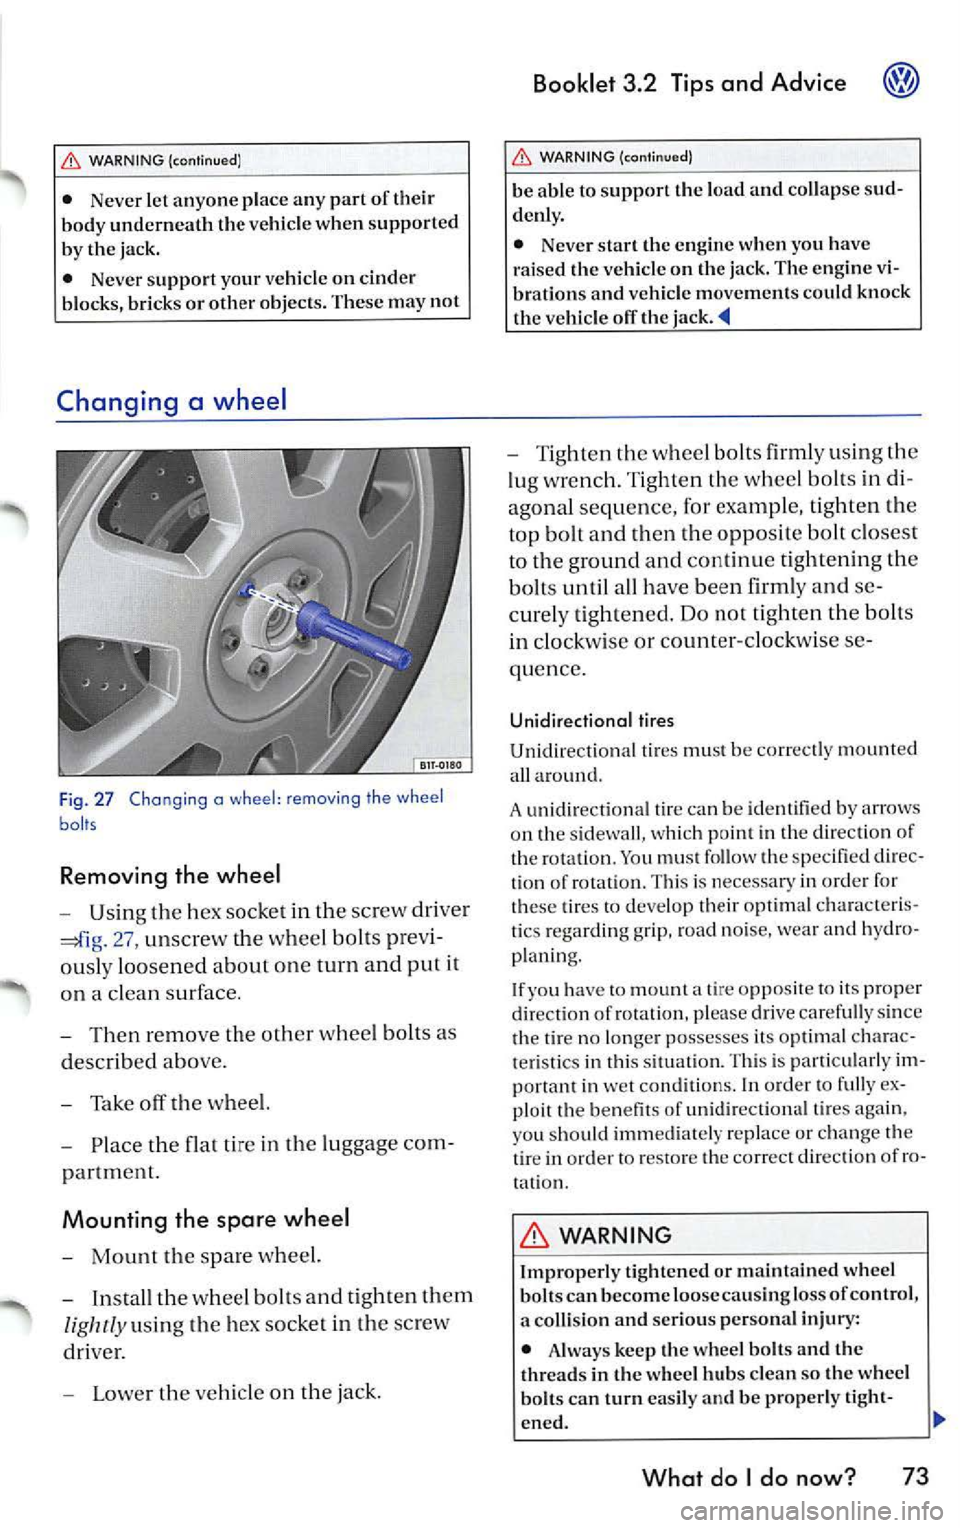
F ig . 27 Chang ing a wheel : removing the wheel
baits
Removing the wheel
-Usin g the h ex socket in th e sc rew dri ver
27, un screw t he w heel bo lts pre vi
o usly loo sen ed about on e turn and put it
o n a cl ean su rface .
- Then re mo ve the oth er whee l bolt s as
d esc ribed abo ve.
- Tak e off th e w he el.
- Place the flat ti re in the lu gg ag e co m-
p artmen t.
Mounting the spare wheel
-Mount the sp a re wh eel.
- Insta ll th e w hee l bolt s and tight en th em
lig htly u sin g th e hex so cke t in th e sc rew
dri ver.
- L ower th e ve hicle on the jack .
Booklet 3.2 Tips and Advice
WARNING {cont inu ed )
be able to support the load and collap se sud
denl y.
• Nev er start the engine when you have
raised the vehicl e on the jack. The engine vi
bration s and v ehicle movements could knock
the v ehicl e off the
- T ig ht en the wheel bolts firml y using the
lu g w re n ch. Ti gh te n th e whee l b olts in di
a gonal s equ ence , for e xampl e, tig h te n th e
top bolt and then th e oppo sit e bolt clo se st
to th e ground and continu e tight enin g the
bolt s until all have bee n firml y and se
c ur ely tight en ed. Do not tight en th e bolts
in clock wise or c ounter-cl oc kw ise se
quen ce.
Unidirectional tires
Unidir ectional tir es mu st be co rrec tly m ount ed
a ll arou nd.
A un idir ection al tir e ca n b e id en tified b y arrows
o n th e s idewa ll, w hi ch p oin t in the di rec tion of
t h e ro tation . Yo u mu st fo llow the speci fied dir ec
ti on of ro ta ti on. Thi s is necessary in orde r for
the se tires to deve lop t heir optim al cha racte ris
ti cs regar ding grip, road noise, wea r and hydro
p la ni ng .
I f y ou have
to moun t a tire opp osite to i ts pro per
dir ection of rot atio n. p lease drive caref ull y sin ce
th e tir e no lo nge r poss esses its o ptimal chara c
t e ri stic s in thi s s itu atio n. Thi s is parti cul arl y im
po rta nt in we t con ditions. In orde r to f ully ex
pl oi t th e benefi ts of unidir ectio nal tire s ag ain ,
yo u sh ou ld imm edi ate ly re place or change the
tir e in or der to resto re th e co rrect d irec tion of ro
t a ti on .
WARNING
Improp erl y tight en ed or maintain ed wheel
b olt s can b ecome loose cau sin g lo ss of control ,
a colli sio n and seriou s per son al inju ry:
• Alw ay s keep th e wheel bolt s and th e
thread s in the wh eel hub s clean so the whee l
bolt s can turn easily and be p roperl y tight-
en ed .
What do I do now? 73
Page 395 of 477

Booklet 3.2 Tips and Advice
WARNING (continued)
• Never grease or oil the wheel bolts and the
threads in the whee l hubs. They can become
loo se wh ile driving if greased or oiled, even if
tightened to the specified torque.
• Always read and heed all WARNINGS and
other important information
66.
73 .
74 What do I do now?
soo n as possible with a torque wr enc h -pr efe r
ably by an au thorized Vo lksw agen dea le r or
qualified worksh op.
• If yo u n otice tha t th e wh eel b o lts are cor
rod ed and difficult to turn, th ey mu st be re
pl aced before you hav e th e to rqu e chec ked or
h ave the bo lts tigh te ned to the prop er t orqu e.
• Have the damag ed tire re pla ced with a tire of
the same brand, specificatio ns and trea d
- Have the damaged tire re pla ced wit h a
tir e of the same brand, sp eci fica tion s and
tread patt ern.
Page 408 of 477

-Press the cove r together u sing both
hand s in the direc tion or th e arrows
42 and pull the cover
Booklet 3.2 Tips and Advice
-Screw th e tow ing eye into the t hread ed
ho le , turnin g
co1111t er-cl ockwi se as far as it
will go
43.
- Use the wre n ch for leverage to tighten
the towing eye.
Towing eye at the rear of the vehicle
Fig. 44 Rear lawing eye
General notes
Installing the towing eye
-Take the towing eye , the wrench a nd
th e sc rew driver out of the vehicl e tool kit
=;:iage 67.
- Pull the cover down and lea ve it
hanging on the vehicl e
- R em ove the cove r on the threaded hole.
- Screw t he towin g eye into th e thr ea ded
hol e, turning
co 1111r er-clockw ise as fa r as it
w ill go
44.
- Use the wrench for leve rage to tight en
the tow ing eye.
po ssi ble tow with the fron t wheels off ground
A lways observe the following use a
t ow-rope :
Notes for the driver of the towing ve
hicle
- Turn on the emerge ncy flas her.
- Driv e slowly at fir st until th e tow-ro pe is
taut. Then acce lerate graduall y.
- Press the acce le rator slow ly .
- Remembe r that the brak e boo ster and
po we r stee rin g ar e not working in the ve
hi cle you are tow ing. Brake earlier and
mor e gently than you wo uld n orm ally
Do not drive than 30 mph (50
k m /h ) and furth er tha n 30 miles (5 0 km ).
Notes for the driver of the towed ve
hicl e
-Turn on the emergency flash er.
- Move the selecto r leve r or gears hi ft
l ever to the neutral posi tion (NJ
- Make sure tha t rh e tow -rope is taut at a ll
Tow-ro pe or tow -bar
It is easier and sa fer to tow a vehicle with a tow
bar . O nl y use a tow- rope if yo u d o no t h ave a
tow -bar.
A tow -rope s hould be sli ghtl y e las tic to re duce
th e lo adin g on both vehicl es. U se
tow-rope
mad e of sy nthetic fib er or sim ilar ela sti c m ate -
r ia l.
What do I do now? 87
Page 415 of 477

Booklet 3.2 Tip s and Ad vic e
F
Fab ric trim
C lea ning 23
box 79
F u ses 77
G
Gaske ts 20
Gaso line 32
B le nd s 32
Co ntaining alcohol 32
Oc tan e rating 32
P etro l 32
Pr emium 32
R eg ular 32
U nl eaded 32
W ha t if I purc hase poor qua lity fu el? 32
W hat wou ld happ en if I put l ead ed gaso-
line in my car? 32
W in te r or summ er tip s 32
Gaso lin e addit ives 33
G lossa ry of tire and l oad ing t ermin ology 52
H
H ow could I damag e th e ca taly tic
co nverter? 10
H ow do I kno w how much oil m y eng in e is
co nslllnin g? 38
H ow do I unlo ck th e engine hood? 36
H ow doe s moi sture or road sal t affe ct the
bra kes? 8
H ow oft en sh o uld I c h ec k my tire
pr ess ures? 57
H ow of te n sh ou ld I rep lace my eng in e
battery? 50
H ow ofte n sh ould I wa x m y c ar? 19
H ow often sh ou ld th e brake fluid be
c h anged? 48
Hu bca ps 69
H ydro pla nin g 60
I mp ort ant inform ation fo r ve hicle s wi th Die
se l eng ine when addin g or changin g en
g in e oil 41
94 Alphabetical index
Impo rtan t inf ormati on to kn ow before dis
c on nec t the battery 49
I ns trum en t panel
C le aning 23
J
Jack 72
Jum p star lin g 84
Jump er cables 84
L
Lea ther
C lea nin g 23
Lifting pla tfo rm 89
Lifti ng th e ve hicle 89
Li gh t cha nge 81
L ock cy linders
21
Lo cks 21
M
Mod ificat io n s 28
N
New tires an d wheels 6 1
N HT SA 90
No tice about data r ecorded by vehicle con
trol modu les 6
0
Oil 37
O il ch an ge 42
Oil dips tick 39
Ope ratin g you r vehicl e ou ts id e th e U. S.A . o r
Ca nada 91
Outs id e mirr ors
C lea ning 19
p
Pa int
P o lishin g 19
Wax ing 19
Park ing Ass is ta nce
C le aning sensors
Page 416 of 477

Parts 27
Plastic parts 19
Clean ing 23
Power steering 6
Power wa sh er 18
Prem ium Gaso line 32
R
Rai sing th e veh icle wit h th e jac k 72
Hear lid
Escape handle 76
wind ow heat ing
Heatin g element wires 20
Refue ling 30
H eg ular Gaso line 32
Repair s 28
Hep lacin g
Whee l rim s 63
Rep lacing tires and wheels 6 1
He por ting safety de fects
Ca nada 90
Unit ed States 90
Rims Replacing 63
gas kets 20
s
Safery belt s
Cleaning 26
S now chains 66
Spa res 27
Speed Hating Letter Code 62
Sta rtin g w ith jum per ca bles 84
Ste ps fo r dete rmining correc t load lim it 59
T
Tank
Fillin g
tank 30
Openi ng the fu el filler
30
Tec hnical m od ifica tions 28
T ire pressu re 56
T ir e pressure monitoring system
Se nso rs 63
Tir es and whee ls 63
Va lves 63
Booklet 3.2 Tips and Advice @
Tire service life 59
T ir es
Rep la cing 63
Se rv ice life 59
Speed Hating Leller Code 62
Ti re manufa cturing dale 62
Ti re specificat ions 62
Tread depth 59
Uni form tire qua lity gradi ng 64
Win te r tires 65
Tir es and vehicle load limit s 58
Tir es and whe els 5 1
C hec king tir e press ure 56
Co ld tire innation pre ssure 54
D imens ions 6 1
General notes 51
Glo ssary of
and loadin g
t e rm inology 52
New tires and whee ls 61
Rep lacing 6 1
Snow cha ins 66
T ire pressu re mon ito rin g sys tem 63
Tir es and vehicle load limit s 58
Whee l bolts 66
W int er tire s 65
Tools 67
Towing 86
Four-wheel dr ive 86
General notes 87
When can yo ur vehicl e not be towed? 88
Towing eye 86
Tra iler tow ing
Brak es ll
Dr iv in g tips 13
Operating instru ction s 12
Safety chain s 11, 12
Tec hnical requir ements IO
Tire press ure 12
T ow ing tips 13
Trailer lights 11
Tra iler weigh t 12
Tra nspo rt Ca nada 90
Tread Wea r Ind ica to r (TWI) 59
u
Underbody sea lant 22
Unidir ectiona l tires 51, 73
Uniform lir e qu alit y g rading 64
Alphabetical index 95