2008 VOLKSWAGEN JETTA Controls
[x] Cancel search: ControlsPage 215 of 477
Booklet 3.1 Controls and Equipment
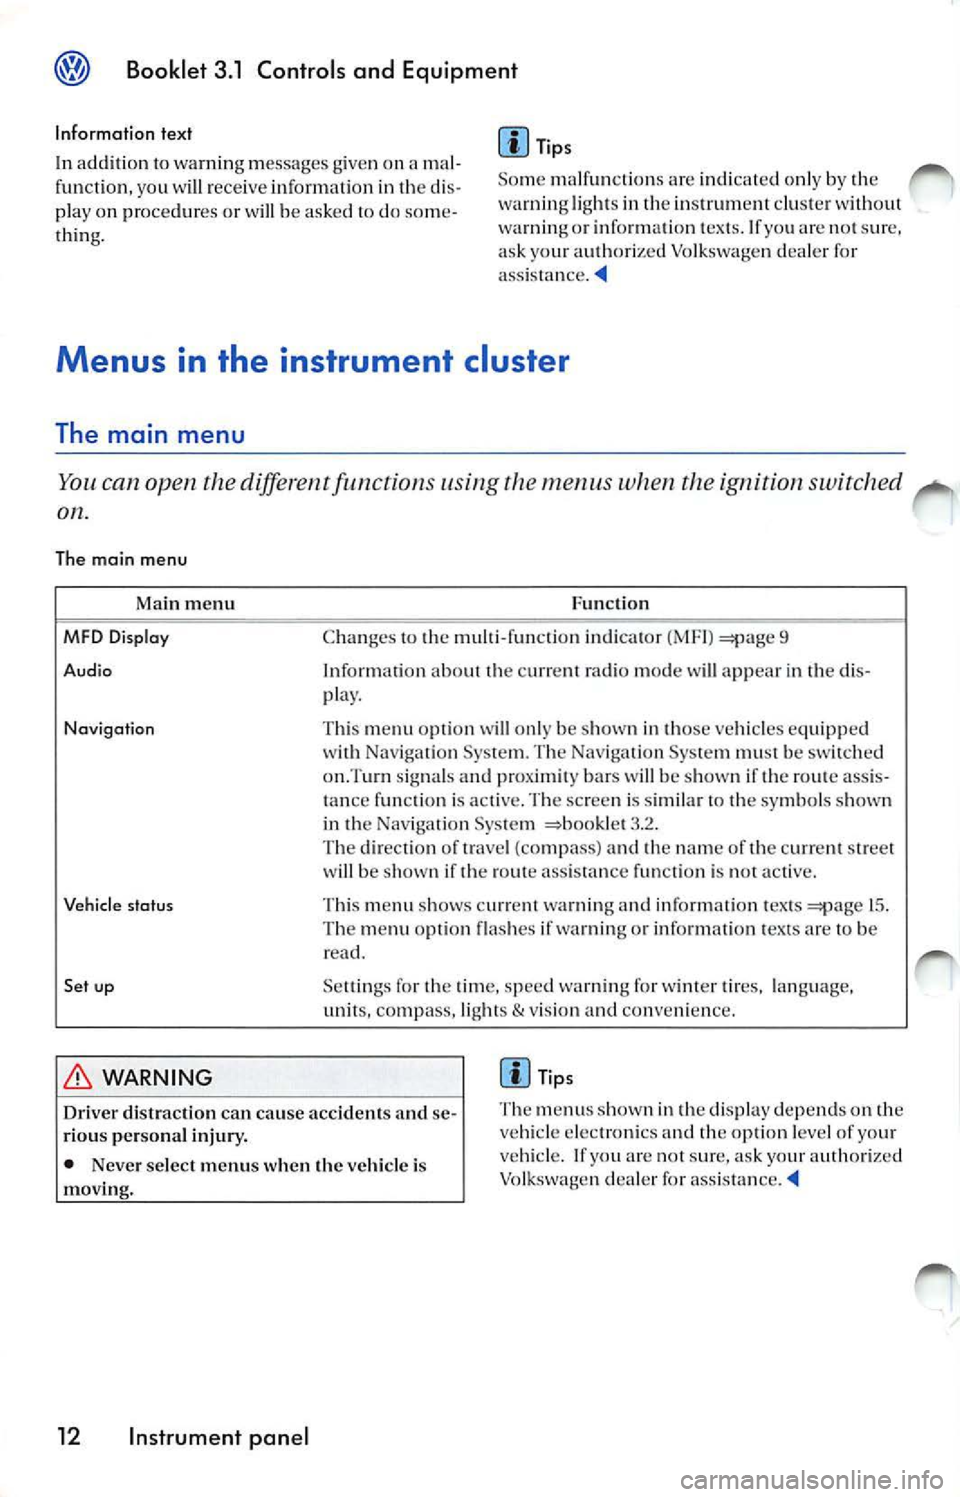
Information text
In ad dition 10 warnin g message s give n on a maJ .
fun ction , yo u w ill r ece ive inform ati on in th e di s
pla y on procedur es or will be asked to do some
thin g. Tips
So me indicat ed onl y by the
warning light s in the in strum ent du ste r w ith out
warning o r inf ormat ion tex 1s. If yo u
not sur e,
a sk you r auth ori zed Vo lkswage n dealer for
WARNING
Fun ction
C han ges to 1he multi -fun ctio n indi cat or (MFI)
9
In forr na1i on about t he c urrenl radi o mode
appear in th e dis
pla y.
Thi s m enu op lion
on ly be s how n in those vehicles equi pp ed Naviga tion Sys te m . T he Nav igat ion Sys te m mu st b e sw i1ched
on.T urn signals an d pro ximity bar s be sh ow n if th e rou te ass is
t a n ce func tio n is ac1i ve. The sc ree n is s im ilar to 1he symbol s shown
in th e Nav iga tion Sys1e111
3.2 .
Th e dir ect io n of trave l (co mp ass) and the nam e of the curr ent s1r ee 1
will b e show n if 1he rout e ass is ta nce fun ction is 1101 ac1ive.
Thi s m en u sh ows c urrent warnin g and informal io n tex ts
15.
The m enu opti on fl ashes if warni ng o r in form ati on t exts are to be
read.
Se lling s for th e time , spee d wa rnin g fo r w inter tires, la n guag e,
unit s, co mpass, ligh ls
& vis ion and conve nien ce .
Tip s
Driver distracti on ca n cause accident s and se
rious persona l injur y. Th
e m enu s sho wn in the di sp lay depe nds o n th e
ve hicl e elec troni cs a nd the op tion le vel of yo ur
ve hicle. If you are not sur e, a sk yo ur authori zed
Vo lkswage n dea le r for
• Neve r se lec t menu s when the vehicle is
moving.
12 Instrument panel
Page 216 of 477
Booklet 3.1 Controls and Equipment
Applies to vehicles: H ighline instrumen t cluster and multi-function steering wheel
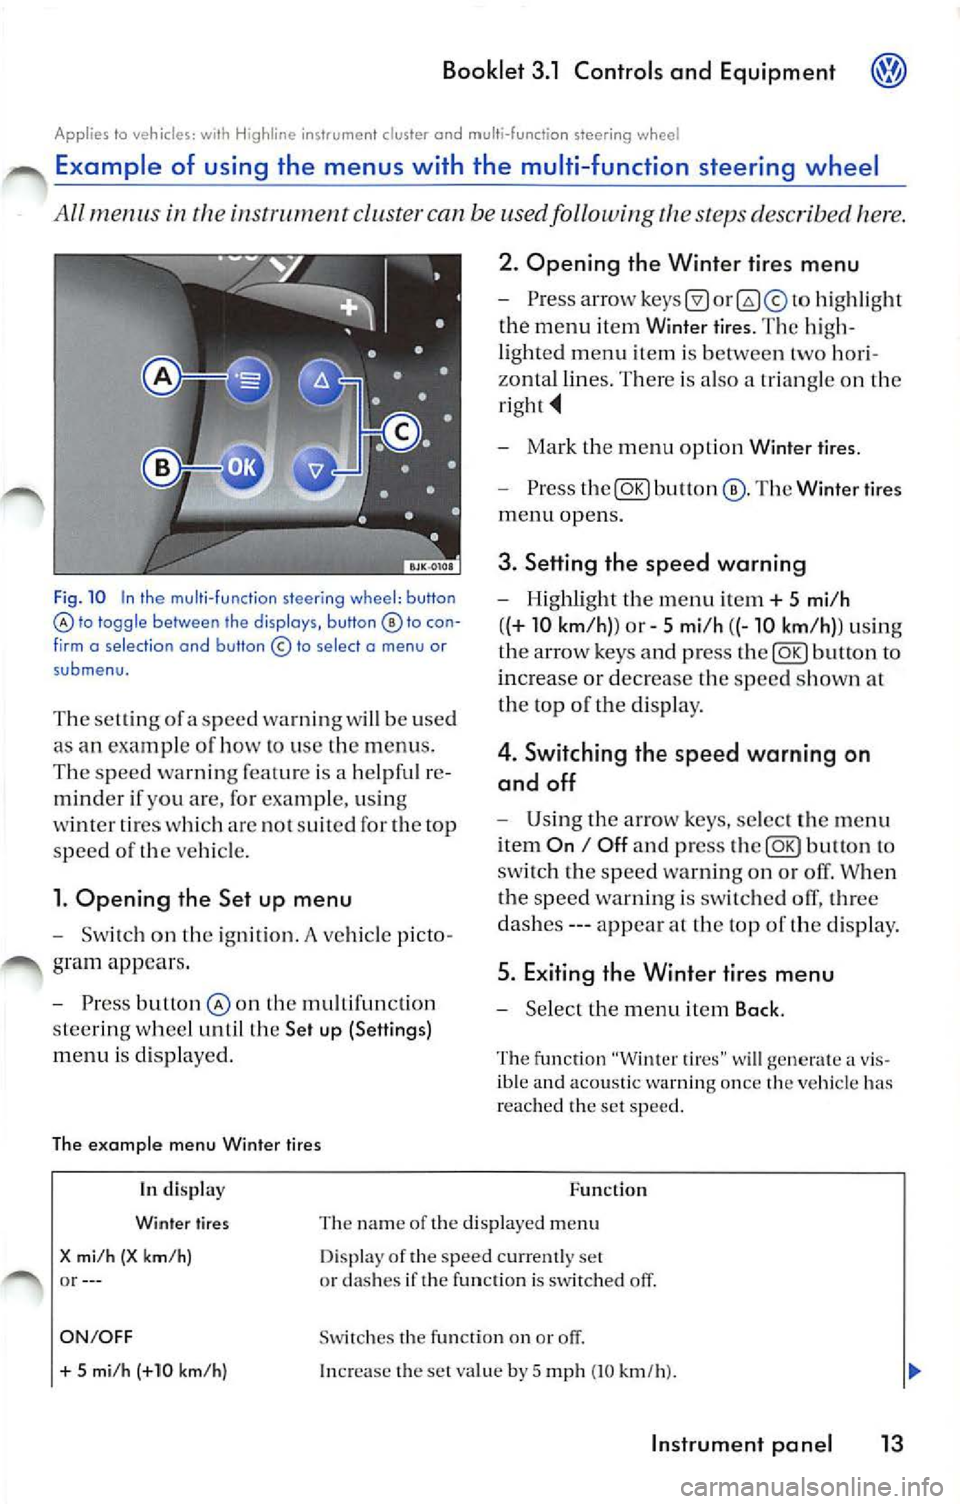
Example of using the menus with the mult i- function steering wheel
All menus in the i nstrwnen t cluster can be used following the steps described here.
Fig . 10 In the multi -fu nction steering wh eel: button lo toggle between the disp lays, button to con
f irm o se lect ion and button © to select o menu or
submenu.
T he se lling of a speed warning w ill be used
as an exam pie of how lo use the menus .
The speed warn ing feat ure is a helpfu l re
minder if you are, for example, usi ng
wi nter ti res whi ch arc no t suit ed for th e top
s p ee d of
ve hicle.
l. Opening the Set up menu
Switch on the ignition. A ve hicle p icto
gram appea rs .
Press butlon the mult ifunct io n
s tee rin g whee l until the Set up (Settings)
menu is disp layed.
The example menu Winter tires 2. Opening the Winter
tires menu
hig hli ght
the menu item Winier tires. The hig h
li ghted menu item is between two hori
zonta l lines. Th ere is also a trian gle on the
Mark the m enu opt ion Wint er tire s.
Press The Winter tires
menu opens.
3. Setting th e speed warning
Highlight th e menu it em+ 5 mi/h
( (+
10 km /h )) or 5 mi /h ((-10 km /h)) usi ng
th e ar row keys and p ress
butto n to
increa se or decrease the speed s how n at
th e top of t he di sp lay.
4 . Switching the speed warning on
and off
U sing th e arrow keys , select th e menu
i tem
On I Off a nd press to
sw itch the sp ee d wa rnin g on o r off. When
t h e s peed warnin g is swi tched olT, three
da she s --- appea r at the top of the disp lay .
5. Exiting the Winter tires menu
Se lect the m enu item Back .
The fu nction "Winter tires" w ill generate a v is
ible and acoustic warn ing once the ve hicl e has
r eac hed th e set speed .
In di splay
Winter tires
X mi /h (X km/ h) or--- Function
Th e na m e of the displaye d m enu
D isp lay of the speed cur ren tly set
or dashes if the function is switched off.
ON/OFF Swi tc h es the fu nction on or
+ 5 mi /h (+10 km/h ) In crease the set va lue by 5 mp h (10 km/h ).
Instrument pan el 13
Page 217 of 477
Booklet 3.1 Controls and Equipment
Function
In di splay
5 mi /h (-10 km/h)
Bock Dec reases t he se t va lue by 5 mph (10 km /h }.
Th e
Winter tires men u is close d and th e las t d is pla yed menu is
o pene d.
Tips
The m en us s ho wn in t he di spl ay dep end s on th e
veh icle elec tronic s an d th e o ption leve l of your
App lies lo ve hicles: wi th H igh line i nstr u ment cluster
ve hi cle. If you a re not s ure, as k yo ur authori zed
Vo lkswage n dea ler for as sis ta nce.
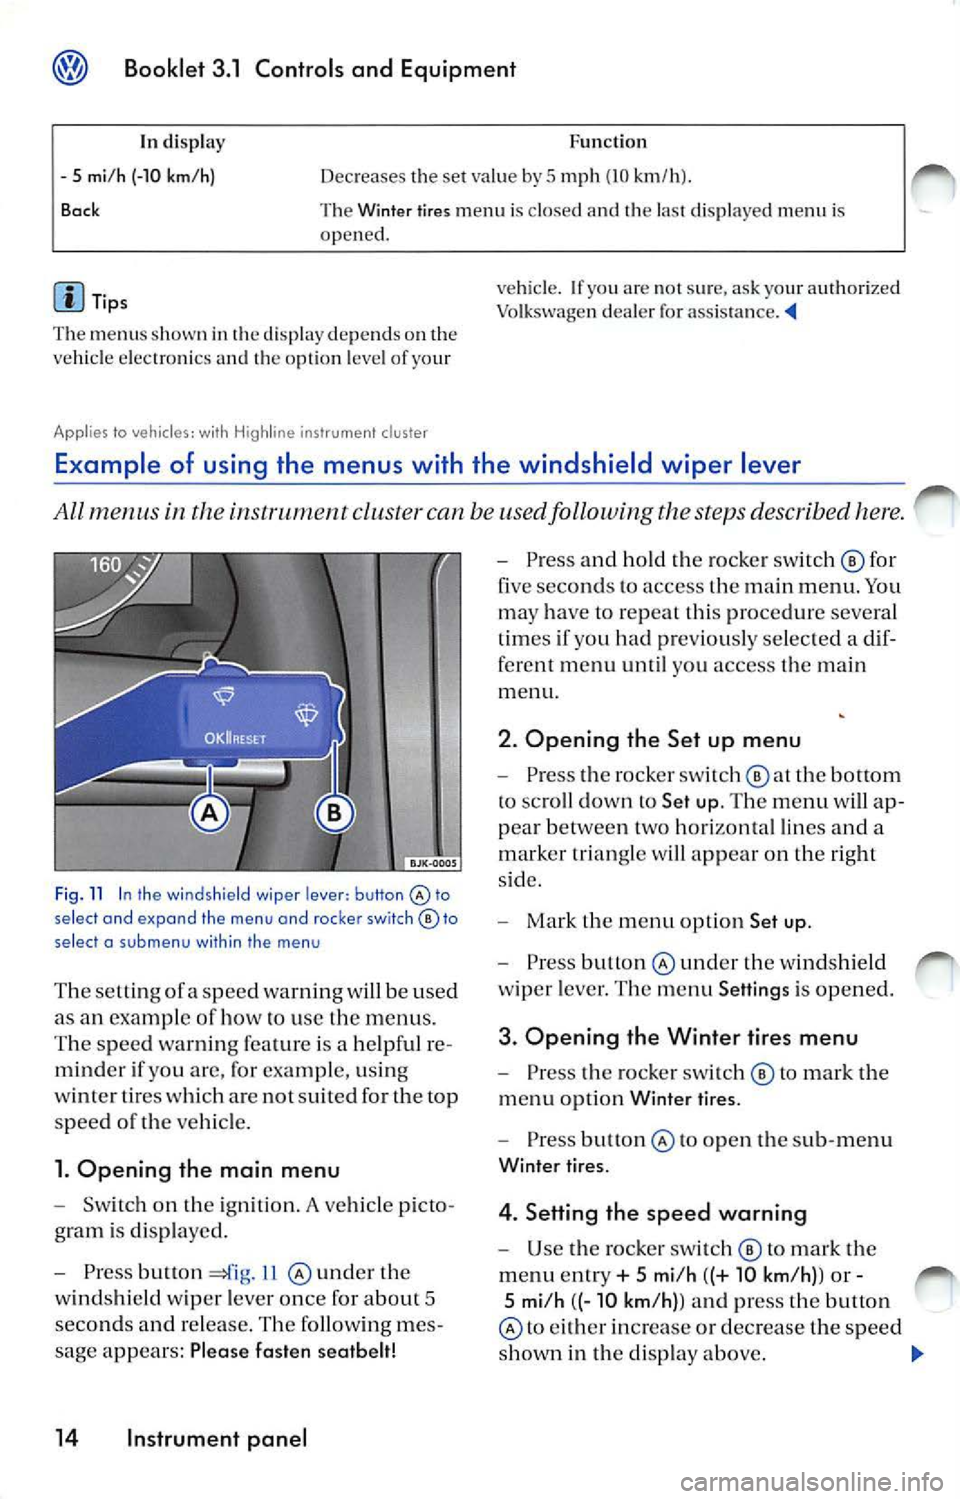
Example of using the menus with the windshield wiper lever
All menus in the cluste r can be used following the steps described here.
Fig . 11 In the wind shield wiper lever: button select and expand the menu and roc ker switch© to
select a su b m enu with in the men u
The se tting ofa sp eed warnin g will be used
as an examp le of how to use the menu s.
T he s pee d wa rnin g fe atu re is a help ful re
mind er if yo u are, for exa mpl e, u sin g
w int er tires w hich are not suit ed for the top
spee d
the ve hicl e.
1. Opening the main menu
Switch on the ig ni tion. A vehicle p icto
g ram is di spl aye d.
Press button 11 und er th e
w in ds hield wiper leve r o nce for abou t 5
seco nds and re lease . The followin g me s
sage appears: Plea se fasten seatbelt!
14 Instrument panel
Press an d hold the ro cke r sw itch © for
five seco nds to access the m ain men u. Yo u
ma y have to repeat this pro cedur e severa l
t im es if you had pr eviously se lec ted a dif
ferent me nu until you access the main
m enu.
2. Opening the Set up menu
Press the rocker switch the bottom
to sc roll dow n to Set up. The menu will ap
p ea r betwee n two hori zon ta l lin es and a
m arker tr ia n gle w ill app ear on the right
s id e.
Mark the m en u opt io n Set up .
Press under the w indshi eld
w ip er leve r. Th e m enu Setting s is opened.
3. Opening the Winter tires menu
Pr ess the ro cke r swi tc h © to m ark the
m enu opti on Wint er ti res.
Pre ss to o pen th e sub-m enu
Winter tir es.
4. Setting the speed warning
U se the ro cker sw itch © to mark the
m enu ent ry + 5 mi/h ((+ 10 km /h) ) or -
5 mi/h ((- 10 km /h) ) a nd press the button
to eith er in crease or de crease the spe ed
s h ow n in th e di sp lay above.
Page 218 of 477
Booklet 3.1 Controls and Equipment
5. Switching th e spee d warning on
and off
U se the ro cker switc h © to select
m enu point ON I OFF an d pr ess th e
bu tton @
sw itc h th e spe ed warnin g ei
on o r off. Thr ee das hes ---app ear al
t h e top of th e di sp lay if th e sp ee d wa rning
is sw itch ed off.
Th e ex amp le menu Winter tires
6. E xiting the Winter t ires menu
Sc roll dow n to Back and pre ss butt on
The function "Wi nter tire s" w ill gen erate a vis
ib le an d aco ustic wa rning on ce the ve hicle has
r eac hed the set sp eed.
In disp lay
Wi nter tires
X mi /h (X km /h )
or --- Func
tio n
Th e name of th e di sp layed men u
D is pl ay of th e s pee d curr entl y se t
o r clas hes if th e function is sw itc h ed off.
ON/ OFF Swit c h es th e fun ctio n on or off.
+ 5 mi/ h (+1 0 km /h )
- 5 mi/h (-10 km /h )
B ock I
n crease the set va lu e by
5 mph (10 km /h ).
Decreases the set va lue by
5 mp h (10 km /h ).
T he W inter tires m en u is cl osed a nd the las t di spl aye d menu i s
ope ned.
d is p la y depe nds o n th e
ve hicl e e lectro nics and th e op tio n leve l o f yo ur
Vehicle status menu
vehicle. If yo u are not sur e, ask your Vo lkswagen dea le r fo r ass is ta nce . ._
Thi s m enu will disp lay warning or information text s.
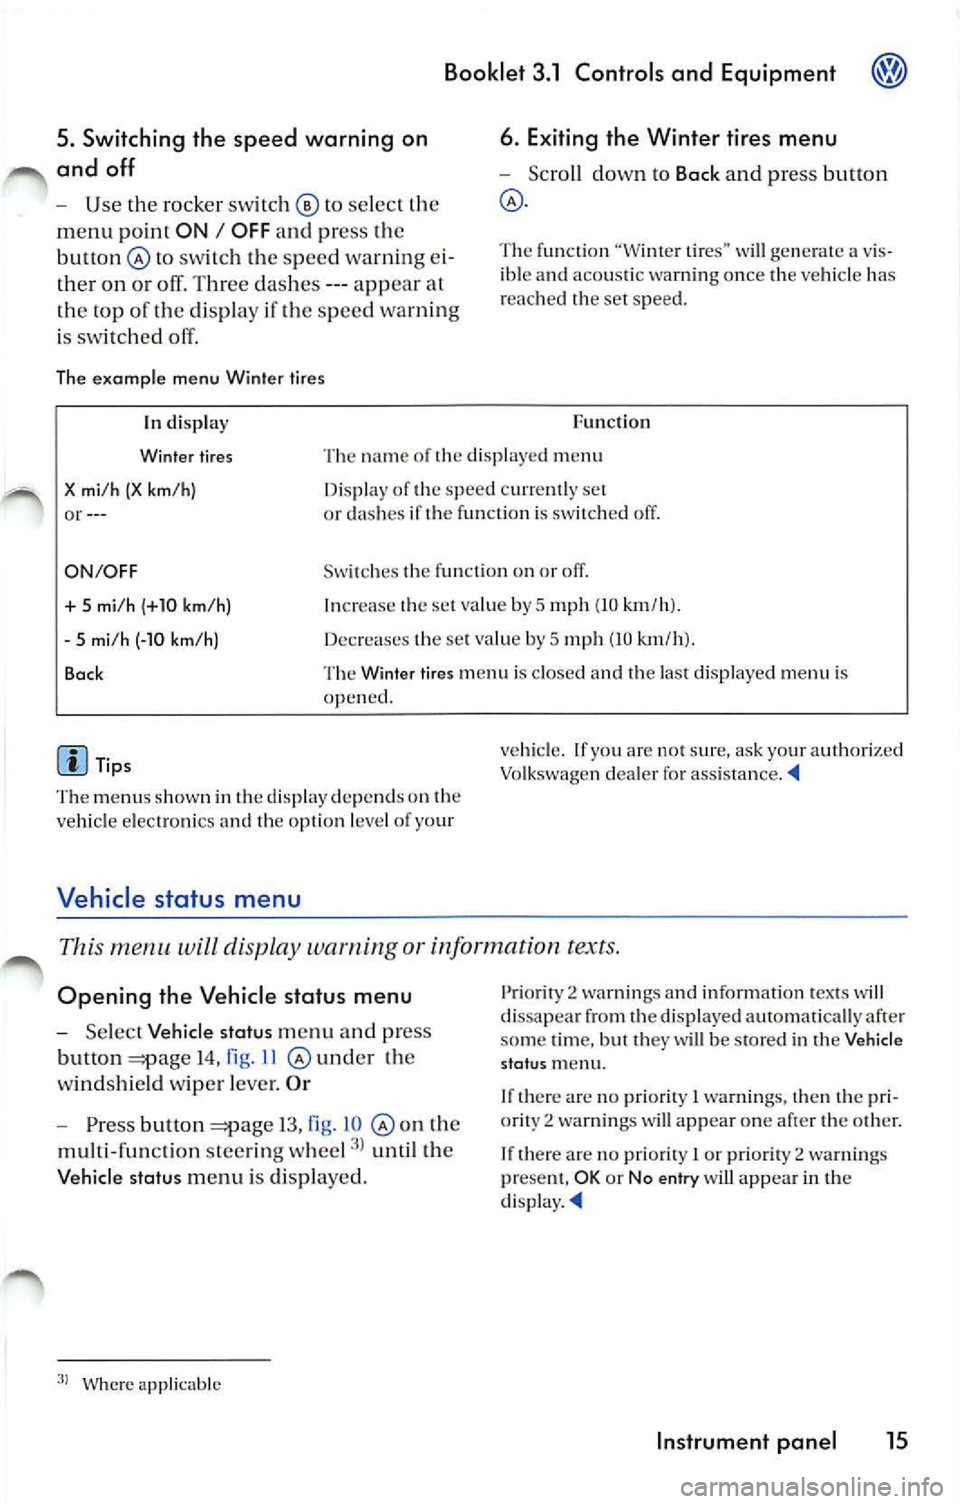
Op eni ng the Veh icl e status m enu
Se lec t Vehicle statu s men u and press
b u tto n
14 , fig . 11 @ und er th e
w indshie ld wipe r leve r.
O r
Pr ess but ton 13 , fi g. 10 th e
mul ti-func tion stee rin g w hee l
unt il th e
Veh icl e s tatu s menu i s di sp laye d.
Where applicabl e P
ri ori ty
2 warning s and i nformatio n tex ts w ill
d issa pea r from the disp la yed automatica lly af te r
so me time, but the y w ill be s tored in th e Vehi cle
s ta tu s m enu .
I f th ere are no priorit y
I warnin gs, then the pri
or ity 2 wa rnin gs will appear one af ter th e oth er.
If th ere are no prio rit y
I or priority 2 wa rnin gs
p rese nt, OK or N o en try w ill appea r in th e
d is pl ay . ._
Instrument panel 15
Page 219 of 477

Bookle t 3.1 Controls and Equipm ent
Set up menu
Th e se t up m enu u se d to mak e variou s diff ere nt setting s fo r th e function s in th e
ve hicl e.
Opening th e Set up menu - Press butto n 13, fig . 10 th e
m ult i- fun cti on stee ring w hee l
unti l th e
Set
u p m en u i s dis p la ye d.
- Se
lect th e m enu opti on Set up fr om th e
ma in menu
1 2 a nd press button
14, fig . 11 und er th e wi ndshie ld
w ipe r le ver. Or An examp le of how use the m enu 13 or 14 .
Se ttings
Tim e
Wint er tire s
L ang uag e
Unit s
Co mpa ss
Co nve nience
Li ght s
& Vis io n
D isplay off
Ba ck
Tip s F
un cti on
Yo u can set the clock hou rs a nd min utes both in th e in strum ent
cl uster a nd in t he Navig ation Sys te m . C hoose be twee n a 12 a nd 2 4
h ou r d is p lay a nd switc h
Summ er tim e (an S ap pears in th e up per of the d isp lay)
Yo u ca n en te r h ere w hether an opt ica l an d aco usti c warn ing s hould
be made an d at w hic h speed. You can use th is fun ctio n if yo u have
i n sta lled wi nte r tir es w hic h a re not su ited fo r th e to p spe ed of your
ve hicl e =>boo klet 3 .2 "Tips a nd Ma inten an ce", ch ap ter "W hee ls" .
T he tex ts in th e dis pl ay a nd in th e Nav igat io n Sys tem ca n be di s
p layed in seven diffe rent lan guages.
T he unit s use d for te m perature, fue l co nsu mpt io n va lues an d dis
t ances
set here .
Th e co mpass c an be calib ra te d and th e va ria nce zo ne adj uste d
18
T hi s m en u is use d
to make t he se ttin gs fo r the convenience f unc
ti o ns in t he ve hicle 17
Va rious se tlings can be m ade f or th e ve hicle ligh ti ng in th e Lig hts
& Vis io n m enu 17
T he dis play is sw itc hed off .
co mes bac k on when yo u sw itch th e
m ain men u back on or if a wa rning is detec ted.
You w ill ret urn
th e m ain m enu.
• T he m enu s shown in th e display dep ends on
th e ve hicle elec tro nics and th e op tio ns in stall ed
o n yo ur ve hicl e. lfyo u are no t sur e, ask yo ur au
th ori ze d Vo lk swage n dea ler o r qu alifi ed wo rk
s h op fo r ass is ta n ce . •
Your autho rize d Vo lkswage n dea le r or qu ali
fied works hop can p rogra m or mo dify ad dition al
fu nct ions depen ding o n kin d of dis play
on your ve hicl e.
• The Settings men u ca n onl y be o pened when
th e veh icl e is at a sta nd still
Wher e app licable
16 Instrument panel
Page 220 of 477
Booklet 3.1 Controls and Equipment
Opening the Lights & Vision menu
Select Set up from the main m enu
12a nd pr ess the button 14,
ll @ underthe wind shi eld wip er leve l.
Or
Ugh ts & Visio n
Pre ss button 13, fig . on the
multi fun cti on stee ring whee l
until th e
Set up menu i s dis pl aye d.
Selec t th e sub -m enu Lights Visio n.
An ex ampl e of how to use th e menu 13 o r 14.
Fun cti on
Coming Home Her e yo u ca n dete rmi ne how long the light s should remain on aft er
yo u h ave loc ked th e ve hicle 47.
Leavin g Home Here yo u ca n dete rmin e how l ong th e lig ht s s ho uld on when
y o u unlo ck th e veh icl e.
Fo otwe ll light
Comfort i nd ic. 13rightn ess of th e footwell ligh ting when t he doo rs are op en.
Th e tum sig nal w ill fla sh at leas t thr ee tim es if the turn sign al lever
i s o pera ted to chan ge lan es
49
Fact ory sett ing
Bac k Rese ts th e funct io ns in thi s m enu to th e fa cto ry se tting s.
Yo u will return to th e Se ttings m enu .
Tip s
The menu s shown in the dis pla y depend s on the
ve hicl e elec tron ics and th e opti on l evel of yo ur
Convenience functions m enu
ve hicle. If yo u ar e no t sur e. ask your aut ho ri ze d
Vo lkswagen deal er fo r ass is ta nce. '4
The con venien ce is used to make th e sett ings fo r the conve 11 ie n ce function s
in the
Opening the Convenience menu
Select Set up from the m ain m enu
12an d pr ess the but ton 14,
11 und er th e w indsh ie ld wipe r leve r.
Or
Where ap plicable
Wher e app licable
P ress bu lion 13, fig. o n th e
mu lt ifun ctio n stee rin g w hee l
unt il th e
set up m enu i s di spl ayed .
Selec t th e sub-m enu Convenience .
An exa mpl e of h ow to use th e 13 o r 14.
Instrument panel 17
Page 221 of 477

Booklet 3.1 Controls and Equipment
Func tion
Co nven ience
Door open The vehicl e lock s all door s w he n th e vehicle is mov ing and unl ocks
th e door s w hen key is re mo ved fr om ignition loc k.
ATA con firm The activati on of ala rm sys te m ca n be confirmed if re
quir ed .
Co nv. mode Co nve nien ce opera tio n of powe r w ind ows: dete rm in es if dri ver's door wi ndow, all w indows o r no window all sh ould h e
o p en ed when ve hicle is unlo cked. Thi s fun ctio n ca n o nly be ac
t ivated via dr iver's door.
Mirrors odjust The pa sse nger mir ror will be adju ste d au to mati cally wit h dri ve r's mirror if thi s fun cti o n is on.
Factory setting
Bo ck fun ctio n s in thi s m en u factory sellin gs.
Y o u w ill
m enu .
Tip s
T he m enu s show n in
displ ay depends on ve hicl e elec troni cs and o pti on l eve l of yo ur v
ehicl e. If
arc s ur e, ask yo ur authori zed
Vo lk sw age n dealer for assis ta nce .
Applies lo vehicles: wi th Hig hline ins trument cluster and compass
Compa ss
Th e ve hicle c ompa ss displa ys diff ere nt dir ect of trave l
The com pass is a n extremely ac curat e comput er di spl ays veh icle hea di ng s of N, NW . W, SW ,
S , SE , and NE. Th e m enu "Co mpa ss" can b e
op en ed wit h th e mu lti-fun cti on stee ring w hee l
bu H ons.
Ti ps
W hen dri vi ng in und erg round garages, throug h
or nea r subwa y stat ions o r rail roads·· - -"
app ear in displa y in stead of tr ave l
di rec tio n. If
m enu Compa ss is op en ed by
u sing w ind shi eld wipe r lever or multi-func
tion stee rin g w hee l butto ns Co m
pa ss avai lable prese nt" wi ll in dis p lay. Once imerfer cn ce cause dis appears. co mp ass rea ding will re app ear in d isp lay.
Applies to vehicles: with instrument cluster and compass
Calibrating the compass
vehicle compass must be calibrated time install aclditionnl i te m s
your vehicle, i.e. a roof ra ck.
Opening the Compass menu
Se lec t Set up the ma in
1 2 and press the bu11on
und er th e windsh ie ld wiper leve r o r th e
button on the multi-func tion steer ing
18 Instrument panel
wheel 13, fig . IO
Selec t th e sub-m enu Composs and
pr ess
button.
Page 222 of 477
Booklet 3.1 Controls and Equipm ent
Calibrat ing the compas s
-Ma rk the m enu ent ry Calibra tion and
pr ess
butt on. The fo llow ing m es
sage will be di sp layed To calib rate drive
round a comp lete circle.
- Drive t he ve hicle in circl es a t 5 mph (10
km/h) or less until th e disp lay indica tes
th at th e ca libra tio n process has bee n com
pl eted. • Durin g th e ca libration process or the cali
b ra tio n process is not su ccess rully accom
pli sh ed th e word "CA I."
will ap pear in the dis
p la y in stead or the directio n.
• 1r "CAL" ap pea rs in the dis p lay instead of the trave l di rectio n th e co mpa ss mu st be ca librat ed.
• While calib ratin g th e co mpass do no t drive
w ith the rea r lid ope n or the rea r seatback un
l o ck ed to avoid ina ccurate
Adjusting the compass variance zone
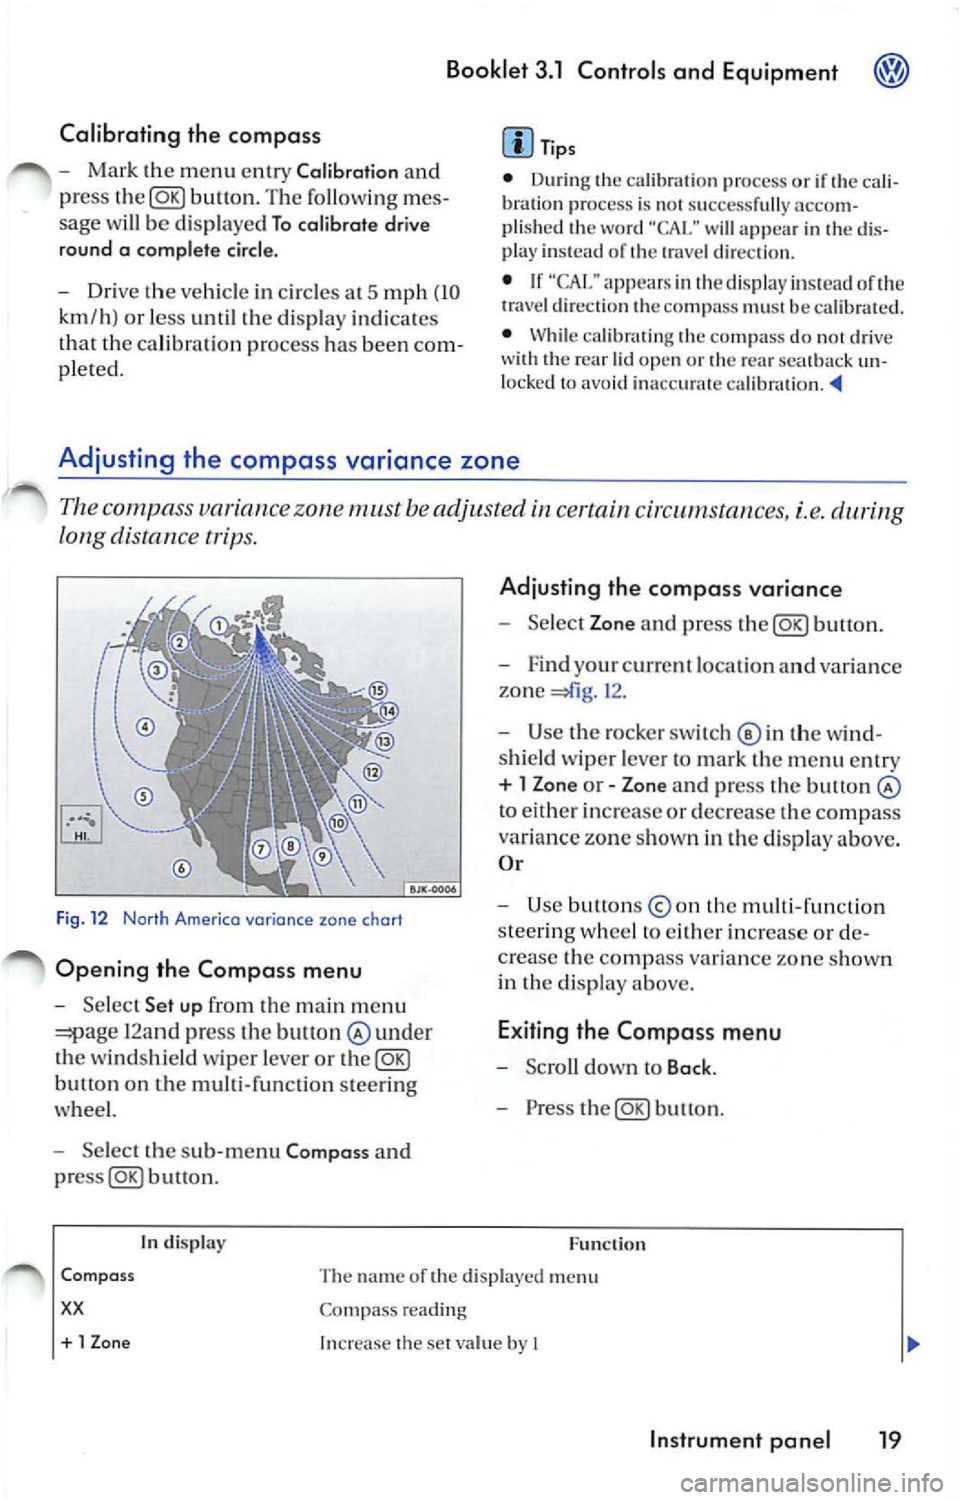
Th e c ompa ss variance zone must be adjusted certain cir cums tances, i.e.
long distance tr ips.
F ig . 12 Norlh Americo variance zone chort
Opening the Compa ss menu
- Se lec t Set up fr om the main m enu
12and press the bult on under
th e winds hield wiper leve r or the@g)
butt on on the multi-function steer ing
whee l.
- Select the sub -m enu Compa ss and
buu on .
tn disp lay
Adju sting th e compass variance
- Select Zone and press button.
- F ind your cur rent loca tio n an d varia nce
zone
1 2 .
- Use the rock er switch© in th e wi nd
s hi eld wiper leve r to ma rk th e m enu entr y
+ l Zon e or - Zone and press the button
to eith er in crease or decrease the compass
variance zone sh own in th e d isplay above.
O r
- Use button s
the multi -fun ction
s tee rin g w hee l to eith er increase o r de
c rea se the comp ass va ria n ce zone s how n
in th e di sp lay above.
E xiting the Compa ss menu
- Scro ll down to Back .
- Press the@g)button.
F u nc tion
Com pass
xx
The name or the di sp layed menu
Co mpass reading
+ 1 Zon e Increase the se t va lue by I
In strument pan el 19