Page 357 of 444

WARNING
Improperly tighten ed wheel bo lts can become loose, causin g lo ss of cont rol, a colli sio n an d seriou s perso nal injury.
Never tigh ten the wheel bolts with a onal socke t in th e screw driver han dle beca use
yo u will not be abl e to tighte n the bo lts to the
req uired torque .
WARNING
Improper use of your vehicle jack can ca use seriou s perso na l i njury.
Spare
3.2 Tips and Advice
(continued)
Never use the factory su pplied
port th e veh icle .
Alway s properly secure the vehi cle jack and tool k it in th e lu ggage com pa rtm ent .
Loose ite m s in th e ve h icle can fly a round the in side of th e vehicl e during hard braki ng or in a c rash causin g serious pe rso na l inju ry.
in th e ve hicle" on page 85.
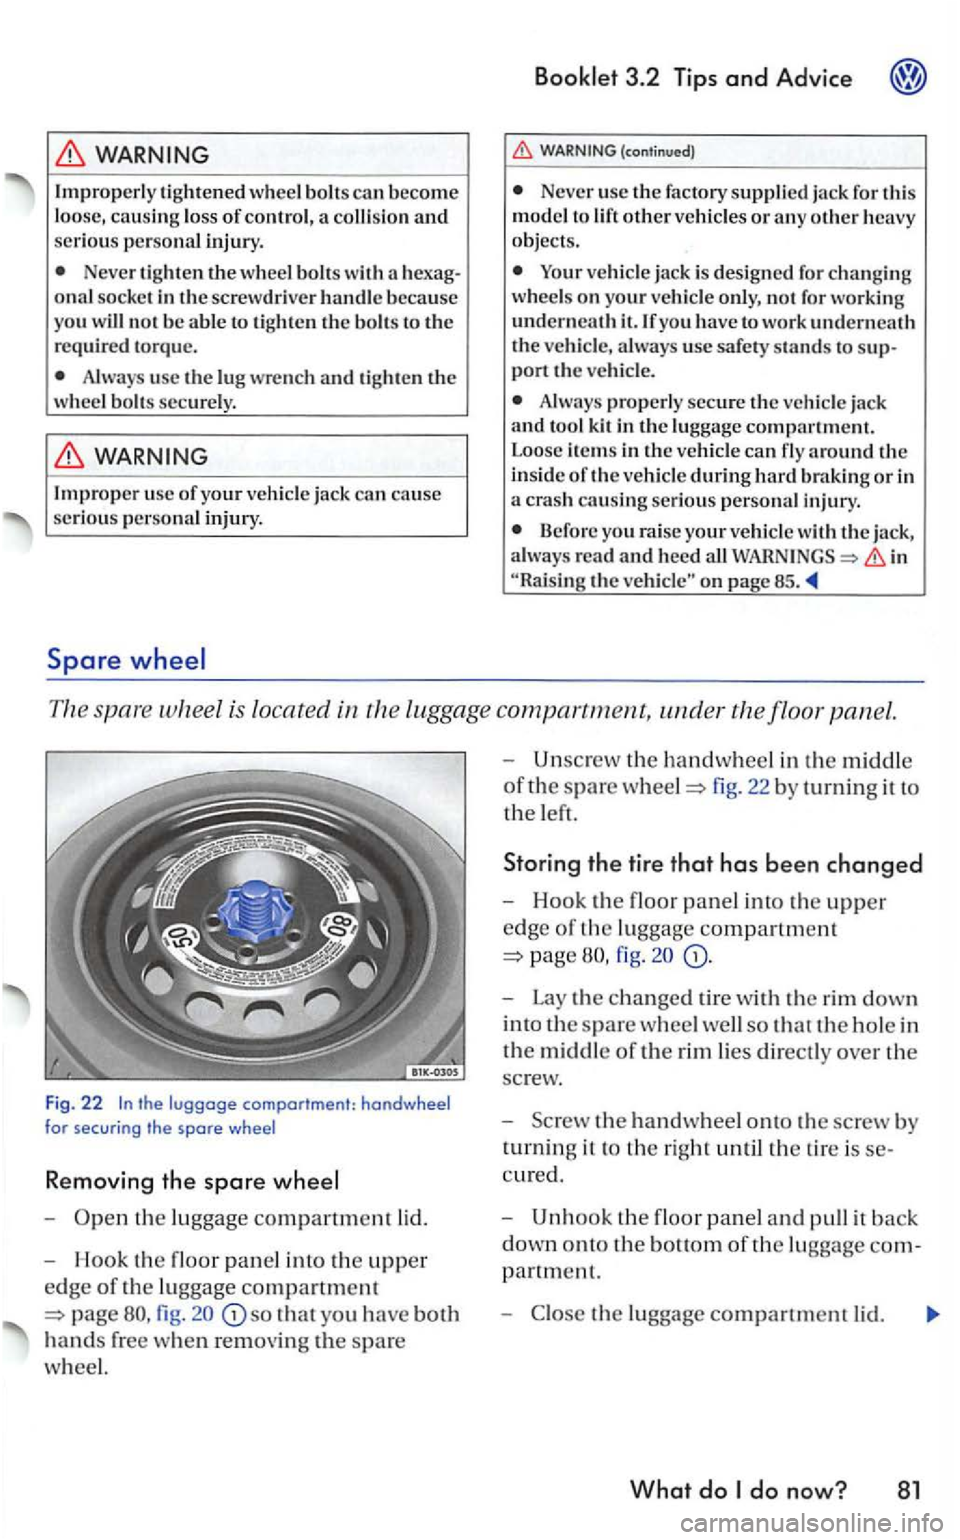
spare is located in t h e luggage compartment, the floor panel.
F ig. 22
-
fig. so that yo u h ave both
hands free when removin g the spare
w h
eel.
-Unscrew th e hanclwhee l in the m iddle
of the spare fig. 22 by turning it to
t h e left.
Storing the tire that has been changed
-Hook the floor panel into th e upper
edge of th e lu ggage compartment
page
-Lay the changed tire with th e rim down
i n to
the spare wheel well so that th e hole in
the middl e of th e rim lies directly over t h e
sc r
ew.
- Scr
ew the hand wheel onto th e screw b y
t
urni ng it to the right until the tire is
partment.
- C lose the luggage compartment lid.
What do do n ow? 81
Page 358 of 444

3.2 Tips and Advice
WARNING
The spare whee l may be smaller than the origina l tir e. The s maller spare wheel is identified with a sticker and the words
The spare whee l m ust be returned to the
spare whee l well so on as the standard road
wheel can be re pla ced.
Getting started
The spare wheel must always be secured
with the w hee l bolts provided by the factory .
After
r
vehicle in a safe place before changing a wheel.
If yo u have a flat tire or puncture, park
the vehicle as far away fro m the of
traffic as possib le on a firm, even surface
Turn off the e ngin e. Turn on the emer
gency flasher.
App ly the parkin g brake firm ly and e n
gage a
gear or put the selector in
If yo u are towin g a trailer, unhitch it
from yo
ur vehicle.
WARNING
Changin g a wheel, especially on
Alw ays stop the ve hicl e
to change the
Turn on th e e merge ncy fla sh er and se t up an o th er warning device ab o ut 27 ya rds (25 meters) beh ind the vehicl e to warn ap
proa ching traffic.
Always sure th at th e ground is leve l and firm, if necessary usc sturdy under the ja ck .
When one wh eel is lift ed off the ground putting the se lec to r l ever in
Always apply tl1e par k in g brake firmly and firmly engage gea r or put th e selec tor lever in
Page 363 of 444

in wet con dition s. o rd er t o f ully exploi t th e
b en efits of un idi re c tional tires ag ain, yo u sh o uld
imm ed iat ely r eplace or chan ge th e tire in o rd er
t o r estor e th e co rrect direc tio n o f rotat ion.
WARNING
Imprope rl y tig h te n ed or mainta ined wheel
bo lts can b ec ome lo ose causing loss o f co n tro l,
a c olli sion and serious p erso nal inju ry:
Always keep the wh eel bolt s and th e
thread s in the wh eel hu bs clean so th e wheel
b olt s can turn eas ily and be properly
N eve r g re ase or oil th e w heel bo lts and the
threads in the wheel hub s. They can become loose whil e dri vin g if gr ease d or oiled , eve n if
ti ghten e d t o the sp ecified t orque.
After changing a
-secure the jack and
tool kit in th e luggage
-
page 86 .
- H
ave the tire pressures all
the d e tect an
page 62 o r
Always read a nd heed all and oth e r important pa ge 79,
Note
The s pecified to rqu e for th e w hee l bolts is
88 ft / lb s N m). The torque must be c hecke d
a s soon as possib le w ith a torq ue w re n ch -erably by an authorize d Volkswa gen deale r o r
q ualified wo rksho p.
rod ed and pla ced befo re you ha ve the torq ue chec ked or have the b olts ti g htened to th e proper to rq ue.
H ave th e damage d tire replace d with a tire o f
th e sa me brand . s p ecifi ca tio ns a nd tread
WARNING
Alw ays properly secure the vehicl e jack an d
too l kit in the lu gg ag e compartment.
ment. Loose item s in th e ve hicle ca n fly
a round the in sid e o f the ve hicl e d urin g hard brakin g or in a c rash causin g se riou s perso nal
in jury.
Note
Th e specified to rqu e fo r th e w heel bolts is
88 N m). Th e torqu e must be c hec ked as soo n as possi ble w ith a torqu e w renc h -erably by an a uth orized Volk sw age n deale r o r
qua lified wo rk s h o p.
yo u no tice that the w he el b olts arc rode d and ha rd to tu rn . they mu st b e rep la ced
b efor e yo u have the torq ue c hec ke d or have th e
b olts tight en ed to the prop er
W ha t d o
Page 366 of 444
left side of the instrument panel and behind fu se box covers in
the engine
compa rtment.
Fig. 32
- Turn off the igni tion and the con
cerning component.
-
Insert the flat blade of a screwdri ver
into
the openin g of th e fuse box cove r
32.
-
the respeclive fuse.
-
the fuse tables to find out the loca-
tion of the blown page 92.
- If
the fuse is blown (the m etal strip is
melted) , replace it w ith a new fuse of the
same amp ra tin g (sa m e co lo r and sam e
marking).
Fuse bo x Bin the engine compartment
-Turn off the ign ition an d the con
cerning component.
-th e eng in e hood.
fig . 33 .
- Remove
the cover.
-To remount the cover, place it ove r the
fuse box and press th e lock buttons back
ward aga inst the directio n of the arrow
until
they latch securely .
Th e indi vidual electric a l c ir cuit s are pro tected by fuses. recommend you carry severa l spare
f uses at
clear 2 5
Page 371 of 444

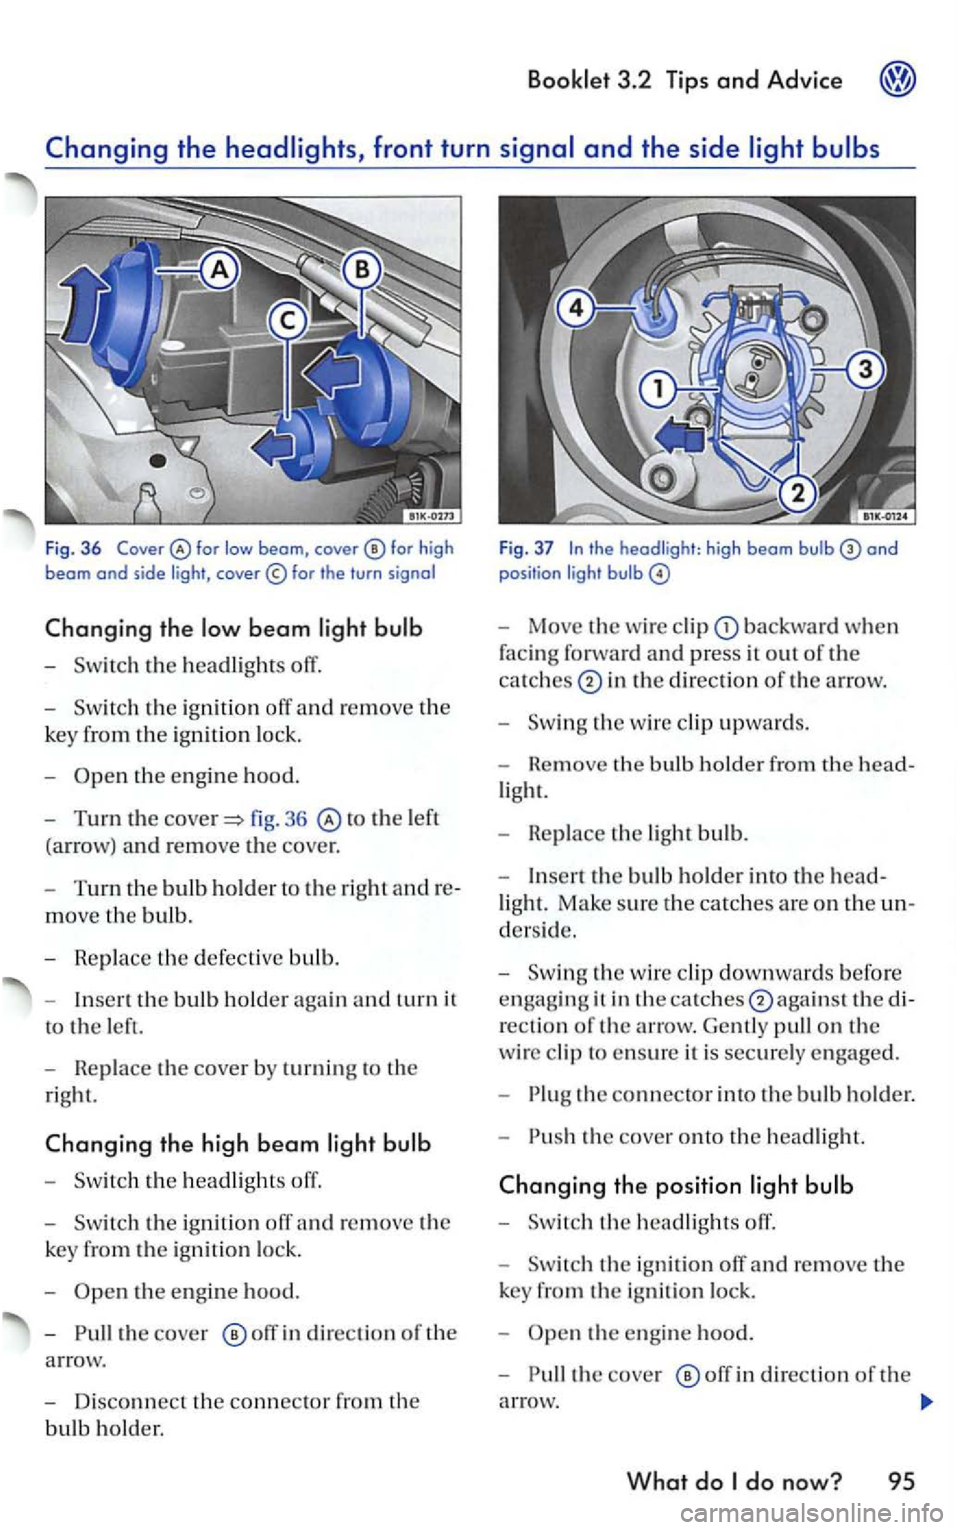
Fig . 36 for high beam and side light ,
th e ignition off and re m ove the
k
ey fro m the ignition lo ck .
-
to the left
(a rrow) a
nd re move the cove r.
- T
urn th e bulb holder t o the right andre
move th e bulb.
- R ep lace th e defec tive bulb.
-
t h e bulb h o ld er again and turn it
t o
the left.
-
Replace t h e cover by turning to th e
rig ht.
the high beam light bulb
-
the ig nition
th e en gin e hood.
-
o ff in direc tio n of the
a rrow.
- Disco
nnect the connec tor fro m the
bulb hold er.
Bookl et 3.2 Tips and Advice
Fig. 37
- Move th e wi re cli p backward when
f
acin g forwa rd and press it ou t of the
ca tc h
es in th e di rection of the arrow.
-
the w ire clip upward s.
- Rem ove th e bul b ho ld er fro m the h
ead-
light.
- Repl
ace th e light bu lb .
- In
sert the bulb ho ld er into th e head-
light. Make sure the catches are on th e un
d ers ide.
-
the wire clip downwards befo re
e n
gagin g it in thecatc hes0again sl the di
r
ectio n of th e arrow. Gently pull on th e
wire clip to ensure it is securely e ngage d.
-
th e connector into the bul b ho ld e r.
-
the cove r onto the hea dlight.
the e ngi ne hood.
-
the cove r off in direction of t h e
a rro
w.
What do