2008 VOLKSWAGEN BEETLE warning
[x] Cancel search: warningPage 47 of 138
Downloaded from www.Manualslib.com manuals search engine lcctrlc windows-functions
lr .. t r ,nd nd obsorv the Introductory
lnf rmotl n nn d 1 fety warnings~ on
n - t uc h opening ond closing
11 t ur.11 p n ln a n d cl sing mnk s it possib le
t fully p n n
butt on , do n t h v t o e h Id do wn to do this .
r
o n -touch closing: pull th button fo r th e ap
pr prl1 l window up brl fly Into the s co nd posi
tion.
or ono-touch opening: pr ss the bu tto n for the
ppr prl1t wind w down bri fly Into the seco nd
p
s lti n .
Stopping the one-touch function: press or pull
lh
bu tt n f r the appropri te window again.
R
estoring one-touch opening and closing
On - touc h op ning and closing is deac tiv a te d if
th v hi 'I batt ery has been disconnec ted or dis
c h
rg d whil e the wind ow s were not fully closed.
The fun ction will ha ve to be reset.
• Cl s all windows and doors .
• Swi tc h on the ignit ion .
• Pull up the bu tton for the window and hold it in
thi s posi tion for longer than 2 sec onds .
• Let go of the bu tton then pull it up aga in and
ho ld i t in this position . On e-to uch opening and
c los ing is
now ready for operation .
The one -to uch function can be res tored for individ
u
I windows or for several wind ow s a t th e same
tim e.
Convenience opening and closing
The windows ca n be opened and clos ed from out
side
t11e v e hi cle using the vehicle key :
• Press and hold the locking or unlocking button
o n the
ve hi cle k e y. All electr ic windows will be ei
ther opened or closed.
•
To interrupt this function , let go of the locking or
unlo cking button .
During co
nveni ence closing , the windows and the
elec tric panorama sliding/tilting roof close .
A varie ty of setti ngs re lated to window operation
can be made and adjusted using the @) button
and the
G and (open and close ) function buttons
~page 31.
A WARNING
Improper or unsupervised use of the electric
windows can cause serious injuries.
• The electric windows should only be
opened or closed when you are sure that no
body is in their operating area.
• Never leave children or people requiring
assistance alone in the vehicle when the ve
hicle is locked. The windows can no longer
be opened in an emergency.
• Always take all vehicle keys with you ev
ery time you leave the vehicle. The windows
can still be operated using the buttons sever
al minutes after the ignition has been switch
ed off, provided that the driver door and front
passenger door are not opened.
• When transporting children on the rear
bench seat, the rear electric windows should
always be deactivated using the safety button
so that they cannot be opened or closed.
r::l One-touch opening and closing and the roii
L!J back function will not work if there is a fault in
the
electric windows . Proceed to a qualified work-
shop . ~
Roll-back function for the electric windows
r-('n First read and observe the i~troductory
l.-W.I information and safety warnmgs A on
page 60.
The roll -b ac k function for the electric windows can
reduce the risk
of injuri es when the windows are
closing => ,&. If the one- touch closing function for a
wind ow
does not work beca use it is stiff or is being
obs tructe d the
window will autom atically open I
again.
• Check to see why the window has not closed.
• Try to close the window again. ..,..
Opening and closing 61
Page 48 of 138
Downloaded from www.Manualslib.com manuals search engine l
• If the window is again prevented from closing
within approximately
10 seconds of the first at
temp t because it is stiff or obstructed, the automat
Ic clo s
1ng fun ctio n Is switched off fo r approximately
10 seconds.
• If the window is still obstructed , the window
st ops at this point. To c lose the window withou t the
roll-bac k function, press the button again within
1 0 seconds ~ &,.
Closing the window without the roll-back
function
• Try to close the window again within approxi
mately 10 seconds by holding the button . The roll
back function will be dea ctiva ted for a small
section of the path of the closing window.
• If the c losing procedure takes longer than ap
proximately 10 seconds, the roll-back functio n will
be reac tivat ed . The window will then stop again if it
Is s tiff o r meets another obstacle .
• Please proceed to a qualified workshop if the
window
st1ll can not be closed .
t:2 I Bflfore th journey
---
A WARNING
Closing the electric windows without the roll
back function can lead to severe injuries.
• Always take care when closing electric
windows.
• Ensure that nobody obstructs the path of
the electric windows, especially if the roll
back function is not active.
• The roll-back function does not prevent
fingers or other body parts from being press
ed against the window frame and sustaining
injury.
W The roll-back fun ctio n is also ac tivated if the
l!J windows are closed using t he ve hicle key f or
convenience closing
~page 61.
I ..
Page 49 of 138

Downloaded from www.Manualslib.com manuals search engine M chanica l controls on the front seat
Fig. 43 Front left-hand seat controls
Fig. 43
CD
Function
Folding the seat backrest forwards
or backwards (2-door vehicl es only)
if'l1 First read and obscrvo th introductory
L-.lr::JJ inforn1ation and safety warnings~ on
page 66.
The la yout of the contr I~ n tt1 fr nt ri~jt1t-h·1nd
seat is a mirror imElg f th 1 ... y ut f th ntr I
on the front left- h nd s ot.
The following secti n c ntain d s ripti n f 11
possibl e controls. Th nun1b r f ntr I n1 y v ry
depending on the v r ion of tl1
The seat m ay h v e con1bin, ti n o f 111 t1~.. nic I
and electrical contr ols-=> png 70.
Action
Folding forwards: Pull le ver a nd fold s
ward. Push the se at forw ards at th e an1 tirl"l
Folding backwards : slide the se t b k s f r
go until it clicks into place. The
b ckr t r I o
matic ally and can be fold ed b ackward . Engag
t for-
it will
s ut -
th
seat backrest in an up rig ht position .
--~------------------@ Adjusting the lumbar support . Change lev er position .
----~--~~--~~--------~-------1----~----~------------------
f'3 Take all weig ht off the bac kres t and turn th h nd-
\:V Ad just ing the backrest. wheel.
0 Adjusting the seat height.
® Adjusts the angle of the sea t cush
ion . Move
the le v
er up or down sev era l tirn a s r quir d.
Pull or press the le ve r severa l tin 1es as r qui r d.
--------~------------------------~----------------------------
®
Adjusts the seat forwards and back -Raise the handl e and slide the sea t forw rd or b ck-
wards . wards .
--------~------------------------~----------------------------
(j)
Pushing the front seat forwards or Lift the hand le and move the fron t seat. Th front t
backwards. must engage after
the le ve r has been r I a d.
Sitting correctly and safely 69
Page 50 of 138
Downloaded from www.Manualslib.com manuals search engine Electrical controls on the front seats ~~~~~~~~~~~~-----------------------
®
651<-()590
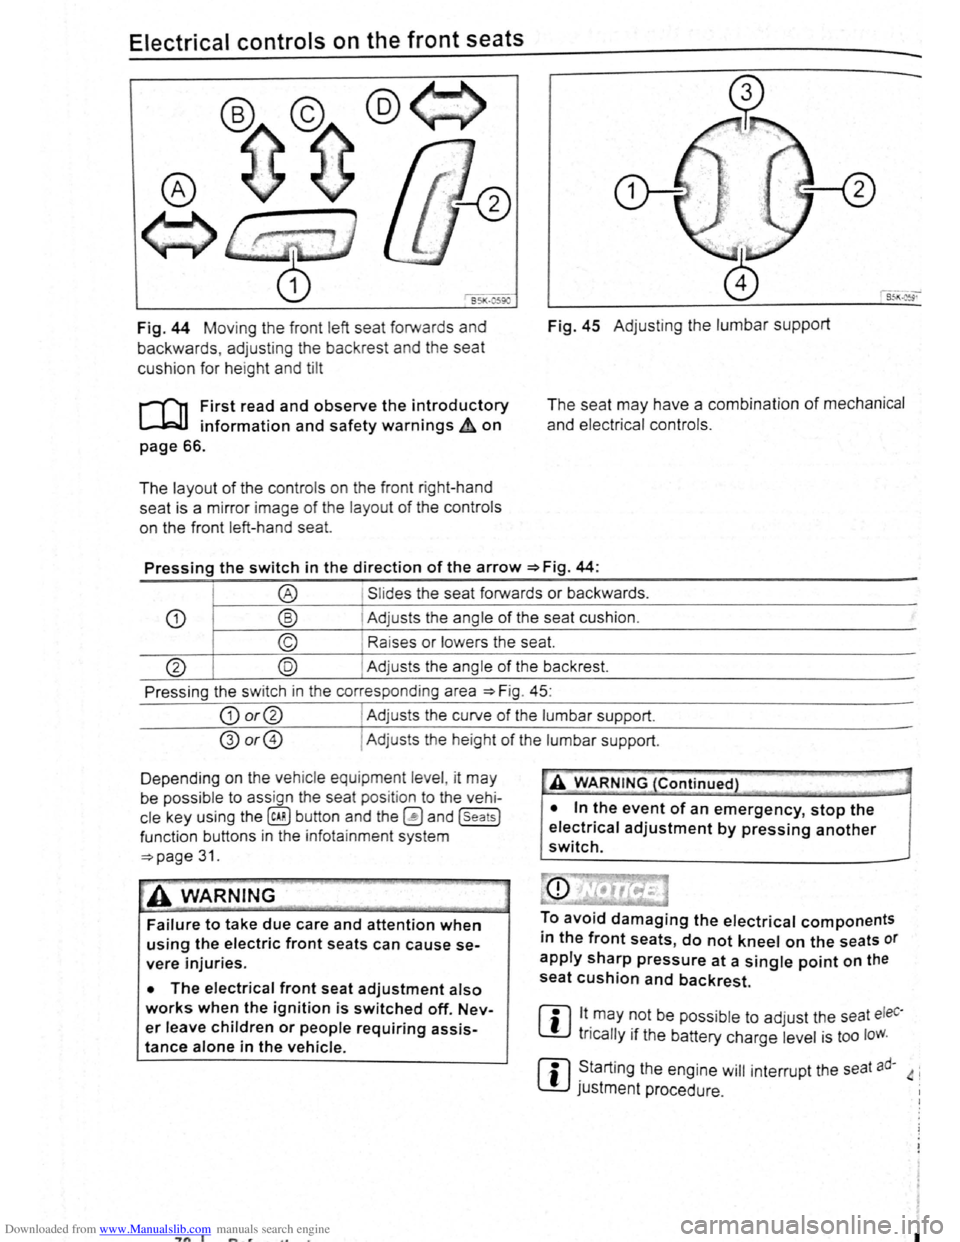
Fig. 44 Moving th e front left seat forwards and
backwards , ad j
usting the backrest and the seat
cushion for hei
ght and tilt
r-('n First read and observe the introductory
L-.lc:J.I information and safety warnings~ on
page 66.
The layout of the contro ls on the front r ight-hand
seat is a m irror image
of the layout of th e contro ls
on the front left-hand sea
t.
Fig. 45 Adju stin g the lumbar support
The seat may have a combination of mechanical
and electrical controls.
Pressing the switch in the direction of the arrow ~Fig. 44:
® Slides the seat forwards or backwards .
CD ® Adjusts the ang le of the seat cushion.
© Raises or lower s the seat.
@ @ Adjust s th e angle of the backrest.
Press ing the s witch in th e corresponding area
~Fig. 45:
CD or@ I Adjusts the curv e of the lumbar support.
@or@ I Ad justs the he ight of the lumbar support .
D epending on the veh ic le equ ipment leve l, it
may
be possib le to ass ign the seat pos it ion to the vehi
cle key using the @ill button and the~ and (seats]
funct ion buttons in the info ta inment system
~page 31.
~A WARNING
Failure to take due care and attention when
using the electric front seats can cause se
vere injuries.
• The electrical front seat adjustment also
works when the ignition is switched off. Nev
er leave children or people requiring assis
tance alone in the vehicle.
~"'A WARNING (Continued} --~ ~ -·-
• In the event of an emergency, stop the
electrical adjustment by pressing another
switch.
To avoid damaging the electrical components
in the front seats, do not kneel on the seats or
apply sharp pressure at a single point on the
seat cushion and backrest.
m lt.may ~Ot be poss ib le to adjust the seat eleC·
W tncally 1f the battery charge level is too loW.
m ~tarting the engine will interrupt the seat ad· 4 i
W JUStment procedure .
"7n I I
Page 51 of 138
Downloaded from www.Manualslib.com manuals search engine Adjusting the head restraints
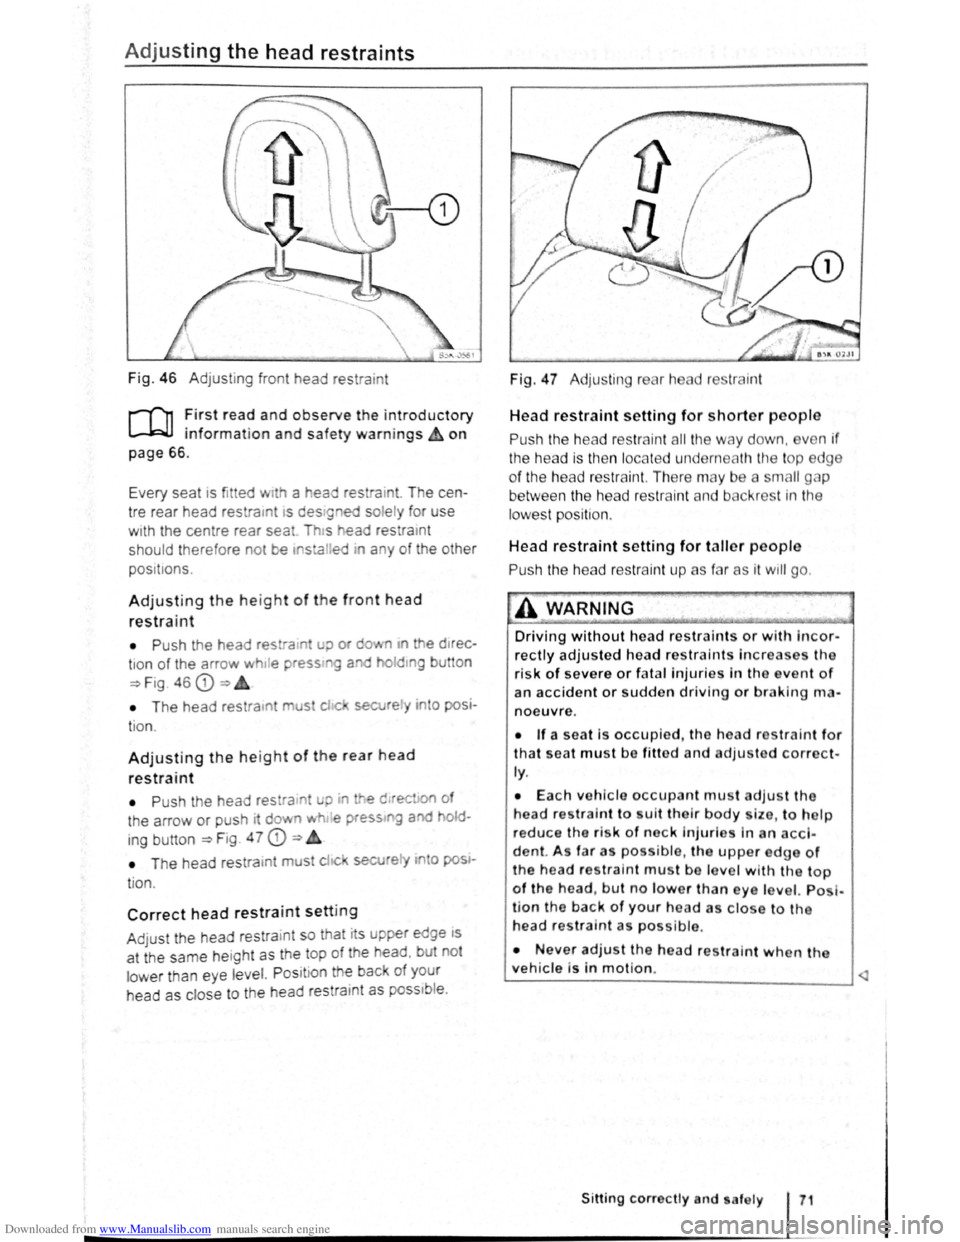
Fig. 46 Adjustin g f ront head restra int
r-T'n :irst rea? and observe the introductory
L..-.WJ 1nfor mat1on an d safety warnings & on
page
66 .
Ev ery s
eat 1s fit ted w1th a t'lea r es ra10t. T he ce n
tre rear head restra rnt
IS d e stgned so le ly for use
wrth the centre rear sea Th s ead res ratnt
s hould therefore no t be ,stalred ira any of th e othe r
pos 1t 1ons .
Adjusting the height of th e front head
restraint
• P ush th e head res ra in u;> or cfo.• n •n e d Jrec -
tron of the arrow h1Je pressmg a holdtng bu tto n
~Fig 46 CD=>
• T he head re stratn mus chc sec re~y n o posi
t io n.
Adjusting the height of the rear head
restraint
• P ush the head res ra in! uo ~ e d rec on of
t h e a rrow
or push rt do vn wh . e press g aod old
ing b utton ~Fig. 4 7 CD ~
• T he head re str a tn t must c! c secJ 'e i'1 o pos •
t io n.
Correct head restraint setting
A dju st the head rest ra 1nt s o t hat its upper ed ge rs
a t th e sa me he ig ht as th e top of th e head . b ut no t
l o w
er th a n eye le vel. P osit ion th e bac of you r
h ead
as close to th e hea d res tram t as poss1b le .
Fig. 47 Adju ting rear h ad r str ai nt
Head restraint setting for shorter people
Push the he ad restra in t all the w ay d own , ve n if
the head is then locat e d un derneath th e top edg e
of the head res traint. There may b e a sm all g p
between the head res trai nt and b ck ros t in tt1e
lowes t position .
Head restraint setting for taller people
Pus h the hea d r estrain t up as f r as it w ill go .
A WARNING
Driving without head restraints or with Incor
rectly adjusted head restraints Increases tho
risk of severe or fatal injuries In th o even t of
an accident or sudden driving or braking rlHl
noeuvre.
• If a seat is occupied, the hea d r traint for
that seat must be fitted and adjusted corre ct·
ly.
• Each vehicle occupant mu t adjus t the
head restra i
nt to uit tho lr body ize , to h lp
reduce the risk of nock injurlo in an acci
d ent. A s fa r a po s ibl e, the upper edge of
the head res tra int mu t be lo ve l w ith the top
of the head , but no lower 'than eye le vel. Po I·
l ion the back of your head as clo e to th e
head restra int as possible .
• Never adjust the hea d restraint when tha
vehicle is in motion. ~
Sitting correctly nd . af ely
Page 52 of 138
Downloaded from www.Manualslib.com manuals search engine ~emoving and fitting head restraints
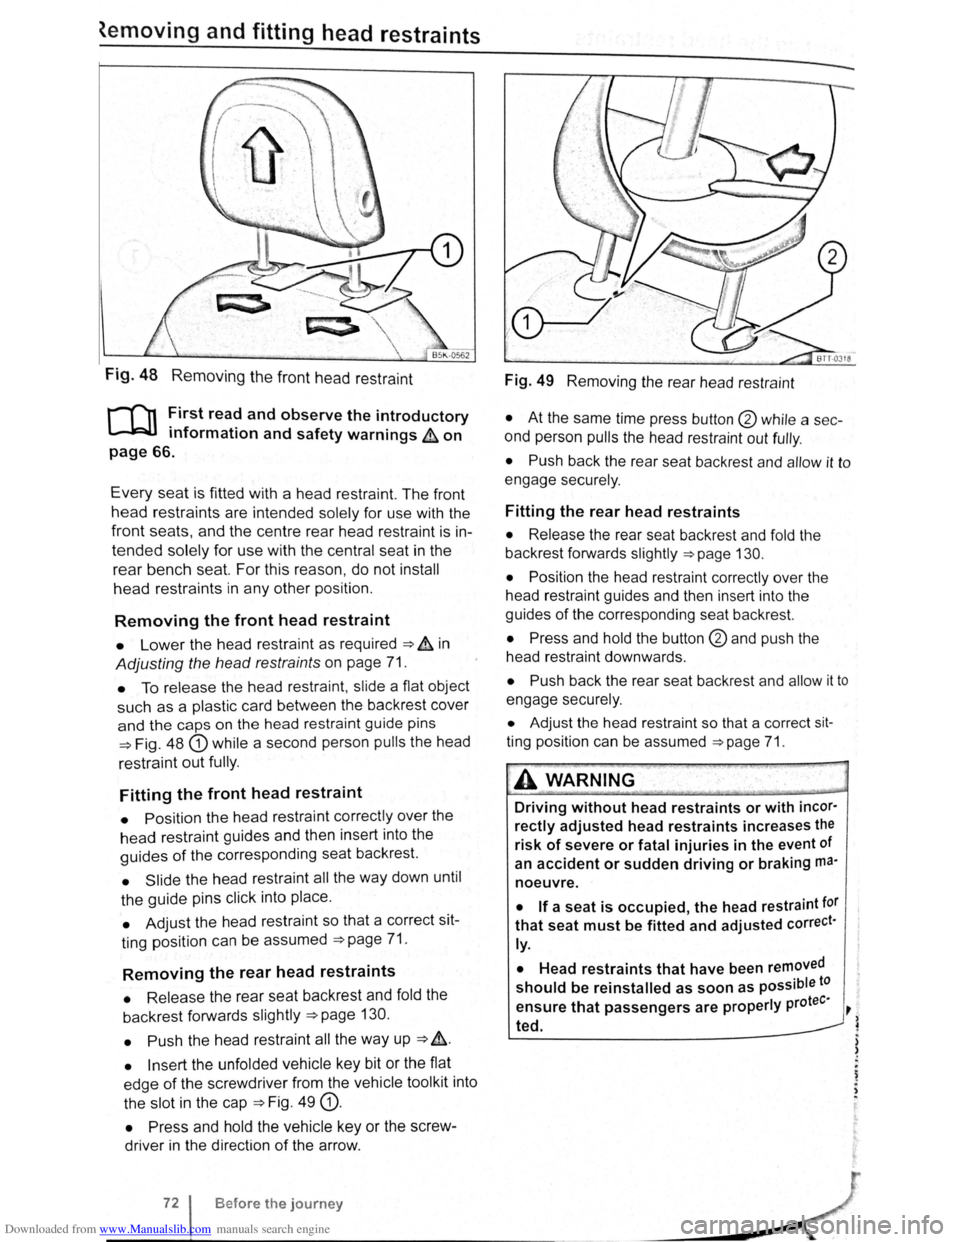
Fig. 48 Removing the front head restraint
r-f'n First read and observe the introductory
L-lcJJ information and safety warnings & on
page 66.
Every seat is fitted with a head restraint. The front
head restraints are intended solely for use with the
front seats, and the centre rear head restra int is in
tended solely for use with the central seat in the
rear bench seat. For this reason , do not install
head restraints in any other position.
Removing the front head restraint
• Lower the head restraint as required ===> & in
Adjusting the head restraints on page 71.
• To release the head restraint , slide a flat object
such as a plas tic card between the backrest cover
and the caps on the head restraint guide pins
===>Fig. 48 G) while a second person pulls the head
restraint
out fully .
Fitting the front head restraint
• Position the head restraint correctly over the
head restraint guides and then insert into the
guides of the corresponding seat backrest.
• Slide the head restraint all the way down until
the guide pins click into place .
• Adjust the head restraint so that a correct sit
ting position can be assumed
===>page 71.
Removing the rear head restraints
• Release the rear seat backrest and fold the
backrest forwards slightly
===>page 130.
• Push
the head restraint all the way up ===> &.
• Insert the unfolded vehicle key bit or the flat
edge
of the screwdriver from the vehicle tool kit into
the slot in the cap
===>Fig. 49 G).
• Press and hold the vehicle key or the screw
driver in the direction
of the arrow .
Before the journey
Fig. 49 Removing the rear head restraint
• At the same time press button @ while a sec
ond person
pulls the head restraint out fully .
• Push back the rear seat backrest and allow it to
engage securely .
Fitting the rear head restraints
• Release the rear seat backrest and fold the
backrest forwards slightly
===>page 130.
• Position
the head restraint correctly over the
head restraint guides and then insert into the
guides
of the corresponding seat backrest.
• Press and hold the button @and push the
head restraint downwards .
• Push back the rear seat backrest and allow it to
engage securely.
• Adjust the head restraint so that a correct sit
ting position can be assumed ===>page 71.
A WARNING .
Driving without head restraints or with incor·
rectly adjusted head restraints increases the
risk of severe or fatal injuries in the event of
an
accident or sudden driving or braking ma·
noeuvre.
• If a seat is occupied, the head restraint tor
that seat must be fitted and adjusted correct·
ly.
•
Head restraints that have been removed
should be reinstalled as soon as possible to
tee· ensure that passengers are properly pro ~
~ ted.
) )
.
~ . ,
Page 54 of 138
Downloaded from www.Manualslib.com manuals search engine Centre armrest
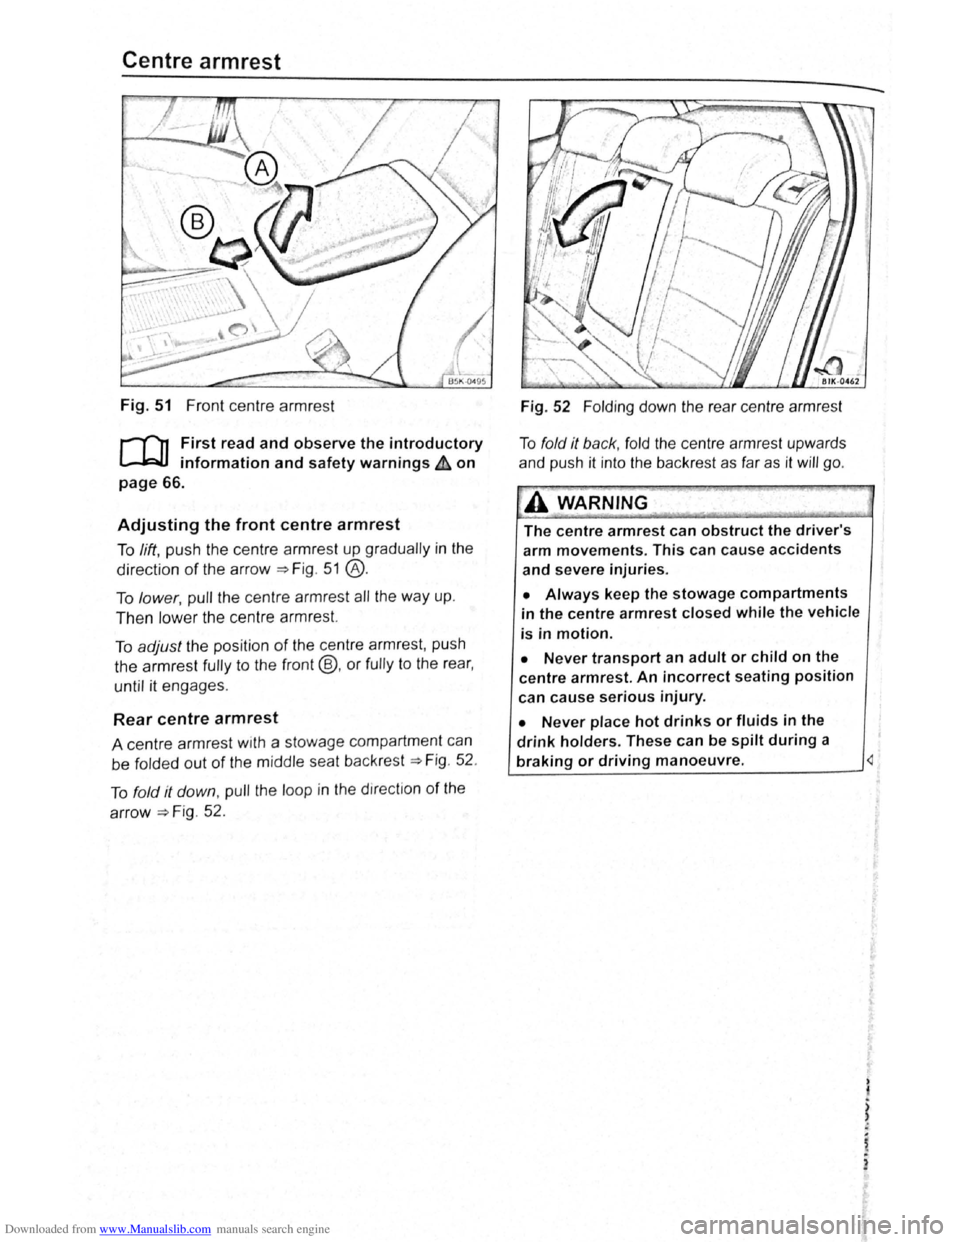
Fig. 51 Front centre armr est
r-T'n First read and observe the introductory
L-.!::J.I information and safety warnings & on
page 66.
Adjusting the front centre armrest
To lift , pu sh th e ce ntr e a rmres t up grad ua lly in the
directio n of th e arrow~ Fig . 5 1 @ .
To lower, pull th e ce ntre armr est all the way up .
Then low er th e ce ntr e a rmr est.
To adjust the posi tio n of the ce ntr e a rmr est, pu sh
th e
armrest fully to the front@, or fully to the rea r,
until it engages .
Rear centre armrest
A centre armr est w1th a stowage compartmen t can
be
f o lded out of the m idd le sea t back rest~ Fig . 52 .
T o
fo ld it down , pull the loop in t he direc tio n of the
arrow~ F ig. 52 .
Fig . 52 Folding d o wn the rea r cen tre a rmr est
T o
fo ld it back , fo ld the ce ntr e a rmr est upw ards
a nd pu sh it int o
the bac kres t as fa r as it will go .
A WARNING~
The centre armrest can obstruct the driver's
arm movements. This can cause accidents
and severe injuries.
• Always keep the stowage compartments
in the centre armrest closed while the vehicle
is in motion.
• Never transport an adult or child on the
centre armrest. An incorrect seating position
can
cause serious injury.
• Never place hot drinks or fluids in the
drink holders. These can be spilt during a
braking or driving manoeuvre.
)
i
,.
2
Page 55 of 138
Downloaded from www.Manualslib.com manuals search engine Seat functions
[ Introduction
1 hi · chnptor contnins inforrnntion o n th e follo wing
sub wrts :
'" t dt ll 'nting . . . . . . . . . . . . . . . . . . . . . . . . . . . 75
8dl.k nm~S<. g fun ction . . . . . . . . . . . . . . . . . . . 76
F lldm .. th front Pt ~seng r s n t bac kres t
ft.)rWflrd.. . . . . . . . . . . . . . . . . . . . . . . . . . . . . . . . 77
Additiona l inforn1ation and warnings:
• Adjus ting the s t1t po sitio n ;;. page 66
• S at b Its -:-pag e 79
• Airbrtg sys te m => pag e 88
• Child s ts (accessories ) ::::>page 97
• Ex t rior mirr ors =-> pflge 1 22
• Arr condi tio ning ->page 256
Seat heating
c.:.:..J L.:..J L..:..l
BAJ -0013
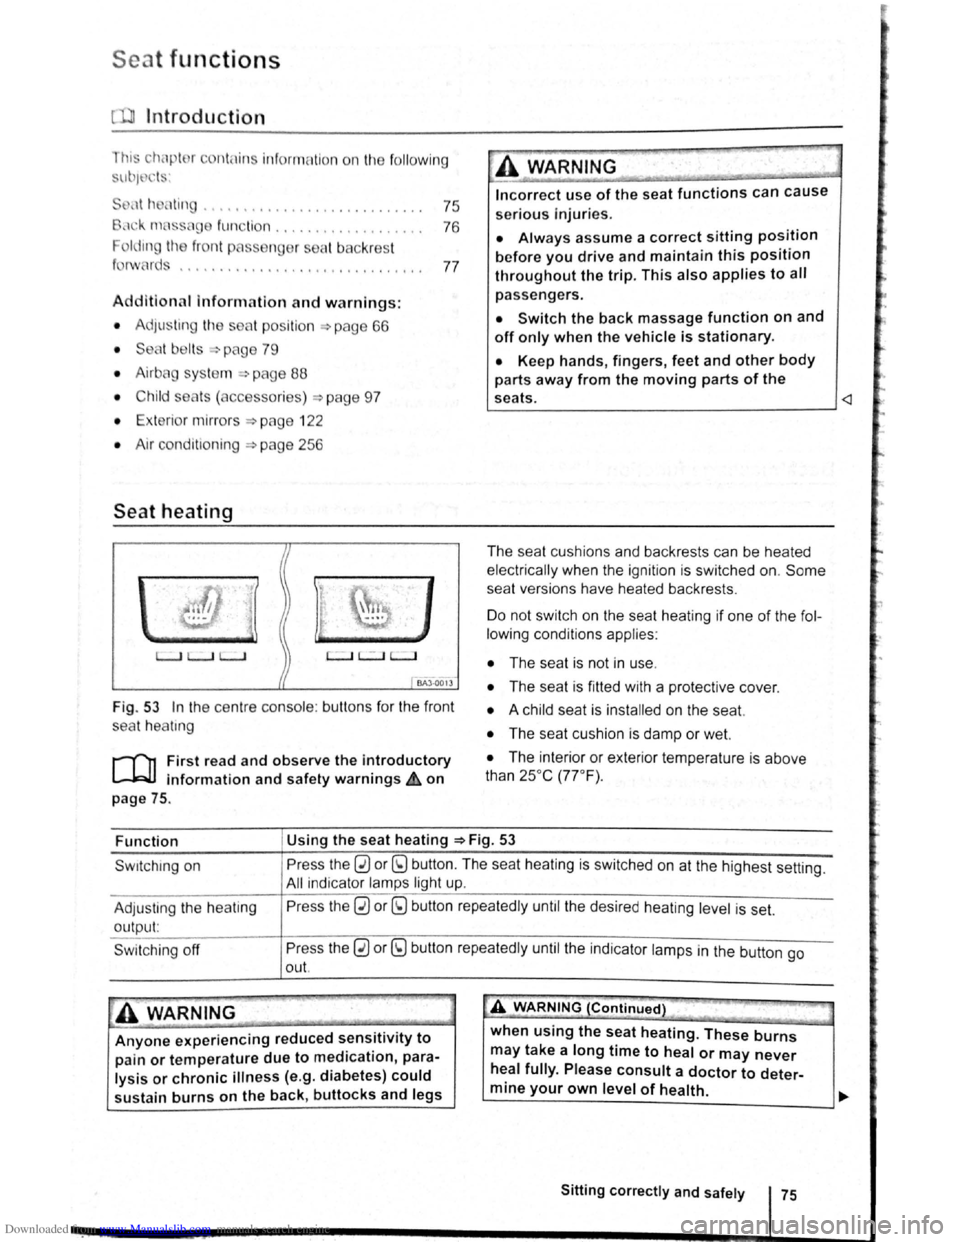
Fig . 53 In the ce ntre conso le : butt ons for the front
sea t
hea trng
i""""fl1 First read and observe the introductory
L-...lr::JJ information and safety warnings £ on
page
75.
Incorrect use of the seat functions can cause
serious Injuries.
• Always assume a correct sitting position
before you drive and maintain this position
throughout the trip. This also applies to all
passengers.
• Switch the back massage function on and
off only when the vehicle is stationary.
• Keep hands , fingers, feet and other body
parts away from the moving parts of the
seats.
elec trical ly when the ignition is switched on.
Some
seat ve rsions have heated backrests .
Do not switc h on the seat heating if one of the fol
lowing conditions applies:
• The seat is not in u se.
• The seat is fitted with a protect ive cover.
• A chi ld seat is installed on the seat.
• The seat cushion is damp or wet.
• The interior or exterior tempera ture is above
than 25oc (77 °F) .
Function Using
the seat heating ::::>Fig. 53
Swrtching on
Adjus ting
the heating
output:
Swi tchi ng off
Press the 0 or (9 button. The seat heating is switched on at the highest setting.
All indicato r l amps light up.
Pre ss the
0 or (9 button repeatedly until the desired heating level is set.
Press the
0 or (9 button repeatedly until the ind ica tor lamps in the button go
out.
~A WARNING (Continued) " ._..~~1 ~...... -~.~. ~-~ ~----J
Anyone experiencing reduced sensitivity to
pain or temperature due to medication, para
lysis or chronic illness (e.g. diabetes) could
sustain burns on the back, buttocks and legs when
using the
seat heating. These burns
may take a long time to heal or may never
heal fully. Please consult a doctor to deter
mine your own level of health.
~--------------~--------~~
Sitting correctly and safely 75