Page 17 of 24
 15
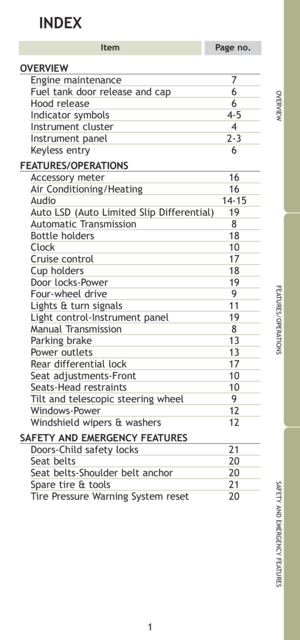
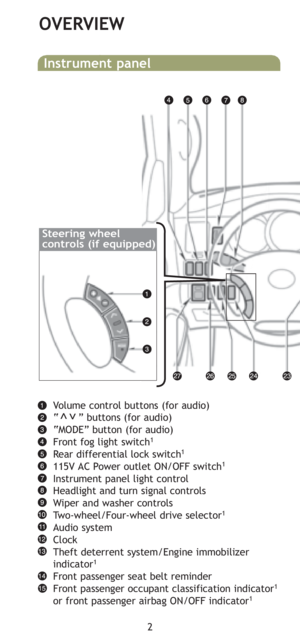
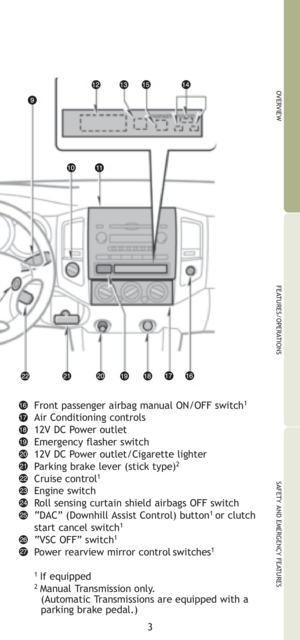
OVERVIEW
FEATURES/OPERATIONS
SAFETY AND EMERGENCY FEATURES
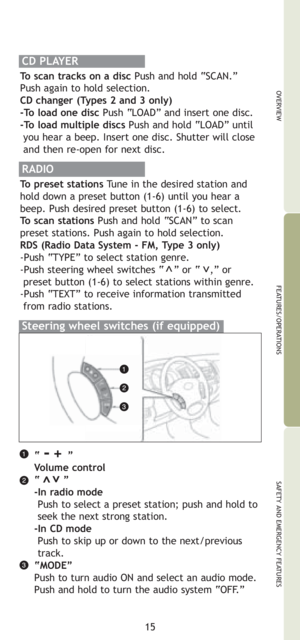
ŌĆ£ -+ ŌĆØ
Volume control
ŌĆ£ ŌĆØ
-In radio mode
Push to select a preset station; push and hold to
seek the next strong station.")
15
OVERVIEW
FEATURES/OPERATIONS
SAFETY AND EMERGENCY FEATURES
ŌĆ£ -+ ŌĆØ
Volume control
ŌĆ£ ŌĆØ
-In radio mode
Push to select a preset station; push and hold to
seek the next strong station.
-In CD mode
Push to skip up or down to the next/previous
track.
ŌĆ£MODEŌĆØ
Push to turn audio ON and select an audio mode.
Push and hold to turn the audio system ŌĆ£OFF.ŌĆØ
>>
Steering wheel switches (if equipped)
RADIO
To preset stations Tune in the desired station and
hold down a preset button (1-6) until you hear a
beep. Push desired preset button (1-6) to select.
To scan stations Push and hold ŌĆ£SCANŌĆØ to scan
preset stations. Push again to hold selection.
RDS (Radio Data System - FM, Type 3 only)
-Push ŌĆ£TYPEŌĆØ to select station genre.
-Push steering wheel switches ŌĆ£ ŌĆØ or ŌĆ£ ,ŌĆØ or
preset button (1-6) to select stations within genre.
-Push ŌĆ£TEXTŌĆØ to receive information transmitted
from radio stations.
>>
CD PLAYER
To scan tracks on a disc Push and hold ŌĆ£SCAN.ŌĆØ
Push again to hold selection.
CD changer (Types 2 and 3 only)
-To load one disc Push ŌĆ£LOADŌĆØ and insert one disc.
-To load multiple discs Push and hold ŌĆ£LOADŌĆØ until
you hear a beep. Insert one disc. Shutter will close
and then re-open for next disc.
Page 18 of 24
16
FEATURES/OPERATIONS
Air Conditioning (if equipped)/Heating
Fan speed
Temperature
Airflow vent
In ŌĆ£ ŌĆØ or ŌĆ£ ŌĆØ mode, use fresh air (ŌĆ£ ŌĆØ
indicator ŌĆ£OFFŌĆØ) to reduce window fogging.
Fresh or recirculated cabin air
Air Conditioning ON/OFF (if equipped)
Use fresh air to quickly cool interior, then
change to recirculate for cooler air.
Accessory meter (if equipped)
E/M (English/Metric) buttonTo select Fahrenheit
or Celsius.
Compass
Outside temperature display
Page 19 of 24
17
OVERVIEW
FEATURES/OPERATIONS
SAFETY AND EMERGENCY FEATURES
Use ONLYwhen wheel spinning occurs in a ditch, or
on slippery or unpaved surfaces. DO NOT USE THE
REAR DIFFERENTIAL LOCK IN CONDITIONS OTHER
THAN SPECIFIED IN THE OWNERŌĆÖS MANUAL.
UNLOCK THE DIFFERENTIAL ONCE THE VEHICLE
MOVES OUT OF THE TROUBLE SPOT.
Refer to your OwnerŌĆÖs Manualfor complete details
on this system before attempting to use it.
Rear differential lock (if equipped)
Rear differential
Lock/Unlock
Cruise control (if equipped)
1 The set speed may also be cancelled by depressing
the brake pedal.
2 The set speed may be resumed once vehicle speed
exceeds 25 mph.
Turning system ON/OFF
Functions
System ON/OFF
Resume
2/Increase speed
Set/Decrease speed
Cancel1
Page 20 of 24
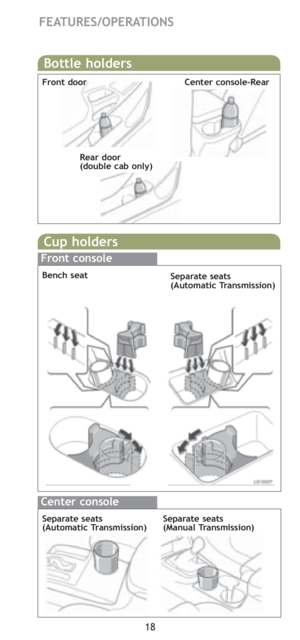
18
FEATURES/OPERATIONS
Bottle holders
Front door
Rear door
(double cab only)
Center console-Rear
Cup holders
Bench seat
Separate seats
(Manual Transmission)Separate seats
(Automatic Transmission)
Front console
Center console
Separate seats
(Automatic Transmission)
Page 21 of 24
19
OVERVIEW
FEATURES/OPERATIONS
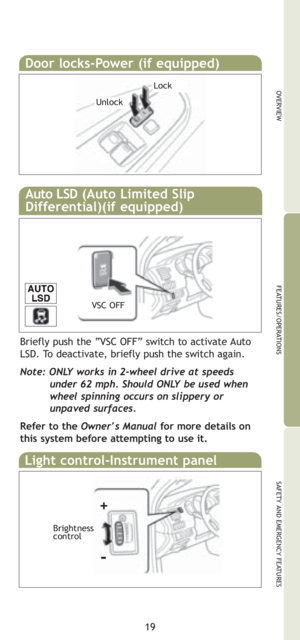
SAFETY AND EMERGENCY FEATURES
Door locks-Power (if equipped)
Light control-Instrument panel
VSC OFF
Lock
Unlock
Brightness
control
-
Briefly push the ŌĆ£VSC OFFŌĆØ switch to activate Auto
LSD. To deactivate, briefly push the switch again.
Note: ONLY works in 2-wheel drive at speeds
under 62 mph. Should ONLY be used when
wheel spinning occurs on slippery or
unpaved surfaces.
Refer to the OwnerŌĆśs Manualfor more details on
this system before attempting to use it.
+
Auto LSD (Auto Limited Slip
Differential)(if equipped)
Page 22 of 24
20
SAFETY AND
EMERGENCY FEATURES
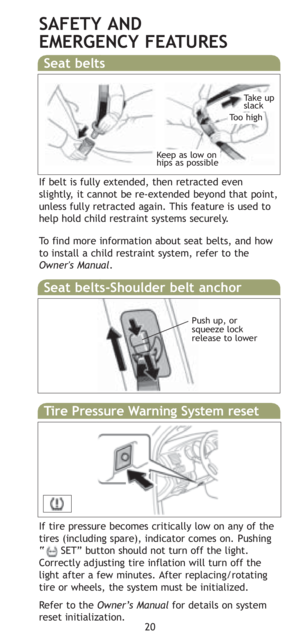
If belt is fully extended, then retracted even
slightly, it cannot be re-extended beyond that point,
unless fully retracted again. This feature is used to
help hold child restraint systems securely.
To find more information about seat belts, and how
to install a child restraint system, refer to the
Owner's Manual.
Keep as low on
hips as possible
Take up
slack
Too high
Seat belts
Seat belts-Shoulder belt anchor
Push up, or
squeeze lock
release to lower
Tire Pressure Warning System reset
If tire pressure becomes critically low on any of the
tires (including spare), indicator comes on. Pushing
ŌĆ£ SETŌĆØ button should not turn off the light.
Correctly adjusting tire inflation will turn off the
light after a few minutes. After replacing/rotating
tire or wheels, the system must be initialized.
Refer to the OwnerŌĆÖs Manualfor details on system
reset initialization.
Page 23 of 24
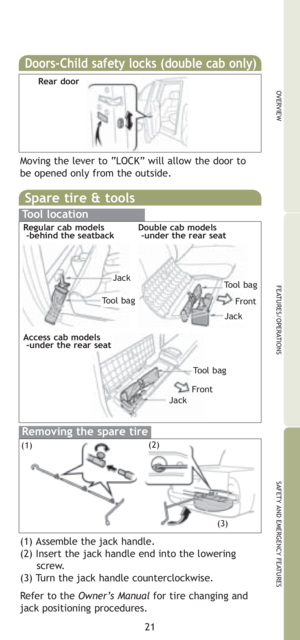
Spare tire & tools
Tool location
Removing the spare tire
21
OVERVIEW
FEATURES/OPERATIONS
SAFETY AND EMERGENCY FEATURES
(1) Assemble the jack handle.
(2) Insert the jack handle end into the lowering
screw.
(3) Turn the jack handle counterclockwise.
Refer to the
OwnerŌĆÖs Manualfor tire changing and
jack positioning procedures.
Regular cab models
-behind the seatbackDouble cab models
-under the rear seat
Access cab models
-under the rear seat
Tool bag
Jack
Tool bag
Jack
Tool bag
Jack
Front
Front
Moving the lever to ŌĆ£LOCKŌĆØ will allow the door to
be opened only from the outside.
Doors-Child safety locks (double cab only)
Rear door
(1)
(3) (2)
Page 24 of 24
MN 00505-QRG08-TAC
Printed in the USA 7/07
Customer Experience Center
1-800-331-4331
Page:
< prev 1-8 9-16 17-24


 16
FEATURES/OPERATIONS
Air Conditioning (if equipped)/Heating
Fan speed
Temperature
Airflow vent
In ŌĆ£ ŌĆØ or ŌĆ£ ŌĆØ mode, use fresh air (ŌĆ£ ŌĆØ
indicator ŌĆ£OFFŌĆØ) to reduce window f")
 17
OVERVIEW
FEATURES/OPERATIONS
SAFETY AND EMERGENCY FEATURES
Use ONLYwhen wheel spinning occurs in a ditch, or
on slippery or unpaved surfaces. DO NOT USE THE
REAR DIFFERENTIAL LOCK IN CONDITIONS OTH")
 18
FEATURES/OPERATIONS
Bottle holders
Front door
Rear door
(double cab only)
Center console-Rear
Cup holders
Bench seat
Separate seats
(Manual Transmission)Separate seats
(Automatic Transmission)
Fr")
 19
OVERVIEW
FEATURES/OPERATIONS
SAFETY AND EMERGENCY FEATURES
Door locks-Power (if equipped)
Light control-Instrument panel
VSC OFF
Lock
Unlock
Brightness
control
-
Briefly push the ŌĆ£VSC OFFŌĆØ swit")
 20
SAFETY AND
EMERGENCY FEATURES
If belt is fully extended, then retracted even
slightly, it cannot be re-extended beyond that point,
unless fully retracted again. This feature is used to
help hold c")
 Spare tire & tools
Tool location
Removing the spare tire
21
OVERVIEW
FEATURES/OPERATIONS
SAFETY AND EMERGENCY FEATURES
(1) Assemble the jack handle.
(2) Insert the jack handle end into the lowering
sc")
 MN 00505-QRG08-TAC
Printed in the USA 7/07
Customer Experience Center
1-800-331-4331")