Page 38 of 226

DESTINATION SEARCH
56
“Select Category”: To return to the POI
category selection screen.
“Show List”: To display the list of POIs in the
selected categories.By touching the touch screen button of the de-
sired item, the screen changes and displays
the map location of the selected destination
and the route preference. (See “Starting
route guidance” on page 61.)
“On Route”: When the indicator is illumi-
nated by touching this touch screen button,
the list of the items searched along the route
is displayed.
— Destination search by
“Emergency”
1. Push the “DEST” button.
2. Touching “Emergency” on the “Des-
tination” screen.
The display changes to a screen to select po-
lice stations, dealers, hospitals or fire sta-
tions. While driving, only nearby police sta-
tions, dealers, hospitals, or fire stations are
shown. The current position is shown with an
address, and the latitude and the longitude at
the top of the screen.
3. Touch the desired emergency catego-
ry.
The selected emergency category list is dis-
played.
Page 39 of 226

DESTINATION SEARCH
57
4. Touch the touch screen button of the
desired destination.
The screen changes and displays the map
location of the selected destination and the
route preference. (See
“Starting route guid-
ance” on page 61.)
INFORMATION
The navigation system does not guide in
areas where route guidance is unavail-
able. (See page 223.)
— Destination search by
“Memory”
1. Push the “DEST” button.
2. Touch “Memory” on the “Destination”
screen.
A list of registered memory points is dis-
played. (To register or edit memory points,
see “My places” on page 88.)
3. Touch the touch screen button of your
desired memory point.
The screen changes and displays the map
location of the selected destination and the
route preference. (See “Starting route guid-
ance” on page 61.)
— Destination search by
“Previous”
1. Push the “DEST” button.
2. Touch “Previous”
on the “Destination”
screen.
The previous starting point and up to 100 pre-
viously set destinations are displayed on the
screen.
3. Touch the touch screen button of the
desired destination.
The screen changes and displays the map
location of the selected destination and the
route preference. (See “Starting route guid-
ance” on page 61.)
Page 40 of 226
DESTINATION SEARCH
58
INFORMATION
The list of previous destinations can be
deleted while the vehicle is stopped, if
these destinations are no longer neces-
sary. (See “ — Deleting previous points”
on page 99.)
— Destination search by
“Map”
1. Push the “DEST” button.
2. Touch “Map” on the “Destination”
screen.
The screen changes and displays the map
location that was previously displayed just
before the destination input operation and the
route preference. (See “Starting route guid-
ance” on page 61.)
INFORMATION
Guidance starts if “Enter” is touched
even while driving. However, the cursor
cannot be moved.
— Destination search by
“Intersection”
1. Push the “DEST” button.
2. Touch “Intersection” on the “Destina-
tion” screen.
3. Input the name of the two intersecting
streets which are located near the destina-
tion to be set.
Page 41 of 226
DESTINATION SEARCH
59
4. Touch the touch screen button of the
desired item.
After inputting the two intersecting streets,
the screen changes and displays the map
location of the selected destination and the
route preference. (See “Starting route guid-
ance” on page 61.)
If the same two streets cross at more than one
intersection, the screen changes and dis-
plays the menu to select the city name where
the streets intersect. Select the city, and the
map location of the selected destination and
the route preference. (See “Starting route
guidance” on page 61.)
— Destination search by
“Freeway Ent./Exit”
1. Push the “DEST” button.
2. To input a freeway entrance or exit,
touch “Freeway Ent./Exit” on the “Des-
tination” screen.
Be sure to use the complete name of the free-
way or highway, including the hyphen, when
entering the destination. Freeways and inter-
states use an “I” (I−405). US highways use
the state designation before the number
(CA−118).
Page 42 of 226
DESTINATION SEARCH
60
3. Select the desired freeway by touching
the touch screen button.
4. Either a freeway “Entrance” or “Exit”
can be selected.
5. Touch the touch screen button of the
desired entrance or exit name.
The screen changes and displays the map
location of the selected destination and the
route preference. (See
“Starting route guid-
ance” on page 61.)
“Input Name”: An applicable list is displayed
by touching this touch screen button and in-
putting the name.
— Destination search by
“Coordinates”
1. Push the “DEST” button.
2. Touch “Coordinates” on the “Destina-
tion” screen.
3. Input the latitude and the longitude.
4. When the input is finished, touch
“OK”.
By touching the touch screen button of the de-
sired point, the screen changes and displays
the map location of the selected destination
and the route preference. (See
“Starting
route guidance” on page 61.)
Page 43 of 226

DESTINATION SEARCH
61
— Destination search by
“Phone #”
1. Push the “DEST” button.
2. Touch “Phone #” on the “Destination”
screen.
3. Input a telephone number.
4. After inputting a telephone number,
touch “OK”.
The screen changes and displays the map
location of the selected destination and the
road preference. (See “Starting route guid-
ance” on page 61.)
If there is more than one site having the same
number, the following screen will be dis-
played.
INFORMATION
�If there is no match for the telephone
number inputted, a list of identical
numbers with different area codes
will be displayed.
�To set a memory point as a destina-
tion using the phone number, the
number must be registered previous-
ly. (See page 93.)
Starting route guidance
After inputting the destination, the screen
changes and displays the map location of the
selected destination and the route prefer-
ence. Registering the destination allows you
select a route.
1. When an arrow facing the desired
point is touched, the map scrolls in that di-
rection.
Releasing the finger from the arrow will stop
the scrolling.
Page 44 of 226

DESTINATION SEARCH
62
2. Touch “Enter”.
The system starts route search and displays
recommended routes.
If there is already a set destination, “Add to
” and “Replace ” are displayed.
“Add to
”: To add a destination.
“Replace
”: To delete the existing destina-
tions and set a new one.
“Route Preference”: To change the route
preference. (See page 63.)
“Info.”: If this touch screen button is dis-
played on the top of the screen, touch the
switch to view items such as name, address,
and phone number.
1Current position
2Destination point
3Type of the route and the distance
4Distance of the entire route
3. To start guidance, touch “Guide”.
“3 Routes”: To select the desired route from
three possible routes. (See page 64.)
“Route”: To change the route. (See pages
71 and 73.)
INFORMATION
�Guidance can be suspended or re-
sumed. (See “Suspending and re-
suming guidance” on page 84.)
�If “Guide” is touched until a beep
sounds, Demo mode will start. Push
the “MAP/VOICE” button to finish
Demo mode.
�The route for returning may not be the
same as that for going.
�The route guidance to the destination
may not be the shortest route nor a
route without traffic congestion.
�Route guidance may not be available
if there is no road data for the speci-
fied location.
�When setting the destination on a
map with a scale larger than 0.5 miles
(800 m), the map scale changes to 0.5
miles (800 m) automatically. Set the
destination again.
�If a destination is entered, the road
nearest to the point you selected is
set as the destination.
Page 46 of 226
DESTINATION SEARCH
64
INFORMATION
�Even if the “Allow Freeway” indicator
is dimmed, the route cannot avoid in-
cluding a freeway in some cases.
�If the calculated route includes a trip
by ferry, the route guidance shows a
sea route. After you travel by ferry,
the current vehicle position may be
incorrect. Upon reception of GPS sig-
nals, it is automatically corrected.
3 ROUTES SELECTION
1. To select the desired route from three
routes, touch “3 Routes”.
2. Touch “Quick1”, “Quick2” or “Short”
to select the desired route.
“Quick1”: Recommended route.
This route is indicated by an orange line.
“Quick2”: Alternative route.
This route is indicated by a purple line.“Short”: A route by which you can reach the
destination in the shortest distance.
This route is indicated by a green line.
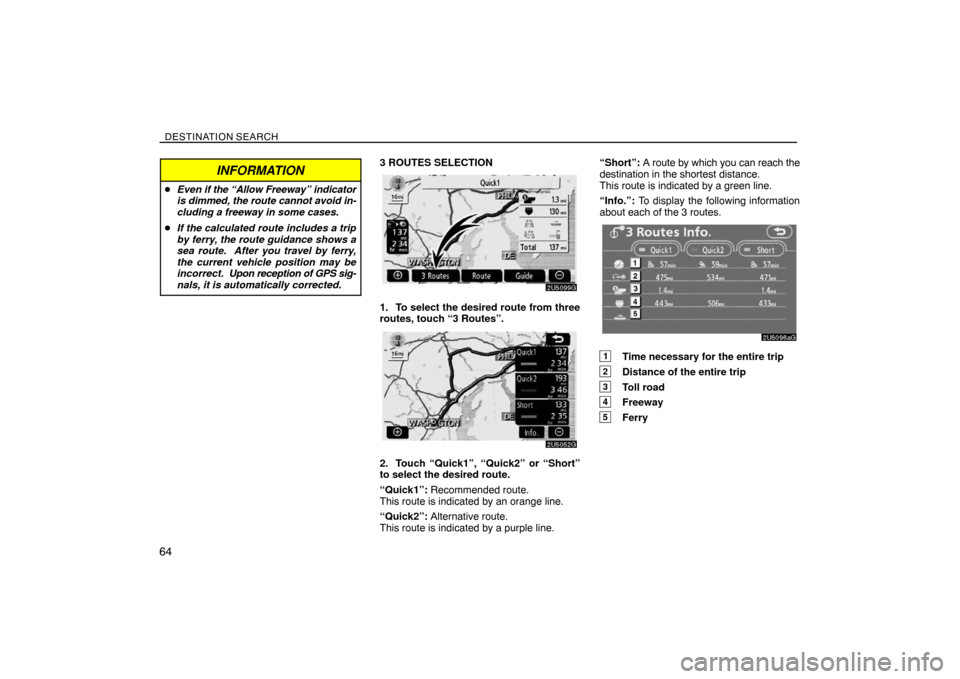
“Info.”: To display the following information
about each of the 3 routes.
1Time necessary for the entire trip
2Distance of the entire trip
3Toll road
4Freeway
5Ferry