Page 155 of 226

Finish
AUDIO/VIDEO SYSTEM
173
The touch screen buttons for radio, CD
changer and DVD player operation are dis-
played on the function touch screen but-
ton display screen when the audio control
mode is selected. Touch them lightly and
directly on the screen.
The selected switch is highlighted.
INFORMATION
�If the system does not respond to a
touch of a touch screen button, move
your finger away from the screen and
then touch it again.
�You cannot operate dimmed touch
screen buttons.
�Wipe off fingerprints on the surface of
the display using a glass cleaning
cloth.
(b) Tone and balance
How good an audio program sounds to you is
largely determined by the mix of the treble,
midrange, and bass levels. In fact, different
kinds of music and vocal programs usually
sound better with different mixes of treble,
mid−range, and bass.
A good balance of the left and right stereo
channels and of the front and rear sound lev-
els is also important.
Keep in mind that if you are listening to a ste-
reo recording or broadcast, changing the
right/left balance will increase the volume of
one group of sounds while decreasing the vol-
ume of another.
1. Push the “AUDIO” button.
2. Touching “SOUND” displays the
sound adjustment screen.
Page 156 of 226
Finish
AUDIO/VIDEO SYSTEM
174
3. Touch the desired button.
“TREB” “+” or “–”: Adjusts high−pitched
tones.
“MID” “+” or “–”: Adjusts mid−pitched
tones.
“BASS” “+” or “–”: Adjusts low−pitched
tones.
“FRONT” or “REAR”: Adjusts sound bal-
ance between the front and rear speakers.
“L” or “R”: Adjusts sound balance between
the left and right speakers.
4. Touch “OK”.
The tone of each mode (for such as AM, FM1
and CD changer) can be adjusted.(c) DSP control
You can turn on/off the surround function and
the automatic sound levelizer.
1. Push the “AUDIO” button.
2. Touch “DSP” to display the DSP con-
trol mode screen.
Surround function:
Select “ON” of “SURROUND” and touch
“OK”.
The surround function will turn on.
Automatic sound levelizer (ASL):
When the audio sound becomes difficult to be
heard due to road noise, wind noise or other
noises while driving, the system adjusts to the
optimum volume according to the noise level.
Select “ON” of “ASL” and touch “OK”.
Page 157 of 226
 Selecting screen size (with rear seat
entertainment system)
The video screen can be changed from nor-
mal mode to wide mode.
1. Push the “AUDIO” button.
2. Touch")
Finish
AUDIO/VIDEO SYSTEM
175
(d) Selecting screen size (with rear seat
entertainment system)
The video screen can be changed from nor-
mal mode to wide mode.
1. Push the “AUDIO” button.
2. Touch “WIDE”.
“NORMAL”:Displays a 3 � 4 screen, with
either side in black.
“WIDE 1”:Widens the 3 � 4 screen hori-
zontally to fill the screen.
“WIDE 2”:Widens the 3 � 4 screen verti-
cally and horizontally, in the
same ratio, to fill the screen.
When you touch
, the previous screen
returns.
(e) Your CD changer
When you insert a disc, touch “LOAD” and
gently push the disc in with the label side up.
This CD changer can store up to four discs.
The changer will play from track 1 through to
the end of the disc. Then it will play from track
1 of the next disc.
The changer is intended for use with 12 cm
(4.7 in.) discs only.
NOTICE
�Do not stack up two discs for inser-
tion, or it will cause damage to the
changer. Insert only one disc into
slot at a time.
�Never try to disassemble or oil any
part of the changer. Do not insert
anything other than a disc into the s-
lot.
Page 158 of 226
 Your DVD player
(with rear seat entertainment system)
The sound of the rear seat entertainment sys-
tem can be enjoyed by pushing the
“DISC·AUX” button.
(g) AUX")
Finish
AUDIO/VIDEO SYSTEM
176
(f) Your DVD player
(with rear seat entertainment system)
The sound of the rear seat entertainment sys-
tem can be enjoyed by pushing the
“DISC·AUX” button.
(g) AUX adapter
The sound of portable audio players con-
nected to the AUX adapter can be enjoyed.
Push the “DISC·AUX” button to switch to
AUX mode. For details, refer to the “Owner’s
Manual”.— Radio operation
(a) Listening to the radio
Push these buttons to choose either an
AM or FM station.
“AM”, “FM1” or “FM2” appears on the screen.
If your vehicle is equipped with a satellite ra-
dio broadcast system, when you push the
“AM·SAT” button, “AM”, “SAT1”, “SAT2”,
“SAT3” station appears on the display. For
details about satellite radio broadcast, see
“— Radio operation (XM� satellite radio
broadcast)” on page 179.
Turn the knob clockwise to step up the sta-
tion band or counterclockwise to step
down.
Your radio automatically changes to stereo
reception when a stereo broadcast is re-
ceived. “ST” appears on the screen. If the
signal becomes weak, the radio reduces the
amount of channel separation to prevent the
weak signal from creating noise. If the signal
becomes extremely weak, the radio switches
from stereo to mono reception. In this case,
“ST” disappears from the screen.
Page 159 of 226
 Presetting a station
1. Tune in the desired station.
2. Touch one of the touch screen buttons
(1 — 6) you want and hold it until a beep is
heard. This sets the sta")
Finish
AUDIO/VIDEO SYSTEM
177
(b) Presetting a station
1. Tune in the desired station.
2. Touch one of the touch screen buttons
(1 — 6) you want and hold it until a beep is
heard. This sets the station to the touch
screen button and the frequency appears
on the touch screen button.
Each radio mode (AM, FM1 or FM2) can store
up to 6 stations. To change the preset station
to a different one, follow the same procedure.
The preset station memory is cancelled when
the power source is interrupted by battery dis-
connection or a blown fuse.(c) Selecting a station
Tune in the desired station using one of the
following methods.
Preset tuning: Touch the touch screen but-
ton (1 — 6) for the station you want. The
touch screen button is highlighted and the
station frequency appears on the screen.
Seek tuning: Push the “SEEK/TRACK” but-
ton on either side. The radio will begin seek-
ing up or down for a station of the nearest fre-
quency and will stop on reception. Each time
you push the button, the stations will be
searched automatically one after another.
To scan all the frequencies: Touch “SCAN”
on the screen or push the “SCAN” button
briefly. “SCAN” appears on the screen. The
radio will find the next station and stay there
for a few seconds, and then scan again. To
select a station, touch “SCAN” or push the
“SCAN” button again.
To scan the preset stations: Touch
“SCAN” on the screen or push the “SCAN”
button for longer than a second. “P. SCAN”
appears on the screen. The radio will tune in
the next preset station, stay there for a few se-
conds, and then move to the next preset sta-
tion. To select a station, touch “SCAN” or
push the “SCAN” button again.(d) Radio Data System
Your audio system is equipped with Radio
Data Systems (RDS). RDS mode provides
you to receive text messages from radio sta-
tions that utilize RDS transmitters.
When RDS is on, the radio can
— only select stations of a particular program
type,
— display messages from radio stations,
— search for a stronger signal station.
RDS features are available for the use only on
FM stations which broadcast RDS informa-
tion.
Page 160 of 226
Finish
AUDIO/VIDEO SYSTEM
178
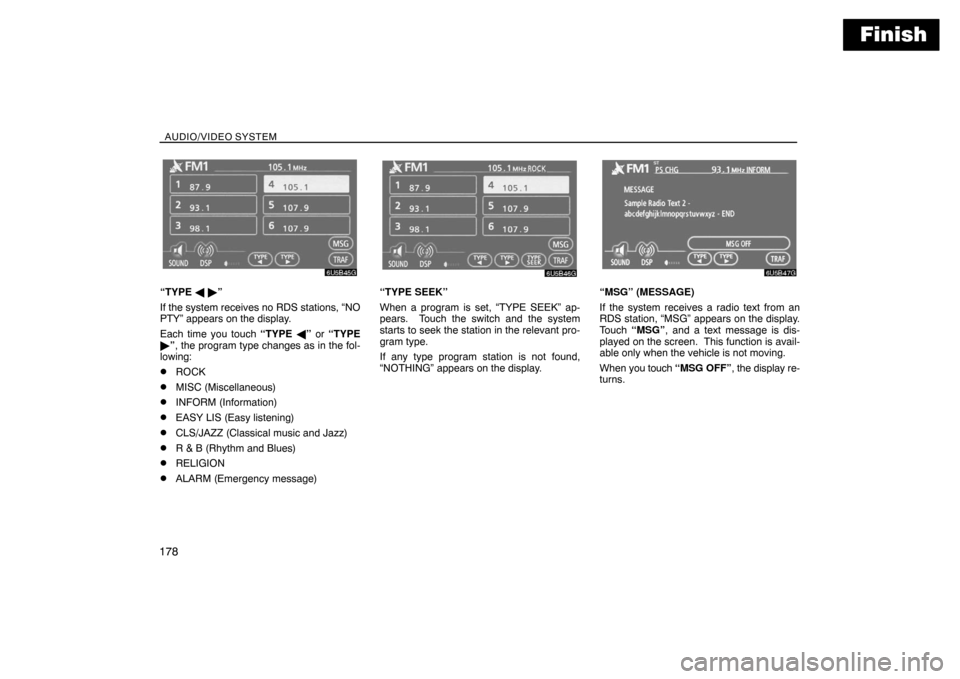
“TYPE � �”
If the system receives no RDS stations, “NO
PTY” appears on the display.
Each time you touch “TYPE �” or “TYPE
�”, the program type changes as in the fol-
lowing:
�ROCK
�MISC (Miscellaneous)
�INFORM (Information)
�EASY LIS (Easy listening)
�CLS/JAZZ (Classical music and Jazz)
�R & B (Rhythm and Blues)
�RELIGION
�ALARM (Emergency message)
“TYPE SEEK”
When a program is set, “TYPE SEEK” ap-
pears. Touch the switch and the system
starts to seek the station in the relevant pro-
gram type.
If any type program station is not found,
“NOTHING” appears on the display.“MSG” (MESSAGE)
If the system receives a radio text from an
RDS station, “MSG” appears on the display.
Touch “MSG”, and a text message is dis-
played on the screen. This function is avail-
able only when the vehicle is not moving.
When you touch “MSG OFF”, the display re-
turns.
Page 161 of 226
 Traffic announcement
“TRAF”
A station that regularly broadcasts traffic in-
formation is automatically located.
When you touch “TRAF”, “TRAF SEEK” ap-
pea")
Finish
AUDIO/VIDEO SYSTEM
179
(e) Traffic announcement
“TRAF”
A station that regularly broadcasts traffic in-
formation is automatically located.
When you touch “TRAF”, “TRAF SEEK” ap-
pears on the display and the radio will start
seeking any traffic program station.
If no traffic program station is found,
“NOTHING” appears on the display.
If a traffic program station is found, the name
for traffic program station is displayed for a
while until a traffic announcement is received.
— Radio operation
(XM� satellite radio broadcast)
To listen to a satellite radio broadcast in your
vehicle, an additional genuine Toyota satellite
receiver and antenna must be purchased and
installed, and the subscription to the XM� sat-
ellite radio is necessary.
�How to subscribe to an XM� satellite
radio
An XM� satellite radio is a tuner designed ex-
clusively to receive broadcasts provided un-
der a separate subscription. Availability is
limited to the 48 contiguous states.
How to subscribe: You must enter into a
separate service agreement with the XM� ra-
dio in order to receive satellite broadcast pro-
gramming in the vehicle. Additional activation
and service subscription fees apply that are
not included in the purchase price of the ve-
hicle and optional digital satellite tuner. For
complete information on subscription rates
and terms, or to subscribe to the XM� radio,
visit XM� on the web at www.xmradio.com
or
call an XM�’s Listener Care at (800)
967−2346. The XM� radio is solely responsi-
ble for the quality, availability and content of
the satellite radio services provided, which
are subject to the terms and conditions of the
XM� radio customer service agreement.Customers should have their radio ID ready;
the radio ID can be found by selecting “chan-
nel 000” on the radio. For details, see the
“Displaying the radio ID” that follows.
All fees and programming are the responsibil-
ity of the XM� satellite radio and are subject
to change.
Satellite tuner technology notice: Toyota’s
satellite radio tuners are awarded Type
Approval Certificates from XM� Satellite
Radio Inc. as proof of compatibility with the
services offered by the XM� satellite radio.
�Displaying the radio ID
Each XM� tuner is identified with a unique ra-
dio ID. You will need the radio ID when activat-
ing XM� service or when reporting a problem.
If you select the “CH 000” using the “TUNE”
knob, the ID code of 8 alphanumeric charac-
ters appears. If you select another channel,
display of the ID code is canceled. The chan-
nel (000) alternates the display between the
radio ID and the specific radio ID code.
Page 162 of 226
Finish
AUDIO/VIDEO SYSTEM
180�
Listening to satellite radio
Push the “AM·SAT” button to choose ei-
ther an AM station or a SAT (satellite)
channel.
Besides “AM”, “SAT1”, “SAT2” or “SAT3” ap-
pears on the display.
Turn this knob to select the next or pre-
vious channel.
If you turn continuously, you can rapidly scroll
forward or down through the channels.
�Channel category
Touch either “TYPE�” or “TYPE�” to go to
the next or previous category.