Page 142 of 476
142 2-2. Instrument cluster
Odometer/trip meter/instrument panel light control and trip meter
reset button
Switches between odometer and trip meter displays. Pressing and
holding the button will reset the trip meter when the trip meter is being
displayed. To adjust the brightness of the instrument panel light, turn
the button. ( P. 144)
Automatic transmission shift position indicator lights
P. 133
Automatic transmission shift range display (if equipped)
P. 133
Page 144 of 476

144 2-2. Instrument cluster
Instrument panel light controlThe brightness of the instrument panel lights can be adjusted.
Darker
Brighter
When the headlight switch is
turned to on, the brightness
will be reduced slightly unless
the control dial is turned fully
clockwise.
Odometer, trip meter and outside temperature display
Odometer: Displays the total distance the vehicle has been driven.
Trip meter: Displays the distance the vehicle has been driven since the
meter was last reset. Trip meters A and B can be used to record and
display different distances independently.
Outside temperature: Displays the outside temperature.
Automatic transmission shift position indicator lights
P. 133
Automatic transmission shift range display (if equipped)
P. 133
NOTICE
■To prevent damage to the engine and its components
●Do not let the indicator needle of the tachometer enter the red zone, which
indicates the maximum engine speed.
● The engine may be overheating if the engine coolant temperature gauge is
in the red zone (H). In this case, immediately stop the vehicle in a safe
place, and check the engine after it has cooled completely. (
P. 421)
Page 160 of 476
160 2-4. Using other driving systems
■Fine adjustment of the set speed
Adjustment of the set speed by approximately 1.0 mph (1.6 km/h) can be
made by lightly pressing the lever up or down and releasing it.
■ Cruise control can be set when
●Automatic transmission:
The shift lever is in D or 4 (standard type), or in D, 4, 5 or 6 range of S
(multi-mode type).
● Vehicle speed is above 25 mph (40 km/h).
■ Accelerating
The vehicle can be accelerated normally.
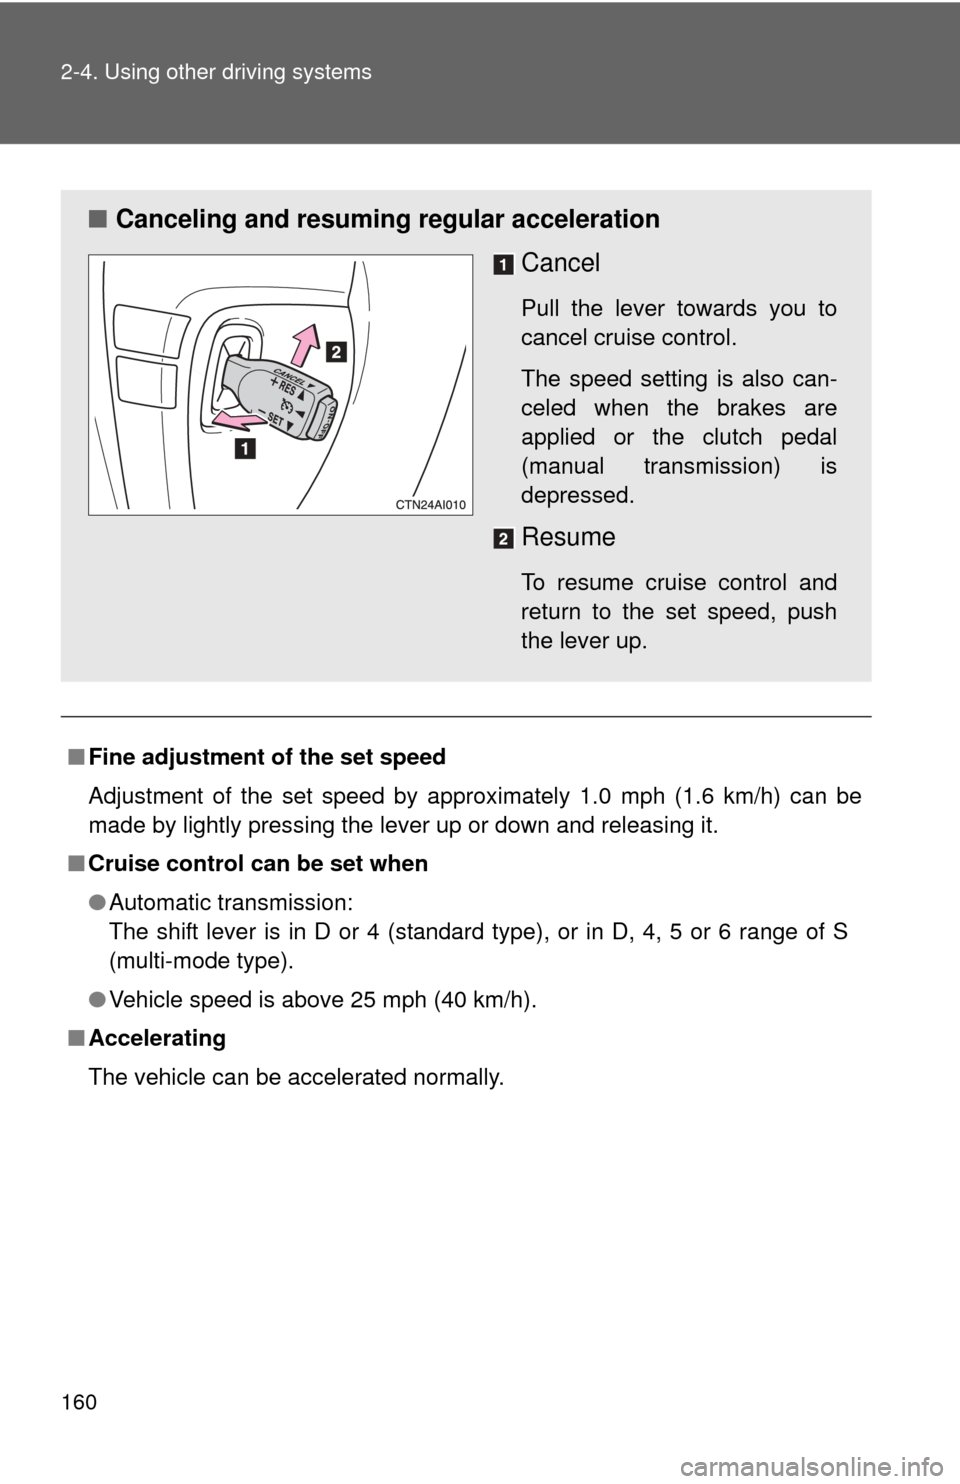
■ Canceling and resuming regular acceleration
Cancel
Pull the lever towards you to
cancel cruise control.
The speed setting is also can-
celed when the brakes are
applied or the clutch pedal
(manual transmission) is
depressed.
Resume
To resume cruise control and
return to the set speed, push
the lever up.
Page 167 of 476
167
2-5. Driving information
2
When driving
CAUTION
■Storage precautions
●Vehicles with fold-down type rear
seat: To prevent cargo and luggage
from sliding forward during braking, do not stack anything in the
enlarged trunk. Keep cargo and luggage low, as close to the floor as
possible.
●Vehicles with fold-down type rear seat: Never allow anyone to ride in
the enlarged trunk. It is not design ed for passengers. They should ride
in their seats with their seat belts properly fastened. Otherwise, they
are much more likely to suffer death or serious bodily injury, in the
event of sudden braking or a collision.
●Do not place anything on the package tray behind the rear seatback.
Such items may be thrown about and possibly injure people in the
vehicle during sudden braking or in an accident.
●Do not drive with objects on top of the instrument panel.
They may interfere with the driver’s field of view or move during sharp
acceleration or turning, thus impairing the driver’s control of the vehi-
cle. In an accident they may injure the vehicle occupants.
●Secure all items in the occupant compartment, as they may shift and
injure someone during an accident or sudden braking.
■Capacity and distribution
●Do not exceed the maximum axle weight rating or the total vehicle
weight rating.
●Even if the total load of occupant's weight and the cargo load is less
than the total load capacity, do not apply the load unevenly.
Improper loading may cause deterioration of steering or braking con-
trol which may cause death or serious injury.
Page 170 of 476
170 2-5. Driving information
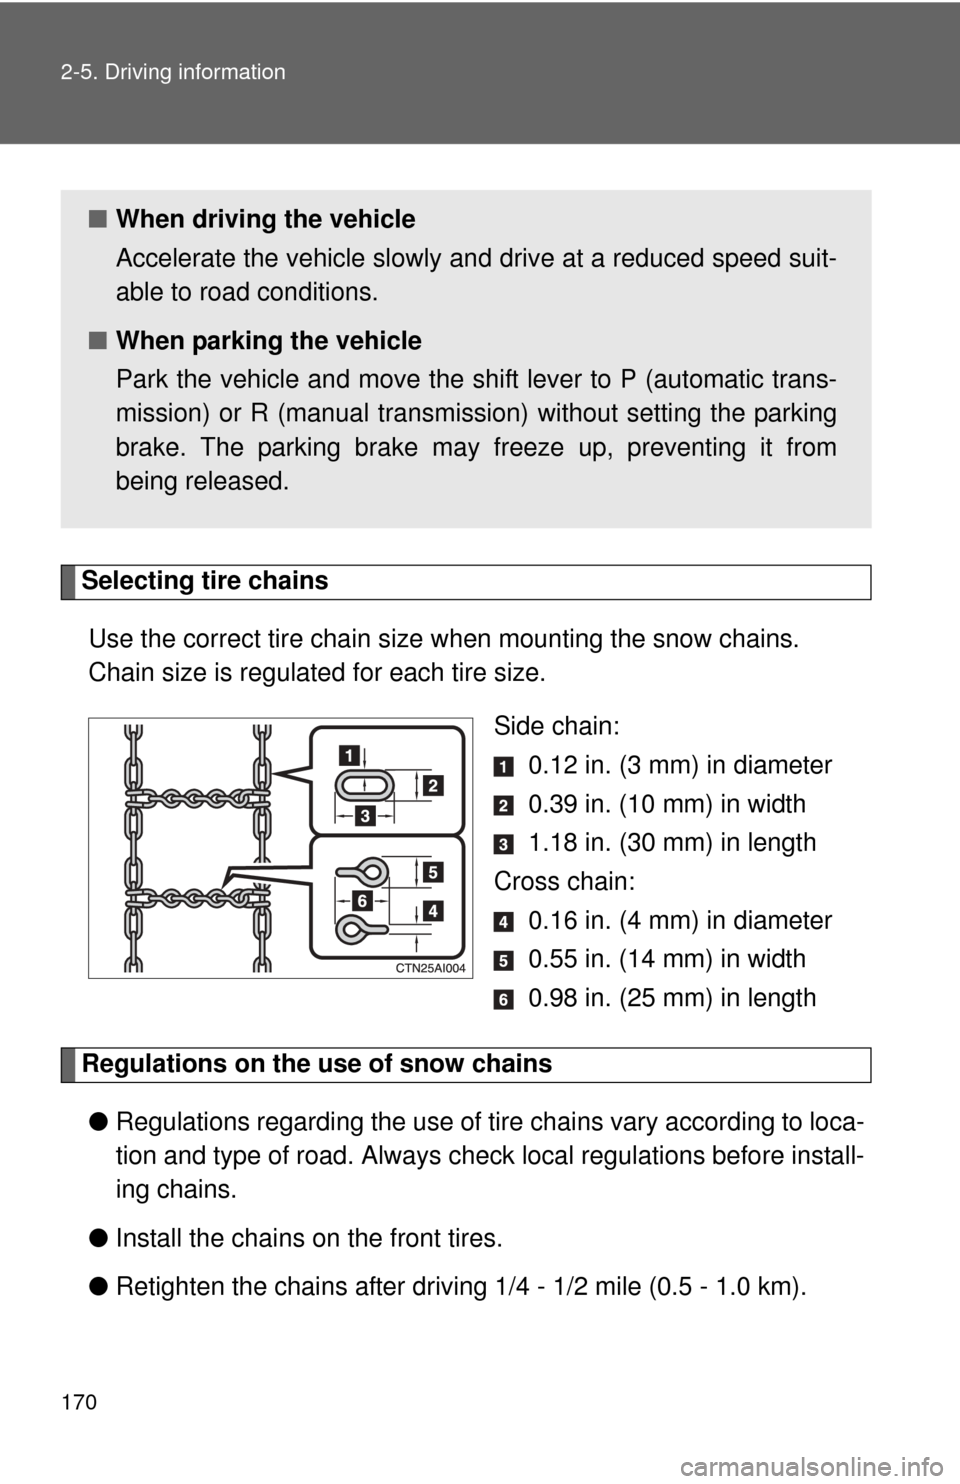
Selecting tire chainsUse the correct tire chain size when mounting the snow chains.
Chain size is regulated for each tire size.
Side chain: 0.12 in. (3 mm) in diameter
0.39 in. (10 mm) in width
1.18 in. (30 mm) in length
Cross chain: 0.16 in. (4 mm) in diameter
0.55 in. (14 mm) in width
0.98 in. (25 mm) in length
Regulations on the use of snow chains
● Regulations regarding the use of tire chains vary according to loca-
tion and type of road. Always check local regu lations before install-
ing chains.
● Install the chains on the front tires.
● Retighten the chains after drivi ng 1/4 - 1/2 mile (0.5 - 1.0 km).
■When driving the vehicle
Accelerate the vehicle slowly and drive at a reduced speed suit-
able to road conditions.
■ When parking the vehicle
Park the vehicle and move the shift lever to P (automatic trans-
mission) or R (manual transmission) without setting the parking
brake. The parking brake may freeze up, preventing it from
being released.
Page 179 of 476

179
2-5. Driving information
2
When driving
●
In order to maintain efficient engine braking and electrical charging
performance, do not use overdrive (automatic transmission) or the
5th gear (manual transmission).
● Due to the added load of the trailer, your vehicle's engine may
overheat on hot days (at temperatures over 85°F [30°C]) when
driving up a long or steep grade. If the engine coolant temperature
gauge indicates overheating, immedi ately turn off the air condition-
ing (if in use), pull your vehicle off the road and stop in a safe spot.
( P. 421)
● Always place wheel blocks under both the vehicle and the trailer
wheels when parking. Apply the parking brake firmly, and put the
transmission in P (automatic transmission) or in first or R (manual
transmission). Avoid parking on a slope, but if unavoidable, do so
only after performing the following:
Apply the brakes and keep them applied.
Have someone place wheel blocks under both the vehicle and
trailer wheels.
When the wheel blocks are in pl ace, release the brakes slowly
until the blocks absorb the load.
Apply the parking brake firmly.
Shift into first or R (manual transmission) or P (automatic
transmission) and turn off the engine.
● When restarting after parking on a slope:
With the transmission in the P position (automatic transmis-
sion) or the clutch pedal (m anual transmission) depressed,
start the engine. On vehicles with an automatic transmission,
be sure to keep the brake pedal pressed.
Shift into a forward gear. If reversing, shift into the R position.
Release the parking brake (also brake pedal on vehicles with
automatic transmission), and sl owly pull or back away from
the wheel blocks. Stop and apply the brakes.
Have someone retrieve the blocks.
STEP1
STEP2
STEP3
STEP4
STEP5
STEP1
STEP2
STEP3
STEP4
Page 180 of 476
180 2-5. Driving information
CAUTION
■To avoid an accident
●Do not exceed 45 mph (72 km/h) or posted towing speed limit, whichever
is lower. As instability (swaying) of the towing vehicle-trailer combination
increases as speed increases, exceeding 45 mph (72 km/h) may cause
loss of control.
● Slow down and downshift before descending steep or long downhill
grades. Do not make sudden downshifts.
● Avoid holding the brake pedal down too long or applying the brakes too
frequently. This could cause the brakes to overheat and result in reduced
braking efficiency.
Page 182 of 476
182
2-5. Driving information
Dinghy towing (manual transmission)
Towing your vehicle with 4 wheels on the groundTo prevent damage to your vehicle, perform the following procedures
before towing. Shift the shift lever to neutral.
Switch to “ACC” position. ( P. 130)
Ensure that the audio system and other powered devices have been
turned off.
Release the parking brake.
After towing, leave the engine in idle for at least 3 minutes before
driving the vehicle.
■Necessary equipment and accessories
Specialized equipment and accessories are required for dinghy towing. Con-
tact the service branch of the motor home manufacturer regarding recom-
mended equipment.
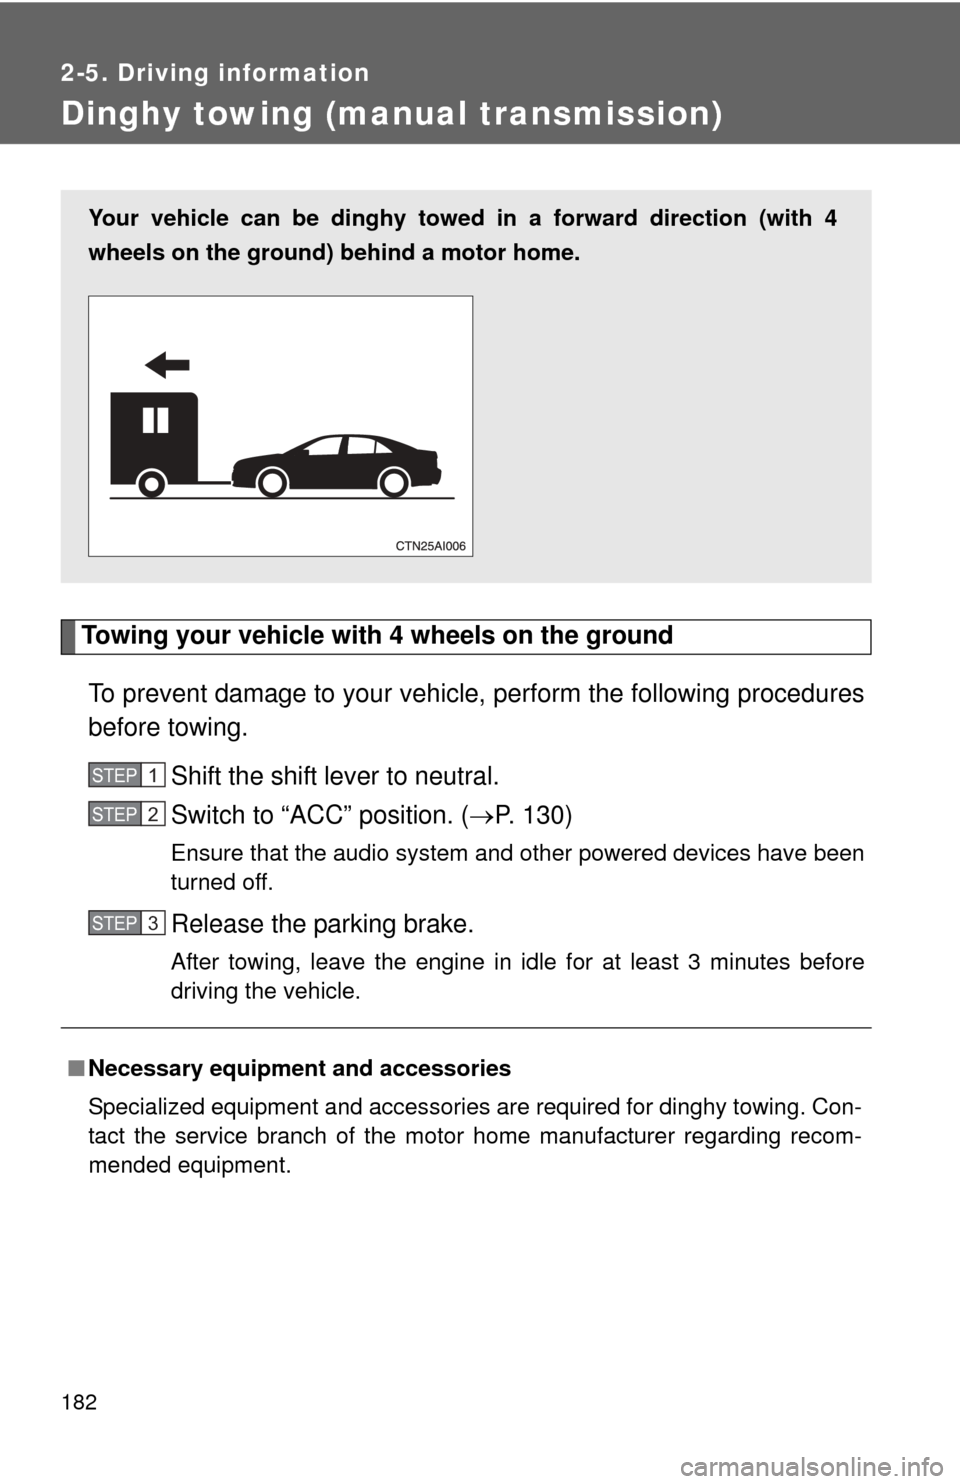
Your vehicle can be dinghy towed in a forward direction (with 4
wheels on the ground) behind a motor home.
STEP1
STEP2
STEP3