Page 32 of 146
BASIC FUNCTIONS
46
You can use voice guidance while driv-
ing to the destination.
You can adjust the volume of the voice or
turn off voice guidance.
1. Push the “MENU” button on the
navigation controller.
2. Select the “Volume” switch.
3. Select the volume using the
switches “1”�“7”.
If you do not need voice guidance, select
the
“Off” switch.
The selected item is highlighted in green.
INFORMATION
During route guidance, the voice
guidance continues even if the navi-
gation screen is changed to other
screens.
“Adaptive volume control”: If you select
the “Adaptive volume control”,
the volume is turned up automatically
when the vehicle speed exceeds 50 mph
(80 km/h).
To turn the system of the
“Adaptive
volume control” on, select the
switch. The indicator will be highlighted.
Voice guidance
Page 40 of 146
BASIC FUNCTIONS
54
When there are 2 screens displayed, se-
lect “Right screen” switch. You can
display the “Edit right screen”.
Select “Show POI icons”. POI icon is
displayed when the indicator next to the
is highlighted, and if not, the POI icon
is not displayed.You can change from the map screen to
a “Turn list” screen that displays the list
of the roads up to your destination. This
list can be used for a route guidance.
1. Push the “MENU” button on the
navigation controller.
2. Screen and select the “Route
overview” switch.
Turn list
Page 92 of 146

MORE ADVANCED FUNCTIONS
106
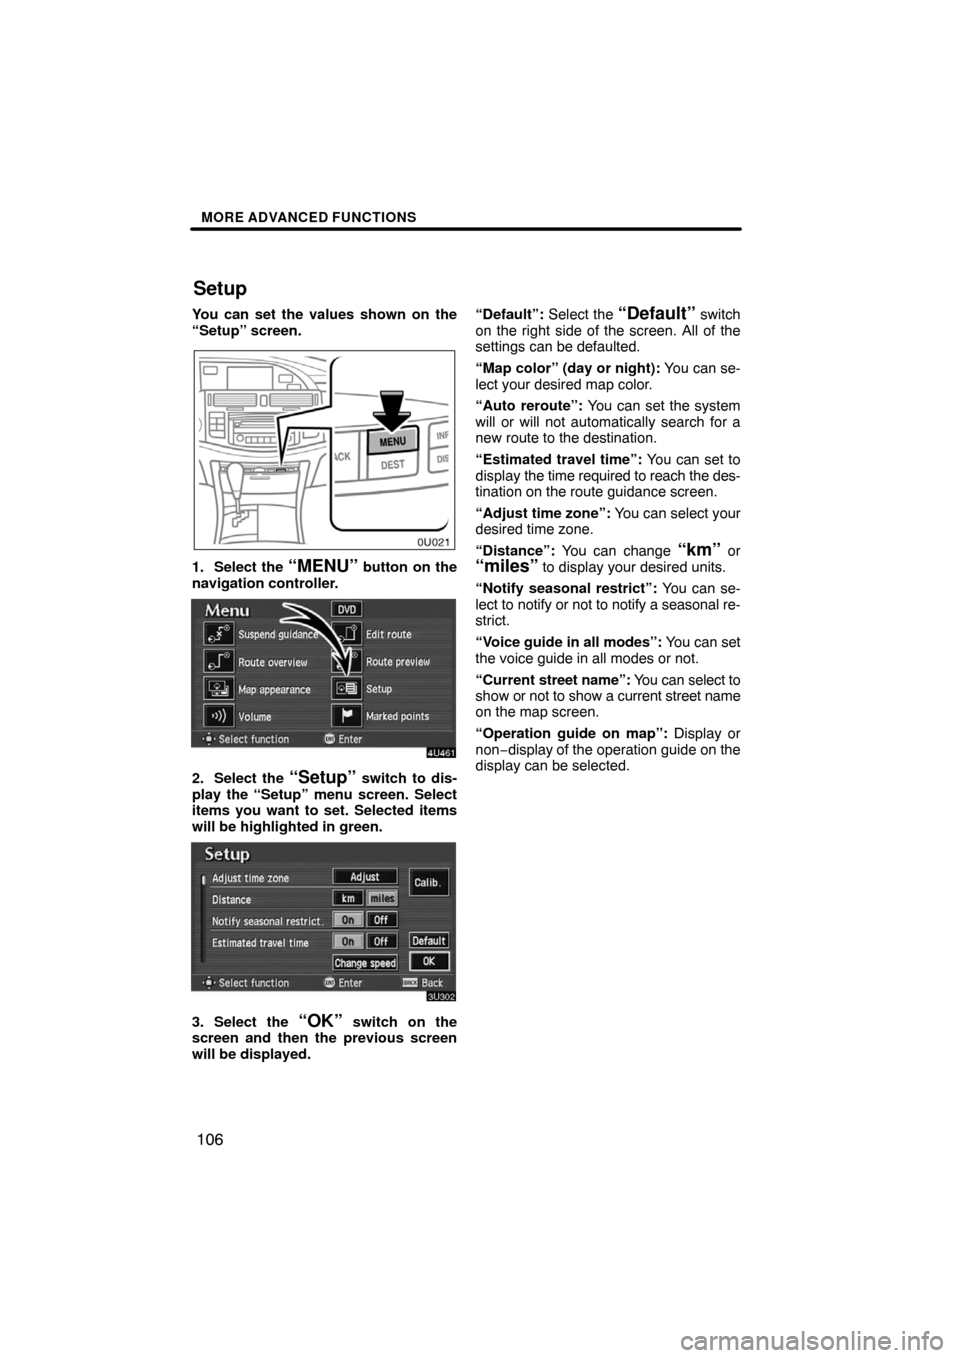
You can set the values shown on the
“Setup” screen.
1. Select the “MENU” button on the
navigation controller.
2. Select the “Setup” switch to dis-
play the “Setup” menu screen. Select
items you want to set. Selected items
will be highlighted in green.
3. Select the “OK” switch on the
screen and then the previous screen
will be displayed.“Default”: Select the
“Default” switch
on the right side of the screen. All of the
settings can be defaulted.
“Map color” (day or night): You can se-
lect your desired map color.
“Auto reroute”: You can set the system
will or will not automatically search for a
new route to the destination.
“Estimated travel time”: You can set to
display the time required to reach the des-
tination on the route guidance screen.
“Adjust time zone”: You can select your
desired time zone.
“Distance”: You can change
“km” or“miles” to display your desired units.
“Notify seasonal restrict”: You can se-
lect to notify or not to notify a seasonal re-
strict.
“Voice guide in all modes”: You can set
the voice guide in all modes or not.
“Current street name”: You can select to
show or not to show a current street name
on the map screen.
“Operation guide on map”: Display or
non−display of the operation guide on the
display can be selected.
Setup
Page 94 of 146
MORE ADVANCED FUNCTIONS
108
3. Select the “On” switch of “Auto re-
route”.
Selected switch is highlighted in green.
INFORMATION
If your vehicle leaves the guidance
route, the system searches for a new
route to the destination. The new
route may or may not take you back to
the previous route depending on how
far you are off the original guidance
route.
When the “Estimated travel time” fea-
ture is turned on, the time estimated to
reach the destination is displayed on
the route guidance screen.
To turn the “Estimated travel time”
mode on:
1. Push the “MENU” button on the
navigation controller.
Time to destination
Page 95 of 146

MORE ADVANCED FUNCTIONS
109
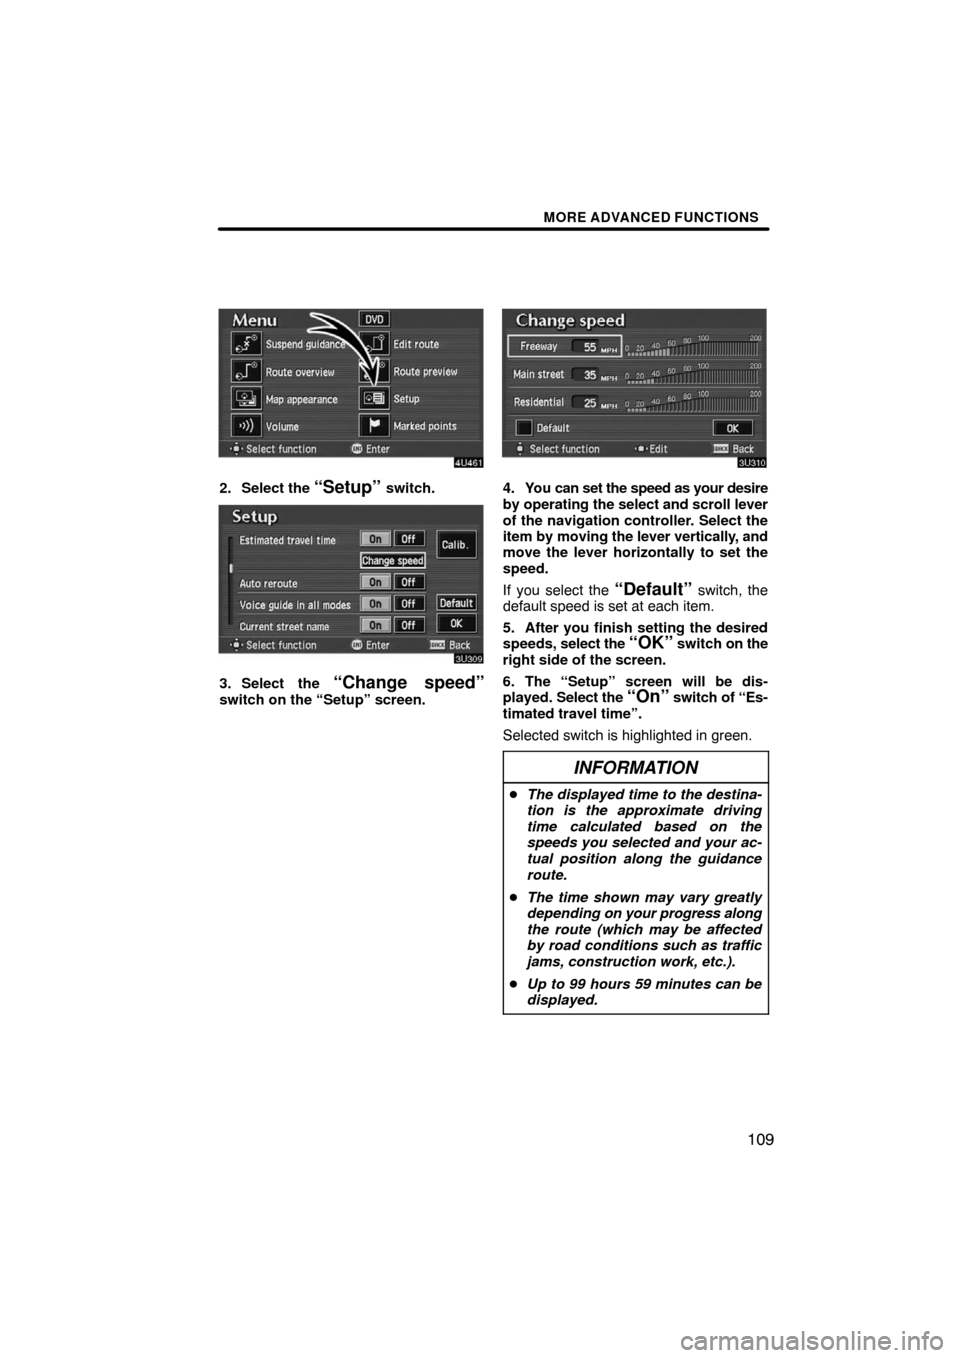
2. Select the “Setup” switch.
3. Select the “Change speed”switch on the “Setup” screen.
4. You can set the speed as your desire
by operating the select and scroll lever
of the navigation controller. Select the
item by moving the lever vertically, and
move the lever horizontally to set the
speed.
If you select the
“Default” switch, the
default speed is set at each item.
5. After you finish setting the desired
speeds, select the
“OK” switch on the
right side of the screen.
6. The “Setup” screen will be dis-
played. Select the
“On” switch of “Es-
timated travel time”.
Selected switch is highlighted in green.
INFORMATION
�The displayed time to the destina-
tion is the approximate driving
time calculated based on the
speeds you selected and your ac-
tual position along the guidance
route.
�The time shown may vary greatly
depending on your progress along
the route (which may be affected
by road conditions such as traffic
jams, construction work, etc.).
�Up to 99 hours 59 minutes can be
displayed.
Page 96 of 146
MORE ADVANCED FUNCTIONS
11 0
1. Push the “MENU” button on the
navigation controller.
2. Select the “Setup” switch.
3. Select the “Adjust” switch. The
“Adjust time zone” screen appears on
the display.
4. Select your desired time zone.
Selected switch is highlighted in green.
“Daylight saving time”: Select the
“On” switch on the screen and then se-
lect
or to set the day light saving
time.
5. Select the
“OK” switch on the
screen and the “Setup” screen will be
displayed.
Adjust time zone
Page 97 of 146
MORE ADVANCED FUNCTIONS
111
1. Push the “MENU” button on the
navigation controller.
2. Select the “Setup” switch on the
screen.
3. Choose the “km” or “miles”switch of “Distance” to select your de-
sired units.
Selected switch is highlighted in green.
4. Select the
“OK” switch.
1. Push the “MENU” button on the
navigation controller.
2. Select the “Setup” switch on the
screen.
DistanceNotify seasonal restrict
Page 107 of 146
MORE ADVANCED FUNCTIONS
121
This system has a function which in-
forms you the memo you entered.
When the system begins operating af-
ter reaching the memo’s date, the “In-
formation” screen will be displayed.
The “Information” screen will not be dis-
played again by selecting the
“Do not
display this message again”
switch.
1. Push the “INFO” button on the
navigation controller.
2. Select the “Calendar” switch to
display the “Calendar” screen.
Today’s date is highlighted. If today’s date
is not displayed on the screen, select
“Today” switch to display a calendar of
this month.
Calendar with memo