Page 8 of 496

viii
Installation of a mobiletwo−way radio system
As the installation of a mobile two−way radio system in
your vehicle could affect electronic systems such as fol-
lows, be sure to check with your Toyota dealer for precau-
tionary measures or special instructions regarding installa-
tion.
��Multiport fuel injection system/sequential multiport
fuel injection system
� �SRS airbag system
� �Seat belt pretensioner system
� �Traction control system (two−wheel drive models)
� �Active traction control system
(four−wheel drive models)
� ��AUTO LSD" system (two−wheel drive models)
� �Vehicle stability control system
� �Downhill assist control system
(four−wheel drive models)
� �Hill−start assist control system
� �Rear height control air suspension
��Tire pressure warning system
� �Cruise control system
� �Anti−lock brake system
� �Electronic throttle control system
Tires and loading on your
To y o t a
Underinflated or overinflated tire pressure and the
excess load may result in the deterioration of
steering ability and braking ability, leading to an
accident. Check the tire inflation pressure periodi-
cally and be sure to keep the load limits given in
this Owner ’s Manual. For details about tire inflation
pressure and load limits, see pages 441 and 364.
Page 14 of 496
2
1. Side vents
2. Side defroster outlets
3. Instrument cluster
4. Center vents
5. Personal lights
6. Electric moon roof switch
7. Garage door opener
8. Auxiliary boxes
9. Glove box
10. Automatic transmission selector lever
11. Power door lock switches
12. Power window switches
13. Seat heater switches
14. Rear height control air suspension switch
15. Rear vents
16. Trash holder
17. Toyota electronic modulated suspension mode select switch
18. Downhill assist control switch
19. Front cup holders
20. Tilt steering lock release lever
Instrument panel overview
CY11050y
Page 21 of 496
9
Slip indicator light
Turn signal indicator lightsDownhill assist control system indicator light
(four−wheel drive models)
Headlight high beam indicator light
Headlight low beam indicator light
Tail light indicator light
�AUTO LSD" indicator light
Four−wheel drive indicator light∗
3
(multi−mode four−wheel drive models)
Center differential lock indicator light∗3
(four−wheel drive models) Automatic transmission indicator lights
Low speed four−wheel drive indicator light∗3
(four−wheel drive models)
Vehicle stability control system off
indicator/warning light∗1
Front fog light indicator light
Cruise control indicator light∗5
Height control �OFF" indicator light∗4
Height control indicator lights
Page 22 of 496
10
∗1: For details, see �Service reminder indicators and warning
buzzers" on page 149 in Section 1−6.
∗2: For details, see �Roll sensing of curtain shield airbags off
switch" on page 95 in Section 1−3.
∗3: If this light flashes, see �Four−wheel drive system" on page
168 in Section 1−7.
∗4: If this light flashes, see �Rear height control air suspension"
on page 191 in Section 1−7.
∗5: If this light flashes, see �Cruise control" on page 203 in
Section 1−7.
Page 56 of 496
44
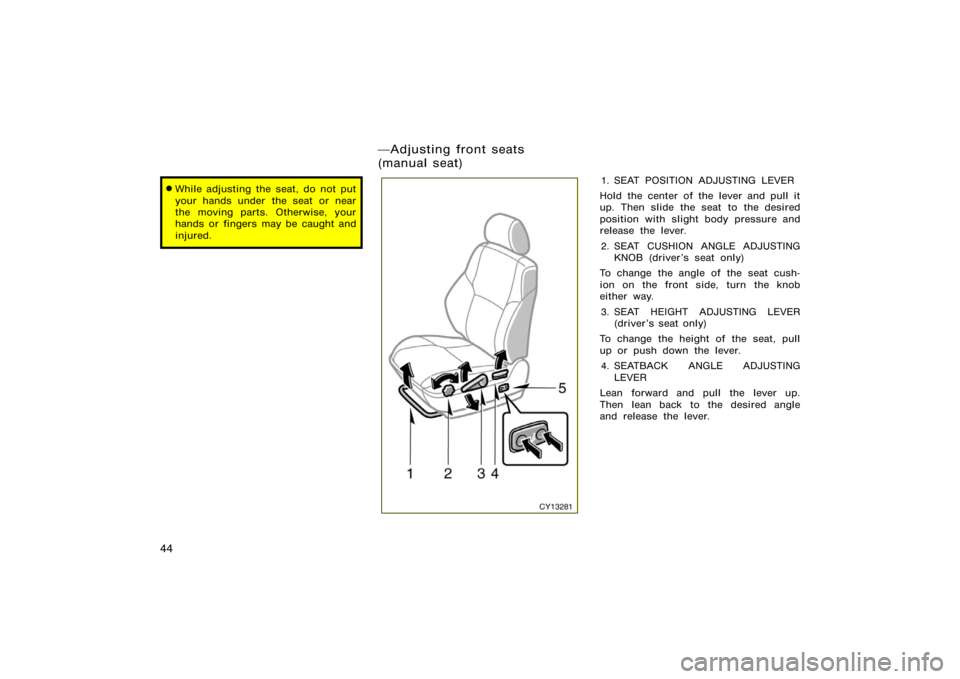
�While adjusting the seat, do not put
your hands under the seat or near
the moving parts. Otherwise, your
hands or fingers may be caught and
injured.
CY13281
1. SEAT POSITION ADJUSTING LEVER
Hold the center of the lever and pull it
up. Then slide the seat to the desired
position with slight body pressure and
release the lever.
2. SEAT CUSHION ANGLE ADJUSTING KNOB (driver’s seat only)
To change the angle of the seat cush-
ion on the front side, turn the knob
either way.
3. SEAT HEIGHT ADJUSTING LEVER (driver ’s seat only)
To change the height of the seat, pull
up or push down the lever. 4. SEATBACK ANGLE ADJUSTING LEVER
Lean forward and pull the lever up.
Then lean back to the desired angle
and release the lever.
�Adjusting front seats
(manual seat)
Page 57 of 496

45
CAUTION
Avoid reclining the seatback any
more than needed. The seat belts pro-
vide maximum protection in a frontal
or rear collision when the driver and
the front passenger are sitting up
straight and well back in the seats. If
you are reclined, the lap belt may
slide past your hips and apply re-
straint forces directly to the abdomen
or your neck may contact the shoul-
der belt. In the event of a frontal
collision, the more the seat is re-
clined, the greater the risk of death
or serious injury.
5. SEAT LUMBAR SUPPORTADJUSTING SWITCH (driver’s seat
only)
Push the control switch on either side.
The amount of lumbar support will change
while the switch is pushed.
CY13001
1. DRIVER’S SEAT: SEAT POSITION, SEAT CUSHION ANGLE AND SEAT
HEIGHT ADJUSTING SWITCH
PASSENGER’S SEAT: SEAT POSITION
ADJUSTING SWITCH
Move the control switch in the desired
direction.
Releasing the switch will stop the seat at
that position.
Do not place anything under the front
seats, as this might interfere with the seat
movement. 2. SEATBACK ANGLE ADJUSTING SWITCH
Move the control switch in the desired
direction.
Releasing the switch will stop the seat-
back at that position.
�Adjusting front seats (power
seat)
Page 64 of 496

52
CAUTION
When returning seats to their original
position, observe the following pre-
cautions in order to prevent death or
serious injury in a collision or sud-
den stop:
�Make sure the seatback is securely
locked by pushing forward and rear-
ward on the top of the seatback.
Failure to do so will prevent the
seat belt from operating properly.
�Make sure the seat belts are not
twisted or caught in the seatback
and are arranged in their proper
position and are ready to use.
�Make sure the bottom cushion is
securely locked by trying to pull up
the edge of the cushion near the
lock release straps.
�Make sure to arrange the buckles of
the seat belts in their proper posi-
tion and be ready to use.
CAUTION
�Adjustment should not be made
while the vehicle is moving.
�When adjusting the seat, be careful
not to hit the seat against a pas-
senger or luggage.
�After adjusting the seatback, push
back your body to make sure it is
locked in position.
�When returning seats to their origi-
nal position, observe the following
precautions in order to prevent
death or serious injury in a colli-
sion or sudden stop:
Make sure the seat is securely
locked by pushing forward and rear-
ward on the top of the seatback or
by trying to pull up the edge of the
bottom cushion. Failure to do so
will prevent the seat belt from oper-
ating properly.
Make sure the seat belts are not
twisted or caught under the seat
and are arranged in their proper
position and are ready to use.
�The third seats have a maximum
capacity of two belted occupants
who do not exceed 150 cm (59 in.)
in height. Exceeding these limits
can result in increased risk of seri-
ous injuries or death.
Folding the seats up will enlarge the
luggage compartment. See ��Stowage
precautions" on page 365 in Section 2 for
precautions when loading luggage.
�Rear seat precautions
(vehicles with third seats)
Page 171 of 496
1. Apply the parking brake.
2. Open one of the side doors or back")
159
CHECKING SERVICE REMINDER
INDICATORS (except the low fuel level
warning light and low windshield
washer fluid level warning light)1. Apply the parking brake.
2. Open one of the side doors or back door.
The open door warning light should
come on.
3. Close the door. The open door warning light should go
off.
4. Turn the engine switch to �ON", but do not start the engine.
All the service reminder indicators ex-
cept the open door warning light should
come on.
The following service reminder indica-
tors go off after a few seconds:
�Engine oil replacement reminder light
��ABS" warning light
�Tire pressure warning light
��RSCA OFF" indicator light
��AUTO LSD" indicator light
��VSC OFF" indicator/warning light
�Slip indicator light
�Height control indicator lights
�Downhill assist control system indicator
light (four−wheel drive models)
�Height control �OFF" indicator light
The SRS warning light goes off after
about 6 seconds.
There may be the case that the �ABS"
warning light (brake assist system
warning light), �AUTO LSD" indicator
light, �VSC OFF" indicator/warning light
or slip indicator light stay on for about
60 seconds after the engine switch is
turned to the �ON" position. It is nor-
mal if they go out after a while.
If any service reminder indicator or warn-
ing buzzer does not function as described
above, have it checked by your Toyota
dealer as soon as possible.


Headlight high beam indicator light
Headlight low beam indicator light
Tai")