Page 234 of 496

222
(Reverse/Fast−forward button)
Push and hold �
" (preset button 6) or
�
" (preset button 5) to fast−forward or
reverse within a compact disc. When you
release the button, the compact disc play-
er will resume playing.
AM·SAT (AM band and XM
� Satellite Ra-
dio∗)
Push the �AM·SAT" button to turn on the
radio and select the AM or XM
� band.
�AM", �SAT1", �SAT2" or �SAT3" will ap-
pear on the display.
Error messages
If the satellite radio t uner malfunctions,
your audio system will display following
error messages.
�ANTENNA":
�The XM� antenna is not connected.
Check whether the XM
� antenna cable
is attached securely.
�A short−circuit occurs in the antenna or
the surrounding antenna cable. See a
Toyota certified dealer. �UPDATING":
�You have not subscribed to the XM�
Satellite Radio. The radio is being up-
dated with the latest encryption code.
Contact the XM
� Satellite Radio for
subscription information. When a con-
tact is canceled, you can choose the
�CH000" and all free−to−air channels.
�The premium channel you selected is
not authorized. Wait for about 2 sec-
onds until the radio returns to the pre-
vious channel or �CH001". If it does
not change automatically, select anoth-
er channel. If you want to listen to the
premium channel, contact the XM
� Sat-
ellite Radio.
�NO SIGNAL": The XM
� signal is too
weak at the current location. Wait until
your vehicle reaches a location with a
stronger signal.
�LOADING": The unit is acquiring audio
or program information. Wait until the unit
has received the information.
�OFF AIR": The channel you selected is
not broadcasting any programming. Select
another channel. �−�−�−":
The channel you selected is no
longer available. Wait for about 2 seconds
until the radio returns to the previous
channel or �CH001". If it does not change
automatically, select another channel.
The XM
� Listener Care Center is also
available on the phone, please call
1−800−967−2346 (U.S.A.) or
1−877−438−9677 (Canada).
∗: Use of satellite radio r equires XM�
tuner and service. Contact your Toyota
dealer for details.
AUDIO CONT (Tone and sound balance
controls)
Each time you push the �AUDIO CONT"
knob, the mode changes. To adjust the
tone and balance, turn the knob.
BAS: Adjusts low−pitched tones. The dis-
play ranges from −5 to 5.
TRE: Adjusts high−pitched tones. The dis-
play ranges from −5 to 5.
FAD: Adjusts the sound balance between
the front and rear speakers. The display
ranges from F7 to R7.
BAL: Adjusts the sound balance between
the right and left speakers. The display
ranges from L7 to R7.
Page 243 of 496

231
(Reverse/Fast−forward button)
Push and hold �
" (preset button 6) or
�
" (preset button 5) to fast−forward or
reverse within a compact disc. When you
release the button, the compact disc play-
er will resume playing.
AM·SAT (AM band and XM
� Satellite Ra-
dio∗)
Push the �AM·SAT" button to turn on the
radio and select the AM or XM
� band.
�AM", �SAT1", �SAT2" or �SAT3" will ap-
pear on the display.
Error messages
If the satellite radio t uner malfunctions,
your audio system will display following
error messages.
�ANTENNA":
�The XM� antenna is not connected.
Check whether the XM
� antenna cable
is attached securely.
�A short−circuit occurs in the antenna or
the surrounding antenna cable. See a
Toyota certified dealer. �UPDATING":
�You have not subscribed to the XM�
Satellite Radio. The radio is being up-
dated with the latest encryption code.
Contact the XM
� Satellite Radio for
subscription information. When a con-
tact is canceled, you can choose the
�CH000" and all free−to−air channels.
�The premium channel you selected is
not authorized. Wait for about 2 sec-
onds until the radio returns to the pre-
vious channel or �CH001". If it does
not change automatically, select anoth-
er channel. If you want to listen to the
premium channel, contact the XM
� Sat-
ellite Radio.
�NO SIGNAL": The XM
� signal is too
weak at the current location. Wait until
your vehicle reaches a location with a
stronger signal.
�LOADING": The unit is acquiring audio
or program information. Wait until the unit
has received the information.
�OFF AIR": The channel you selected is
not broadcasting any programming. Select
another channel. �−�−�−":
The channel you selected is no
longer available. Wait for about 2 seconds
until the radio returns to the previous
channel or �CH001". If it does not change
automatically, select another channel.
The XM
� Listener Care Center is also
available on the phone, please call
1−800−967−2346 (U.S.A.) or
1−877−438−9677 (Canada).
∗: Use of satellite radio r equires XM�
tuner and service. Contact your Toyota
dealer for details.
AUDIO CONTROL (Tone and sound bal-
ance controls)
Each time you push the �AUDIO
CONTROL" knob, the mode changes. To
adjust the tone and balance or turn the
rear seat entertainment system on/off, turn
the knob.
BAS: Adjusts low−pitched tones. The dis-
play ranges from −5 to 5.
MID: Adjusts mid−pitched tones. The dis-
play ranges from −5 to 5.
TRE: Adjusts high−pitched tones. The dis-
play ranges from −5 to 5.
FAD: Adjusts the sound balance between
the front and rear speakers. The display
ranges from F7 to R7.
Page 261 of 496

249
NOTICE
�Be sure that the positive side and
negative side of the controller bat-
tery should be faced correctly.
� Do not replace the battery with wet
hands. Water may cause rust.
� Do not touch or move any compo-
nents inside of the controller, or it
may interfere with proper operation.
� Be careful not to bend the electrode
of the controller battery insertion.
� Close the battery case securely.
After replacing the battery, check that the
controller operates properly. If the control-
ler still does not operate properly, contact
your Toyota dealer.
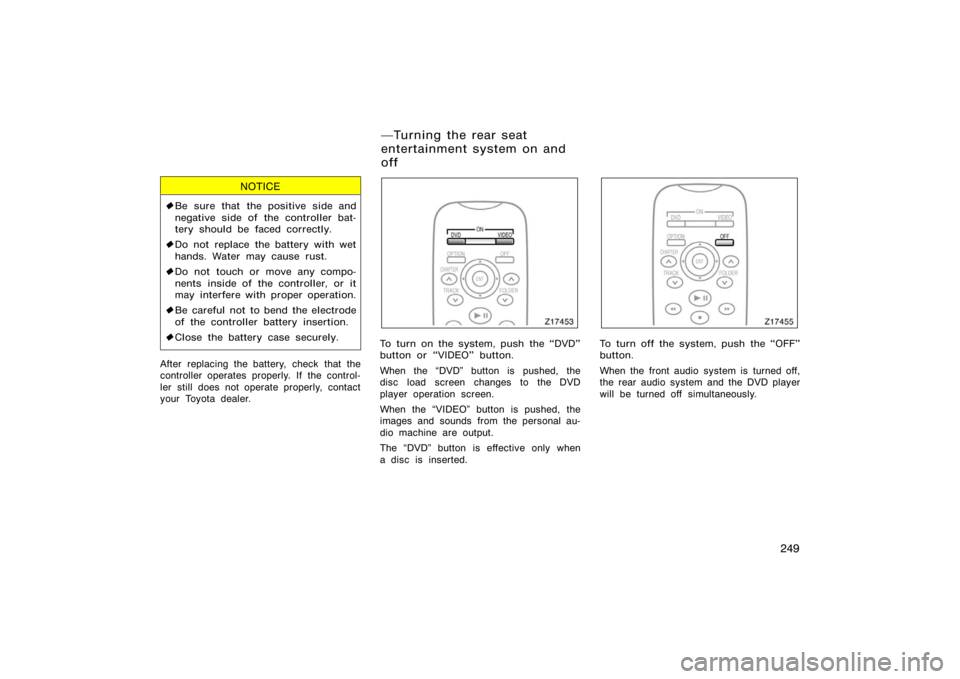
Z17453
To turn on the system, push the �DVD"
button or �VIDEO" button.
When the �DVD" button is pushed, the
disc load screen changes to the DVD
player operation screen.
When the �VIDEO" button is pushed, the
images and sounds from the personal au-
dio machine are output.
The �DVD" button is effective only when
a disc is inserted.
Z17455
To turn off the system, push the �OFF"
button.
When the front audio system is turned off,
the rear audio system and the DVD player
will be turned off simultaneously.
�Turning the rear seat
entertainment system on and
off
Page 324 of 496

312
CAUTION
�When doing the circling calibration,
be sure to secure a wide space,
and watch out for people and ve-
hicles in the neighborhood. Do not
violate any local traffic rules while
performing circling calibration.
�Do not adjust the display while the
vehicle is moving. Be sure to adjust
the display only when the vehicle is
stopped.
The rear view monitor system assists
the driver by displaying an image of
the view behind the vehicle while back-
ing up. The image is displayed in re-
verse on the screen. This allows the
image to appear in the same manner as
that of the rear view mirror.
To display the rear view image on the
screen, place the selector lever in the
�R" position when the engine switch is
in the �ON" position.
If you move the selector lever out of the
�R" position, the screen returns to the
previous screen. Operating another func-
tion of the navigation system will display
another screen.
The rear view monitor system is a supple-
ment device intended to assist back up.
When backing up, be sure to check be-
hind and all around the vehicle visually.CAUTION
�Never depend on the rear view
monitor system entirely when back-
ing up. Always make sure your in-
tended path is clear.
Use caution, just as you would
when backing up any vehicle.
�Never back up while looking only at
the screen. The image on the
screen is different from actual con-
ditions. Depicted distances between
objects and flat surfaces will differ
from actual distance. If you back up
while looking only at the screen,
you may hit a vehicle, a person or
an object. When backing up, be
sure to check behind and all around
the vehicle visually and with mir-
rors before proceeding.
Rear view monitor system
Page 327 of 496
315
CY19118
If a bright light (for example, sunlight re-
flected off the vehicle body) is picked up
by the camera, the smear effect
∗ peculiar
to the camera may occur.
∗: Smear effect�A phenomenon that oc-
curs when a bright light (for example, sun-
light reflected off the vehicle body) is
picked up by the camera; when trans-
mitted by the camera, the light source
appears to have a vertical streak above
and below it.
CY19035
Rear console box
CY19002
Luggage compartment
The power outlets are designed for
power supply for car accessories.
In the rear console box�To use the
power outlet, push the lid of the auxil-
iary box to open.
The engine switch must be in the �ACC"
or �ON" position for the power outlet to be
used.
Power outlet (12 VDC)
Page 330 of 496
318
CY19070
On some models, an auxiliary box is
located inside the glove box.
To increase the capacity of the glove box,
raise the lower panel of the auxiliary box.
CY19130
Indicator light
Buttons
The garage door opener (\b
Universal Transceiver) is manufactured
under license from HomeLink\b and can
be programmed to operate garage
doors, gates, entry doors, door locks,
home lighting systems, and security
systems, etc.
Garage door opener
Page 333 of 496

321
6. Test the operation of the HomeLink\b by
pressing the newly programmed button.
Check to see if the gate/device oper-
ates correctly.
7. Repeat steps 1 through 6 for each re- maining HomeLink
\b button to program
another device.
Programming other devices
To program other devices such as home
security systems, home door locks or
lighting, contact your authorized Toyota
dealer for assistance.
Reprogramming a button
Individual HomeLink
\b buttons cannot be
erased, however, to reprogram a single
button, follow the procedure �Programming
the HomeLink
\b".
(b) Operating the HomeLink
\b
To operate the HomeLink\b, press the
appropriate HomeLink\b button to activate
the programmed device. The HomeLink\b
indicator light should come on. The
HomeLink\b continues to send the signal
for up to 20 seconds as long as the
button is pressed.
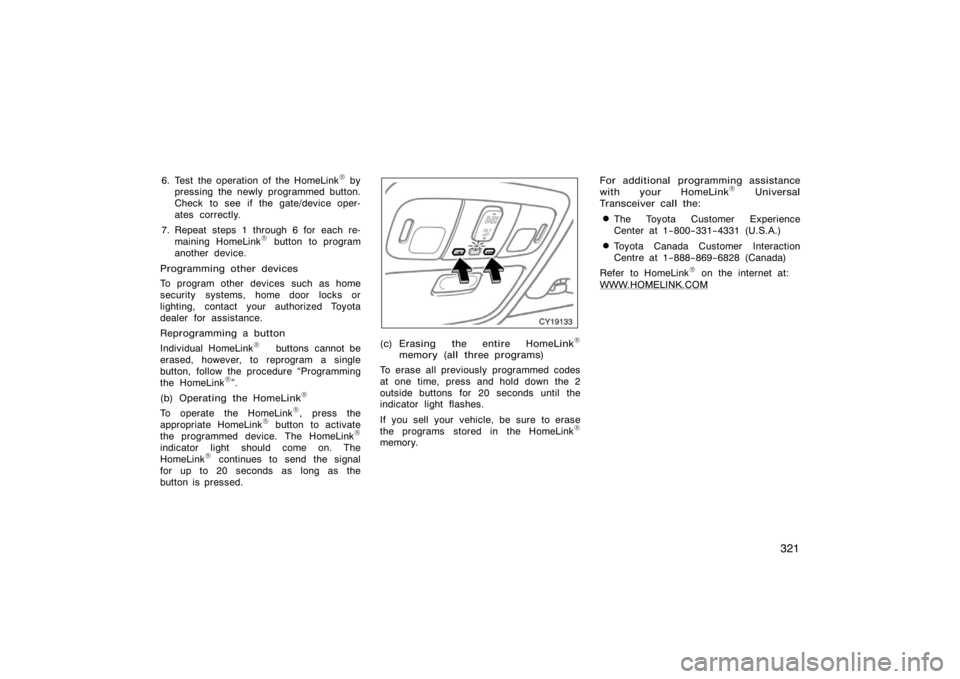
CY19133
(c) Erasing the entire HomeLink\b
memory (all three programs)
To erase all previously programmed codes
at one time, press and hold down the 2
outside buttons for 20 seconds until the
indicator light flashes.
If you sell your vehicle, be sure to erase
the programs stored in the HomeLink
\b
memory. For additional programming assistance
with your HomeLink
\b Universal
Transceiver call the:
�The Toyota Customer Experience
Center at 1−800−331−4331 (U.S.A.)
�Toyota Canada Customer Interaction
Centre at 1−888−869−6828 (Canada)
Refer to HomeLink
\b on the internet at:
WWW.HOMELINK.COM
Page 336 of 496
324
CY19074
The right side of luggage compartment
auxiliary box is equipped with a belt to
hold the objects.
To use the belt, do the following.1. To loosen: Pull the buckle forward.
2. To tighten: Pull on the belt.
Make sure the objects are securely held.CY19071
CONSOLE BOX TABLE
To use the console box table, open it.
CAUTION
To reduce the chance of injury in
case of an accident or a sudden stop,
always keep the table closed while
driving.
NOTICE
To prevent damage to the table, do
not place any object heavier than 1
kg (2.20 lb.) on it, and do not leave
any object on the table for a long
time.
�Using the holding belts Rear console box