2008 SUZUKI SX4 brake
[x] Cancel search: brakePage 199 of 278

9-10
INSPECTION AND MAINTENANCE
80J21-03E
R: Replace or change
I : Inspect, clean, adjust, lubricate or replace as necessary
NOTE:
This table shows the service schedule up to 125000 km (75000 miles).
Beyond 125000 km (75000 miles), perform the same services at the same intervals shown in the chart.
*1 Clean more frequently if the air flow from the air conditioner decreases.Interval: This interval should be judged by odometer
reading or months, whichever comes first.miles (x 1000) 42 45 48 51 54 57 60 63 66 69 72 75
km (x 1000) 70 75 80 85 90 95 100 105 110 115 120 125
months 42 45 48 51 54 57 60 63 66 69 72 75CHASSIS AND BODY
1. Clutch (for manual transaxle)
Pedal and fluid level
–
I
–
–
–
–
I
–
–
–
–
I
*2. Brake discs and pads (front, rear) – – I – – – I – – – I –
Brake drums and shoes
(rear)
–
–
I
–
–
–
I
–
–
–
I
–
*3. Brake hoses and pipes – – I – – – I – – – I –
4.Brake fluid level check, *replacement
–
I
–
–
–
–
R
–
–
–
–
I
5.Brake pedal stroke check, *adjustment – I –––– I –––– I
6.Parking brake lever and *cableLever movement check, *adjustment – I –––– I –––– I7.Tires (including tire rotation)
I
–
I
–
I
–
I
–
I
–
I
–
8.Wheel discs I–I–I–I–I–I–
*9.
Wheel bearings
–
–
I
–
–
–
I
–
–
–
I
–
*10. Suspension system I – I – I – I – I – I –
*11.
Propeller shafts (i-AWD)/Drive axle boots
I
–
I
–
I
–
I
–
I
–
I
–
*12. Manual transaxle oil
Level check, *replacement
–
R
–
–
–
–
R
–
–
–
–
R
13.Automatic transaxle (A/T) Fluid level – I –––– I –––– I
*Fluid change
Replace every 80000 km (48000 miles)-----4-speed A/T
*Fluid hose – I ––––––––––
*14.
Transfer oil (i-AWD)
–
R
–
–
–
–
R
–
–
–
–
R
*15.Rear differential oil (i-AWD) –R––––R––––R
16.
Steering systemSteering wheel movement, *linkage I – I – I – I – I – I –
17.
Power steering (if equipped)
I
–
I
–
I
–
I
–
I
–
I
–
18. All latches, hinges and locks I – I – I – I – I – I –
19.
Air conditioner filter element (if equipped)*
1
I
–
I
–
I
–
R
–
I
–
I
–
Engine Oil and Filter: 1, 2
Gear Oil: 6, 10
Page 204 of 278

9-15INSPECTION AND MAINTENANCE
80J21-03E
Manual transaxle
54G097
Transfer case (i-AWD)
80J007
(1) Oil filler and level plugRear differential (i-AWD)
80J015
(1) Oil filler and level plug
Tightening torque
Gear Oil Level CheckThe manual transaxle, transfer gears (i-
AWD A/T) and rear differential (i-AWD) are
lubricated with gear oil. To check the gear
oil level in any of the above locations, use
the following procedure:
1) Park the vehicle on a level surface. Set
parking brake and stop the engine.
2) Remove the oil filler plug (1).
3) Check the inside of the hole with your
finger. If the oil level comes up to the
bottom of the plug hole, the oil level is
correct. If so, reinstall the plug.
4) If the oil level is low, add gear oil
through the filler plug hole (1) until the
oil level reaches the bottom of the filler
hole.Gear Oil ReplacementSince special procedures, materials and
tools are required to change the automatic
transaxle oil, it is recommended that you
trust this job to your authorized SUZUKI
dealer.
(1)
Oil Filler Plug
Manual transaxle21 Nm
(15.2 lb-ft)
(2.1 kg-m)
Transfer 23 Nm
(16.6 lb-ft)
(2.3 kg-m) Rear differential
(1)
Engine Coolant: 1, 2
Windshield Washer Fluid: 3
Page 205 of 278
9-16
INSPECTION AND MAINTENANCE
80J21-03E
Automatic Transaxle FluidSpecified FluidUse an automatic transaxle fluid equivalent
to DEXRON
®-III.
Fluid Level CheckYou must check the fluid level with the
automatic transaxle fluid at normal operat-
ing temperature.
To check the fluid level:
1) To warm up the transaxle fluid, drive the
vehicle or idle the engine until the tem-
perature gauge indicates normal oper-
ating temperature.
2) Then drive for ten more minutes.
NOTE:
Do not check the fluid level if you have just
driven the vehicle for a long time at high
speed, or if you have driven in city traffic in
hot weather. Wait until the fluid cools down
(about 30 minutes), or the fluid level indica-
tion will not be correct.
3) Park your vehicle on level ground.
4) Apply the parking brake and then start
the engine in “P” (Park). Let it idle for
two minutes and keep it running during
the fluid level check.5) With your foot on the brake pedal, move
the gearshift lever through each gear,
pausing for about three seconds in
each range. Then move it back to the
“P” (Park) position.
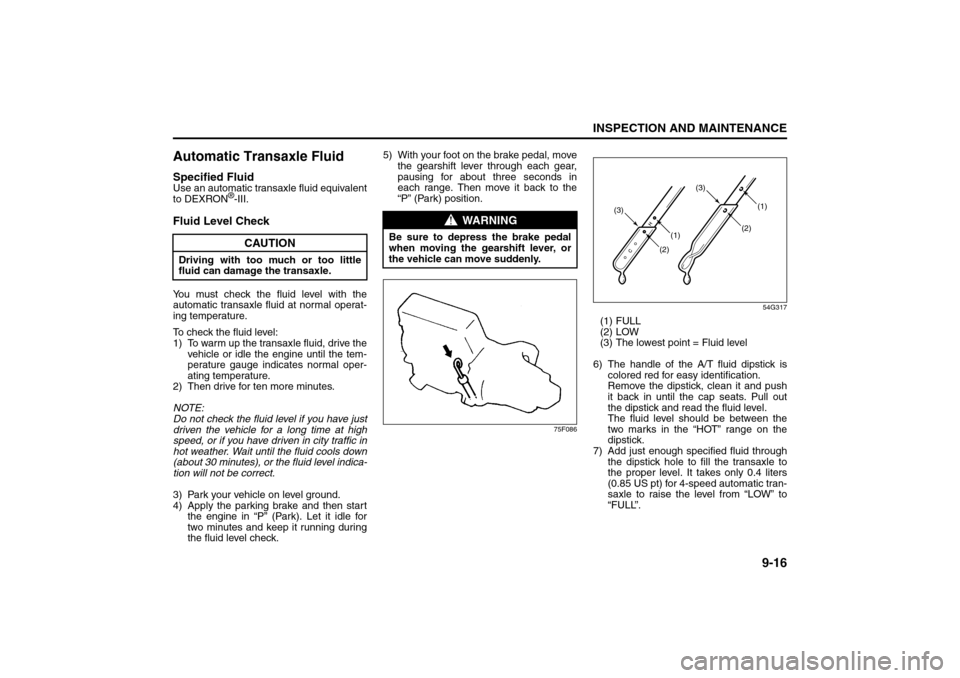
75F08654G317
(1) FULL
(2) LOW
(3) The lowest point = Fluid level
6) The handle of the A/T fluid dipstick is
colored red for easy identification.
Remove the dipstick, clean it and push
it back in until the cap seats. Pull out
the dipstick and read the fluid level.
The fluid level should be between the
two marks in the “HOT” range on the
dipstick.
7) Add just enough specified fluid through
the dipstick hole to fill the transaxle to
the proper level. It takes only 0.4 liters
(0.85 US pt) for 4-speed automatic tran-
saxle to raise the level from “LOW” to
“FULL”.
CAUTION
Driving with too much or too little
fluid can damage the transaxle.
WARNING
Be sure to depress the brake pedal
when moving the gearshift lever, or
the vehicle can move suddenly.
(1)(2) (3)(1)
(2)(3)
Windshield Washer Fluid: 3
Air Cleaner: 1, 2
Page 207 of 278
9-18
INSPECTION AND MAINTENANCE
80J21-03E
Coolant Level CheckCheck the engine coolant level at the
reserve tank, not at the radiator. With the
engine cool, the engine coolant level
should be between the “FULL” and “LOW”
marks.Adding CoolantIf the engine coolant level is below the
“LOW” mark, more engine coolant should
be added. Remove the reserve tank cap
and add engine coolant until the reserve
tank level reaches the “FULL” mark. Never
fill the reserve tank above the “FULL” mark.
Coolant ReplacementSince special procedures are required, we
recommend you take your vehicle to your
SUZUKI dealer for coolant replacement.
CAUTION
(Continued)
Do not add extra inhibitors or addi-
tives. They may not be compatible
with your cooling system.
Do not mix different types of base
coolants. Doing so may result in
accelerated seal wear and/or the
possibility of severe overheating
and extensive engine/automatic
transaxle damage.
CAUTION
The mixture you use should con-
tain 50% concentration of anti-
freeze.
If the lowest ambient temperature
in your area is expected to be –
35°C (–31°F) or below, use higher
concentrations up to 60% following
the instructions on the antifreeze
container.
When putting the cap on the reser-
voir tank, line up the arrow on the
cap and the arrow on the tank. Fail-
ure to follow this can result in cool-
ant leakage.
WARNING
Engine coolant is harmful or fatal if
swallowed or inhaled. Do not drink
antifreeze or coolant solution. If swal-
lowed, do not induce vomiting. Imme-
diately contact a poison control
center or a physician. Avoid inhaling
mist or hot vapors; if inhaled, remove
to fresh air. If coolant gets in eyes,
flush eyes with water and seek medi-
cal attention. Wash thoroughly after
handling. Solution can be poisonous
to animals. Keep out of the reach of
children and animals.
Brakes: 6
Page 208 of 278
9-19INSPECTION AND MAINTENANCE
80J21-03E
Windshield Washer Fluid
65D108
80J008
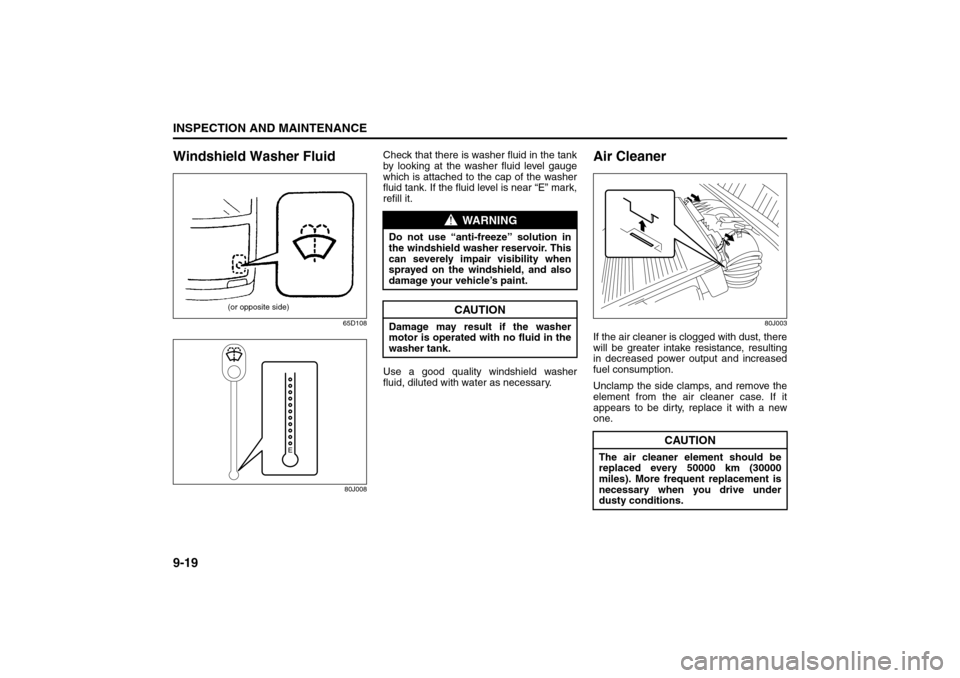
Check that there is washer fluid in the tank
by looking at the washer fluid level gauge
which is attached to the cap of the washer
fluid tank. If the fluid level is near “E” mark,
refill it.
Use a good quality windshield washer
fluid, diluted with water as necessary.
Air Cleaner
80J003
If the air cleaner is clogged with dust, there
will be greater intake resistance, resulting
in decreased power output and increased
fuel consumption.
Unclamp the side clamps, and remove the
element from the air cleaner case. If it
appears to be dirty, replace it with a new
one.
(or opposite side)
WARNING
Do not use “anti-freeze” solution in
the windshield washer reservoir. This
can severely impair visibility when
sprayed on the windshield, and also
damage your vehicle’s paint.
CAUTION
Damage may result if the washer
motor is operated with no fluid in the
washer tank.
CAUTION
The air cleaner element should be
replaced every 50000 km (30000
miles). More frequent replacement is
necessary when you drive under
dusty conditions.
Brakes: 6
Page 209 of 278
9-20
INSPECTION AND MAINTENANCE
80J21-03E
Spark Plugs
65D180
You should inspect spark plugs periodically
for carbon deposits. When carbon accu-
mulates on a spark plug, a strong spark
may not be produced. Remove carbon
deposits with a wire or pin and adjust the
spark plug gap.
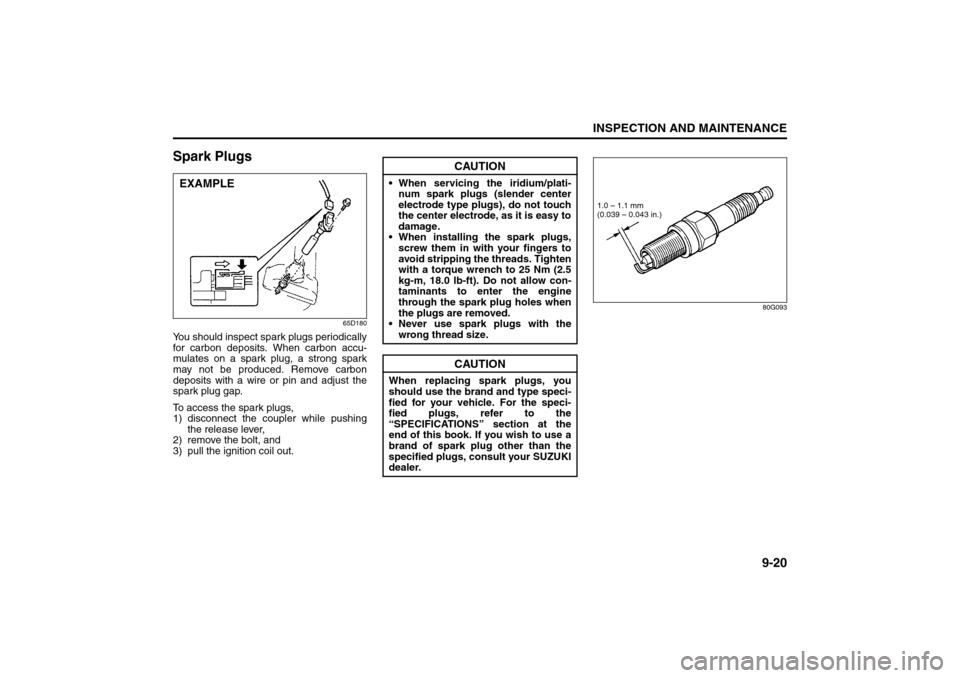
To access the spark plugs,
1) disconnect the coupler while pushing
the release lever,
2) remove the bolt, and
3) pull the ignition coil out.
80G093
EXAMPLE
CAUTION
When servicing the iridium/plati-
num spark plugs (slender center
electrode type plugs), do not touch
the center electrode, as it is easy to
damage.
When installing the spark plugs,
screw them in with your fingers to
avoid stripping the threads. Tighten
with a torque wrench to 25 Nm (2.5
kg-m, 18.0 lb-ft). Do not allow con-
taminants to enter the engine
through the spark plug holes when
the plugs are removed.
Never use spark plugs with the
wrong thread size.
CAUTION
When replacing spark plugs, you
should use the brand and type speci-
fied for your vehicle. For the speci-
fied plugs, refer to the
“SPECIFICATIONS” section at the
end of this book. If you wish to use a
brand of spark plug other than the
specified plugs, consult your SUZUKI
dealer.
1.0 – 1.1 mm
(0.039 – 0.043 in.)
Brakes: 6
Steering Wheel: 6
Page 210 of 278
9-21INSPECTION AND MAINTENANCE
80J21-03E
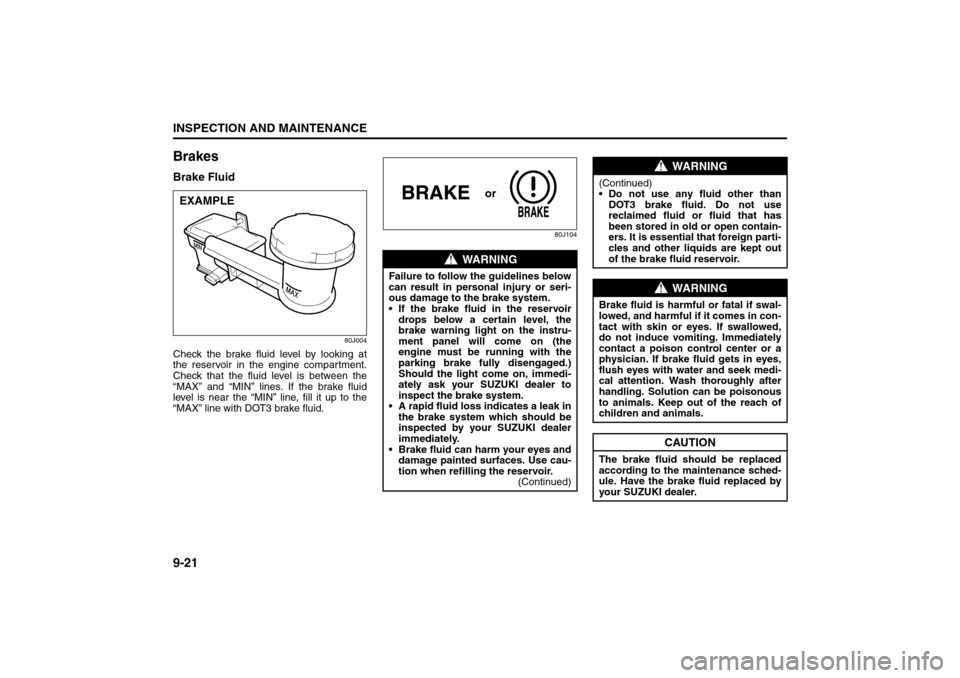
BrakesBrake Fluid
80J004
Check the brake fluid level by looking at
the reservoir in the engine compartment.
Check that the fluid level is between the
“MAX” and “MIN” lines. If the brake fluid
level is near the “MIN” line, fill it up to the
“MAX” line with DOT3 brake fluid.
80J104
EXAMPLE
WARNING
Failure to follow the guidelines below
can result in personal injury or seri-
ous damage to the brake system.
If the brake fluid in the reservoir
drops below a certain level, the
brake warning light on the instru-
ment panel will come on (the
engine must be running with the
parking brake fully disengaged.)
Should the light come on, immedi-
ately ask your SUZUKI dealer to
inspect the brake system.
A rapid fluid loss indicates a leak in
the brake system which should be
inspected by your SUZUKI dealer
immediately.
Brake fluid can harm your eyes and
damage painted surfaces. Use cau-
tion when refilling the reservoir.
(Continued)
or
WARNING
(Continued)
Do not use any fluid other than
DOT3 brake fluid. Do not use
reclaimed fluid or fluid that has
been stored in old or open contain-
ers. It is essential that foreign parti-
cles and other liquids are kept out
of the brake fluid reservoir.
WARNING
Brake fluid is harmful or fatal if swal-
lowed, and harmful if it comes in con-
tact with skin or eyes. If swallowed,
do not induce vomiting. Immediately
contact a poison control center or a
physician. If brake fluid gets in eyes,
flush eyes with water and seek medi-
cal attention. Wash thoroughly after
handling. Solution can be poisonous
to animals. Keep out of the reach of
children and animals.
CAUTION
The brake fluid should be replaced
according to the maintenance sched-
ule. Have the brake fluid replaced by
your SUZUKI dealer.
Clutch Pedal: 6
Tires: 6
Page 211 of 278
9-22
INSPECTION AND MAINTENANCE
80J21-03E
NOTE:
With disc brakes, the fluid level can be
expected to gradually fall as the brake
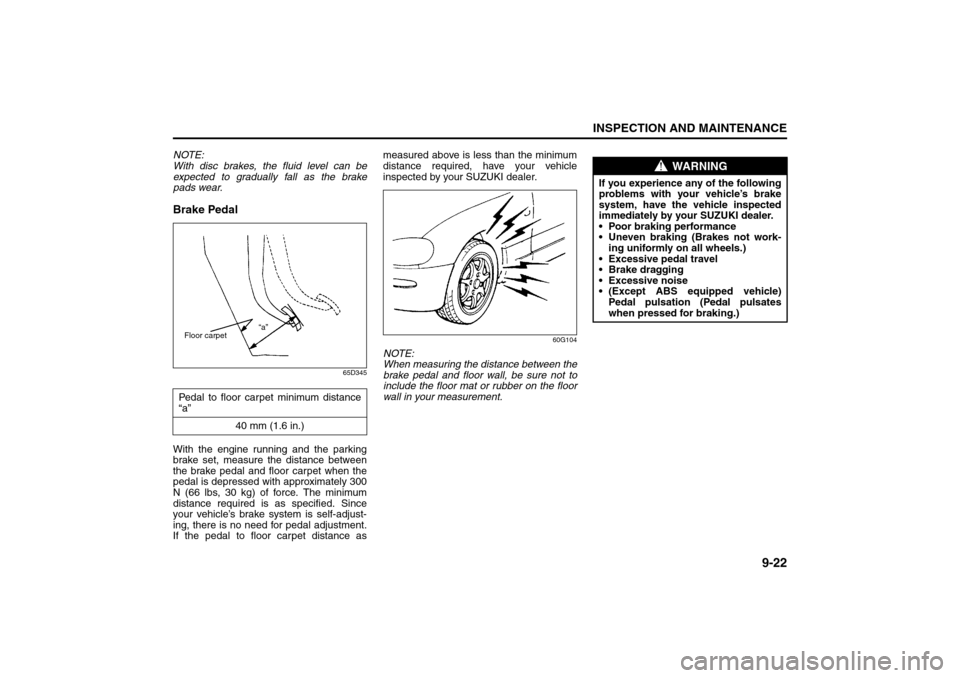
pads wear.Brake Pedal
65D345
With the engine running and the parking
brake set, measure the distance between
the brake pedal and floor carpet when the
pedal is depressed with approximately 300
N (66 lbs, 30 kg) of force. The minimum
distance required is as specified. Since
your vehicle’s brake system is self-adjust-
ing, there is no need for pedal adjustment.
If the pedal to floor carpet distance asmeasured above is less than the minimum
distance required, have your vehicle
inspected by your SUZUKI dealer.
60G104
NOTE:
When measuring the distance between the
brake pedal and floor wall, be sure not to
include the floor mat or rubber on the floor
wall in your measurement.
Pedal to floor carpet minimum distance
“a”
40 mm (1.6 in.)
“a”
Floor carpet
WARNING
If you experience any of the following
problems with your vehicle’s brake
system, have the vehicle inspected
immediately by your SUZUKI dealer.
Poor braking performance
Uneven braking (Brakes not work-
ing uniformly on all wheels.)
Excessive pedal travel
Brake dragging
Excessive noise
(Except ABS equipped vehicle)
Pedal pulsation (Pedal pulsates
when pressed for braking.)
Tires: 6