2008 SUZUKI GRAND VITARA steering
[x] Cancel search: steeringPage 73 of 290
3-12
STEERING COLUMN CONTROLS
66J22-03E
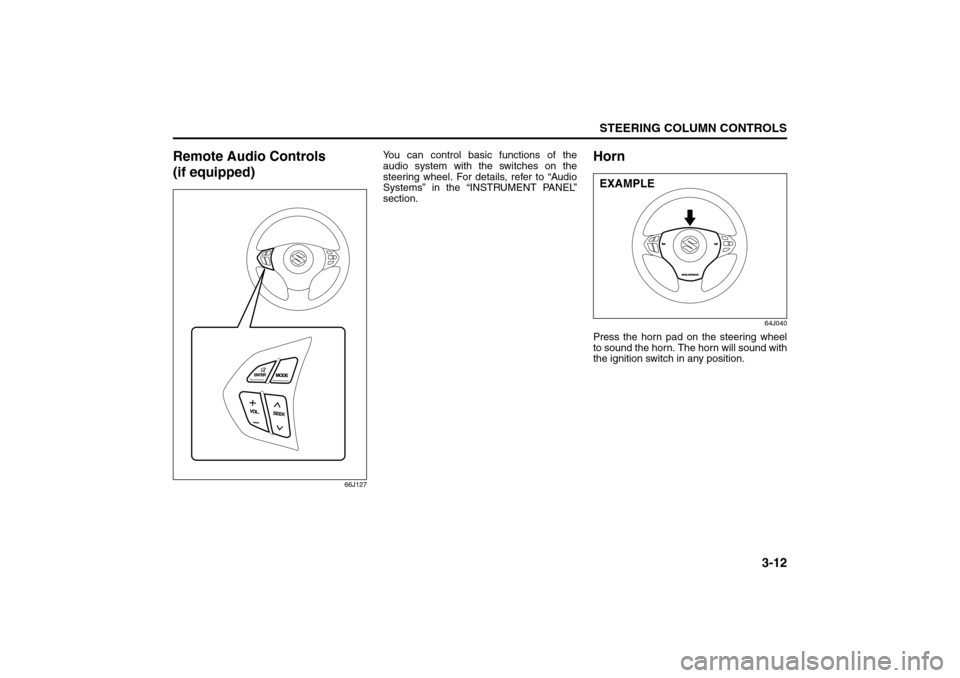
Remote Audio Controls
(if equipped)
66J127
You can control basic functions of the
audio system with the switches on the
steering wheel. For details, refer to “Audio
Systems” in the “INSTRUMENT PANEL”
section.
Horn
64J040
Press the horn pad on the steering wheel
to sound the horn. The horn will sound with
the ignition switch in any position.EXAMPLE
Remote Audio Controls:
Horn: 6
Page 74 of 290

3-13STEERING COLUMN CONTROLS
66J22-03E
MEMO
Page 79 of 290

4-4
INSTRUMENT PANEL
66J22-03E
inflation pressure as specified in the vehi-
cle placard and owner’s manual.
The low tire pressure warning light is also
used to inform you of a TPMS malfunction.
When the system detects a malfunction,
this light will flash for approximately one
minute and then remain continuously illu-
minated. This sequence will be repeated
approximately ten minutes after subse-
quent vehicle start-ups as long as the mal-
function exists.
NOTE:
The low tire pressure warning light may not
come on immediately if you have a sudden
loss of air pressure.
Refer to “Tire Pressure Monitoring System”
in the “OPERATING YOUR VEHICLE” sec-
tion for additional details on the tire pres-
sure monitoring system. Refer to “Tires” in
the “INSPECTION AND MAINTENANCE”
section for information on maintaining
proper tire pressure.
WARNING
If the low tire pressure warning light
does not come on when the ignition
is turned to the “ON” position, or
comes on and blinks while driving
there may be a problem with the tire
pressure monitoring system. Have
your vehicle inspected by an autho-
rized SUZUKI dealer. Even if the light
turns off after blinking, indicating
that the monitoring system has
recovered, make sure to have an
authorized SUZUKI dealer check the
system.
WARNING
The load rating of your tires is
reduced at lower inflation pressures.
If your tires become even moderately
under-inflated, the vehicle load may
exceed the load rating of the tires,
which can lead to tire failure. The low
tire pressure warning light will not
alert you of this condition. The warn-
ing light will only come on when one
or more of your tires become signifi-
cantly under-inflated. Check and
adjust your tire inflation pressure at
least once a month. Refer to “Tires”
in the “INSPECTION AND MAINTE-
NANCE” section.
WARNING
If the low tire pressure warning light
comes on and stays on, reduce your
speed and avoid abrupt steering and
braking. Stop in a safe place as soon
as possible and check your tires.
If you have a flat tire, replace it with
the spare tire. Refer to “Jacking
Instructions” in the “EMERGENCY
SERVICE” section. Refer to
“Replacing Tires and/or Wheels”
for instructions on how to restore
normal operation of the tire pres-
sure monitoring system after you
have had a flat tire.
(Continued)
WARNING
(Continued)
If one or more of your tires is
under-inflated, adjust the inflation
pressure in all of your tires to the
recommended inflation pressure as
soon as possible.
Be aware that driving on a signifi-
cantly under-inflated tire can cause
the tire to overheat and can lead to
tire failure, and may affect steering
control and brake effectiveness. This
could lead to an accident, resulting in
severe injury or death.
Warning and Indicator Lights: 8
Page 84 of 290

4-9INSTRUMENT PANEL
66J22-03E
Open Door Warning Light
54G391
This light remains on until all doors (includ-
ing the tailgate) are completely closed.“CRUISE” Indicator Light
(if equipped)
52D113
When the cruise control system is on, this
light will be on.
“SET” Indicator Light (if equipped)
65D474
When the vehicle’s speed is controlled by
the cruise control system, this light will be
on.Keyless Start System Indicator
Light (if equipped)
62J041
When you push the ignition switch for vehi-
cle with the keyless start system, this light
will come on in blue or red. If this light
comes on in blue, you can turn the ignition
switch without using an ignition key. If this
light comes on in red, you can not turn the
ignition switch without using an ignition
key. For details, refer to “Ignition Switch” in
the “STEERING COLUMN CONTROLS”
section.If this light blinks in red, it reminds you that
the remote controller is not in the vehicle.
For details, refer to “Keyless Start System
Remote Controller/Keyless Entry System
Transmitter” in the “BEFORE DRIVING”
section.
Turn Signal Indicators
50G055
When you turn on the left or right turn sig-
nals, the corresponding green arrow on the
instrument panel will flash along with the
respective turn signal lights.
When you turn on the hazard warning
switch, both arrows will flash along with all
of the turn signal lights.
Warning and Indicator Lights: 8
Page 102 of 290

4-27INSTRUMENT PANEL
66J22-03E
System Operating InstructionsAutomatic operation
66J242
You can let the climate control system work
automatically. To set the system for fully-
automatic operation, follow the procedure
below.
1) Set the desired temperature by turning
the temperature selector (1).
2) Push the “AUTO” switch (7).
The blower speed selector (2), air intake
selector (3), and air flow selector (4) are
controlled automatically to maintain the set
temperature.
You can use the air conditioning switch (8)
to manually turn the air conditioner on or
off according to your preference. When
you turn the air conditioning switch off, the
climate control system cannot lower theinside temperature below outside tempera-
ture.
To turn the climate control system off, push
the “OFF” switch (6).
NOTE:
If the “AUTO” on the LCD display blinks,
there is a problem in the heating system
and/or air conditioning system. You should
have the system inspected by an autho-
rized SUZUKI dealer.
NOTE:
To find the temperature at which you are
most comfortable, start with the 22°C
(72°F) setting.
If you turn the temperature selector (1)
until “HI” or “LO” appears on the LCD
display, the climate control system will
operate at the maximum cooling or heat-
ing and the blower will run at full speed.
To avoid blowing cold air in cold weather
or hot air in hot weather, the system will
delay turning on the blower until warmed
or chilled air is available.
If your vehicle has been left in the sun
with the windows closed, it will cool
faster if you open the windows briefly.
Even under the automatic operation, you
can set individual selectors to the man-
ual mode. The manually selected func-
tions are maintained, and the other
functions remain under automatic opera-
tion. To return the blower speed selector (2),
air intake selector (3), and air flow selec-
tor (4) to automatic operation, push the
“AUTO” switch.
64J080
Be careful not to cover the interior temper-
ature sensor (F) located between the
steering wheel and the climate control
panel, or the solar sensor (G) located at
the top of the driver’s side dashboard.
These sensors are used by the automatic
system to regulate temperature.
Manual operation
You can manually control the climate con-
trol system. Set the selectors to the
desired positions.
(7)
(6)
(F)
(G)
EXAMPLE
Heating and Air Conditioning System: 4
Page 124 of 290

4-49INSTRUMENT PANEL
66J22-03E
Remote Audio Controls
(if equipped)
64J041
You can control basic functions of the
audio system with the switches on the
steering wheel.To control the volume:
To increase the volume, push the upper
part of the switch (1). The volume contin-
ues to increase until you release the
switch.
To decrease the volume, push the lower
part of the switch (1). The volume contin-
ues to decrease until you release the
switch.
To mute, push the switch (2).
To select the mode (AM1, AM2, FM1, FM2,
XM (option), CD, External CD-changer
(option), AUX (option)), push the switch
(3).
You can also turn on the audio system by
pushing the switch (3).
To change the radio station:
To advance to the next preset station,
push the upper part of the switch (4)
briefly.
To select the previous preset station,
push the lower part of the switch (4)
briefly.
To scan to a higher frequency radio sta-
tion, push and hold the upper part of the
switch (4).
To scan to a lower frequency radio sta-
tion, push and hold the lower part of the
switch (4).To change the selection on a CD:
To advance to the next track on a CD,
push the upper part of the switch (4)
briefly.
To select the previous track on a CD,
push the lower part of the switch (4).
(1)(2)
(4)(3)
Audio Systems:
Page 161 of 290

6-2
OPERATING YOUR VEHICLE
66J22-03E
Daily Inspection ChecklistBefore Driving1) Make sure that windows, mirrors, lights
and reflectors are clean and unob-
structed.
2) Visually check the tires for the following
points:
– the depth of the tread groove
– abnormal wear, cracks and damage
– loose wheel nuts
– existence of foreign material such as
nails, stones, etc.
Refer to “Tires” in “INSPECTION AND
MAINTENANCE” section for details.
3) Look for fluid, oil leaks.
NOTE:
It is normal for water to drip from the air
conditioning system after use.
4) Make sure the hood is fully closed and
latched.
5) Check the headlights, turn signal lights,
brake lights and horn for proper opera-
tion.
6) Lock all doors.
7) Adjust the seat and adjustable head
restraints (if equipped).
8) Check the brake pedal and the parking
brake lever.
9) Adjust the mirrors.
10)Make sure that you and all passengers
have properly fastened your seat belts.11)Make sure that all warning lights come
on as the key is turned to the “ON” or
“START” position.
12)Check all gauges.
13)Make sure that the BRAKE SYSTEM
WARNING light turns off when the
parking brake is released.
Once a week, or each time you fill your fuel
tank, perform the following under-hood
checks:
1) Engine oil level
2) Coolant level
3) Brake fluid level
4) Power steering (if equipped) fluid level
5) Windshield washer fluid level
6) Hood latch operation
Pull the hood release handle inside the
vehicle. Make sure that you cannot
open the hood all the way without
releasing the secondary latch. Be sure
to close the hood securely after check-
ing for proper latch operation. See the
item “All Latches, Hinges and Locks” of
“CHASSIS AND BODY” in the “Periodic
Maintenance Schedule” in the
“INSPECTION AND MAINTENANCE”
section for lubrication schedule.
Starting the EngineBefore Starting the Engine1) Make sure the parking brake is set fully.
2) Manual Transmission – Shift into “N”
(Neutral) and depress the clutch pedal
all the way to the floor.
Hold it while starting the engine.
Automatic Transmission – If the gear-
shift lever is not in “P” (Park) position,
shift into “P”. (If you need to re-start the
engine while the vehicle is moving, shift
into “N”.)
NOTE:
The engine of manual transmission vehicle
will not start unless the clutch pedal is
depressed.
NOTE:
Automatic transmission vehicles have a
starter interlock device which is designed
to keep the starter from operating if the
transmission is in any of the drive posi-
tions.
WARNING
Make sure the hood is fully closed
and latched before driving. If it is not,
it can fly up unexpectedly during
driving, obstructing your view and
resulting in an accident.
WARNING
Make sure that the parking brake is
set fully and the transmission is in
Neutral (or Park for vehicles with an
automatic transmission) before
attempting to start the engine.
Daily Inspection Checklist: NO
Starting the Engine: 1
Page 175 of 290

6-16
OPERATING YOUR VEHICLE
66J22-03E
Power Assisted BrakesYour vehicle has power assisted brakes. If
power assistance is lost due to a stalled
engine or other failures, the system is still
fully operational on reserve power and you
can bring the vehicle to a complete stop by
pressing the brake pedal once and holding
it down. The reserve power is partly used
up when you depress the brake pedal and
reduces each time the pedal is pressed.
Apply smooth and even pressure to the
pedal. Do not pump the pedal.
Brake Assist SystemWhen you slam the brakes on, the brake
assist system judges as an emergency
stop and provides more powerful braking
for a driver who cannot hold down the
brake pedal firmly.
NOTE:
If you depress the brakes forcefully, you
may hear a clicking sound in the brake
pedal. This is normal and indicates that the
brake assist system is activated properly.
Anti-Lock Brake System (ABS)ABS will help you avoid skidding by elec-
tronically controlling braking pressure. It
will also help you maintain steering control
when braking on slippery surfaces or when
braking hard.
The ABS works automatically, so you do
not need any special braking technique.
Just push the brake pedal down without
pumping. The ABS will operate whenever it
senses that the wheels are locking up.
You may feel the brake pedal pulsate while
the ABS is operating.
NOTE:
The ABS will not work if vehicle speed is
under 5 – 6 km/h (3 – 4 mph).
WARNING
If water gets into the brake drums,
brake performance may become poor
and unpredictable. After driving
through water or washing the under-
side of the vehicle, test the brakes
while driving at a slow speed to see if
they have maintained their normal
effectiveness. If the brakes are less
effective than normal, dry them by
repeatedly applying the brakes while
driving slowly until the brakes have
regained their normal effectiveness.
WARNING
Even without reserve power in the
brake system, you can still stop the
vehicle by pressing the brake pedal
harder than normally required. How-
ever, the stopping distance may be
longer.
Using the Transfer Switch: 10
Braking: 6