Page 351 of 444

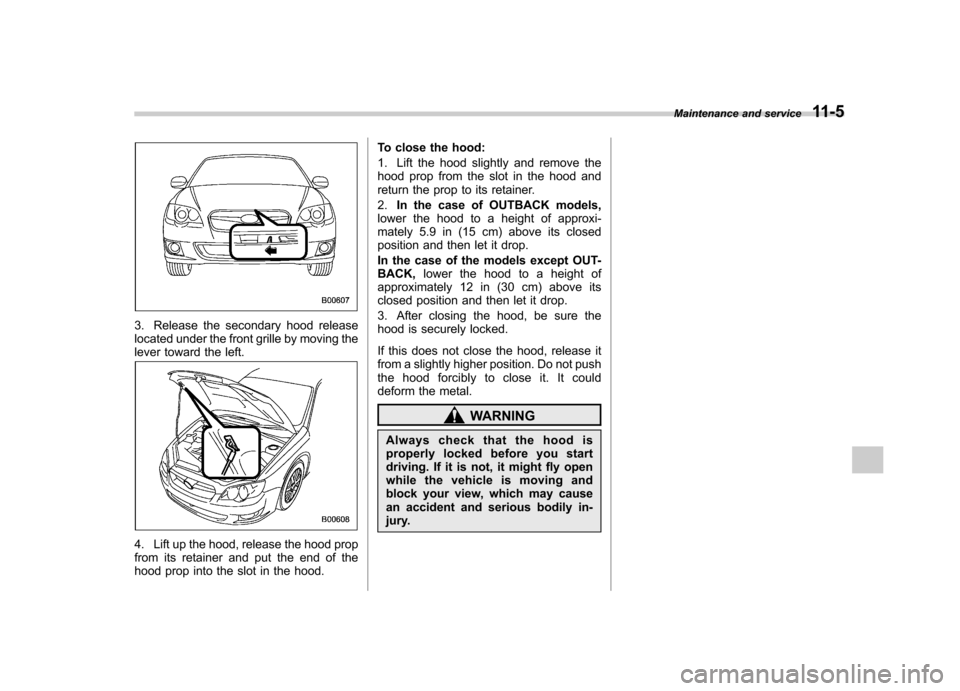
3. Release the secondary hood release
located under the front grille by moving the
lever toward the left.
4. Lift up the hood, release the hood prop
from its retainer and put the end of the
hood prop into the slot in the hood.To close the hood:
1. Lift the hood slightly and remove the
hood prop from the slot in the hood and
return the prop to its retainer. 2.
In the case of OUTBACK models,
lower the hood to a height of approxi-
mately 5.9 in (15 cm) above its closed
position and then let it drop.
In the case of the models except OUT- BACK, lower the hood to a height of
approximately 12 in (30 cm) above its
closed position and then let it drop.
3. After closing the hood, be sure the
hood is securely locked.
If this does not close the hood, release it
from a slightly higher position. Do not push
the hood forcibly to close it. It could
deform the metal.
WARNING
Always check that the hood is
properly locked before you start
driving. If it is not, it might fly open
while the vehicle is moving and
block your view, which may cause
an accident and serious bodily in-
jury. Maintenance and service
11-5
Page 357 of 444
3.0-liter models
4. Drain out the engine oil by removing
the drain plug while the engine is still
warm. The used oil should be drained into
an appropriate container and disposed of
properly.
WARNING
Be careful not to burn yourself with
hot engine oil.
5. Wipe the seating surface of the drain
plug with a clean cloth and tighten it
securely with a new sealing washer after
the oil has completely drained out.
2.5-liter models
3.0-liter models
6. Open the access cover by removing
the clips and turning the access cover
counterclockwise. The oil filter will beexposed.
2.5-liter models
3.0-liter models
7. Remove the oil filter with an oil filter wrench.
8. Before installing a new oil filter, apply a
thin coat of engine oil to the seal. Maintenance and service
11-11
– CONTINUED –
Page 362 of 444

11-16Maintenance and service
2. Place a proper container under the
drain plug and loosen the drain plug.
3. Loosen the radiator cap to drain the
coolant from the radiator. Then drain the
coolant from the reserve tank. Tighten the
drain plug securely.
WARNING
Never attempt to remove the radia-
tor cap until the engine has been
shut off and has cooled down
completely. Since the coolant is
under pressure, you may suffer
serious burns from a spray of boil-
ing hot coolant when the cap is removed.
4. Install the under cover.
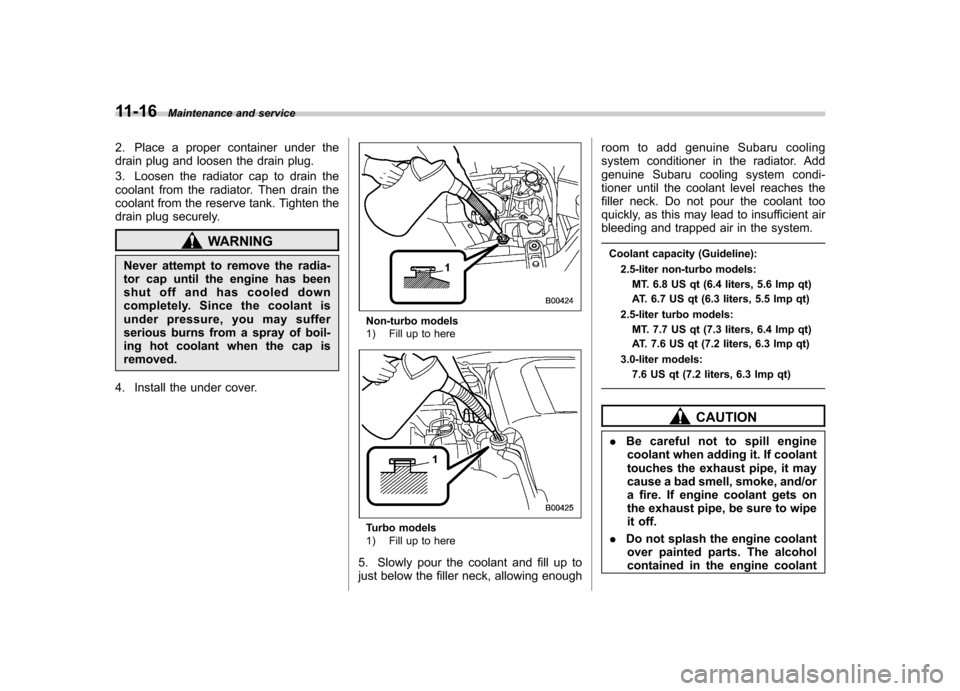
Non-turbo models
1) Fill up to here
Turbo models
1) Fill up to here
5. Slowly pour the coolant and fill up to
just below the filler neck, allowing enough room to add genuine Subaru cooling
system conditioner in the radiator. Add
genuine Subaru cooling system condi-
tioner until the coolant level reaches the
filler neck. Do not pour the coolant too
quickly, as this may lead to insufficient air
bleeding and trapped air in the system.
Coolant capacity (Guideline): 2.5-liter non-turbo models:MT. 6.8 US qt (6.4 liters, 5.6 Imp qt)
AT. 6.7 US qt (6.3 liters, 5.5 Imp qt)
2.5-liter turbo models: MT. 7.7 US qt (7.3 liters, 6.4 Imp qt)
AT. 7.6 US qt (7.2 liters, 6.3 Imp qt)
3.0-liter models: 7.6 US qt (7.2 liters, 6.3 Imp qt)
CAUTION
. Be careful not to spill engine
coolant when adding it. If coolant
touches the exhaust pipe, it may
cause a bad smell, smoke, and/or
a fire. If engine coolant gets on
the exhaust pipe, be sure to wipe
it off.
. Do not splash the engine coolant
over painted parts. The alcohol
contained in the engine coolant
Page 392 of 444
11-46Maintenance and service
2. Pull the blade rubber assembly out of
the plastic support.
1) Metal spines
3. If the new blade rubber is not provided
with two metal spines, remove the metal
spines from the old blade rubber and
install them in the new blade rubber.
4. Align the claws of the plastic support
with the grooves in the blade rubber
assembly, then slide the blade rubber
assembly into place.
Securely retain both ends of the rubber
with the stoppers on the plastic support ends. If the rubber is not retained properly,
the wiper may scratch the rear windowglass.
5. Install the wiper blade assembly to the
wiper arm. Make sure that it locks in place.
6. Hold the wiper arm by hand and slowly
lower it in position.
Page 399 of 444
!Low beam light bulbs
Right-hand side
1. Use a screwdriver to undo the clips on
the air intake duct, then remove the air
intake duct. (right-hand side)
Left-hand side 2. Use a screwdriver to remove the
secured clip of the washer tank. To make
it easy to access the bulb, move the
washer tank to the horizontal direction.
(left-hand side)
3. Remove the bulb cover, by turning it counterclockwise.
4. Disconnect the electrical connector.
5. Remove the retainer spring.
6. Replace the bulb, then set the retainer
spring securely.
7. Reconnect the electrical connector.
8. Install the bulb cover.
9. Install the air intake duct with clips.
(right-hand side)
10. Set the washer tank to the original
place and secure it by clip. (left-hand side)
Maintenance and service
11-53
– CONTINUED –
Page 400 of 444

11-54Maintenance and service
! High beam light bulbs
Right-hand side
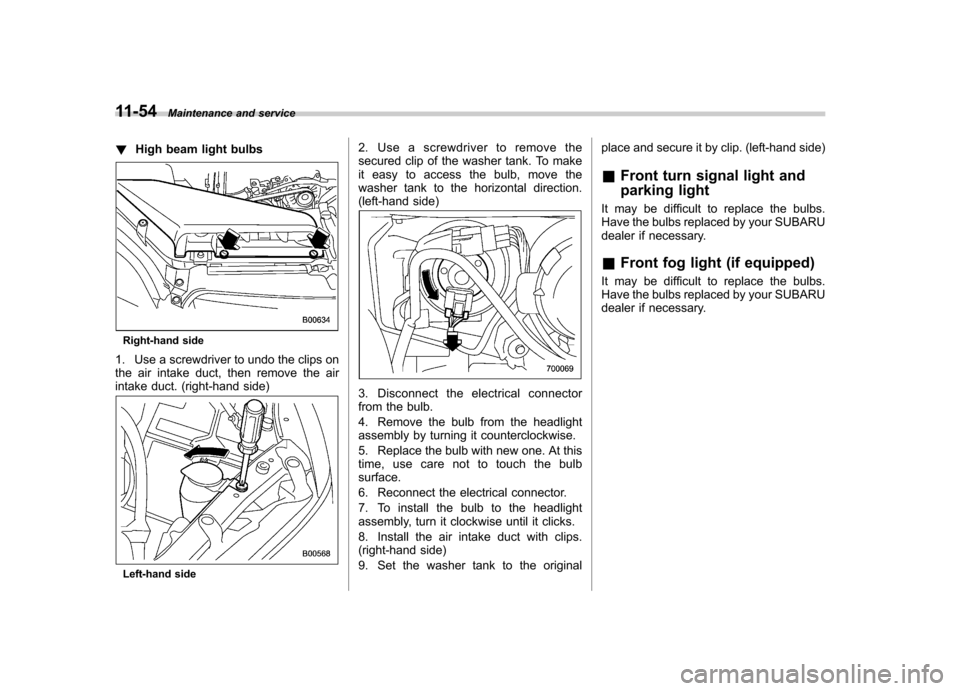
1. Use a screwdriver to undo the clips on
the air intake duct, then remove the air
intake duct. (right-hand side)
Left-hand side 2. Use a screwdriver to remove the
secured clip of the washer tank. To make
it easy to access the bulb, move the
washer tank to the horizontal direction.
(left-hand side)
3. Disconnect the electrical connector
from the bulb.
4. Remove the bulb from the headlight
assembly by turning it counterclockwise.
5. Replace the bulb with new one. At this
time, use care not to touch the bulbsurface.
6. Reconnect the electrical connector.
7. To install the bulb to the headlight
assembly, turn it clockwise until it clicks.
8. Install the air intake duct with clips.
(right-hand side)
9. Set the washer tank to the original
place and secure it by clip. (left-hand side) &
Front turn signal light and
parking light
It may be difficult to replace the bulbs.
Have the bulbs replaced by your SUBARU
dealer if necessary. & Front fog light (if equipped)
It may be difficult to replace the bulbs.
Have the bulbs replaced by your SUBARU
dealer if necessary.
Page 401 of 444
&Rear combination lights
! Sedan
1. Push the knobs of the cover to open
the cover.
1) Rear turn signal light
2) Back-up light
3) Brake/tail and rear side marker light
2. Remove the bulb holder from the rear
combination light assembly by turning itcounterclockwise.
3. Pull the bulb out of the bulb holder and
replace it with a new one.
4. Set the bulb holder into the rear
combination light assembly and turn it
clockwise until it locks.
5. Securely lock the cover against the
trunk trim. !
Station wagon
1. Using a Phillips screwdriver, remove
the upper and lower screws.
Maintenance and service 11-55
– CONTINUED –
Page 403 of 444
8. Reinstall the rear combination light
assembly by sliding the two-pronged part
of the combination light assembly securely
to each holder of the vehicle side.
9. Tighten the upper and lower screws.
10. Reinstall the side cover.&
Back-up light (Station wagon)
1. Apply a flat-head screwdriver to the
corner of the light cover as shown in the
illustration, and pry the light cover off from
the rear gate trim.
2. Turn the bulb socket counterclockwise and remove it.
3. Pull the bulb out of the bulb socket and
replace it with a new one.
4. Install the bulb socket by turning it
clockwise. Install the light cover on the
rear gate. &
License plate light
! Sedan
It may be difficult to replace the bulbs.
Have the bulbs replaced by your SUBARU
dealer if necessary. Maintenance and service
11-57
– CONTINUED –