Page 338 of 444
9-18In case of emergency
towed.
4. Take up slack in the towline slowly to
prevent damage to the vehicle. Rear gate (Station wagon)
–if
the rear gate cannot be un- locked
In the event that you cannot unlock the
rear gate by operating the power door
locking switches or the remote keyless
entry system, you can unlock it from inside
the cargo area.
1. Remove the access cover at the
bottom-center of the rear gate trim using
flat-head screwdriver.
2. Locate the rear gate lock release lever
behind the rear gate trim panel.
3. Unlock the rear gate by pressing the
lever inside the trim downward.
4. Open the rear gate from outside by
raising the rear gate handle.
Page 339 of 444
Maintenance tools &Jack
A jack and other maintenance tools are
stored in the tool bucket in the center of
the spare tire located in the trunk or in the
cargo area.
Sedan: To take out the jack and main-
tenance tools, open the floor cover and
remove the bucket from the center of the
spare tire. Then, take the jack out of thebucket.
Station wagon: To take out the jack and
maintenance tools, open the center lid and
remove the bucket from the center of the
spare tire. Then, take the jack out of thebucket. & Jack handle
The jack handle is stowed on the back of
the floor cover of the trunk or on the back
of the center lid of the cargo area.Sedan: Open the floor cover and remove
the jack handle from the back of the floor
cover.
Station wagon: Open the center lid,
remove the left-hand part of the lid, and
take out the jack handle. In case of emergency
9-19
– CONTINUED –
Page 340 of 444
9-20In case of emergency
For how to use the jack, refer to “Flat
tires ”.
& Other maintenance tools
In addition to a jack and a jack handle, the
tool bucket on your vehicle contains the
following maintenance tools.
Screwdriver
Towing hook
Wheel nut wrench
Page 351 of 444

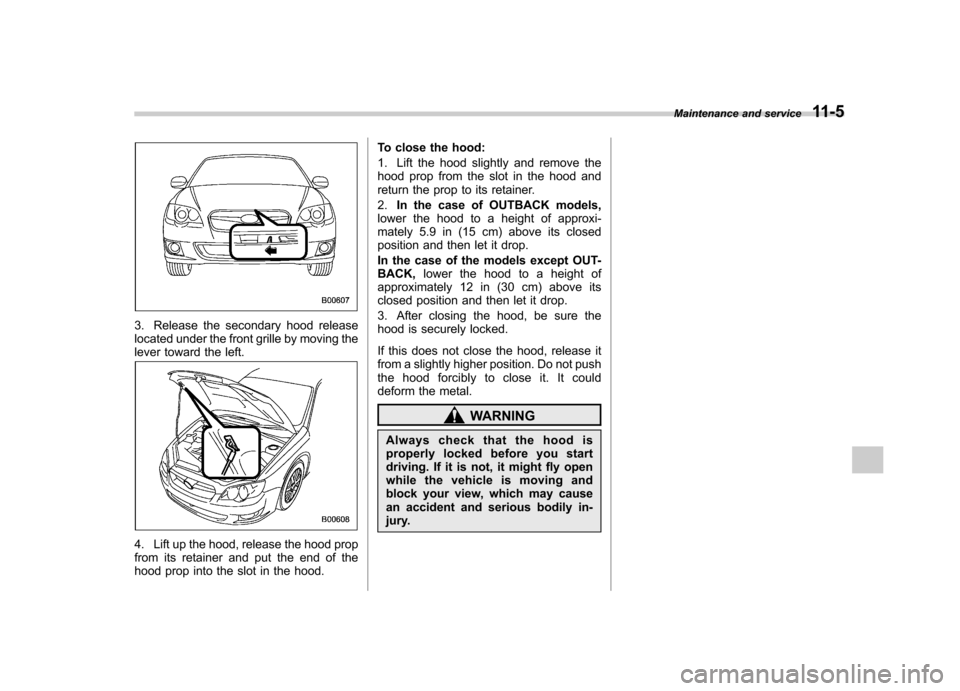
3. Release the secondary hood release
located under the front grille by moving the
lever toward the left.
4. Lift up the hood, release the hood prop
from its retainer and put the end of the
hood prop into the slot in the hood.To close the hood:
1. Lift the hood slightly and remove the
hood prop from the slot in the hood and
return the prop to its retainer. 2.
In the case of OUTBACK models,
lower the hood to a height of approxi-
mately 5.9 in (15 cm) above its closed
position and then let it drop.
In the case of the models except OUT- BACK, lower the hood to a height of
approximately 12 in (30 cm) above its
closed position and then let it drop.
3. After closing the hood, be sure the
hood is securely locked.
If this does not close the hood, release it
from a slightly higher position. Do not push
the hood forcibly to close it. It could
deform the metal.
WARNING
Always check that the hood is
properly locked before you start
driving. If it is not, it might fly open
while the vehicle is moving and
block your view, which may cause
an accident and serious bodily in-
jury. Maintenance and service
11-5
Page 359 of 444

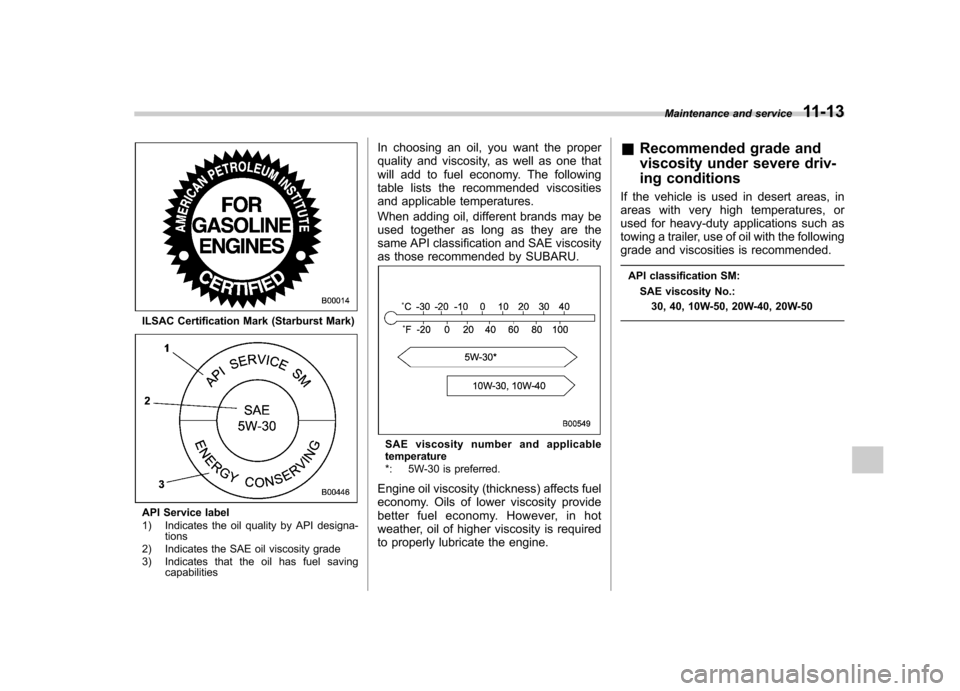
ILSAC Certification Mark (Starburst Mark)
API Service label
1) Indicates the oil quality by API designa-tions
2) Indicates the SAE oil viscosity grade
3) Indicates that the oil has fuel saving capabilities In choosing an oil, you want the proper
quality and viscosity, as well as one that
will add to fuel economy. The following
table lists the recommended viscosities
and applicable temperatures.
When adding oil, different brands may be
used together as long as they are the
same API classification and SAE viscosity
as those recommended by SUBARU.
SAE viscosity number and applicable
temperature
*: 5W-30 is preferred.
Engine oil viscosity (thickness) affects fuel
economy. Oils of lower viscosity provide
better fuel economy. However, in hot
weather, oil of higher viscosity is required
to properly lubricate the engine. &
Recommended grade and
viscosity under severe driv-
ing conditions
If the vehicle is used in desert areas, in
areas with very high temperatures, or
used for heavy-duty applications such as
towing a trailer, use of oil with the following
grade and viscosities is recommended.
API classification SM: SAE viscosity No.:30, 40, 10W-50, 20W-40, 20W-50 Maintenance and service
11-13
Page 391 of 444
&Rear window wiper blade assembly
1. Raise the wiper arm off the rear
window.
2. Turn the wiper blade assembly coun- terclockwise.
3. Pull the wiper blade assembly toward
you to remove it from the wiper arm. &
Rear window wiper blade rubber
1. Pull out the end of the blade rubber
assembly to unlock it from the plasticsupport.
Maintenance and service 11-45
– CONTINUED –
Page 394 of 444
11-48Maintenance and service
Fuses
CAUTION
Never replace a fuse with one hav-
ing a higher rating or with material
other than a fuse because serious
damage or a fire could result.
The fuses are designed to melt during an
overload to prevent damage to the wiring
harness and electrical equipment. The
fuses are located in two fuse boxes. One
is located under the instrument panel
behind the fuse box cover on the driver ’s
seat side.
Open the lid that is located above the
hood release knob and pull it toward you
to remove it.
The other one is housed in the engine compartment.
The spare fuses are stored in the main
fuse box cover in the engine compart-ment.
The fuse puller is stored in the main fuse
box in the engine compartment.
Page 411 of 444
&Tires
Tire size P205/55R16
89H P225/60R16
97H P205/50R17
88V 215/45R17
91W P225/55R17
95V 215/45R18
89Y P215/45R18
89W
Wheel size 16 66.5JJ 17 67JJ 18 67JJ
Pressure Front 32 psi
(220 kPa,
2.2 kgf/cm
2) 32 psi
(220 kPa,
2.2 kgf/cm2) 33 psi
(230 kPa,
2.3 kgf/cm2) 35 psi
(240 kPa,
2.4 kgf/cm2) 32 psi
(220 kPa,
2.2 kgf/cm2) 33 psi
(230 kPa,
2.3 kgf/cm2)
Rear 30 psi
(210 kPa,
2.1 kgf/cm
2) 30 psi
(210 kPa,
2.1 kgf/cm2) 32 psi
(220 kPa,
2.2 kgf/cm2) 33 psi
(230 kPa,
2.3 kgf/cm2) 30 psi
(210 kPa,
2.1 kgf/cm2) 32 psi
(220 kPa,
2.2 kgf/cm2)
Rear at
trailer tow- ing –
32 psi
(220 kPa,
2.2 kgf/cm
2) –
32 psi
(220 kPa,
2.2 kgf/cm2) –
Temporary
spare tire Size T135/80R16 T155/70D17 T135/80R16 T135/70D17 T155/70D17 T155/70D17 Pressure
60 psi (420 kPa, 4.2 kgf/cm
2)
& Wheel alignment
Item Legacy OUTBACK
Sedan Station wagon Station wagon
Toe Front 0 in (0 mm)
Rear 0 in (0 mm)
Camber Front �0815 ’ 0840 ’
Rear �0840 ’ �0830 ’ �
0810 ’Specifications
12-5