2008 SKODA OCTAVIA radio
[x] Cancel search: radioPage 63 of 304

Lights and Visibility
62
sensor, the Coming Home Func tion is not switched on after switching off the igni-
tion.
Note
•If the Coming Home Function is switch ed on constantly, the battery will be
heavily discharged particularly in short-haul traffic.
•The switching on of the described lights should only be undertaken in accord-
ance with the legal requirements.
•You can change the illumination period for the Coming Home Function by
means of the information display*.
Leaving Home Function
This function makes it possible to switch on the lights when approaching
the vehicle.
Switching on Leaving Home Function
– Unlock the vehicle with the radio remote control - the lights come on.
Depending on equipment fitted the function Leaving Home switches on the
following lights:
•Parking lights,
•Low beam,
•Entry lighting in the exterior mirrors,
•Licence plate light.
Leaving Home Function
The function Leaving Home is controlled wi th the light sensor in the mount of the
interior rear mirror. If the light intensity is higher than the set value of the light
sensor, the Leaving Home Func tion is not switched on after unlocking the vehicle
with the radio remote control. After unlocking the vehicle with the radio remote control, the lights come on for 10
seconds. The Leaving Home Function is also switched off after the ignition is
switched on and after locking the vehicle.
If no door is opened within 30 seconds, th
e lights go out and the vehicle is locked
automatically.
Note
•If the Leaving Home Function is switch ed on constantly, the battery will be
heavily discharged particularly in short-haul traffic.
•The switching on of the described lights should only be undertaken in accord-
ance with the legal requirements.
•You can change the illumination period for the Leaving Home Function by
means of the information display*.
Fog lights*
Switching on the fog lights
– First of all turn the light switch into position
or ⇒ fig. 58 .
– Pull the light switch into position .
Fig. 58 Dash panel: Light
switch
A1
20A5Facelift.book Page 62 Saturday, September 6, 2008 2:13 PM
Page 80 of 304

Seats and Stowage79
Using the systemSafetyDriving TipsGeneral MaintenanceBreakdown assistanceTechnical Data
– Engage reverse gear.
– Move the right exterior mirror into the desired position ⇒page 73.
– Take the vehicle out of gear. The set position of the exterior mirror is stored.
Memory buttons
Memory for the seat offers the possibility to store the individual driver seat and
external mirror position. An individual posi tion can be allocated to each of the three
memory buttons ⇒page 78, fig. 78 , that is three in tota l. After pressing the
corresponding memory button , the seat and the exterior mirror are automati-
cally moved into the positions which have been allocated to this button ⇒page 79.
Emergency Off
You can interrupt the setting operation at any time, if you operate any button of the
driver seat.
Note
•When storing settings with the memory buttons, we recommend that you begin
with the front button and assign a memo ry button to each additional driver.
•Each new setting stored with the same button erases the previous setting.
•Each time you store the seat and exterior mirror settings for driving forward you
also have to re-store the individual setting of the exterior mirror on the passenger
side for reversing.
Assigning remote control to the memory buttons
After storing the settings of the seat and exterior mirrors, you have 10
seconds in order to assign the remote control to the appropriate memory
button.
– Withdraw the ignition key.
– Press the button for unlocking the vehicle ⇒page 50. The setting is
stored with the memory button which you have selected.
If you wish to be able to retrieve the settings which are stored in the memory by also
using the remote control, you have to assign the remote control to a memory
button in each case.
If you wish, you can obtain an additional key with radio remote control from a
Škoda dealer and then assign the radio re mote control to another memory button.
Note
•If the remote control had previously been assigned to another memory button,
this setting is then erased by the new assignment.
•If you assign the remote control to a memory button which has already been
assigned to a remote control, the old assi gnment is also replaced by a new assign-
ment in this case.
•The assignment of the remote control to a memory button is retained, however,
after reassigning the seats and exterior mirrors.
Retrieving settings of the seat and mirrors
You can retrieve the stored settings either with the memory buttons
or with the remote control*.
Retrieving settings with memory buttons
– In order to retrieve the stored setting, you have two possibilities:
– One-touch automatic memory: Briefly press the desired memory
button ⇒page 78, fig. 78 . The seat and exterior mirror are moved
automatically into the stored position s (this applies only if the ignition
is switched on and the speed is less than 5 km/h).
– Memory keying : Press and hold the desired memory button
pressed long enough until the seat and the exterior mirror are moved
into the stored positions.
ABAB
AB
AB
20A5Facelift.book Page 79 Saturday, September 6, 2008 2:13 PM
Page 117 of 304
Heating and air conditioning system
116
WARNING
•For your own safety and that of other road users, ensure that all the
windows are free of ice, snow and mistin g. Please familiarize yourself about
how to correctly operate th e heating and ventilation systems, how to demist
and defrost the windows, as well as with the cooling mode.
•You should not leave recirculated air mode on over a longer period of
time, as “stale” air may result in fatigue in the driver and occupants, divert
your attention and also cause the windows to mist up. The risk of having an
accident increases. Switch recirculated air mode off as soon as the windows
begin misting up.
Note
•If the cooling system has not been switched on for a lengthy period, odours may
be produced at the evaporator because of deposits. Switch the cooling system on
at least once a month for approximately 5 mi nutes at the highest blower stage - also
during the cold season of the year - in order to remove such odours. Also open a
window for a short time.
•We recommend that you do not smoke in the vehicle when the recirculating air
mode is operating since the smoke which is drawn at the evaporator from the inte-
rior of the vehicle forms deposits in the evaporator of the air conditioning system.
This produces a permanent odour when the air conditioning system is operating
which can only be eliminated through co nsiderable effort and expense (replace-
ment of compressor).
•The used air streams out through the air removal openings in the luggage
compartment.
•On vehicles equipped with a factory-fitted radio* or navigation*, the informa-
tion of the Climatronic is also shown on the display. You can switch off this function
for the Radio* - see operating instructions for radio. This function cannot be
switched off during Navigation*.
•Using the cooling economically ⇒page 114.
•Operational problems ⇒page 115.
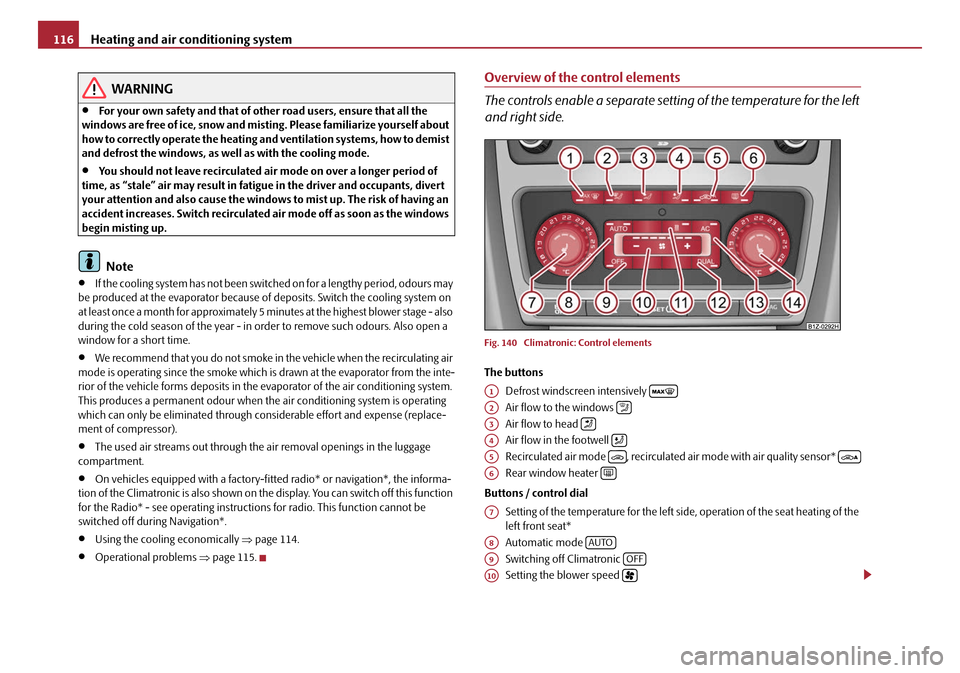
Overview of the control elements
The controls enable a separate setting of the temperature for the left
and right side.
Fig. 140 Climatronic: Control elements
The buttons
Defrost windscreen intensively
Air flow to the windows
Air flow to head
Air flow in the footwell
Recirculated air mode , recirculated air mode with air quality sensor*
Rear window heater
Buttons / control dial Setting of the temperature for the left side, operation of the seat heating of the
left front seat*
Automatic mode
Switching off Climatronic
Setting the blower speed
A1
A2
A3
A4
A5
A6
A7
A8AUTO
A9OFF
A10
20A5Facelift.book Page 116 Saturday, September 6, 2008 2:13 PM
Page 122 of 304

Heating and air conditioning system121
Using the systemSafetyDriving TipsGeneral MaintenanceBreakdown assistanceTechnical Data
– Return to a higher level by selecting the menu point Back, i. e. in the
menu Aux. Heating (auxiliary heating) .
– In the menu Aux. Heating (auxiliary heating) select the menu point
Running time and set the desired operating period in steps of
1 minute. The operating period can be 5 to 60 minutes.
– By selecting the menu point Back, you will reach in the menu
Aux. Heating (auxiliary heating) .
– In the menu Aux. heating (auxiliary heating) select the menu point
Mode .
– In the menu Mode select the desired mode Heating or Ventilation .
Programming
For the programming of the auxiliary heating (auxiliary heating and ventilation) in
the menu Aux. heating (Aux. heating) there are three pre-set times:
•Pre-set time 1
•Pre-set time 2
•Pre-set time 3
In each pre-set time, the day (if necessary each day = daily) and the time (hour and
minute) can be set for the operating period of the auxiliary heating and/or ventila-
tion.
If you leave the pre-set menu by selecting the menu Back or do not operate the
display for longer than 10°seconds, the set values are stored, but the pre-set time is
not active.
Both other pre-set times can be prog rammed and stored in the same way.
If you select the menu Activate after setting the desired values, appears on the
display Pre-set time (weekday, hours, minute) activated! and the set pre-set
time is active.
Only one programmed pre-set time can be active.
The last programmed pre-set time remains active. Changing the active pre-set time is carried out after selecting the menu point
Activate
in the menu Aux. heating (auxiliary heating) by selecting a pre-set time.
The prerequisite for the correct switching on of the auxiliary heating (auxiliary
heating and ventilation) according to th e programmed pre-set time is the correct
setting of the current time and the weekday ⇒ page 120.
If the system is running, a warning light in the button for direct switching on/off of
the auxiliary heating lights up.
The running system deactivates after expiration of the operating period or is deac-
tivated earlier by pres sing the button for direct switching on/off of the auxiliary
heating ⇒page 123.
The random pre-set time can be deactivated by selecting the menu point Deactive
in the menu Activate.
After selecting the menu point Fa c t o r y s e t t i n g in the menu Aux. heating
(auxiliary heating) , it is possible to change to the factory setting.
Radio remote control
The auxiliary heating (auxiliary heating and ventilation) can be
switched on or off with the remote control.
– For switching on, press the button .
– For switching off, press the button .
Fig. 142 Auxiliary heating:
Radio remote control
ON
OFF
20A5Facelift.book Page 121 Saturday, September 6, 2008 2:13 PM
Page 123 of 304

Heating and air conditioning system
122
The transmitter and the battery are housed in the housing of the remote control.
The receiver is located in the interior of the car.
If the battery is properly charged, the ef fective range is up to 600 m. For switching
on or off the auxiliary heating, hold the remote control vertically with the antenna
⇒ page 121, fig. 142 towards the top. You must not cover over the antenna with
the fingers or the palm of the hand. Obstacles between the remote control and the
vehicle, bad weather conditio ns and a weaker battery can clearly reduce the range.
The auxiliary heating can only be switched on or off with the remote control, if the
distance between the remote control and the vehicle is at least 2 m.
Warning light in the remote control
The warning light in the remote control ⇒page 121, fig. 142 indicates after a
keystroke if the remote control signal was received by the auxiliary heating and if
the battery is adequately charged.Caution
There are electronic components in the remote control, protect the remote control
against water, severe shoc ks and direct sun rays.
Changing the battery of the radio remote control
If the warning light of the remote control indicates a weak or discharged
battery, ⇒page 121, fig. 142 , it must be replaced. The battery is located
under a cover on the back of the remote control.
– Place a coin into the gap of the battry cover and by turning to the left, unlock the cover.
– Change the battery, insert the cover and lock it by turning to the right.
For the sake of the environment
Dispose of an old battery in accord ance with environmental regulations.
Note
•Pay attention to the correct polarity when changing the battery.
•The replacement battery must have the same specification as the original
battery.
Display warning lightImportance
Lights up green for 2 seconds.The auxiliary heating was switched on.
Lights up red for 2 seconds.The auxiliary heating was switched off.
Slowly flashes green for 2 seconds.The ignition signal was not received.
Quickly flashes green for 2 seconds.The auxiliary heating is blocked, e. g
because the tank is nearly empty or
there is a fault in the auxiliary heating.
Flashes red for 2 seconds.The switch off signal was not received.
Lights up orange for 2 seconds, then
green or red.The battery is weak, however the
switching on or off signal was received.
Lights up orange for 2 seconds, then
flashes green or red.The battery is weak, however the
switching on or off signal was not
received.
Flashes orange for 5 seconds.The battery is discharged, however the
switching on or off signal was not
received.
AA
20A5Facelift.book Page 122 Saturday, September 6, 2008 2:13 PM
Page 130 of 304

Starting-off and Driving129
Using the systemSafetyDriving TipsGeneral MaintenanceBreakdown assistanceTechnical Data
Rear parking aid*
The parking aid provides a warning of obstacles behind the vehicle.
The audible parking aid determines the distance between the rear bumper and an
obstacle located behind the vehicle with the aid of ultrasound sensors. The tones
of the parking aid can be adapted in the menu of the information display*
⇒ page 30. The sensors are integrated in the rear bumper.
Range of sensors
The clearance warning begins at a distance of about 160 cm from the obstacle (area
⇒ fig. 149 ). The interval between the warning signals becomes shorter as the
clearance is reduced.
A continuous tone sounds from a clearanc e of just 30 cm (Bereich ) - danger
area. You should not reverse any further after this signal sounds! If the vehicle
is equipped with a factory-fi tted towing device*, the border of the danger area
starts - continuous tone - 5 cm further behind the vehicle. The vehicle can be
extended through an installe d detachable towing device.
On vehicles equipped with a factory-fitted radio* or navigation*, the distance to the
obstruction is shown graphically on the disp lay. On vehicles with a factory-fitted
towing device, the sensors are deactivated when towing a trailer. The driver is also
informed of the radio* or the navigation* by a graphic display (vehicle towing a
trailer) on the display. The radio* or navi gation*, which is factory-fitted, can be set
so that the play function volume decrea ses when activating the parking aid, see Owner's Manual radio* or navigation*. This improves the audibility of the parking
aid.
Activating
The parking aid is activated automatically when
reverse gear is engaged and the
ignition is turned on. This is conf irmed by a brief acknowledgement signal.
Deactivating
The parking aid is deactivated by removing the reverse gear.
WARNING
•The parking aid is not a substitute for the driver paying proper attention
and it is always the driver's responsibility to take care when parking the
vehicle or carrying ou t similar manoeuvres.
•You should therefore satisfy yourself, before reversing, that there is no
small obstacle, such as a rock, thin po st, trailer drawbar etc., behind your
vehicle. Such an obstacle might not be within the range detected by the
sensors.
•Under certain circumstances, surfaces of certain objects and types of
clothing cannot reflect the signal of the parking aid. Thus, these objects or
people who wear such clothing are not recognised by the sensors of the
parking aid.
Note
•The parking aid does not operate if you are towing a trailer (applies to models
which feature a factory-fi tted towing device*).
•If a warning signal sounds for about 3 seconds after switching the ignition on
and engaging reverse gear, and there is no obstacle close to your car, this indicates
a system fault. Have the fault rectified by a specialist workshop.
•The sensors must be kept clean and free of ice to enable the parking aid to
operate properly.
Fig. 149 Parking aid: Detec-
tion range of rear sensors
AA
AB
20A5Facelift.book Page 129 Saturday, September 6, 2008 2:13 PM
Page 131 of 304

Starting-off and Driving
130
Front and rear parking aid*
The parking aid provides a warning of obstacles in front and behind
the vehicle.
The audible parking aid determines the distance between the front or rear bumper
and an obstacle with the aid of ultrasound sensors. The sensors are integrated in the
front and rear bumper. The signal tones for the front parking aid sound higher as
standard than for the rear parking aid. The tones of the parking aid can be adapted
in the menu of the information display* ⇒page 30.
Range of sensors
The distance warning begins at a distance of about 120°cm from the obstacle in
front of the vehicle (area ⇒fig. 151 ) and about 160 cm from the obstacle behind the vehicle (area ). The interv
al between the warning signals becomes
shorter as the clearance is reduced.
A continuous tone sounds from a clearanc e of just 30 cm (Bereich ) - danger
area. From this moment on do not continue driving! If the vehicle is equipped
with a factory-fitted towing device*, the bo rder of the danger area starts - contin-
uous tone - 5 cm further behind the vehicle. The vehicle can be extended through
an installed detachable towing device.
On vehicles equipped with a fa ctory-fitted radio* or navigation*, the distance to the
obstruction is shown graphically on the di splay. On vehicles with a factory-fitted
towing device, the rear sensors are deactivated when towing a trailer. The driver is
also informed of the radio* or the navigation* by a graphic display (vehicle towing
a trailer) on the display. The radio* or navi gation*, which is factory-fitted, can be set
so that the play function volume decreases when activating the parking aid, see
Owner's Manual radio* or navigation*. Th is improves the audibility of the parking
aid.
Activating
The parking aid is activated when the reverse gear is engaged and the ignition is
turned on or by pressing the button ⇒fig. 150 - the symbol lights up in the
button. The activation is confirmed by a brief acknowledgement signal.
Deactivating
The parking aid is deactivated after pressing the button° ⇒fig. 150 or at a speed
of more than 10 km/h - the symbol
in the button is no longer illuminated.
WARNING
•The parking aid is not a substitute fo r the driver paying proper attention
and it is always the driver's responsibility to take care when reversing the
vehicle or carrying out similar manoeuvres.
•You should therefore satisfy yourself, before reversing, that there is no
small obstacle, such as a rock, thin po st, trailer drawbar etc., in front or
behind your vehicle. Such an obstacle might not be within the range
detected by the sensors.
•Under certain circumstances, surfaces of certain objects and types of
clothing cannot reflect the signal of the parking aid. Thus, these objects or
Fig. 150 Activating the
parking aid
Fig. 151 Parking aid: Detec-
tion range of the front
sensors
AA
AA
AB
20A5Facelift.book Page 130 Saturday, September 6, 2008 2:13 PM
Page 142 of 304

Communication141
Using the systemSafetyDriving TipsGeneral MaintenanceBreakdown assistanceTechnical Data
Communication
Multifunction steering wheel*
Operate radio und navigation on the multifunction steering wheel
The driver can set the basic functions of the radio and navigation by simply oper-
ating the buttons located on the steering wheel so that he can concentrate on the traffic situation without being distracted as little as possible by operating the radio
and navigation
⇒fig. 159 .
This applies only if your vehicle has been installed with radio
14) or navigation at the
factory. You can of course operate the ra dio and navigation at the appliance. You
will find a description in the operating instructions of your radio system.
When the headlights are switched on, the steering wheel pushbuttons are then also
illuminated.
The buttons apply for the respective operating mode of the current radio or naviga-
tion.
By pressing the buttons, you can carry out the following functions:
Fig. 159 Multifunction
steering wheel: control
buttons
14)Does not apply for Radio Blues.
ButtonActionRadio, traffic informationCDThe CD changer / MP3Navigation
press brieflySwitch off/on tone
press button for a
long period of timeswitch off/on*
turn upwardsIncrease volume
turn down-
wardsDecrease volume
press briefly
Changing to the next stored radio stationChanging to the next stored traffic infor-
mation
Interrupting the traffic report
Changing to the next title
A1
A1
A1
A1
A2
20A5Facelift.book Page 141 Saturday, September 6, 2008 2:13 PM