2008 Seat Ibiza 5D tailgate
[x] Cancel search: tailgatePage 5 of 260
Contents3
ContentsManual structure
. . . . . . . . . . . . . . . . . . . .
Content
. . . . . . . . . . . . . . . . . . . . . . . . . . . . . . . .
Safety First
. . . . . . . . . . . . . . . . . . . . . . . . . . .
Safe driving
. . . . . . . . . . . . . . . . . . . . . . . . . . . . . .
Brief introduction . . . . . . . . . . . . . . . . . . . . . . . .
Proper sitting position for occupants . . . . . . . . .
Pedal area . . . . . . . . . . . . . . . . . . . . . . . . . . . . . .
Stowing luggage . . . . . . . . . . . . . . . . . . . . . . . . .
Seat belts
. . . . . . . . . . . . . . . . . . . . . . . . . . . . . . . .
Brief Introduction . . . . . . . . . . . . . . . . . . . . . . . .
Why wear seat belts? . . . . . . . . . . . . . . . . . . . . . .
Seat belts . . . . . . . . . . . . . . . . . . . . . . . . . . . . . . .
Belt tension devices* . . . . . . . . . . . . . . . . . . . . .
Airbag system
. . . . . . . . . . . . . . . . . . . . . . . . . . . .
Brief introduction . . . . . . . . . . . . . . . . . . . . . . . .
Front airbags . . . . . . . . . . . . . . . . . . . . . . . . . . . .
Side airbags . . . . . . . . . . . . . . . . . . . . . . . . . . . . .
Curtain airbags . . . . . . . . . . . . . . . . . . . . . . . . . .
Deactivating airbags* . . . . . . . . . . . . . . . . . . . . .
Child safety
. . . . . . . . . . . . . . . . . . . . . . . . . . . . . .
Brief introduction . . . . . . . . . . . . . . . . . . . . . . . .
Child seats . . . . . . . . . . . . . . . . . . . . . . . . . . . . . .
Securing child seats . . . . . . . . . . . . . . . . . . . . . .
Operating instructions
. . . . . . . . . . . .
Cockpit
. . . . . . . . . . . . . . . . . . . . . . . . . . . . . . . . . . .
Overview . . . . . . . . . . . . . . . . . . . . . . . . . . . . . . .
Instruments . . . . . . . . . . . . . . . . . . . . . . . . . . . . .
Digital display in the instrument panel . . . . . . .
Warning lamps . . . . . . . . . . . . . . . . . . . . . . . . . . .
Steering column controls*
. . . . . . . . . . . . . . . .
General information . . . . . . . . . . . . . . . . . . . . . .
Audio Control . . . . . . . . . . . . . . . . . . . . . . . . . . . .
Audio + Telephone Control . . . . . . . . . . . . . . . . .
Unlocking and locking
. . . . . . . . . . . . . . . . . . . .
Central locking . . . . . . . . . . . . . . . . . . . . . . . . . . .
Keys . . . . . . . . . . . . . . . . . . . . . . . . . . . . . . . . . . .
Radio frequency remote control . . . . . . . . . . . . .
Anti-theft alarm system* . . . . . . . . . . . . . . . . . . .
Tailgate . . . . . . . . . . . . . . . . . . . . . . . . . . . . . . . . .
Windows . . . . . . . . . . . . . . . . . . . . . . . . . . . . . . .
Panoramic tilting roof* . . . . . . . . . . . . . . . . . . . .
Lights and visibility
. . . . . . . . . . . . . . . . . . . . . . .
Lights . . . . . . . . . . . . . . . . . . . . . . . . . . . . . . . . . .
Interior lights . . . . . . . . . . . . . . . . . . . . . . . . . . . .
Visibility . . . . . . . . . . . . . . . . . . . . . . . . . . . . . . . .
Windscreen washers . . . . . . . . . . . . . . . . . . . . . .
Rearview mirrors . . . . . . . . . . . . . . . . . . . . . . . . .
Seats and stowage
. . . . . . . . . . . . . . . . . . . . . . .
The importance of correct seat adjustment . . . .
Head restraints . . . . . . . . . . . . . . . . . . . . . . . . . .
Front seats . . . . . . . . . . . . . . . . . . . . . . . . . . . . . .
Rear seat bench . . . . . . . . . . . . . . . . . . . . . . . . . .
Stowage compartments . . . . . . . . . . . . . . . . . . .
Ashtrays, cigarette lighter and power point . . . First-aid kit, warning triangle, fire extinguisher*
Boot . . . . . . . . . . . . . . . . . . . . . . . . . . . . . . . . . . .
Heating, Ventilation and Air conditioning
. .
Heating . . . . . . . . . . . . . . . . . . . . . . . . . . . . . . . . .
Air conditioning* . . . . . . . . . . . . . . . . . . . . . . . . .
Climatronic . . . . . . . . . . . . . . . . . . . . . . . . . . . . . .
General notes . . . . . . . . . . . . . . . . . . . . . . . . . . .
Driving
. . . . . . . . . . . . . . . . . . . . . . . . . . . . . . . . . . .
Address . . . . . . . . . . . . . . . . . . . . . . . . . . . . . . . .
Safety . . . . . . . . . . . . . . . . . . . . . . . . . . . . . . . . . .
Ignition lock . . . . . . . . . . . . . . . . . . . . . . . . . . . . .
Starting and stopping the engine . . . . . . . . . . .
Manual gearbox . . . . . . . . . . . . . . . . . . . . . . . . . .
Automatic gearbox* . . . . . . . . . . . . . . . . . . . . . .
Handbrake . . . . . . . . . . . . . . . . . . . . . . . . . . . . . .
Acoustic parking aid system* . . . . . . . . . . . . . . .
Cruise control system (CCS)* . . . . . . . . . . . . . . .
Practical tips
. . . . . . . . . . . . . . . . . . . . . . . . .
Intelligent technology
. . . . . . . . . . . . . . . . . . . . .
Brakes . . . . . . . . . . . . . . . . . . . . . . . . . . . . . . . . .
Anti-lock brake system and traction control ABS
Electronic stabilisation programme (ESP)* . . . .
Driving and the environment
. . . . . . . . . . . . . .
Running-in . . . . . . . . . . . . . . . . . . . . . . . . . . . . . .
Exhaust gas purification system . . . . . . . . . . . . .
Economical and environmentally-friendly driving
Driving abroad . . . . . . . . . . . . . . . . . . . . . . . . . . .
Trailer towing . . . . . . . . . . . . . . . . . . . . . . . . . . . .
5
6
7
7
7
9
14
15
16
16
18
21
25
26
26
29
31
35
38
40
40
42
45 49
49
49
51
52
57
68
68
68
70
72
72
77
78
79
82
84
87
89
89
95
96
97
100
103
103
104
106
108
109
113 115
115
118
118
121
124
127
129
129
130
131
132
134
135
142
144
145
149
149
149
150
151
153
153
154
155
157
161
Ibiza250_angles Seite 3 Dienstag, 5. August 2008 1:11 13
Page 17 of 260
Safe driving15
Safety First
Operating instructions
Practical tips
Te c h n i c a l D a t a
WARNING
•
If the pedals are obstructed, an accide nt may occur. Risk of serious inju-
ries.
•
Ensure that the floor mats are always securely attached.
•
Never lay or fit floor mats or other floor coverings over the original floor
mats. This would reduce the pedal area and could obstruct the pedals. Risk
of accident.
Stowing luggageLoading the boot
All luggage and other loose object s must be safely secured in
the luggage compartment.Unsecured objects which shift back and forth could affect safety or
driving characteristics of the vehicle by shifting the centre of gravity.
– Distribute the load evenly in the luggage compartment.
– Lay and stow heavy luggage as far forward as possible in the luggage compartment.
– Stow heavy luggage as low as possible in the luggage compart- ment.
WARNING
•
Loose luggage and other objects in the boot could cause serious inju-
ries.
•
Always put objects in the luggage compartment.
•
During sudden manoeuvres or accidents, loose objects can be thrown
forward, injuring vehicle occupants or even third parties. This increased
risk of injury will be further increased if a loose object is struck by an
inflating airbag. If this happens, objects can be transformed into
“missiles”. Risk of fatal injury.
•
Please note that the centre of gravity may shift when transporting
heavy objects; this may affect the vehicle's handling and lead to an acci-
dent. Therefore, it is essential to adjust your speed and driving style
accordingly, to avoid accidents.
•
Never exceed the allowed axle loads or allowed maximum weight. If the
allowed axle load or the allowed total weight is exceeded, the driving char-
acteristics of the vehicle may change, leading to accidents, injuries and
damage to the vehicle.
•
Never leave your vehicle unattended, especially when the tailgate is
open. Children could climb into the luggage compartment closing the door
behind them; they will remain trapped without help and there is a mortal
risk.
•
Never allow children to play in or around the vehicle. Close and lock
both the tailgate and all the doors when you leave the vehicle. Before you
lock the vehicle, make sure that ther e are no adults or children in the
vehicle.
•
Never transport passengers in the luggage compartment. Every
passenger must be properly belted in ⇒ page 16.Note
•
Air circulation in the vehicle helps reduce fogging of the windows. Used
air escapes through ventilation slits in the side trim of the luggage compart-
ment. Ensure that the ventil ation slits are never covered.WARNING (continued)
Ibiza250_angles Seite 15 Dienstag, 5. August 2008 1:11 13
Page 61 of 260
Cockpit59
Safety First
Operating instructions
Practical tips
Te c h n i c a l D a t a
WARNING
•
Failure to observe warning lamps and warning messages can result in
serious personal injuries or damage to your vehicle.
•
The risk of an accident increases if your vehicle breaks down. Use a
warning triangle to draw the attention of other road users in order to
prevent danger to thirds.
•
The engine compartment is a dangerous area! Before you open the
bonnet to work on the engine or in the engine compartment, you must
switch the engine off and allow it to cool to reduce the risk of scalding or
other kind of injuries. Read and observe the relevant warnings
⇒ page 181.
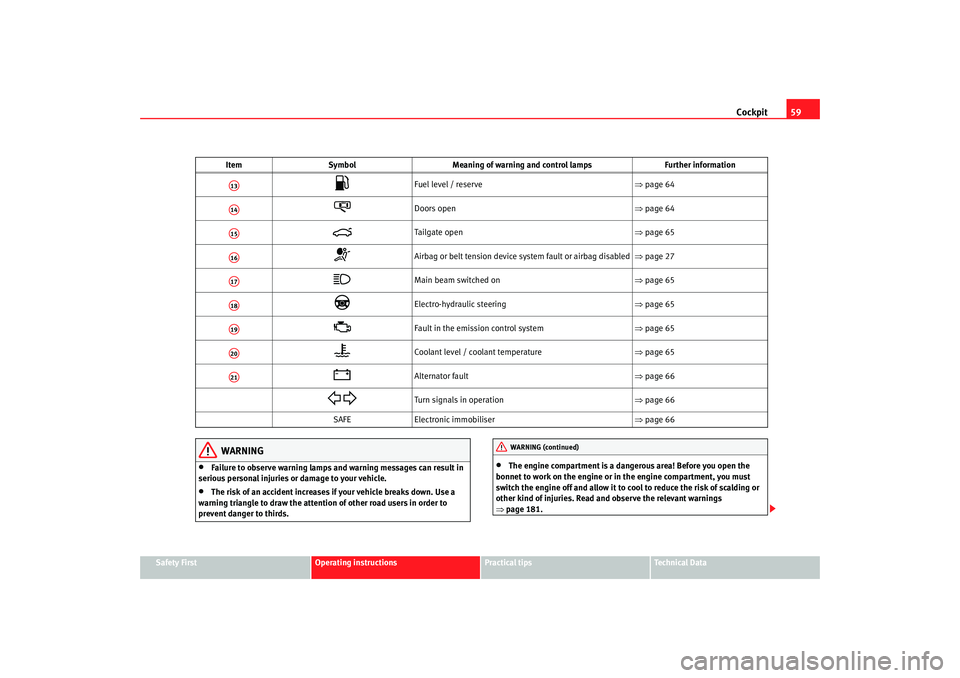
Fuel level / reserve ⇒page 64
Doors open ⇒page 64
Tailgate open ⇒page 65
Airbag or belt tension device system fault or airbag disabled ⇒page 27
Main beam switched on ⇒page 65
Electro-hydraulic steering ⇒page 65
Fault in the emission control system ⇒page 65
Coolant level / coolant temperature ⇒page 65
Alternator fault ⇒page 66
Turn signals in operation ⇒page 66
SAFE Electronic immobiliser ⇒page 66
Item
Symbol Meaning of warning and control lamps Further information
A13A14A15A16A17A18A19A20A21
WARNING (continued)
Ibiza250_angles Seite 59 Dienstag, 5. August 2008 1:11 13
Page 66 of 260
Cockpit
64•
The tyre structure is damaged.
•
The vehicle is unbalanced because of a load.
•
The wheels of one axle are under more pressure (for example, driving with
a trailer or on extreme slopes).
•
The vehicle is fitted with snow chains.
•
The emergency wheel is fitted.
•
The wheel on one axle is changed.
Tyre pressure adjustment
Following the modification to tyre pressure or changing one or more wheels,
the button ⇒ page 63, fig. 37 must be kept pressed while the ignition is on
until an acoustic signal is heard.
If the wheels are under excessive load (for example, driving with a trailer or
heavy load), the tyre pressure must be increased to the recommended value
for a full load (see the sticker on the inside of the fuel flap). If the tyre monitor
system button is pressed down, the new tyre pressures are confirmed.
The tyre pressure monitor indicator
lights up
If the tyre pressure of one wheel is much lower than the value set by the
driver, then the indicator lights up ⇒.
WARNING
•
When the tyre pressure indicator l ights, reduce speed immediately and
avoid any sudden manoeuvre or braking. Stop when possible, and check
the tyre pressure and status.
•
The driver is responsible for maintaining correct tyre pressures. For this
reason, tyre pressures must be regularly checked.
•
Under certain circumstances (for example, when driving in a sportslike
manner, in winter conditions or on a dirt track) the tyre monitor indicator
may light up or function incorrectly.
Note
If the battery is disconnected, the yellow indicator
lights up after the igni-
tion is switched on. This should go out after a brief journey.
Speed selector lever lock*
The footbrake must be depressed when this warning lamp lights up. This is
necessary when the automatic gearbox* selector lever is moved out of posi-
tions P or N.Fuel level / reserve
This symbol lights up to indicate that the fuel tank under the
reserve level.It lights up when only 7 litres of fuel remain in the tank. Moreover, an audible
warning* is heard. It reminds you to fuel up the fuel tank as soon as possible
⇒ page 178.Indicates that the doors are open*
This indicator lights if one of th e doors or the tailgate is open.The warning light
should go off when all the doors are closed correctly.
Ibiza250_angles Seite 64 Dienstag, 5. August 2008 1:11 13
Page 67 of 260
Cockpit65
Safety First
Operating instructions
Practical tips
Te c h n i c a l D a t a
Tailgate open*
The warning lamp
should switch off when the tailgate is fully closed.
Main beam headlights
This warning lamp lights up when the main beams are on.The warning lamp
is switched on once main beams are on or once the
headlight flasher is operating.
Further information ⇒page 94
Electro-hydraulic steering*
The level of steering assistance depends on the vehicle speed and on the
steering wheel turning speed.
The warning lamp should light up for a few seconds when the ignition is
switched on. It should go out once the engine is started.
There is a fault in the electro-hydraulic steering system if the lamp does not
go out or lights up whilst the vehicle is in motion. Take the vehicle to the
Authorised Service Centre as soon as possible.
Note
When towing the vehicle with the engine stopped or due to a fault in the
power steering, this will not operate. The vehicle can still be steered, but it
will require greater force to turn the steering wheel.
Emission control system*
This warning lamp monitors the exhaust system.
Warning lamp
flashes:
When there is misfiring that can damage the catalytic converter. Reduce
speed and drive carefully to the nearest qualified workshop to have the
engine checked.
Warning lamp is lit:
If a fault has developed during driving which has reduced the quality of the
exhaust gas (e.g. lambda probe fault). Reduce speed and drive carefully to
the nearest qualified workshop to have the engine checked.
Coolant Level* / temperature
The warning lamp lights up if the coolant temperature is too
high or if the coolant level is too low.There is a fault if:•
The warning symbol does not go out again after a few seconds.
•
The warning lamp lights up or flashes while the vehicle is moving, while
three acoustic warning signals ⇒ are emitted.
This means that either the coolant level is too low or the coolant temperature
is too high.
Coolant temperature too high
If the warning li ght lights up, stop the vehicle, switch the engine off and wait
for it to cool down. Check the coolant level.
If the coolant level is correct, the over heating may be caused by a malfunction
of the radiator fan. Check the radiator fan fuse and have it replaced if neces-
sary ⇒page 211.
Ibiza250_angles Seite 65 Dienstag, 5. August 2008 1:11 13
Page 74 of 260
Unlocking and locking
72Unlocking and lockingCentral locking Description
The central locking system enables you to lock and unlock all
doors with just pushing on the keybutton.Central locking can be activated by using any of the following options:•
the key , by inserting it into the driver's door cylinder and rotating it manu-
ally,
•
the interior central locking button ⇒page 75.
•
the radio frequency remote control, using the buttons on the key
⇒ page 78.
Various functions are available to improve the vehicle safety:
- Locking system “Safe”
- Selective unlocking system*
- Self-locking system to prevent involuntary unlocking
- Automatic speed-dependent locking and unlocking system*
- Emergency unlocking system
WARNING
•
Locking from the outside without seeing may cause bruising to other
people, particularly tochildren.
•
When locking a vehicle, never leave children unaccompanied inside, as
from the outside it will be difficu lt to provide assistance if required.
•
Having the doors locked prevents an intrusion from getting in, for
example when stopped at a traffic light.
Note
For anti-theft security, only the driver's door is fitted with a lock cylinder.Safety system “Safe*”
This is an anti-theft device which consists of a double lock for
the door locks and a deactivation function for the boot in
order to prevent a forced entry.Activation
The “safe” system is activated when the vehicle is locked using the key or the
remote control.
To activate it with the key, rotate once it is inserted in the door lock cylinder
in the locking direction.
To activate the system using the remote control, press the lock button once on the remote.
Once this system is activated, opening doors from the outside and the inside
is not possible. The tailgate can not be opened. The central locking button
does not work.
Deactivation
Rotate the key inserted in the lock cylinder twice towards the locking direc-
tion.
To activate the system using the remote control, press the lock button on the
remote twice in less than five seconds.
Ibiza250_angles Seite 72 Dienstag, 5. August 2008 1:11 13
Page 76 of 260
Unlocking and locking
74Involuntary unlocking
It is an anti-theft system and prevents the unintentional
unlocking of the vehicle.If the vehicle is unlocked and any of the doors (including the tailgate) are
opened within 30 seconds, it gets re-locked automatically.Automatic speed dependent locking and unlocking system*
This is a safety system which prevent the access to the vehicle
from the outside when it is running (for example, when
stopped at a traffic light).Locking
The doors lock automatically at speeds of above 15km/h. The tailgate locks
automatically at speeds of above 6 km/h.
If the vehicle stops and any of the doors is opened, when the vehicle is
started again and the above speed exceeded, the door or tailgate will lock
again.
Unlocking
On removing the ignition key, the vehicle returns to the status prior to self-
locking.
Each door can be unlocked and opened independently from the inside (for
example, when a passenger gets out of it). To do so, simply operate the lever
inside the door.
Activating the system*
With the ignition on, press the locking key on the central locking system for 3
to 10 seconds. Deactivating the system*
With the ignition on, press the unlocking key on the central locking system for
3 to 10 seconds.
In both cases, if the operation has been carried out correctly, the locking lamp
will flash
⇒page 75, fig. 40 .
WARNING
The door handles must not be operat ed when the vehicle is running: the
door would open.
Note
If the airbags are triggered during an accident, the vehicle is unlocked, except
for the boot. It is possible to lock the vehicle from inside with the central
locking, after turning the ignition off and back on again.Emergency unlocking systemIf the airbags are triggered during an accident, the vehicle is unlocked, except
for the boot. It is possible to lock the vehicle from inside with the central
locking, after turning the ignition off and back on again.
Ibiza250_angles Seite 74 Dienstag, 5. August 2008 1:11 13
Page 77 of 260
Unlocking and locking75
Safety First
Operating instructions
Practical tips
Te c h n i c a l D a t a
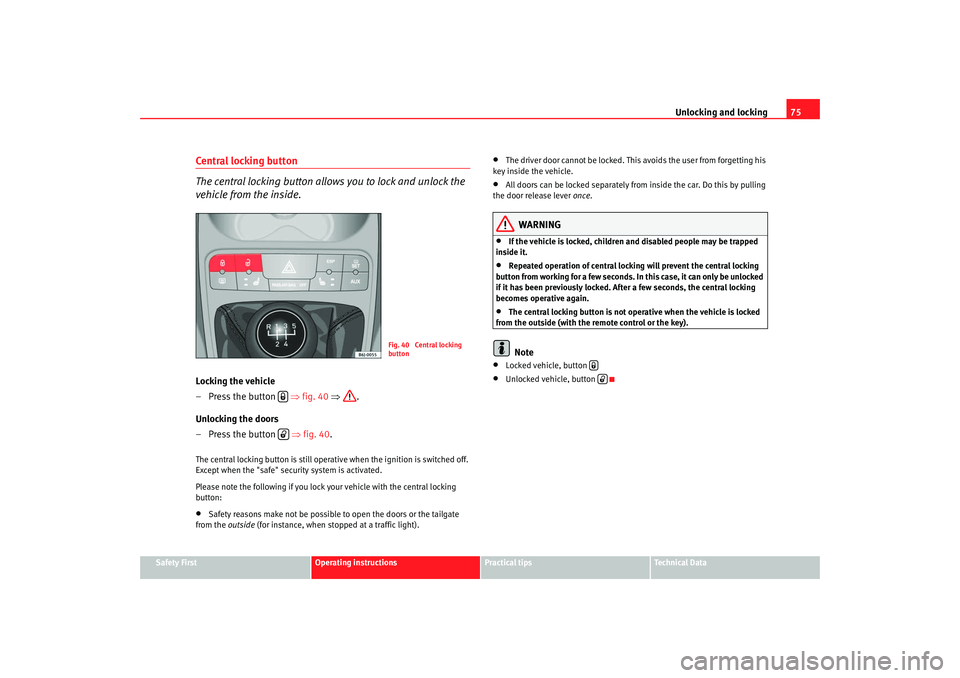
Central locking button
The central locking button allows you to lock and unlock the
vehicle from the inside.Locking the vehicle
– Press the button ⇒fig. 40 ⇒ .
Unlocking the doors
– Press the button ⇒ fig. 40.The central locking button is still operative when the ignition is switched off.
Except when the "safe" security system is activated.
Please note the following if you lock your vehicle with the central locking
button:•
Safety reasons make not be possible to open the doors or the tailgate
from the outside (for instance, when stopped at a traffic light).
•
The driver door cannot be locked. This avoids the user from forgetting his
key inside the vehicle.
•
All doors can be locked separately from inside the car. Do this by pulling
the door release lever once.
WARNING
•
If the vehicle is locked, children and disabled people may be trapped
inside it.
•
Repeated operation of central locking will prevent the central locking
button from working for a few seconds. In this case, it can only be unlocked
if it has been previously locked. Afte r a few seconds, the central locking
becomes operative again.
•
The central locking button is not op erative when the vehicle is locked
from the outside (with the remote control or the key).Note
•
Locked vehicle, button
•
Unlocked vehicle, button
Fig. 40 Central locking
button
Ibiza250_angles Seite 75 Dienstag, 5. August 2008 1:11 13