2008 Peugeot 308 SW BL Dag remove seats
[x] Cancel search: remove seatsPage 42 of 260
!
!
61
COMFORT
No person or object should prevent
the seat slide from returning to its
initial position; the return to this po-
sition is necessary for longitudinal
locking.
Access to the rear seats (3-door)
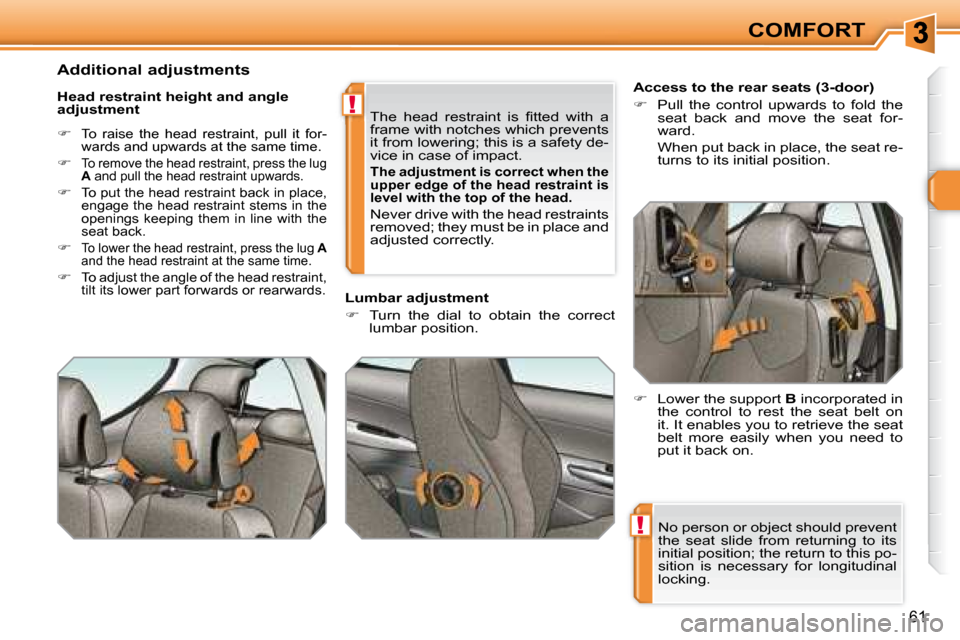
� Pull the control upwards to fold the
seat back and move the seat for-
ward.
When put back in place, the seat re- turns to its initial position.
Head restraint height and angle
adjustment
�
To raise the head restraint, pull it for-
wards and upwards at the same time.
�
To remove the head restraint, press the lug
A and pull the head restraint upwards.
� To put the head restraint back in place,
engage the head restraint stems in the
openings keeping them in line with the
seat back.
� To lower the head restraint, press the lug A
and the head restraint at the same time.
�
To adjust the angle of the head restraint,
tilt its lower part forwards or rearwards.
�T�h�e� �h�e�a�d� �r�e�s�t�r�a�i�n�t� �i�s� �fi� �t�t�e�d� �w�i�t�h� �a�
frame with notches which prevents
it from lowering; this is a safety de-
vice in case of impact.
The adjustment is correct when the
upper edge of the head restraint is
level with the top of the head.
Never drive with the head restraints
removed; they must be in place and
adjusted correctly.
Lumbar adjustment
� Turn the dial to obtain the correct
lumbar position.
Additional adjustments
� Lower the support B incorporated in
the control to rest the seat belt on
it. It enables you to retrieve the seat
belt more easily when you need to
put it back on.
Page 45 of 260
!
64
COMFORT
REAR SEATS
Never drive with the head restraints
removed; they must be in place
and in the high position when pas-
sengers are seated in the rear.
Rear head restraints
These have a high position (comfort
and safety) and a low position (rear vis-
ibility).
They can also be removed.
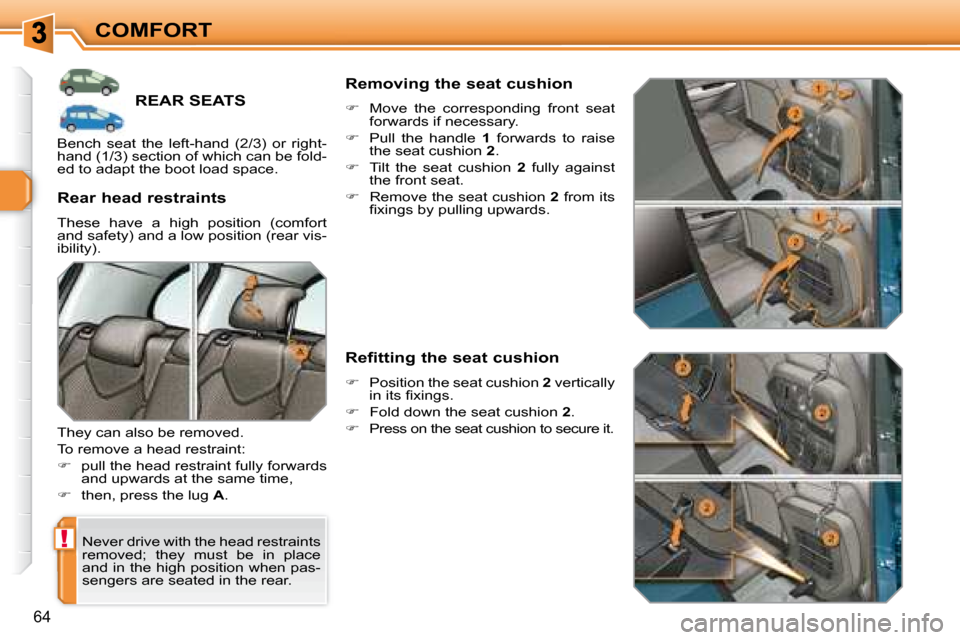
To remove a head restraint:
� pull the head restraint fully forwards
and upwards at the same time,
� then, press the lug A . Removing the seat cushion
� Move the corresponding front seat
forwards if necessary.
� Pull the handle 1 forwards to raise
the seat cushion 2 .
� Tilt the seat cushion 2 fully against
the front seat.
� Remove the seat cushion 2 from its
�fi� �x�i�n�g�s� �b�y� �p�u�l�l�i�n�g� �u�p�w�a�r�d�s�.� � �
Refitting the seat cushion
� Position the seat cushion 2 vertically
�i�n� �i�t�s� �fi� �x�i�n�g�s�.�
� Fold down the seat cushion 2 .
� Press on the seat cushion to secure it.
Bench seat the left-hand (2/3) or right-
hand (1/3) section of which can be fold-
ed to adapt the boot load space.
Page 47 of 260
ii
i
66
COMFORT
REAR SEATS
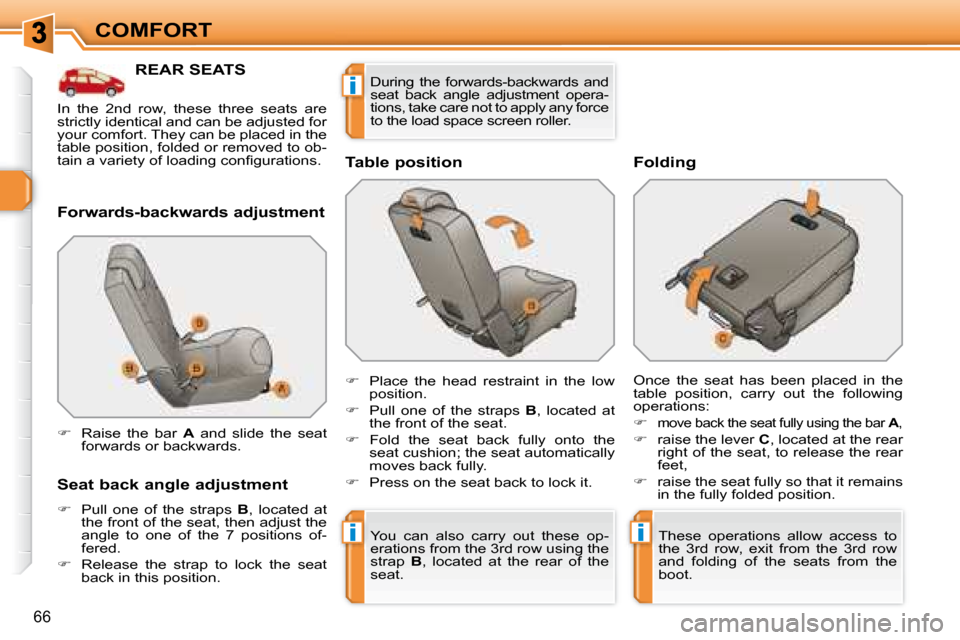
Forwards-backwards adjustment
Seat back angle adjustment
� Pull one of the straps B , located at
the front of the seat, then adjust the
angle to one of the 7 positions of-
fered.
� Release the strap to lock the seat
back in this position. Table position
� Raise the bar A and slide the seat
forwards or backwards.
� Place the head restraint in the low
position.
� Pull one of the straps B , located at
the front of the seat.
� Fold the seat back fully onto the
seat cushion; the seat automatically
moves back fully.
� Press on the seat back to lock it. Folding
Once the seat has been placed in the
table position, carry out the following
operations:
�
move back the seat fully using the bar A ,
� raise the lever C , located at the rear
right of the seat, to release the rear
feet,
� raise the seat fully so that it remains
in the fully folded position.
You can also carry out these op-
erations from the 3rd row using the
strap B , located at the rear of the
seat. These operations allow access to
�t�h�e� �3� �r�d� � �r�o�w�,� �e�x�i�t� �f�r�o�m� �t�h�e� �3� �r�d� � �r�o�w�
and folding of the seats from the
boot.
In the 2nd row, these three seats are
strictly identical and can be adjusted for
your comfort. They can be placed in the
table position, folded or removed to ob-
�t�a�i�n� �a� �v�a�r�i�e�t�y� �o�f� �l�o�a�d�i�n�g� �c�o�n�fi� �g�u�r�a�t�i�o�n�s�.�
During the forwards-backwards and
seat back angle adjustment opera-
tions, take care not to apply any force
to the load space screen roller.
Page 49 of 260
!
68
COMFORT
ADDITIONAL SEATS
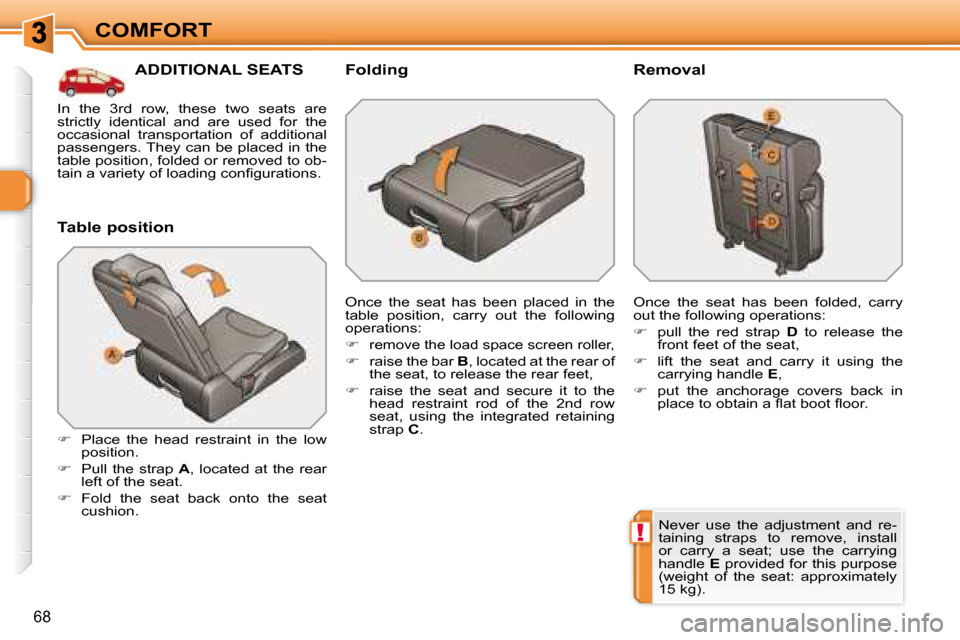
Table position
� Place the head restraint in the low
position.
� Pull the strap A , located at the rear
left of the seat.
� Fold the seat back onto the seat
cushion. Folding
Once the seat has been placed in the
table position, carry out the following
operations:
�
remove the load space screen roller,
� raise the bar B , located at the rear of
the seat, to release the rear feet,
� raise the seat and secure it to the
head restraint rod of the 2nd row
seat, using the integrated retaining
strap C . Removal
Once the seat has been folded, carry
out the following operations:
� pull the red strap D to release the
front feet of the seat,
� lift the seat and carry it using the
carrying handle E ,
� put the anchorage covers back in
�p�l�a�c�e� �t�o� �o�b�t�a�i�n� �a� �fl� �a�t� �b�o�o�t� �fl� �o�o�r�.� �
Never use the adjustment and re-
taining straps to remove, install
or carry a seat; use the carrying
handle E provided for this purpose
�(�w�e�i�g�h�t� �o�f� �t�h�e� �s�e�a�t�:� �a�p�p�r�o�x�i�m�a�t�e�l�y�
15 kg).
In the 3rd row, these two seats are
strictly identical and are used for the
occasional transportation of additional
passengers. They can be placed in the
table position, folded or removed to ob-
�t�a�i�n� �a� �v�a�r�i�e�t�y� �o�f� �l�o�a�d�i�n�g� �c�o�n�fi� �g�u�r�a�t�i�o�n�s�.�
Page 51 of 260
i
!
70
COMFORT
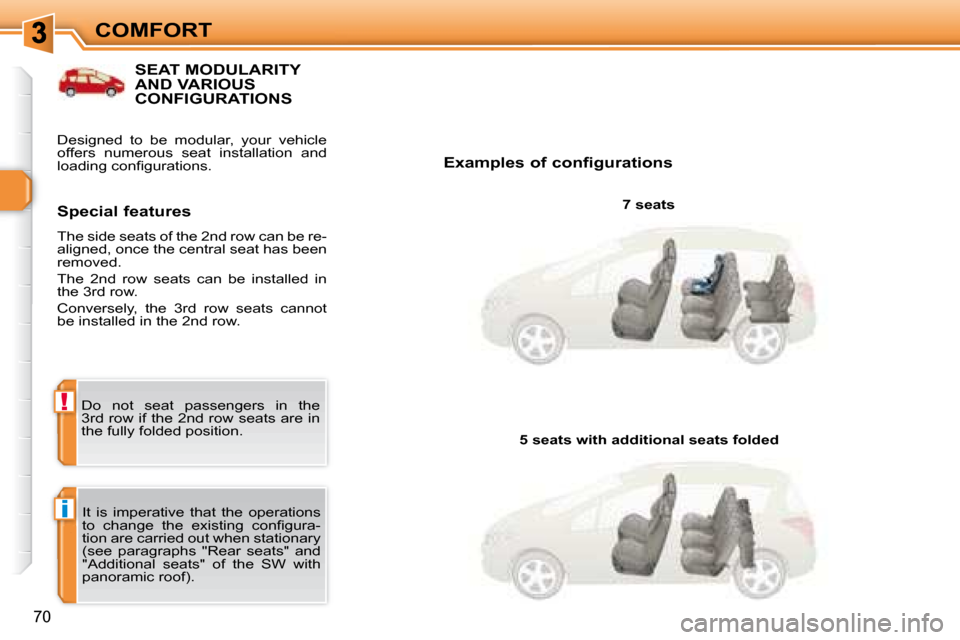
SEAT MODULARITY AND VARIOUS CONFIGURATIONS
Examples of configurations 7 seats
It is imperative that the operations
�t�o� �c�h�a�n�g�e� �t�h�e� �e�x�i�s�t�i�n�g� �c�o�n�fi� �g�u�r�a�-
tion are carried out when stationary
(see paragraphs "Rear seats" and
"Additional seats" of the SW with
panoramic roof).
Special features
The side seats of the 2nd row can be re-
aligned, once the central seat has been
removed.
The 2nd row seats can be installed in
the 3rd row.
Conversely, the 3rd row seats cannot
be installed in the 2nd row.
5 seats with additional seats folded
Do not seat passengers in the
3rd row if the 2nd row seats are in
the fully folded position.
Designed to be modular, your vehicle
offers numerous seat installation and
�l�o�a�d�i�n�g� �c�o�n�fi� �g�u�r�a�t�i�o�n�s�.�
Page 100 of 260
i
107
LAYOUT
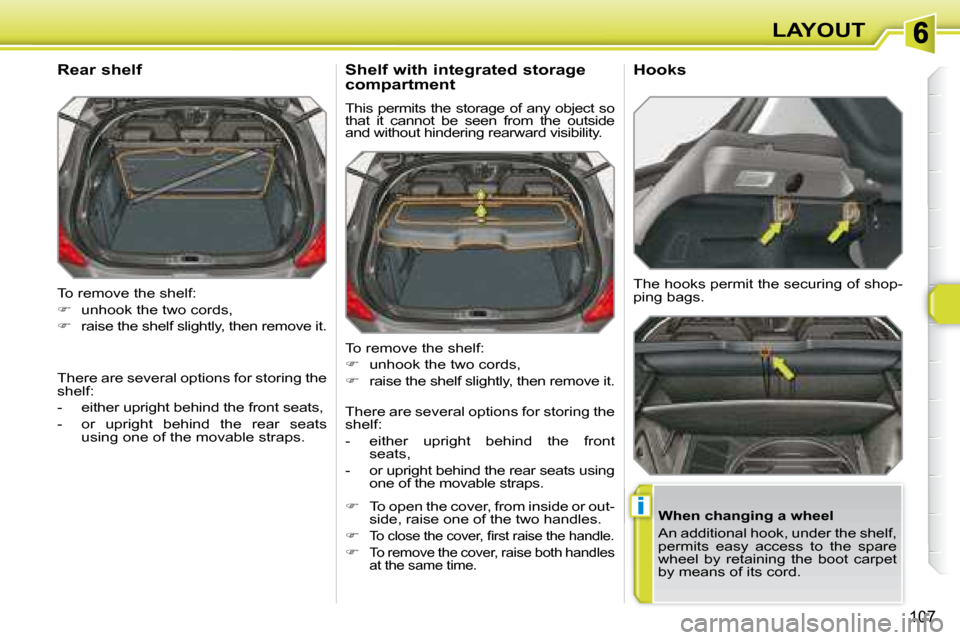
To remove the shelf:
� unhook the two cords,
� raise the shelf slightly, then remove it.
Rear shelf
When changing a wheel
An additional hook, under the shelf,
permits easy access to the spare
wheel by retaining the boot carpet
by means of its cord.
To remove the shelf:
� unhook the two cords,
� raise the shelf slightly, then remove it.
Shelf with integrated storage
compartment
This permits the storage of any object so
that it cannot be seen from the outside
and without hindering rearward visibility.
The hooks permit the securing of shop-
ping bags.
Hooks
There are several options for storing the
shelf:
- either upright behind the front seats,
- or upright behind the rear seats using one of the movable straps. There are several options for storing the
shelf:
- either upright behind the front
seats,
- or upright behind the rear seats using one of the movable straps.
� To open the cover, from inside or out-
side, raise one of the two handles.
�
�T�o� �c�l�o�s�e� �t�h�e� �c�o�v�e�r�,� �fi� �r�s�t� �r�a�i�s�e� �t�h�e� �h�a�n�d�l�e�.
�
To remove the cover, raise both handles
at the same time.
Page 104 of 260
i
i
111
LAYOUT
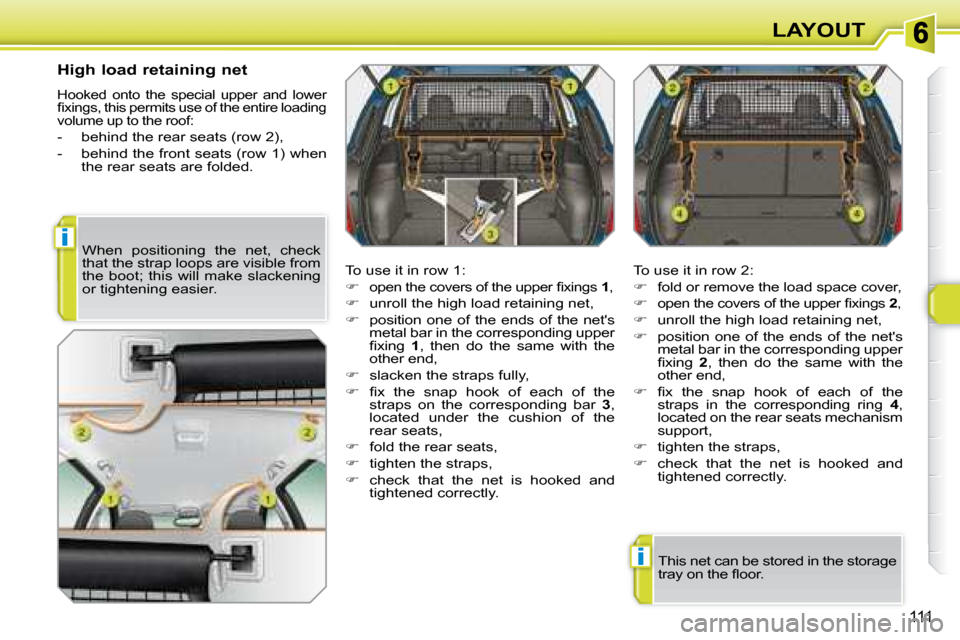
High load retaining net
Hooked onto the special upper and lower
�fi� �x�i�n�g�s�,� �t�h�i�s� �p�e�r�m�i�t�s� �u�s�e� �o�f� �t�h�e� �e�n�t�i�r�e� �l�o�a�d�i�n�g�
volume up to the roof:
- behind the rear seats (row 2),
- behind the front seats (row 1) when the rear seats are folded.
To use it in row 1:
�
�o�p�e�n� �t�h�e� �c�o�v�e�r�s� �o�f� �t�h�e� �u�p�p�e�r� �fi� �x�i�n�g�s� � 1 ,
� unroll the high load retaining net,
� position one of the ends of the net's
metal bar in the corresponding upper
�fi� �x�i�n�g� � 1 , then do the same with the
other end,
� slacken the straps fully,
� � � �fi� �x� �t�h�e� �s�n�a�p� �h�o�o�k� �o�f� �e�a�c�h� �o�f� �t�h�e�
straps on the corresponding bar 3 ,
located under the cushion of the
rear seats,
� fold the rear seats,
� tighten the straps,
� check that the net is hooked and
tightened correctly. To use it in row 2:
� fold or remove the load space cover,
� �o�p�e�n� �t�h�e� �c�o�v�e�r�s� �o�f� �t�h�e� �u�p�p�e�r� �fi� �x�i�n�g�s� � 2 ,
� unroll the high load retaining net,
� position one of the ends of the net's
metal bar in the corresponding upper
�fi� �x�i�n�g� � 2 , then do the same with the
other end,
� � � �fi� �x� �t�h�e� �s�n�a�p� �h�o�o�k� �o�f� �e�a�c�h� �o�f� �t�h�e�
straps in the corresponding ring 4 ,
located on the rear seats mechanism
support,
� tighten the straps,
� check that the net is hooked and
tightened correctly.
When positioning the net, check
that the strap loops are visible from
the boot; this will make slackening
or tightening easier.
This net can be stored in the storage
�t�r�a�y� �o�n� �t�h�e� �fl� �o�o�r�.� �
Page 107 of 260
i
114
LAYOUT
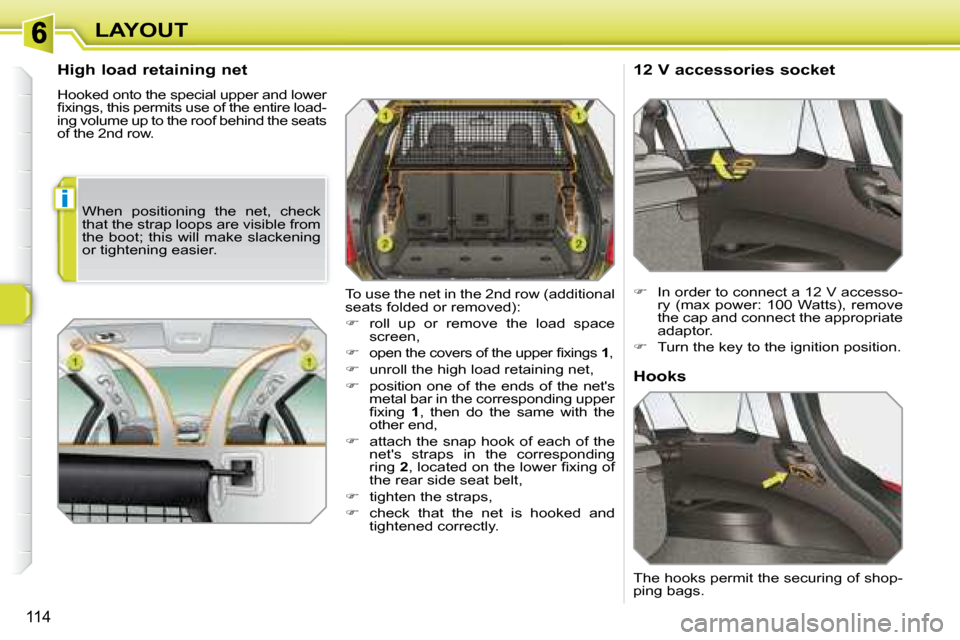
High load retaining net
Hooked onto the special upper and lower
�fi� �x�i�n�g�s�,� �t�h�i�s� �p�e�r�m�i�t�s� �u�s�e� �o�f� �t�h�e� �e�n�t�i�r�e� �l�o�a�d�-
ing volume up to the roof behind the seats
of the 2nd row. 12 V accessories socket
� In order to connect a 12 V accesso-
�r�y� �(�m�a�x� �p�o�w�e�r�:� �1�0�0� �W�a�t�t�s�)�,� �r�e�m�o�v�e�
the cap and connect the appropriate
adaptor.
� Turn the key to the ignition position.
To use the net in the 2nd row (additional
seats folded or removed):
� roll up or remove the load space
screen,
�
�o�p�e�n� �t�h�e� �c�o�v�e�r�s� �o�f� �t�h�e� �u�p�p�e�r� �fi� �x�i�n�g�s� � 1 ,
� unroll the high load retaining net,
� position one of the ends of the net's
metal bar in the corresponding upper
�fi� �x�i�n�g� � 1 , then do the same with the
other end,
� attach the snap hook of each of the
net's straps in the corresponding
ring 2� �,� �l�o�c�a�t�e�d� �o�n� �t�h�e� �l�o�w�e�r� �fi� �x�i�n�g� �o�f�
the rear side seat belt,
� tighten the straps,
� check that the net is hooked and
tightened correctly. Hooks
The hooks permit the securing of shop-
ping bags.
When positioning the net, check
that the strap loops are visible from
the boot; this will make slackening
or tightening easier.