2008 Peugeot 308 SW BL Dag change time
[x] Cancel search: change timePage 17 of 260

!
38
MULTIFUNCTION DISPLAYS
� � �V�e�h�i�c�l�e� �c�o�n�fi� �g�u�r�a�t�i�o�n� Options
Once the "Options" menu has been se-
lected, you can start diagnostics of the
status of the equipment (active, not ac-
tive, faulty).
Languages
Once the "Languages" menu has been
selected, you can change the language
used by the display (Français, Italiano,
Nederlands, Portugues, Portugues-
Brasil, Deutsch, English, Espanol).
Display settings
Once the "Display settings" menu has
been selected, you can gain access to
the following settings:
- year,
- month,
- day,
- hour,
- minutes,
- 12 or 24 hour mode. Units
Once the "Units" menu has been se-
lected, you can change the units of the
following parameters:
- temperature (°C or °F),
- fuel consumption (l/100 km, mpg or
km/l).
� Once you have selected a setting,
press the "OK" button to change its
value.
� � � �W�a�i�t� �f�o�r� �a�p�p�r�o�x�i�m�a�t�e�l�y� �t�e�n� �s�e�c�-
onds without any action to allow
the changed data to be recorded or
press the "ESC" button to cancel.
The display then returns to the normal
display.
� �O�n�c�e� �t�h�e� �"�V�e�h�i�c�l�e� �c�o�n�fi� �g�u�r�a�t�i�o�n�"� �m�e�n�u�
has been selected, you can activate or
deactivate the following equipment:
- selective unlocking (refer to the "Ac- cess" section),
- wiper linked with reverse gear (refer to the "Visibility" section),
- "follow-me-home" and welcome light- ing (refer to the "Visibility" section),
- daytime lights (refer to the "Visibil- ity" section).
For safety reasons, it is imperative
�t�h�a�t� �c�o�n�fi� �g�u�r�a�t�i�o�n� �o�f� �t�h�e� �m�u�l�t�i�f�u�n�c�-
tion displays by the driver takes
place when stationary.
Page 18 of 260

39
MULTIFUNCTION DISPLAYS
MONOCHROME SCREEN A Controls
Displays on the screen
This displays the following information:
- the time,
- the date,
� � �-� � �t�h�e� �o�u�t�s�i�d�e� �t�e�m�p�e�r�a�t�u�r�e� �*� � �(�t�h�i�s� �fl� �a�s�h�- es if there is a risk of ice),
- the status of the accesses (doors, boot, ...),
- the audio sources (radio, CD, ...),
- the trip computer (refer to the end of the section).
Warning messages (e.g.: "Emission
control system faulty") or information
messages (e.g.: "Boot open") may ap-
pear temporarily. These can be cleared
by pressing the "ESC" button. General menu
� Press the "MENU" button to gain
access to the general menu , then
press the " � " or " � " buttons to
scroll through the various menus:
- radio-CD,
� � �-� � �v�e�h�i�c�l�e� �c�o�n�fi� �g�u�r�a�t�i�o�n�,�
- options,
- display settings,
- languages,
- units.
� Press the "OK" button to select the
menu required.
From the RD4 audio equipment control
panel, you can:
� press the "MENU" button to gain
access to the general menu ,
� press the " � " or " � " buttons to scroll
through the items on the screen,
� press the "MODE" button to change
the permanent application (trip com-
puter, audio source, ...),
� press the " � " or " � " buttons to
change a setting value,
� press the "OK"� � �b�u�t�t�o�n� �t�o� �c�o�n�fi� �r�m�,� �
or
� press the "ESC" button to abandon
the operation in progress. Radio-CD
With the RD4 audio equipment switched
on, once the "Radio-CD" menu has been
selected you can activate or deactivate
the functions linked with use of the radio
(RDS, REG), the CD or the CD changer
�(�i�n�t�r�o�s�c�a�n�,� �s�h�u�f�fl� �e�,� �C�D� �r�e�p�e�a�t�)�.�
For further details concerning the "Ra-
dio-CD" application, refer to the RD4
part of the "Audio and Telematics" sec-
tion.
* With air conditioning only.
Page 19 of 260

!
40
MULTIFUNCTION DISPLAYS For safety reasons, it is imperative
�t�h�a�t� �c�o�n�fi� �g�u�r�a�t�i�o�n� �o�f� �t�h�e� �m�u�l�t�i�f�u�n�c�-
tion displays by the driver takes
place when stationary.
Display settings
Once the "Display settings" menu has
been selected, you can gain access to
the following settings:
- year,
- month,
- day,
- hour,
- minutes,
- 12 or 24 hour mode.
Languages
Once the "Languages" menu has been
selected, you can change the language
used by the display (Français, Italiano,
Nederlands, Portugues, Portugues-
Brasil, Deutsch, English, Espanol).
Units
Once the "Units" menu has been se-
lected, you can change the units of the
following parameters:
- temperature (°C or °F),
- fuel consumption (l/100 km, mpg or
km/l).
� Once you have selected a setting,
press the " � " or " � " buttons to
change its value.
� Press the " � " or " � " buttons to
switch respectively to the previous
�o�r� �n�e�x�t� �s�e�t�t�i�n�g�.�
� Press the "OK" button to record
the change and return to the normal
display or press the "ESC" button to
cancel.
� � �V�e�h�i�c�l�e� �c�o�n�fi� �g�u�r�a�t�i�o�n�
Options
Once the "Options" menu has been se-
lected, you can start diagnostics of the
status of the equipment (active, not ac-
tive, faulty).
� �O�n�c�e� �t�h�e� �"�V�e�h�i�c�l�e� �C�o�n�fi� �g�u�r�a�t�i�o�n�"� �m�e�n�u�
has been selected, you can activate or
deactivate the following equipment:
- selective unlocking (refer to the "Ac-
cess" section),
- wiper linked with reverse gear (refer to the "Visibility" section),
- "follow-me-home" and welcome lighting (refer to the "Visibility" sec-
tion),
- daytime lights (refer to the "Visibil- ity" section).
Page 20 of 260

41
MULTIFUNCTION DISPLAYS
MONOCHROME SCREEN C AND COLOUR SCREEN C General menu
Displays on the screen
This displays the following information:
- the time,
- the date,
� � �-� � �t�h�e� �o�u�t�s�i�d�e� �t�e�m�p�e�r�a�t�u�r�e� �*� � �(�t�h�i�s� �fl� �a�s�h�- es if there is a risk of ice),
- the status of the accesses (doors, boot, ...),
- the audio sources (radio, CD, ...),
- the trip computer (refer to the end of the section).
Warning messages (e.g.: "Emission
control system faulty") or information
messages (e.g.: "Automatic switching
on of the headlamps activated") may ap-
pear temporarily. These can be cleared
by pressing the "ESC" button. "Audio functions" menu Controls
From the RD4 audio equipment control
panel, you can:
� press the "MENU" button to gain
access to the general menu ,
� press the " � " or " � " buttons to scroll
through the items on the screen,
� press the "MODE" button to change
the permanent application (trip com-
puter, audio source, ...),
� press the " � " or " � " buttons to
change a setting value,
� press the "OK"� � �b�u�t�t�o�n� �t�o� �c�o�n�fi� �r�m�,� �
or
� press the "ESC" button to abandon
the operation in progress.
� Press the "MENU" button to gain
access to the general menu :
- audio functions,
- vehicle diagnostics,
� � �-� � �p�e�r�s�o�n�a�l�i�s�a�t�i�o�n�-�c�o�n�fi� �g�u�r�a�t�i�o�n�,�
- telephone (hands-free kit).
� Press the " � " or " � " buttons to se-
�l�e�c�t� �t�h�e� �m�e�n�u� �r�e�q�u�i�r�e�d�,� �t�h�e�n� �c�o�n�fi� �r�m�
by pressing the "OK" button.
* With air conditioning only.
With the RD4 audio equipment switched
on, once this menu has been select-
ed you can activate or deactivate the
functions linked with use of the radio
�(�R�D�S�,� �R�E�G�,� �R�a�d�i�o�T�e�x�t�)�,� �t�h�e� �C�D� �o�r� �t�h�e�
�C�D� �c�h�a�n�g�e�r� �(�i�n�t�r�o�s�c�a�n�,� �s�h�u�f�fl� �e�,� �C�D� �r�e�-
peat).
For further details concerning the "Au-
dio functions" application, refer to the
RD4 part of the "Audio and Telematics"
section.
Page 22 of 260

!
43
MULTIFUNCTION DISPLAYS
For safety reasons, it is imperative
�t�h�a�t� �c�o�n�fi� �g�u�r�a�t�i�o�n� �o�f� �t�h�e� �m�u�l�t�i�f�u�n�c�-
tion displays by the driver takes
place when stationary. "Telephone" menu
� � �D�i�s�p�l�a�y� �c�o�n�fi� �g�u�r�a�t�i�o�n�
Once this menu has been selected, you
can gain access to the following set-
tings:
- brightness-video setting,
- date and time setting,
- selection of the units.
Selection of the language
Once this menu has been selected,
you can change the language used by
the display (Deutsch, English, Espanol,
Français, Italiano, Nederlands, Portu-
gues, Portugues-Brasil).
� �E�x�a�m�p�l�e�:� �s�e�t�t�i�n�g� �o�f� �t�h�e� �d�u�r�a�t�i�o�n� �o�f� �t�h�e�
"follow-me-home" lighting
� Press the " � " or " � " buttons, then
the "OK" button to select the menu
required.
� Press the " � " or " � " buttons, then
the "OK" button to select the "Fol-
low-me-home lighting" line.
� Press the " � " or " � " buttons to set
the value required (15, 30 or 60 sec-
onds), then press the "OK" button
�t�o� �c�o�n�fi� �r�m�.�
� Press the " � " or " � " buttons, then
the "OK" button to select the "OK"
�b�o�x� �a�n�d� �c�o�n�fi� �r�m� �o�r� �p�r�e�s�s� �t�h�e� � "ESC"
button to cancel. With the RD4 audio equipment switched
on, once this menu has been select-
�e�d� �y�o�u� �c�a�n� �c�o�n�fi� �g�u�r�e� �y�o�u�r� �B�l�u�e�t�o�o�t�h�
hands-free kit (matching), consult the
various telephone directories (calls log,
services, ...) and manage your commu-
nications (pick up, hang up, call waiting,
secret mode, ...).
For further details concerning the "Tele-
phone" application, refer to the RD4 part
of the "Audio and Telematics" section.
Page 39 of 260

!
i
i
58
COMFORT As a safety precaution, do not car-
ry out any action on the cartridge
while driving.
Do not dismantle the cartridges.
� � � �D�o� �n�o�t� �a�t�t�e�m�p�t� �t�o� �r�e�fi� �l�l� �t�h�e� �f�r�a�g�r�a�n�c�e�
diffuser or the cartridges. Use origi-
nal PEUGEOT cartridges only.
Avoid all contact with the skin and
eyes.
Keep out of reach of children and
animals.
Leave the central vents open.
The intensity of diffusion of the fra-
grance may depend on the ventila-
tion or air conditioning settings.
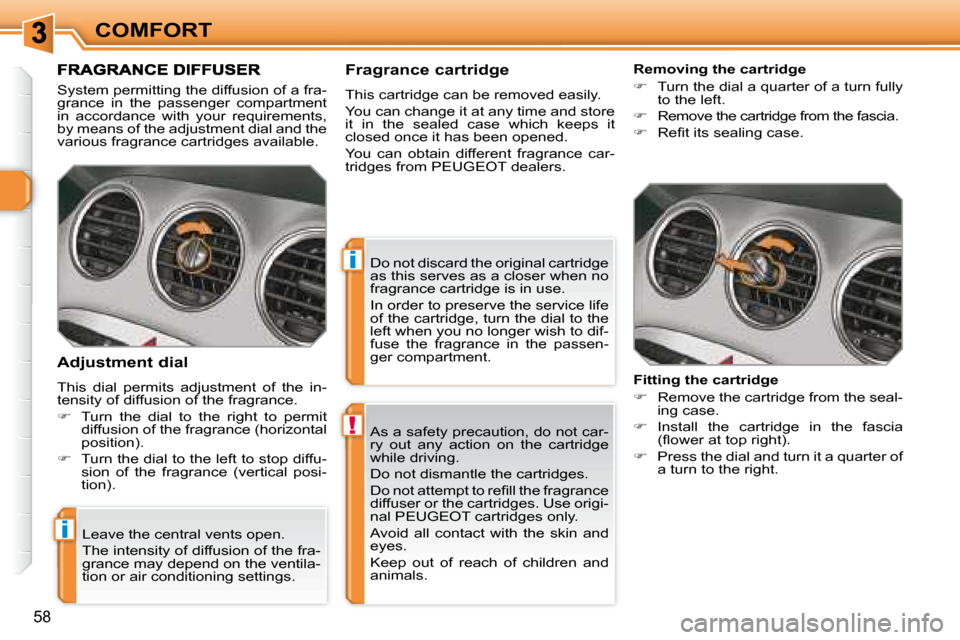
System permitting the diffusion of a fra-
grance in the passenger compartment
in accordance with your requirements,
by means of the adjustment dial and the
various fragrance cartridges available.
Fitting the cartridge
� Remove the cartridge from the seal-
ing case.
� Install the cartridge in the fascia
�(�fl� �o�w�e�r� �a�t� �t�o�p� �r�i�g�h�t�)�.�
� Press the dial and turn it a quarter of
a turn to the right.
Adjustment dial
This dial permits adjustment of the in-
tensity of diffusion of the fragrance.
� Turn the dial to the right to permit
diffusion of the fragrance (horizontal
position).
� Turn the dial to the left to stop diffu-
sion of the fragrance (vertical posi-
tion). Fragrance cartridge
This cartridge can be removed easily.
You can change it at any time and store
it in the sealed case which keeps it
closed once it has been opened.
You can obtain different fragrance car-
tridges from PEUGEOT dealers.
Removing the cartridge
� Turn the dial a quarter of a turn fully
to the left.
� Remove the cartridge from the fascia.
� � � �R�e�fi� �t� �i�t�s� �s�e�a�l�i�n�g� �c�a�s�e�.� � �
Do not discard the original cartridge
as this serves as a closer when no
fragrance cartridge is in use.
In order to preserve the service life
of the cartridge, turn the dial to the
left when you no longer wish to dif-
fuse the fragrance in the passen-
ger compartment.
Page 140 of 260

!i
145
DRIVING
Stopping the vehicle
Before switching off the engine, you
can engage position P or N to place the
�g�e�a�r�b�o�x� �i�n� �n�e�u�t�r�a�l�.�
In both cases, apply the handbrake to
immobilise the vehicle. Operating fault
When the ignition is on, the
lighting of this warning light, ac-
companied by an audible signal
and a message on the multi-
�f�u�n�c�t�i�o�n� �d�i�s�p�l�a�y�,� �i�n�d�i�c�a�t�e�s� �a� �g�e�a�r�b�o�x�
malfunction.
� �I�n� �t�h�i�s� �c�a�s�e�,� �t�h�e� �g�e�a�r�b�o�x� �s�w�i�t�c�h�e�s� �t�o�
emergency mode and is locked in 3rd
gear. You may feel a substantial knock
when changing from P to R and from N
to R . This will not cause any damage to
�t�h�e� �g�e�a�r�b�o�x�.�
� �D�o� �n�o�t� �e�x�c�e�e�d� �6�0� �m�p�h� �(�1�0�0� �k�m�/�h�)�,� �l�o�c�a�l�
speed restrictions permitting.
Have it checked by a PEUGEOT dealer.
� �I�f� �t�h�e� �b�a�t�t�e�r�y� �i�s� �fl� �a�t� �a�n�d� �t�h�e� �l�e�v�e�r� �i�s�
in position P , it will not be possible
to change to another position.
Above all, do not force the lever as
�t�h�i�s� �c�o�u�l�d� �d�a�m�a�g�e� �t�h�e� �g�e�a�r�b�o�x�.� �
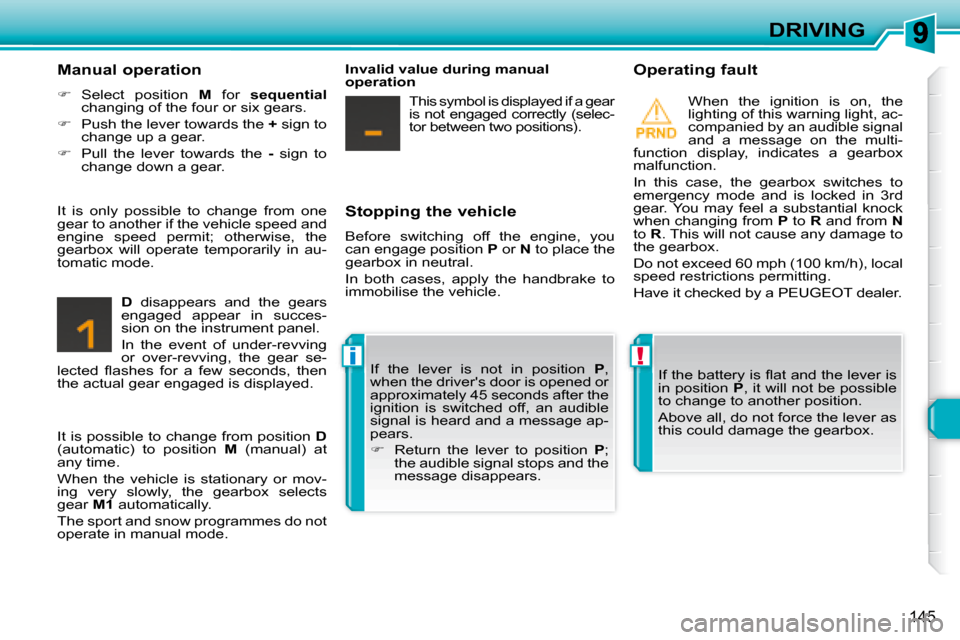
Manual operation
� Select position M for sequential
�c�h�a�n�g�i�n�g� �o�f� �t�h�e� �f�o�u�r� �o�r� �s�i�x� �g�e�a�r�s�.�
� Push the lever towards the + sign to
change up a gear.
� Pull the lever towards the - sign to
change down a gear.
D disappears and the gears
engaged appear in succes-
sion on the instrument panel.
In the event of under-revving
or over-revving, the gear se-
�l�e�c�t�e�d� �fl� �a�s�h�e�s� �f�o�r� �a� �f�e�w� �s�e�c�o�n�d�s�,� �t�h�e�n�
the actual gear engaged is displayed. If the lever is not in position
P ,
when the driver's door is opened or
�a�p�p�r�o�x�i�m�a�t�e�l�y� �4�5� �s�e�c�o�n�d�s� �a�f�t�e�r� �t�h�e�
ignition is switched off, an audible
signal is heard and a message ap-
pears.
� Return the lever to position P ;
the audible signal stops and the
message disappears.
It is only possible to change from one
gear to another if the vehicle speed and
engine speed permit; otherwise, the
�g�e�a�r�b�o�x� �w�i�l�l� �o�p�e�r�a�t�e� �t�e�m�p�o�r�a�r�i�l�y� �i�n� �a�u�-
tomatic mode.
Invalid value during manual
operation
This symbol is displayed if a gear
is not engaged correctly (selec-
tor between two positions).
It is possible to change from position D
(automatic) to position M (manual) at
any time.
When the vehicle is stationary or mov-
�i�n�g� �v�e�r�y� �s�l�o�w�l�y�,� �t�h�e� �g�e�a�r�b�o�x� �s�e�l�e�c�t�s�
gear M1 automatically.
The sport and snow programmes do not
operate in manual mode.
Page 164 of 260

11
i
!
169
PRACTICAL INFORMATION
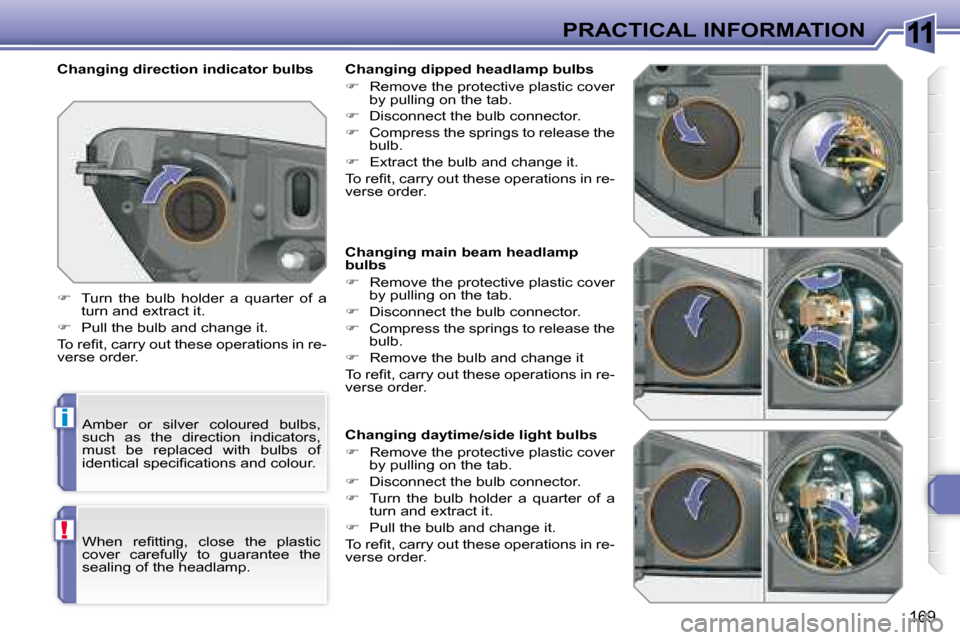
Changing main beam headlamp
bulbs
� Remove the protective plastic cover
by pulling on the tab.
� Disconnect the bulb connector.
� Compress the springs to release the
bulb.
� Remove the bulb and change it
� �T�o� �r�e�fi� �t�,� �c�a�r�r�y� �o�u�t� �t�h�e�s�e� �o�p�e�r�a�t�i�o�n�s� �i�n� �r�e�-
verse order.
Changing daytime/side light bulbs
� Remove the protective plastic cover
by pulling on the tab.
� Disconnect the bulb connector.
� Turn the bulb holder a quarter of a
�t�u�r�n� �a�n�d� �e�x�t�r�a�c�t� �i�t�.�
� Pull the bulb and change it.
� �T�o� �r�e�fi� �t�,� �c�a�r�r�y� �o�u�t� �t�h�e�s�e� �o�p�e�r�a�t�i�o�n�s� �i�n� �r�e�-
verse order.
Changing direction indicator bulbs
Amber or silver coloured bulbs,
such as the direction indicators,
must be replaced with bulbs of
�i�d�e�n�t�i�c�a�l� �s�p�e�c�i�fi� �c�a�t�i�o�n�s� �a�n�d� �c�o�l�o�u�r�.�
� Turn the bulb holder a quarter of a
�t�u�r�n� �a�n�d� �e�x�t�r�a�c�t� �i�t�.�
� Pull the bulb and change it.
� �T�o� �r�e�fi� �t�,� �c�a�r�r�y� �o�u�t� �t�h�e�s�e� �o�p�e�r�a�t�i�o�n�s� �i�n� �r�e�-
verse order.
� �W�h�e�n� �r�e�fi� �t�t�i�n�g�,� �c�l�o�s�e� �t�h�e� �p�l�a�s�t�i�c�
cover carefully to guarantee the
sealing of the headlamp. Changing dipped headlamp bulbs
� Remove the protective plastic cover
by pulling on the tab.
� Disconnect the bulb connector.
� Compress the springs to release the
bulb.
� � � �E�x�t�r�a�c�t� �t�h�e� �b�u�l�b� �a�n�d� �c�h�a�n�g�e� �i�t�.� �
� �T�o� �r�e�fi� �t�,� �c�a�r�r�y� �o�u�t� �t�h�e�s�e� �o�p�e�r�a�t�i�o�n�s� �i�n� �r�e�-
verse order.