2008 Peugeot 206 Dag tow
[x] Cancel search: towPage 38 of 123

39
COMFORT
-
VENTILATION
1. Windscreen de-icing or
demisting vents.
2. Front door windows
de-icing or demisting
vents.
3. Side vents.
4. Centre vents.
5. Air outlet to front
footwells.
6. Air outlet to rear footwells
(with automatic air
conditioning only). Advice on operation and
notes
�P�l�a�c�e� �t�h�e� �a�i�r� �l�o�w� �c�o�n�t�r�o�l� �a�t� �a� �l�e�v�e�l�
�s�u�f�i�c�i�e�n�t� �t�o� �e�n�s�u�r�e� �a�n� �a�d�e�q�u�a�t�e� �r�e
-
newal of air in the passenger com-
partment.
�W�h�e�n� �t�h�e� �a�i�r� �l�o�w� �c�o�n�t�r�o�l� �i�s� �i�n� �t�h�e�
OFF position (system switched off),
temperature-related comfort is no
longer guaranteed. However, a slight
�l�o�w� �o�f� �a�i�r�,� �d�u�e� �t�o� �t�h�e� �m�o�v�e�m�e�n�t� �o�f�
the vehicle, can still be felt.
Select the air distribution which is
�m�o�s�t� �s�u�i�t�e�d� �t�o� �y�o�u�r� �r�e�q�u�i�r�e�m�e�n�t�s� �a�n�d�
the weather conditions.
Change the temperature setting pro-
gressively for greater comfort.
Place the air intake control in the
"Exterior air" position, this facilitates
demisting.
If the interior temperature remains
very high following a long period
parked in the sun, do not hesitate to
ventilate the passenger compartment
for a few minutes.
To obtain a perfectly uniform distribu-
tion of air, do not cover the exterior
air intake grille, the vents, the air pas-
sages and the air outlets in the foot-
wells. In certain cases of particularly ardu-
ous use (towing the maximum load
on a steep gradient in a high temper-
ature), cutting off the air conditioning
permits recovery of the engine power
and, therefore improvement of the
towing capacity.
Ensure that the passenger com-
�p�a�r�t�m�e�n�t� �i�l�t�e�r�,� �l�o�c�a�t�e�d� �b�y� �t�h�e� �w�i�n�d
-
screen, under the bonnet, is in good
�c�o�n�d�i�t�i�o�n�.� �H�a�v�e� �t�h�e� �i�l�t�e�r� �e�l�e�m�e�n�t�s�
replaced regularly. If you drive in a
dusty environment, change them
twice as often.
The air conditioning system does not
contain chlorine and does not present
any danger to the ozone layer.
Operate the air conditioning system
for 5 to 10 minutes, once or twice a
month to keep it in perfect working
order.
The water formed by the condensa-
tion of the air conditioning system is
discharged via an opening provided
for this purpose. Therefore, a pud-
dle may form underneath the vehicle
when stationary.
If the system does not produce
cold air, do not use it and contact a
PEUGEOT dealer.
Page 44 of 123

45
COMFORT
-
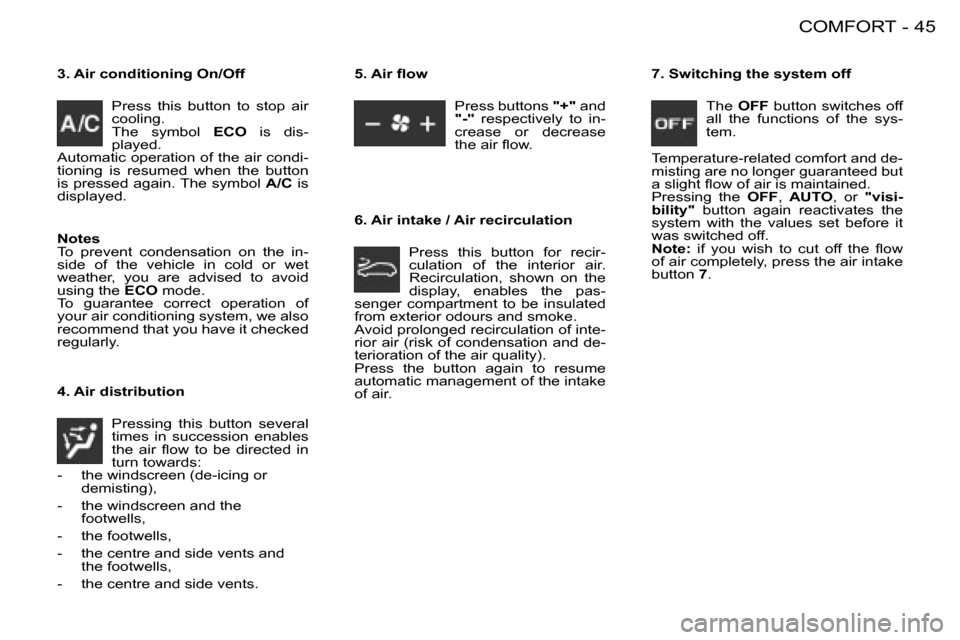
3. Air conditioning On/Off
Press this button to stop air
cooling.
The symbol ECO is dis-
played.
Automatic operation of the air condi-
tioning is resumed when the button
is pressed again. The symbol A/C is
displayed.
4. Air distribution
Pressing this button several
times in succession enables
�t�h�e� �a�i�r� �l�o�w� �t�o� �b�e� �d�i�r�e�c�t�e�d� �i�n�
turn towards:
- the windscreen (de-icing or demisting),
- the windscreen and the footwells,
- the footwells,
- the centre and side vents and the footwells,
- the centre and side vents. �5�.� �A�i�r� �l�o�w
Press buttons "+" and
"-" respectively to in-
crease or decrease
�t�h�e� �a�i�r� �l�o�w�.
6. Air intake / Air recirculation �7�.� �S�w�i�t�c�h�i�n�g� �t�h�e� �s�y�s�t�e�m� �o�f�f
The OFF button switches off
all the functions of the sys-
tem.
Temperature-related comfort and de-
misting are no longer guaranteed but
�a� �s�l�i�g�h�t� �l�o�w� �o�f� �a�i�r� �i�s� �m�a�i�n�t�a�i�n�e�d�.
Pressing the OFF, AUTO , or "visi-
bility" button again reactivates the
system with the values set before it
was switched off.
Note: � �i�f� �y�o�u� �w�i�s�h� �t�o� �c�u�t� �o�f�f� �t�h�e� �l�o�w�
of air completely, press the air intake
button 7.
Press this button for recir-
culation of the interior air.
Recirculation, shown on the
display, enables the pas-
senger compartment to be insulated
from exterior odours and smoke.
Avoid prolonged recirculation of inte-
rior air (risk of condensation and de-
�t�e�r�i�o�r�a�t�i�o�n� �o�f� �t�h�e� �a�i�r� �q�u�a�l�i�t�y�)�.
Press the button again to resume
automatic management of the intake
of air.
Notes
To prevent condensation on the in-
side of the vehicle in cold or wet
weather, you are advised to avoid
using the
ECO mode.
To guarantee correct operation of
your air conditioning system, we also
recommend that you have it checked
regularly.
Page 46 of 123

47
COMFORT
-
FRONT SEATS It is impossible to access the
rear seats if the front seat is in
the reclining position.
B. Pull one of the two handles and
push forwards to fold the seat
back. The seat does not move
forward.
On repositioning, the seat back
returns to its initial angle.
Never drive with the head
�r�e�s�t�r�a�i�n�t�s� �r�e�m�o�v�e�d�;� �t�h�e�y�
must be in place and cor-
rectly adjusted. Rear head restraints, "comma"
type
These have a high position for when
they are in use and a low position for
when they are stored. They are re-
movable.
To lower the head restraints, press
the lug.
To remove them, pull upwards as far
as the stop, then press the release
control.
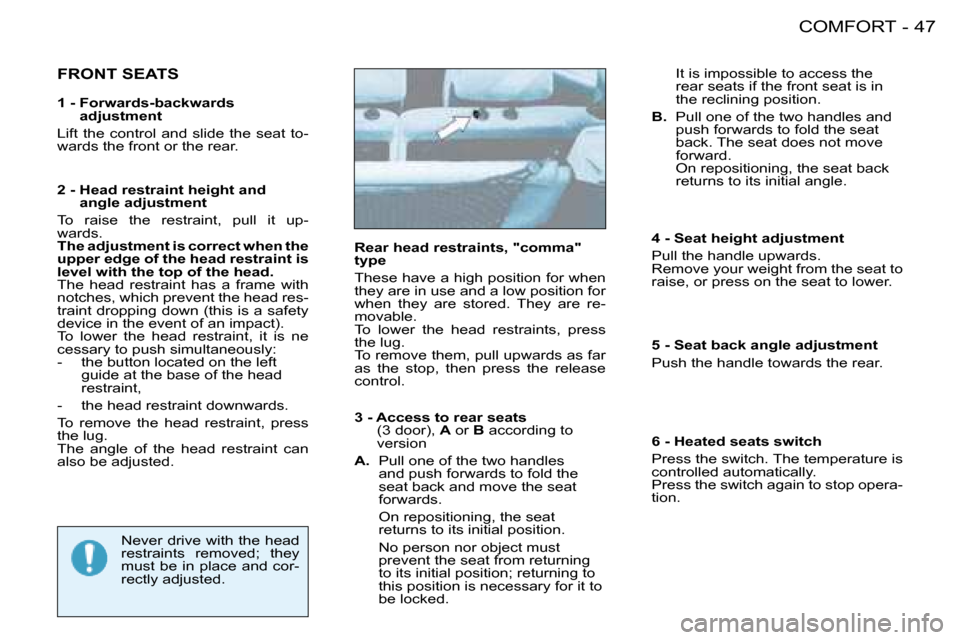
�1� �-� � �F�o�r�w�a�r�d�s�-�b�a�c�k�w�a�r�d�s�
adjustment
Lift the control and slide the seat to-
wards the front or the rear.
2 - Head restraint height and angle adjustment
To raise the restraint, pull it up-
wards.
�T�h�e� �a�d�j�u�s�t�m�e�n�t� �i�s� �c�o�r�r�e�c�t� �w�h�e�n� �t�h�e�
upper edge of the head restraint is
�l�e�v�e�l� �w�i�t�h� �t�h�e� �t�o�p� �o�f� �t�h�e� �h�e�a�d�.
The head restraint has a frame with
notches, which prevent the head res-
traint dropping down (this is a safety
device in the event of an impact).
To lower the head restraint, it is ne
cessary to push simultaneously:
- the button located on the left guide at the base of the head
restraint,
- the head restraint downwards.
To remove the head restraint, press
the lug.
The angle of the head restraint can
also be adjusted. 3 - Access to rear seats
(3 door), A or B according to
version
A. Pull one of the two handles
and push forwards to fold the
seat back and move the seat
forwards.
On repositioning, the seat returns to its initial position.
No person nor object must prevent the seat from returning
�t�o� �i�t�s� �i�n�i�t�i�a�l� �p�o�s�i�t�i�o�n�;� �r�e�t�u�r�n�i�n�g� �t�o�
this position is necessary for it to
be locked. 4 - Seat height adjustment
Pull the handle upwards.
Remove your weight from the seat to
raise, or press on the seat to lower.
5 - Seat back angle adjustment
Push the handle towards the rear.
6 -
�H�e�a�t�e�d� �s�e�a�t�s� �s�w�i�t�c�h
Press the switch. The temperature is
controlled automatically.
Press the switch again to stop opera-
tion.
Page 47 of 123

47
COMFORT
-
FRONT SEATS It is impossible to access the
rear seats if the front seat is in
the reclining position.
B. Pull one of the two handles and
push forwards to fold the seat
back. The seat does not move
forward.
On repositioning, the seat back
returns to its initial angle.
Never drive with the head
�r�e�s�t�r�a�i�n�t�s� �r�e�m�o�v�e�d�;� �t�h�e�y�
must be in place and cor-
rectly adjusted. Rear head restraints, "comma"
type
These have a high position for when
they are in use and a low position for
when they are stored. They are re-
movable.
To lower the head restraints, press
the lug.
To remove them, pull upwards as far
as the stop, then press the release
control.
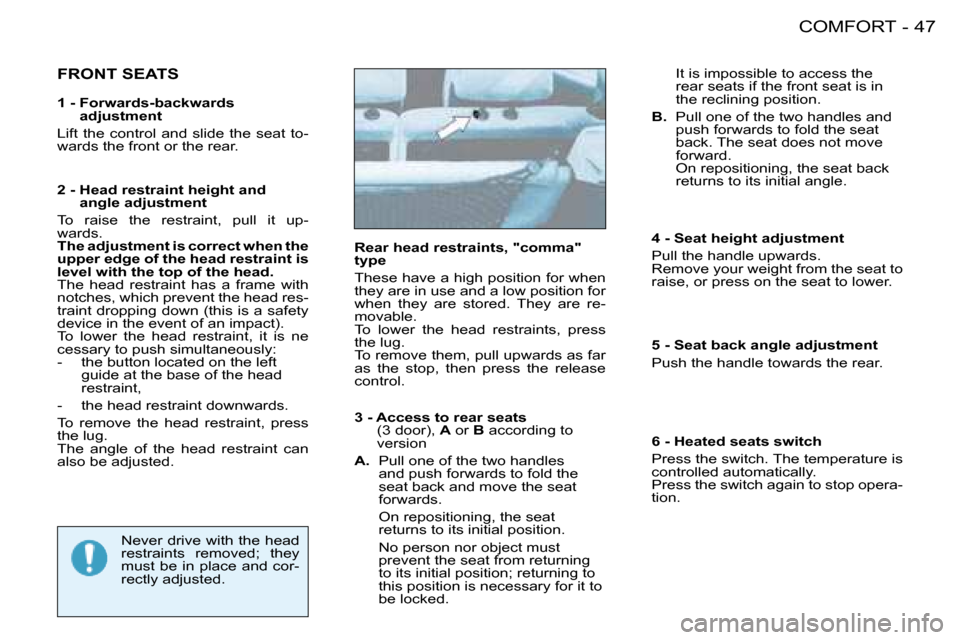
�1� �-� � �F�o�r�w�a�r�d�s�-�b�a�c�k�w�a�r�d�s�
adjustment
Lift the control and slide the seat to-
wards the front or the rear.
2 - Head restraint height and angle adjustment
To raise the restraint, pull it up-
wards.
�T�h�e� �a�d�j�u�s�t�m�e�n�t� �i�s� �c�o�r�r�e�c�t� �w�h�e�n� �t�h�e�
upper edge of the head restraint is
�l�e�v�e�l� �w�i�t�h� �t�h�e� �t�o�p� �o�f� �t�h�e� �h�e�a�d�.
The head restraint has a frame with
notches, which prevent the head res-
traint dropping down (this is a safety
device in the event of an impact).
To lower the head restraint, it is ne
cessary to push simultaneously:
- the button located on the left guide at the base of the head
restraint,
- the head restraint downwards.
To remove the head restraint, press
the lug.
The angle of the head restraint can
also be adjusted. 3 - Access to rear seats
(3 door), A or B according to
version
A. Pull one of the two handles
and push forwards to fold the
seat back and move the seat
forwards.
On repositioning, the seat returns to its initial position.
No person nor object must prevent the seat from returning
�t�o� �i�t�s� �i�n�i�t�i�a�l� �p�o�s�i�t�i�o�n�;� �r�e�t�u�r�n�i�n�g� �t�o�
this position is necessary for it to
be locked. 4 - Seat height adjustment
Pull the handle upwards.
Remove your weight from the seat to
raise, or press on the seat to lower.
5 - Seat back angle adjustment
Push the handle towards the rear.
6 -
�H�e�a�t�e�d� �s�e�a�t�s� �s�w�i�t�c�h
Press the switch. The temperature is
controlled automatically.
Press the switch again to stop opera-
tion.
Page 50 of 123

COMFORT
50 -
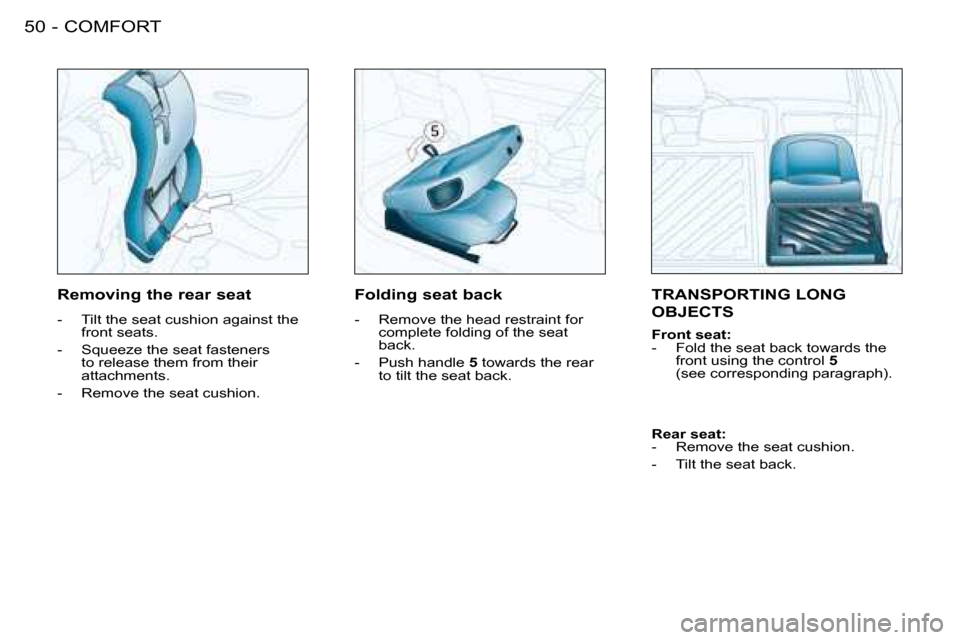
TRANSPORTING LONG
OBJECTS
Front seat:
- Fold the seat back towards the
front using the control 5
(see corresponding paragraph).
Removing the rear seat
- Tilt the seat cushion against the
front seats.
�-� �S�q�u�e�e�z�e� �t�h�e� �s�e�a�t� �f�a�s�t�e�n�e�r�s� to release them from their
attachments.
- Remove the seat cushion. Folding seat back
- Remove the head restraint for
complete folding of the seat
back.
- Push handle 5 towards the rear
to tilt the seat back.
Rear seat:
- Remove the seat cushion.
- Tilt the seat back.
Page 66 of 123

63
VISIBILITY
-
LIGHTS STALK
Dipped / Main beam
change
Pull the stalk towards you. �V�e�h�i�c�l�e�s� �i�t�t�e�d� �w�i�t�h� �f�r�o�n�t�
�f�o�g� �l�a�m�p�s� �a�n�d� �a� �r�e�a�r� �f�o�g� �l�a�m�p�
�(�r�i�n�g� �C�)
Side lights Dipped / Main beam
headlampsAutomatic switching
on of lights Rear fog lamp �F�r�o�n�t� �f�o�g� �l�a�m�p�s� �(�i�r�s�t� �r�o�t�a�t�i�o�n�
of the ring forwards)
Front and rear fog
lamps (2nd rotation of
the ring forwards).
�N�o�t�e�: to switch off the rear fog lamp
and the front fog lamps, turn the ring
backwards twice in succession.
�N�o�t�e�: when the lights are switched
off automatically or when the dipped
headlamps are switched off manu-
ally, the front fog lamps, the rear fog
lamp and the side lights remain on
(turn the ring backwards to switch off
the front fog lamps. The side lights
then switch off).
�V�e�h�i�c�l�e�s� �i�t�t�e�d� �w�i�t�h� �a� �r�e�a�r� �f�o�g�
�l�a�m�p� �(�r�i�n�g� �B�)
This only operates with the dipped /
main beam headlamps.
�N�o�t�e�: when the lights are switched
off automatically, the rear fog lamp
and the dipped headlamps remain on
(turn the ring backwards to switch off
the rear fog lamp. The dipped head-
lamps and side lights then switch off). The front fog lamps operate with
the side lights and the dipped head-
lamps.
Lights off �F�r�o�n�t� �f�o�g� �l�a�m�p�s� �a�n�d� �r�e�a�r�
�f�o�g� �l�a�m�p
Rotate the ring forwards to switch on
and backwards to switch off. The sta-
�t�u�s� �i�s� �c�o�n�i�r�m�e�d� �b�y� �t�h�e� �i�n�d�i�c�a�t�o�r� �l�i�g�h�t�
on the instrument panel.
�L�i�g�h�t�s� �o�n� �r�e�m�i�n�d�e�r
With the ignition off and the auto-
matic lighting function switched off,
when the driver's door is opened, a
buzzer sounds if you have left your
lights on.
�F�r�o�n�t� �a�n�d� �r�e�a�r� �l�i�g�h�t�s
Selection is by turning ring A.
Page 88 of 123

83
SAFETY
-
AIR BAGS
The air bags have been designed to
maximise the safety of the occupants
in the event of serious collisions. They
work in conjunction with the force-lim-
iting seat belts. The electronic detec-
tors register and analyse any abrupt
deceleration of the vehicle in the im-
pact detection zones (see diagram):
if the triggering threshold is reached,
�t�h�e� �a�i�r� �b�a�g�s� �i�n�l�a�t�e� �i�n�s�t�a�n�t�l�y� �a�n�d� �p�r�o -
tect the occupants of the vehicle. Immediately after the impact, the air
�b�a�g�s� �d�e�l�a�t�e� �r�a�p�i�d�l�y� �s�o� �t�h�a�t� �t�h�e�y� �d�o�
not hinder the visibility of the occu-
pants nor their exit if necessary from
the vehicle.
The air bags are not deployed in the
case of minor impacts, rear impacts
or in certain roll-over conditions. The
�s�e�a�t� �b�e�l�t� �i�s� �s�u�f�i�c�i�e�n�t� �t�o� �e�n�s�u�r�e� �m�a�x�i
-
mum protection in these situations.
The seriousness of a collision de-
pends on the nature of the obstacle
and the speed of the vehicle at the
moment of the collision.
�A�i�r� �b�a�g�s� �o�n�l�y� �o�p�e�r�a�t�e� �w�h�e�n� �t�h�e� �i�g -
�n�i�t�i�o�n� �i�s� �s�w�i�t�c�h�e�d� �o�n�.
Note: the gas escaping from
the air bags can be a minor
irritant.
Impact detection zones
A. Front impact zone.
B. Side impact zone. If this warning light comes
on, accompanied by an au-
dible signal and a message
on the multifunction display,
contact a PEUGEOT dealer to have
the system checked. The air bags
may no longer be triggered in the
event of a serious impact �F�r�o�n�t� �a�i�r� �b�a�g� �m�a�l�f�u�n�c�t�i�o�n
FRONT AIR BAGS
These are folded in the centre of the
steering wheel for the driver and in
the fascia for the front passenger.
They are deployed simultaneously,
except in cases where the passen-
ger air bag is disarmed, in the event
of a serious front impact applied in
the impact zone
A in the longitudinal
centreline of the vehicle, on a hori-
zontal plane and from the front of the
vehicle towards the rear. The air bag
�i�n�l�a�t�e�s� �b�e�t�w�e�e�n� �t�h�e� �f�r�o�n�t� �o�c�c�u�p�a�n�t� �o�f�
the vehicle and the fascia to cushion
his forward movement. The air bags
therefore limit the risk of injury to the
head and chest.
Page 89 of 123

SAFETY
84 -
SIDE AIR BAGS AND
CURTAIN AIR BAGS
The side air bags are incorporated
into the front seat backs on the door
side.
The triggering of these air bags re-
quires a serious side impact applied
in the side impact zone B, perpen-
dicular to the longitudinal centreline
of the vehicle, on a horizontal plane
and from the outside of the vehicle
towards the inside. The side air bag
�i�n�l�a�t�e�s� �b�e�t�w�e�e�n� �t�h�e� �f�r�o�n�t� �o�c�c�u�p�a�n�t�
of the vehicle and the door trim pad.
It therefore limits the risk of injury to
the chest.
The rear side air bags afford the rear
passengers the same protection
which the front side air bags offer the
front passengers. If the passenger air bag is
disarmed, the warning light
on the instrument panel re-
mains on until the passenger
air bag is reactivated.
If this warning light comes
on, accompanied by an au-
dible signal and a message
on the multifunction display,
contact a PEUGEOT dealer to have
the system checked. The air bags
may no longer be triggered in the
event of a serious impact.
�D�i�s�a�r�m�i�n�g� �(�c�h�e�c�k�)
The curtain air bags are incorporated
in the headlining.
�T�h�e� �c�u�r�t�a�i�n� �a�i�r� �b�a�g� �i�n�l�a�t�e�s� �b�e�t�w�e�e�n�
the front or rear occupant and the
windows. It therefore limits the risk of
head injuries. In the event of a minor
impact or bump on the side of the ve-
hicle or if the vehicle rolls over, the
air bag may not be triggered. The air
bag is not triggered in the event of a
front or rear collision.
�D�i�s�a�r�m�i�n�g� �t�h�e� �p�a�s�s�e�n�g�e�r�
air bag
�T�o� �e�n�s�u�r�e� �t�h�e� �s�a�f�e�t�y� �o�f� �y�o�u�r� �c�h�i�l�d�,�
�i�t� �i�s� �e�s�s�e�n�t�i�a�l� �t�o� �d�i�s�a�r�m� �t�h�e� �p�a�s -
�s�e�n�g�e�r� �a�i�r� �b�a�g� �w�h�e�n� �y�o�u� �i�n�s�t�a�l�l�
�a� �"�r�e�a�r�-�f�a�c�i�n�g�"� �c�h�i�l�d� �s�e�a�t� �o�n� �t�h�e�
�f�r�o�n�t� �p�a�s�s�e�n�g�e�r� �s�e�a�t�.� �O�t�h�e�r�w�i�s�e�,�
�t�h�e� �c�h�i�l�d� �w�o�u�l�d� �r�i�s�k� �b�e�i�n�g� �s�e�r�i -
�o�u�s�l�y� �i�n�j�u�r�e�d� �o�r� �k�i�l�l�e�d� �i�f� �t�h�e� �a�i�r� �b�a�g�
�w�e�r�e� �t�o� �i�n�l�a�t�e�.
�F �W�i�t�h� �t�h�e� �i�g�n�i�t�i�o�n� �s�w�i�t�c�h�e�d� �o�f�f ,
insert the key into the passenger
air bag disarming switch 1, turn
it to the "OFF" position, then
remove the key keeping the
switch in this position.
In the "OFF" position, the passen-
ger air bag will not be triggered in the
event of an impact.
As soon as the child seat is removed,
turn the air bag switch to the "ON"
position to re-activate the air bag and
thus ensure the safety of your pas-
senger in the event of an impact. �A�i�r� �b�a�g�s� �m�a�l�f�u�n�c�t�i�o�n