Page 31 of 217
Black plate (34,1)
Model "NAV2-N" EDITED: 2007/ 3/ 9
2. The system announces, “Please say a
command”.
3. Speak “Destination street address”.
4. Speak the name of the state, “California”.
5. Speak the name of the city, “Gardena”.
6. Speak the name of the street, “South
figueroa street”.
INFO:
.Only the official street names stored in
the map data can be recognized by the
system.
.You need to speak the street name
precisely including boulevard, way,
north, south, etc. In this case, you
cannot speak “Figueroa street” or “Fig-
ueroa”.
7. Voice feedback will be provided when the
command is accepted, and the list of street
names appears.
8. After the tone sounds and the icon on the
screen changes again, speak “One”.
2-26Getting started
Page 36 of 217

Black plate (39,1)
Model "NAV2-N" EDITED: 2007/ 3/ 9
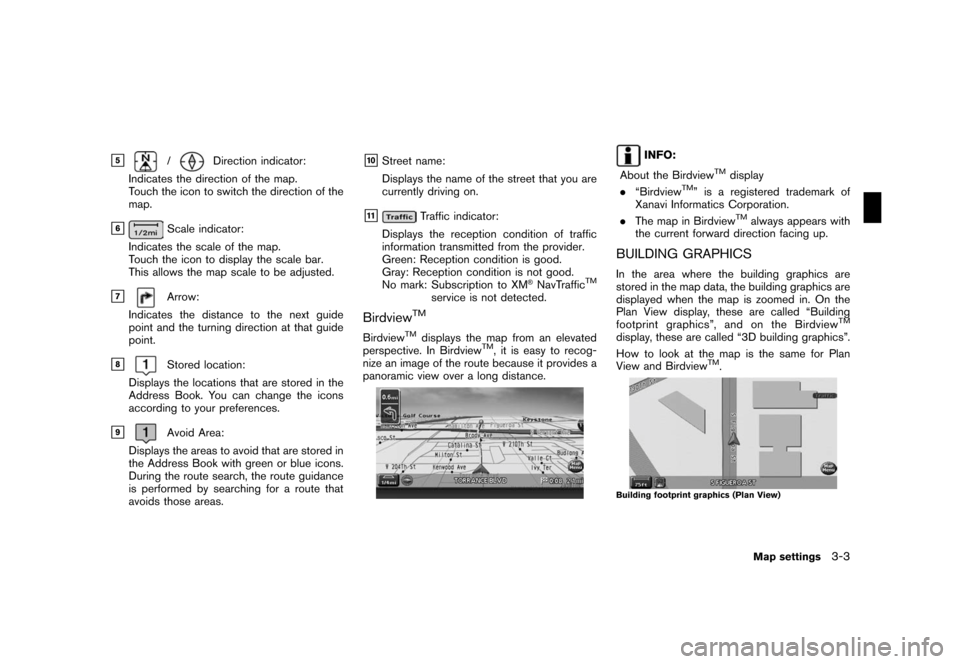
&5/Direction indicator:
Indicates the direction of the map.
Touch the icon to switch the direction of the
map.
&6Scale indicator:
Indicates the scale of the map.
Touch the icon to display the scale bar.
This allows the map scale to be adjusted.
&7Arrow:
Indicates the distance to the next guide
point and the turning direction at that guide
point.
&8Stored location:
Displays the locations that are stored in the
Address Book. You can change the icons
according to your preferences.
&9Avoid Area:
Displays the areas to avoid that are stored in
the Address Book with green or blue icons.
During the route search, the route guidance
is performed by searching for a route that
avoids those areas.
&10Street name:
Displays the name of the street that you are
currently driving on.
&11Traffic indicator:
Displays the reception condition of traffic
information transmitted from the provider.
Green: Reception condition is good.
Gray: Reception condition is not good.
No mark: Subscription to XM
®NavTrafficTM
service is not detected.
BirdviewTM
BirdviewTMdisplays the map from an elevated
perspective. In BirdviewTM, it is easy to recog-
nize an image of the route because it provides a
panoramic view over a long distance.
INFO:
About the Birdview
TMdisplay
.“BirdviewTM” is a registered trademark of
Xanavi Informatics Corporation.
.The map in Birdview
TMalways appears with
the current forward direction facing up.
BUILDING GRAPHICS
In the area where the building graphics are
stored in the map data, the building graphics are
displayed when the map is zoomed in. On the
Plan View display, these are called “Building
footprint graphics”, and on the Birdview
TM
display, these are called “3D building graphics”.
How to look at the map is the same for Plan
View and Birdview
TM.
Building footprint graphics (Plan View)
Map settings3-3
Page 42 of 217
Black plate (45,1)
Model "NAV2-N" EDITED: 2007/ 3/ 9
OPERATING WITH THE BUTTONS ON
THE CONTROL PANEL
Pushor. A scale
appears on the left side of the screen.
To view the map in detail, push.
To view a wider area, push.
The scale will automatically disappear when
neithernorhas
been pushed for several seconds.
If the scaling operation is not performed for a
specified period of time, the scale display
disappears.
INFO:
Free zoom:
Once the Free Zoom is set in the setting screen,
the scale can be changed in smaller steps when
you push and holdor
OUT>than when you briefly push the button.
If you briefly push the button, the operation
returns to normal.
CHANGING THE SCALE OF A MAP
Map settings3-9
Page 46 of 217
![NISSAN XTERRA 2008 N50 / 2.G 06IT Navigation Manual Black plate (49,1)
Model "NAV2-N" EDITED: 2007/ 3/ 9
2. Highlight [Map Settings] and push
<ENTER>.
3. Highlight [Change View] and push the right
button of the directional buttons.
4. Highlight the pre NISSAN XTERRA 2008 N50 / 2.G 06IT Navigation Manual Black plate (49,1)
Model "NAV2-N" EDITED: 2007/ 3/ 9
2. Highlight [Map Settings] and push
<ENTER>.
3. Highlight [Change View] and push the right
button of the directional buttons.
4. Highlight the pre](/manual-img/5/795/w960_795-45.png)
Black plate (49,1)
Model "NAV2-N" EDITED: 2007/ 3/ 9
2. Highlight [Map Settings] and push
.
3. Highlight [Change View] and push the right
button of the directional buttons.
4. Highlight the preferred map view and push
. The indicator of the selected
map view illuminates.
5. Push
Page 68 of 217

Black plate (71,1)
Model "NAV2-N" EDITED: 2007/ 3/ 9
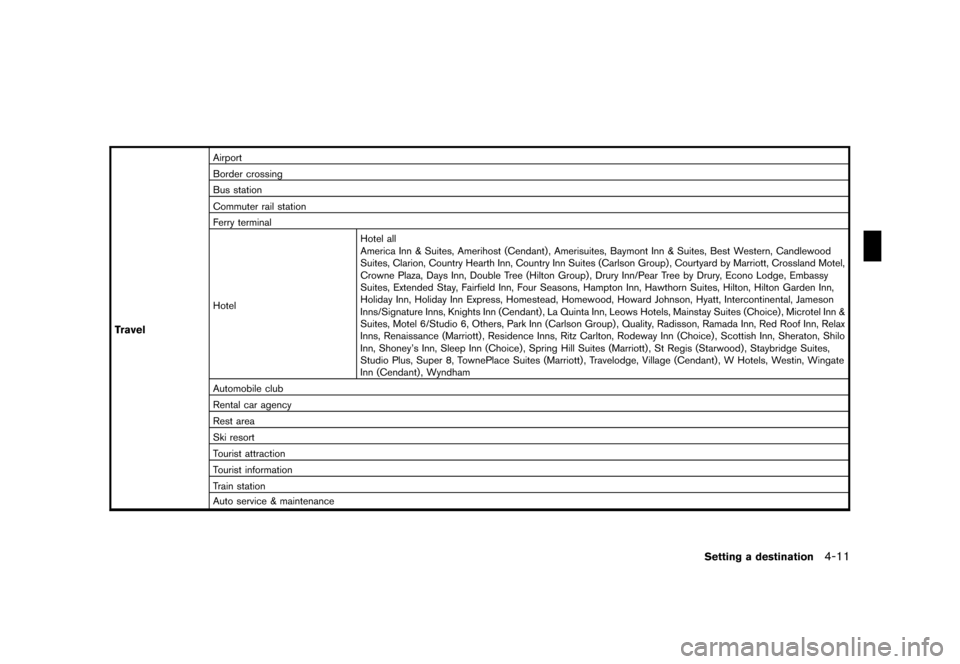
Travel
Airport
Border crossing
Bus station
Commuter rail station
Ferry terminal
HotelHotel all
America Inn & Suites, Amerihost (Cendant) , Amerisuites, Baymont Inn & Suites, Best Western, Candlewood
Suites, Clarion, Country Hearth Inn, Country Inn Suites (Carlson Group) , Courtyard by Marriott, Crossland Motel,
Crowne Plaza, Days Inn, Double Tree (Hilton Group) , Drury Inn/Pear Tree by Drury, Econo Lodge, Embassy
Suites, Extended Stay, Fairfield Inn, Four Seasons, Hampton Inn, Hawthorn Suites, Hilton, Hilton Garden Inn,
Holiday Inn, Holiday Inn Express, Homestead, Homewood, Howard Johnson, Hyatt, Intercontinental, Jameson
Inns/Signature Inns, Knights Inn (Cendant) , La Quinta Inn, Leows Hotels, Mainstay Suites (Choice) , Microtel Inn &
Suites, Motel 6/Studio 6, Others, Park Inn (Carlson Group) , Quality, Radisson, Ramada Inn, Red Roof Inn, Relax
Inns, Renaissance (Marriott) , Residence Inns, Ritz Carlton, Rodeway Inn (Choice) , Scottish Inn, Sheraton, Shilo
Inn, Shoney’s Inn, Sleep Inn (Choice), Spring Hill Suites (Marriott) , St Regis (Starwood), Staybridge Suites,
Studio Plus, Super 8, TownePlace Suites (Marriott) , Travelodge, Village (Cendant) , W Hotels, Westin, Wingate
Inn (Cendant) , Wyndham
Automobile club
Rental car agency
Rest area
Ski resort
Tourist attraction
Tourist information
Train station
Auto service & maintenance
Setting a destination4-11
Page 72 of 217
Black plate (75,1)
Model "NAV2-N" EDITED: 2007/ 3/ 9
1. Push.
2. Highlight [Nearby Places] and push
.
3. Highlight the preferred destination Points of
Interest and push.
A list screen is displayed.
4. Highlight the preferred destination from the
list, and push.
The position of the selected location is
displayed in the preview on the right side
of the screen.
INFO:
.If the suggested route is already set, by
highlighting [Show Along Route] and
pushing, the system displays
only the facilities located along the
route.
.A maximum of 100 facilities can be
displayed on the list screen.
5. The selected destination is displayed at the
center of the map. Highlight [Start] after
confirming the location and push
. The system sets the destination
to the selected location and starts calculat-
ing a route.
INFO:
If the route is already set, the selected location
becomes a waypoint.
Other settings
Setting a destination4-15
Page 82 of 217

Black plate (85,1)
Model "NAV2-N" EDITED: 2007/ 3/ 9
AVAILABLE SETTING ITEMS
.Start:
Sets the destination. If the route is already
set, the location becomes the new destina-
tion, and the route is recalculated.
.Route Details:
Allows you to change the route search
conditions or to check the route information.
“PROCEDURES AFTER SETTING A
DESTINATION” (page 5-2)
.Move Dest.:
Displays a map screen where you can adjust
the location of the destination.
.Add to Route:
Allows you to add a waypoint to the route
already set.
.Store Dest.:
Allows you to store the location in the
Address Book.
.POI Info.:
Allows you to view information about the
facility that you have set as the destination if
it is included in the map data.
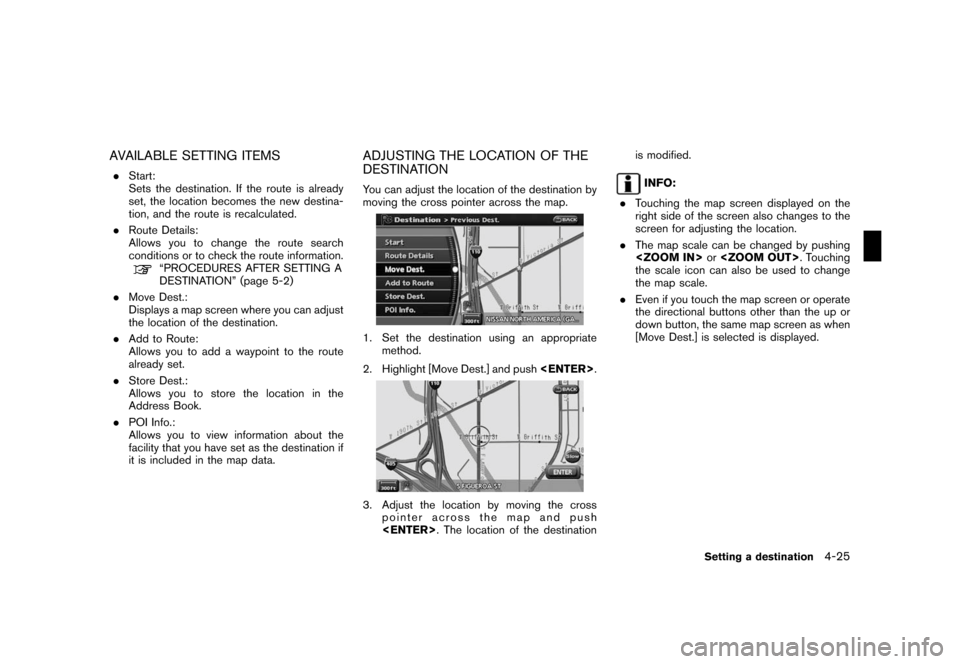
ADJUSTING THE LOCATION OF THE
DESTINATION
You can adjust the location of the destination by
moving the cross pointer across the map.
1. Set the destination using an appropriate
method.
2. Highlight [Move Dest.] and push.
3. Adjust the location by moving the cross
pointer across the map and push
. The location of the destinationis modified.
INFO:
.Touching the map screen displayed on the
right side of the screen also changes to the
screen for adjusting the location.
.The map scale can be changed by pushing
or. Touching
the scale icon can also be used to change
the map scale.
.Even if you touch the map screen or operate
the directional buttons other than the up or
down button, the same map screen as when
[Move Dest.] is selected is displayed.
Setting a destination4-25
Page 87 of 217

Black plate (90,1)
Model "NAV2-N" EDITED: 2007/ 3/ 9
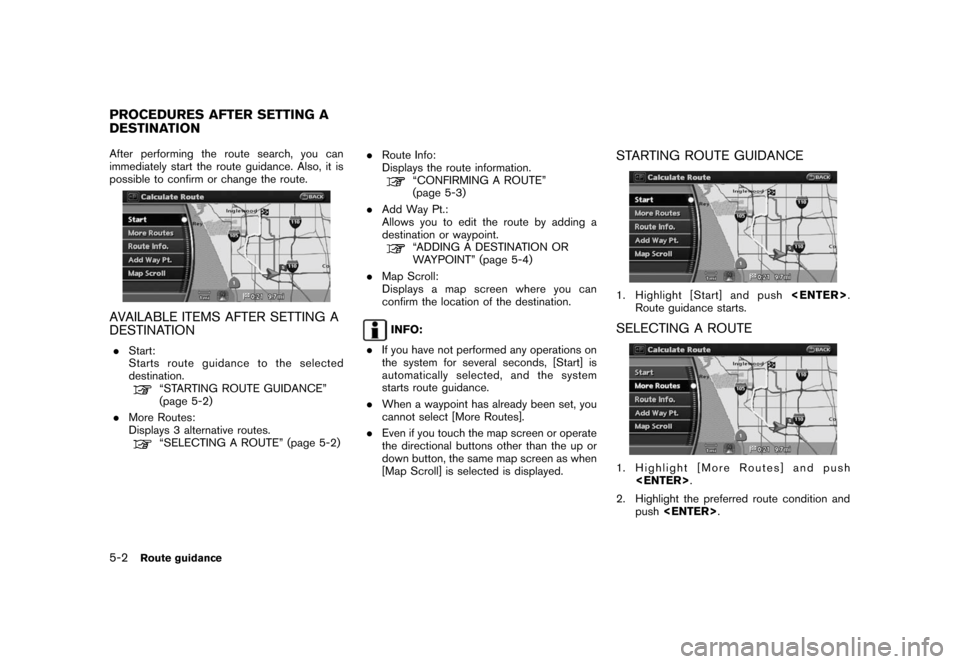
After performing the route search, you can
immediately start the route guidance. Also, it is
possible to confirm or change the route.
AVAILABLE ITEMS AFTER SETTING A
DESTINATION
.Start:
Starts route guidance to the selected
destination.
“STARTING ROUTE GUIDANCE”
(page 5-2)
.More Routes:
Displays 3 alternative routes.
“SELECTING A ROUTE” (page 5-2).Route Info:
Displays the route information.
“CONFIRMING A ROUTE”
(page 5-3)
.Add Way Pt.:
Allows you to edit the route by adding a
destination or waypoint.
“ADDING A DESTINATION OR
WAYPOINT” (page 5-4)
.Map Scroll:
Displays a map screen where you can
confirm the location of the destination.
INFO:
.If you have not performed any operations on
the system for several seconds, [Start] is
automatically selected, and the system
starts route guidance.
.When a waypoint has already been set, you
cannot select [More Routes].
.Even if you touch the map screen or operate
the directional buttons other than the up or
down button, the same map screen as when
[Map Scroll] is selected is displayed.
STARTING ROUTE GUIDANCE
1. Highlight [Start] and push.
Route guidance starts.
SELECTING A ROUTE
1. Highlight [More Routes] and push
.
2. Highlight the preferred route condition and
push.
PROCEDURES AFTER SETTING A
DESTINATION
5-2Route guidance