2008 NISSAN VERSA HATCHBACK ECU
[x] Cancel search: ECUPage 230 of 304

and are installed securely. Check the belt web-
bing for cuts, fraying, wear or damage.
Steering wheelCheck for changes in the steer-
ing system, such as excessive freeplay, hard
steering or strange noises.
Warning lights and chimesMake sure all
warning lights and chimes are operating properly.
Windshield wiper and washer*Check that
the wipers and washer operate properly and that
the wipers do not streak.
Windshield defrosterCheck that the air
comes out of the defroster outlets properly and in
sufficient quantity when operating the heater or
air conditioner.
Under the hood and vehicle
The maintenance items listed here should be
checked periodically (for example, each time you
check the engine oil or refuel) .
Battery*Check the fluid level in each cell. It
should be between the MAX and MIN lines. Ve-
hicles operated in high temperatures or under
severe conditions require frequent checks of the
battery fluid level.
Brake and clutch fluid levels*Make sure that
the brake and clutch fluid level is between the
MIN and MAX lines on the reservoir.Engine coolant level*Check the coolant level
when the engine is cold.
Engine drive belts*Make sure the drive belts
are not frayed, worn, cracked or oily.
Engine oil level*Check the level after parking
the vehicle on a level surface with the engine off.
Wait more than 10 minutes for the oil to drain
back into the oil pan.
Exhaust systemMake sure there are no loose
supports, cracks or holes. If the sound of the
exhaust seems unusual or there is a smell of
exhaust fumes, immediately have the exhaust
system inspected by a NISSAN dealer. See the
carbon monoxide warning in the “Starting and
driving” section of this manual.
Fluid leaksCheck under the vehicle for fuel, oil,
water or other fluid leaks after the vehicle has
been parked for a while. Water dripping from the
air conditioner after use is normal. If you should
notice any leaks or if gasoline fumes are evident,
check for the cause and have it corrected imme-
diately.
Radiator and hosesCheck the front of the
radiator and clean off any dirt, insects, leaves,
etc., that may have accumulated. Make sure the
hoses have no cracks, deformation, rot or loose
connections.UnderbodyThe underbody is frequently ex-
posed to corrosive substances such as those
used on icy roads or to control dust. It is very
important to remove these substances from the
underbody, otherwise rust may form on the floor
pan, frame, fuel lines and exhaust system. At the
end of winter, the underbody should be thor-
oughly flushed with plain water, in those areas
where mud and dirt may have accumulated. See
the “Appearance and care” section of this
manual.
Windshield washer fluid*Check that there is
adequate fluid in the reservoir.
8-4Maintenance and do-it-yourself
ZREVIEW COPYÐ2008 Versa(vrs)
Owners ManualÐUSA_English(nna)
01/02/08Ðdebbie
X
Page 231 of 304
When performing any inspection or maintenance
work on your vehicle, always take care to prevent
serious accidental injury to yourself or damage to
the vehicle. The following are general precau-
tions which should be closely observed.
WARNING
cPark the vehicle on a level surface, ap-
ply the parking brake securely and
block the wheels to prevent the vehicle
from moving. For manual transmission
models, move the shift lever to N (Neu-
tral) . For Automatic Transmission (AT)
or CVT models, move the selector lever
to P (Park) .
cBe sure the ignition key is in the OFF or
LOCK position when performing any
parts replacement or repairs.
cYour vehicle is equipped with an auto-
matic engine cooling fan. It may come
on at any time without warning, even if
the ignition key is in the OFF position
and the engine is not running. To avoid
injury, always disconnect the negative
battery cable before working near the
fan.cIf you must work with the engine run-
ning, keep your hands, clothing, hair
and tools away from moving fans, belts
and any other moving parts.
cIt is advisable to secure or remove any
loose clothing and remove any jewelry,
such as rings, watches, etc. before
working on your vehicle.
cAlways wear eye protection whenever
you work on your vehicle.
cIf you must run the engine in an en-
closed space such as a garage, be sure
there is proper ventilation for exhaust
gases to escape.
cNever get under the vehicle while it is
supported only by a jack. If it is neces-
sary to work under the vehicle, support
it with safety stands.
cKeep smoking materials, flame and
sparks away from the fuel tank and
battery.
cOn gasoline engine models, the fuel
filter or fuel lines should be serviced by
a NISSAN dealer because the fuel lines
are under high pressure even when the
engine is off.
CAUTION
cDo not work under the hood while the
engine is hot. Turn the engine off and
wait until it cools down.
cAvoid contact with used engine oil and
coolant. Improperly disposed engine
oil, engine coolant and/or other vehicle
fluids can damage the environment. Al-
ways conform to local regulations for
disposal of vehicle fluid.
cNever leave the engine or the transmis-
sion related component harness con-
nector disconnected while the ignition
switch is in the ON position.
cNever connect or disconnect the battery
or any transistorized component while
the ignition switch is in the ON position.
This “Maintenance and do-it-yourself” section
gives instructions regarding only those items
which are relatively easy for an owner to perform.
A genuine NISSAN service manual is also avail-
able. See “Owner’s Manual/Service Manual or-
der information” in the “Technical and consumer
information” section of this manual.
You should be aware that incomplete or improper
servicing may result in operating difficulties or
excessive emissions, and could affect warranty
coverage.If in doubt about any servicing,
have it done by a NISSAN dealer.
MAINTENANCE PRECAUTIONS
Maintenance and do-it-yourself8-5
ZREVIEW COPYÐ2008 Versa(vrs)
Owners ManualÐUSA_English(nna)
01/02/08Ðdebbie
X
Page 235 of 304
CAUTION
Oil level should be checked regularly. Op-
erating the engine with an insufficient
amount of oil can damage the engine, and
such damage is not covered by warranty.
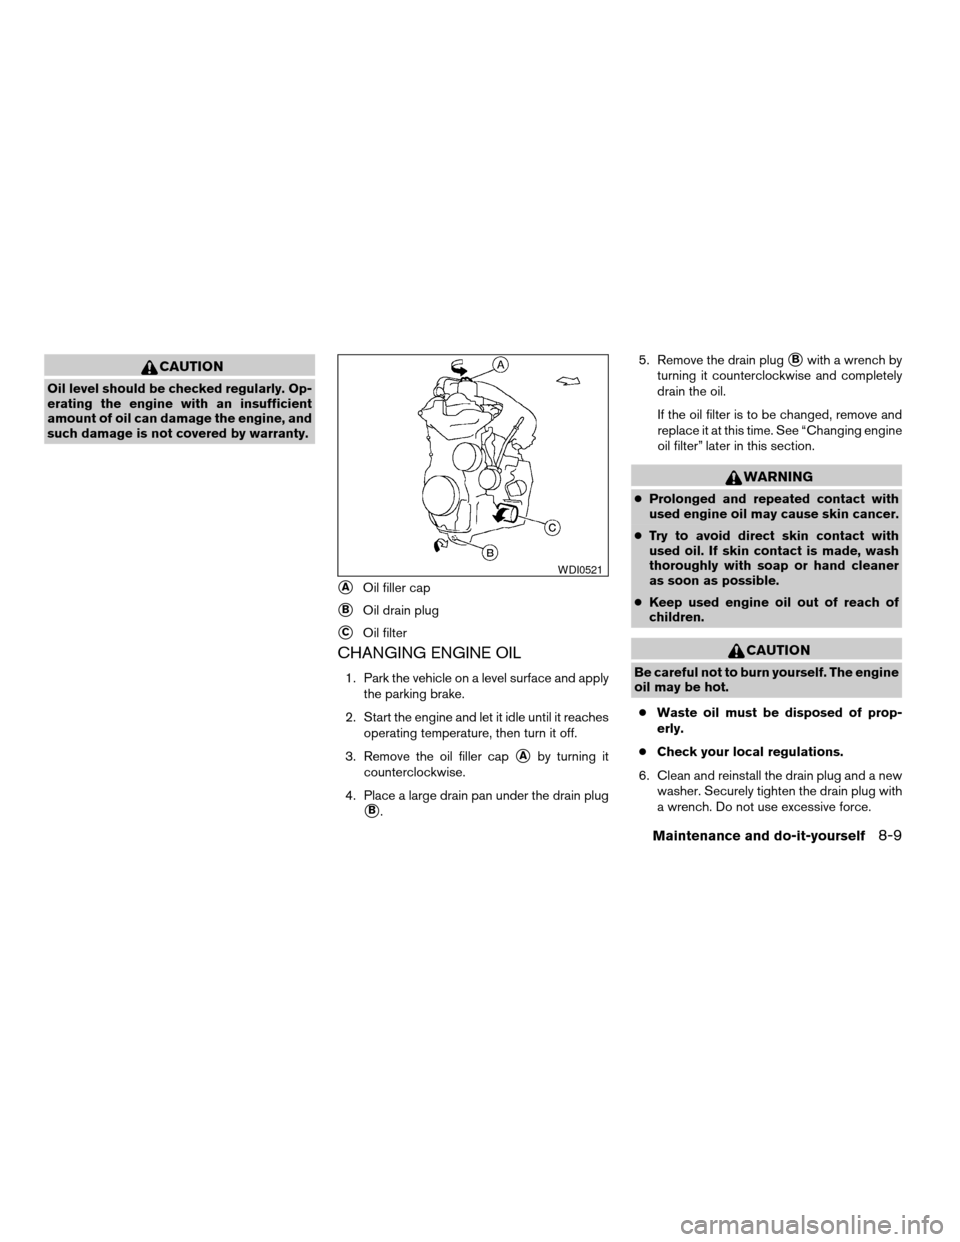
CHANGING ENGINE OIL
1. Park the vehicle on a level surface and apply
the parking brake.
2. Start the engine and let it idle until it reaches
operating temperature, then turn it off.
3. Remove the oil filler cap
sAby turning it
counterclockwise.
4. Place a large drain pan under the drain plug
sB.5. Remove the drain plug
sBwith a wrench by
turning it counterclockwise and completely
drain the oil.
If the oil filter is to be changed, remove and
replace it at this time. See “Changing engine
oil filter” later in this section.
WARNING
cProlonged and repeated contact with
used engine oil may cause skin cancer.
cTry to avoid direct skin contact with
used oil. If skin contact is made, wash
thoroughly with soap or hand cleaner
as soon as possible.
cKeep used engine oil out of reach of
children.
CAUTION
Be careful not to burn yourself. The engine
oil may be hot.
cWaste oil must be disposed of prop-
erly.
cCheck your local regulations.
6. Clean and reinstall the drain plug and a new
washer. Securely tighten the drain plug with
a wrench. Do not use excessive force.
sAOil filler cap
sBOil drain plug
sCOil filter
WDI0521
Maintenance and do-it-yourself8-9
ZREVIEW COPYÐ2008 Versa(vrs)
Owners ManualÐUSA_English(nna)
01/02/08Ðdebbie
X
Page 236 of 304
Drain plug tightening torque:
22 - 29 ft-lb (29 - 39 N·m)
7. Refill engine with recommended oil through
the oil filler opening, then install the oil filler
cap securely.
See “Capacities and recommended
fuel/lubricants” in the “Technical and con-
sumer information” section of this manual for
drain and refill capacity.
The drain and refill capacity depends on the
oil temperature and drain time. Use these
specifications for reference only. Always use
the dipstick to determine when the proper
amount of oil is in the engine.
8. Start the engine. Check for leakage around
the drain plug and oil filter. Correct as re-
quired.
9. Turn the engine off and wait more than 10
minutes. Check the oil level with the dipstick.
Add engine oil if necessary.
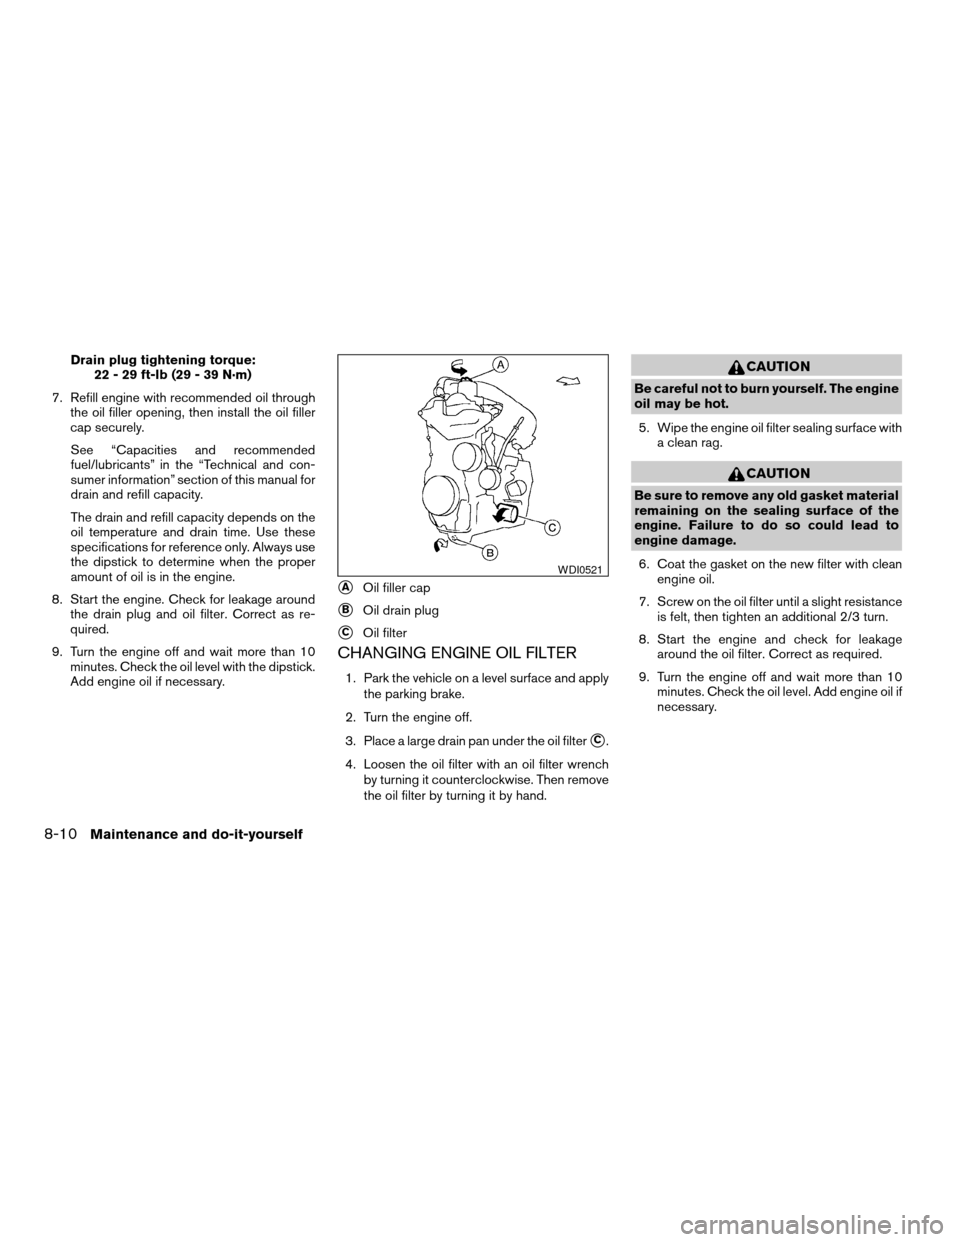
CHANGING ENGINE OIL FILTER
1. Park the vehicle on a level surface and apply
the parking brake.
2. Turn the engine off.
3. Place a large drain pan under the oil filter
sC.
4. Loosen the oil filter with an oil filter wrench
by turning it counterclockwise. Then remove
the oil filter by turning it by hand.
CAUTION
Be careful not to burn yourself. The engine
oil may be hot.
5. Wipe the engine oil filter sealing surface with
a clean rag.
CAUTION
Be sure to remove any old gasket material
remaining on the sealing surface of the
engine. Failure to do so could lead to
engine damage.
6. Coat the gasket on the new filter with clean
engine oil.
7. Screw on the oil filter until a slight resistance
is felt, then tighten an additional 2/3 turn.
8. Start the engine and check for leakage
around the oil filter. Correct as required.
9. Turn the engine off and wait more than 10
minutes. Check the oil level. Add engine oil if
necessary.
sAOil filler cap
sBOil drain plug
sCOil filter
WDI0521
8-10Maintenance and do-it-yourself
ZREVIEW COPYÐ2008 Versa(vrs)
Owners ManualÐUSA_English(nna)
01/02/08Ðdebbie
X
Page 240 of 304
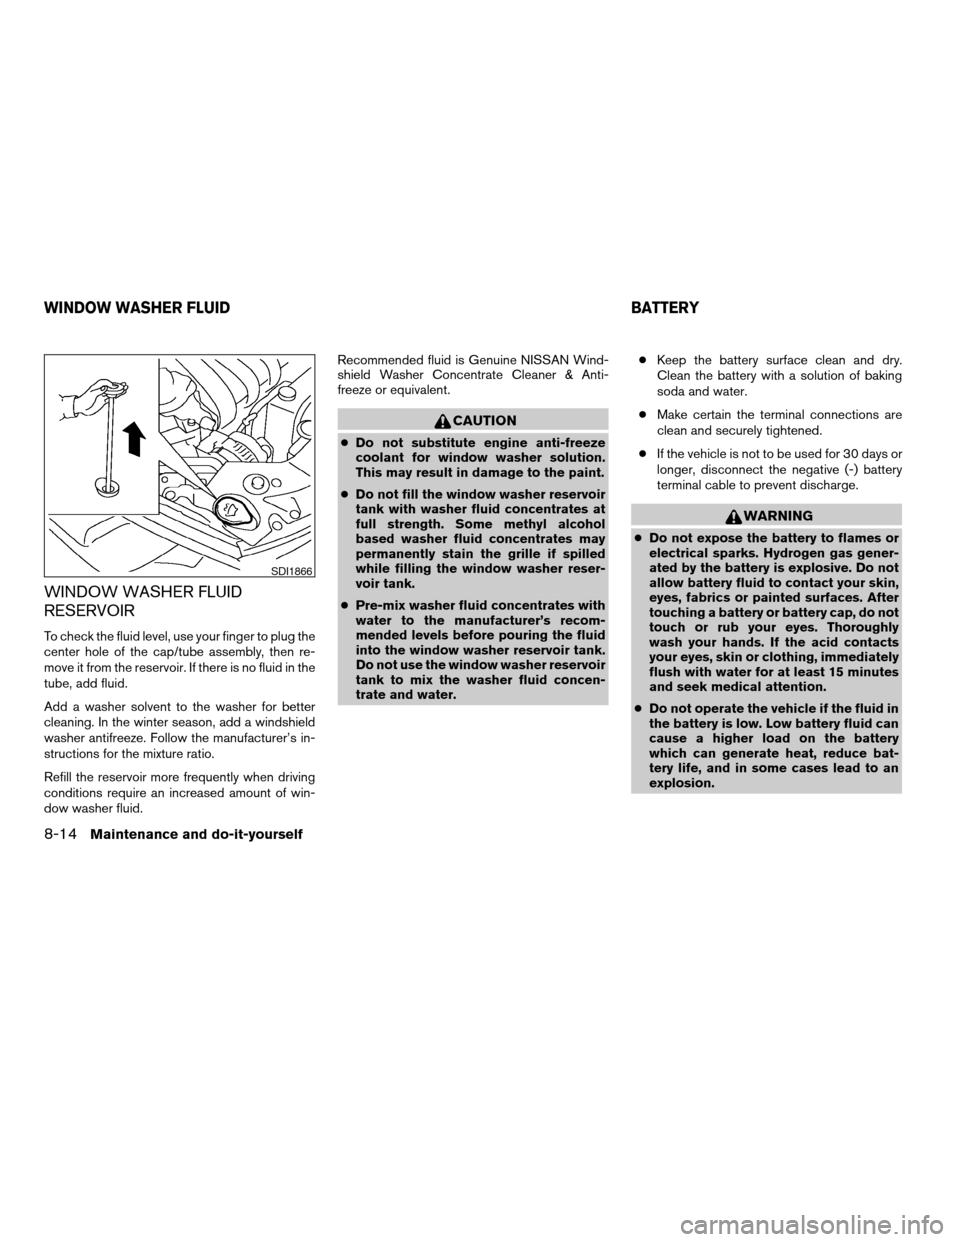
WINDOW WASHER FLUID
RESERVOIR
To check the fluid level, use your finger to plug the
center hole of the cap/tube assembly, then re-
move it from the reservoir. If there is no fluid in the
tube, add fluid.
Add a washer solvent to the washer for better
cleaning. In the winter season, add a windshield
washer antifreeze. Follow the manufacturer’s in-
structions for the mixture ratio.
Refill the reservoir more frequently when driving
conditions require an increased amount of win-
dow washer fluid.Recommended fluid is Genuine NISSAN Wind-
shield Washer Concentrate Cleaner & Anti-
freeze or equivalent.
CAUTION
cDo not substitute engine anti-freeze
coolant for window washer solution.
This may result in damage to the paint.
cDo not fill the window washer reservoir
tank with washer fluid concentrates at
full strength. Some methyl alcohol
based washer fluid concentrates may
permanently stain the grille if spilled
while filling the window washer reser-
voir tank.
cPre-mix washer fluid concentrates with
water to the manufacturer’s recom-
mended levels before pouring the fluid
into the window washer reservoir tank.
Do not use the window washer reservoir
tank to mix the washer fluid concen-
trate and water.cKeep the battery surface clean and dry.
Clean the battery with a solution of baking
soda and water.
cMake certain the terminal connections are
clean and securely tightened.
cIf the vehicle is not to be used for 30 days or
longer, disconnect the negative (-) battery
terminal cable to prevent discharge.
WARNING
cDo not expose the battery to flames or
electrical sparks. Hydrogen gas gener-
ated by the battery is explosive. Do not
allow battery fluid to contact your skin,
eyes, fabrics or painted surfaces. After
touching a battery or battery cap, do not
touch or rub your eyes. Thoroughly
wash your hands. If the acid contacts
your eyes, skin or clothing, immediately
flush with water for at least 15 minutes
and seek medical attention.
cDo not operate the vehicle if the fluid in
the battery is low. Low battery fluid can
cause a higher load on the battery
which can generate heat, reduce bat-
tery life, and in some cases lead to an
explosion.
SDI1866
WINDOW WASHER FLUID BATTERY
8-14Maintenance and do-it-yourself
ZREVIEW COPYÐ2008 Versa(vrs)
Owners ManualÐUSA_English(nna)
01/02/08Ðdebbie
X
Page 244 of 304
WARNING
Be sure the engine and ignition switch are
off and that the parking brake is engaged
securely.
CAUTION
Be sure to use the correct socket to re-
move the spark plugs. An incorrect socket
can damage the spark plugs.
If replacement is required, see your NISSAN
dealer for assistance.
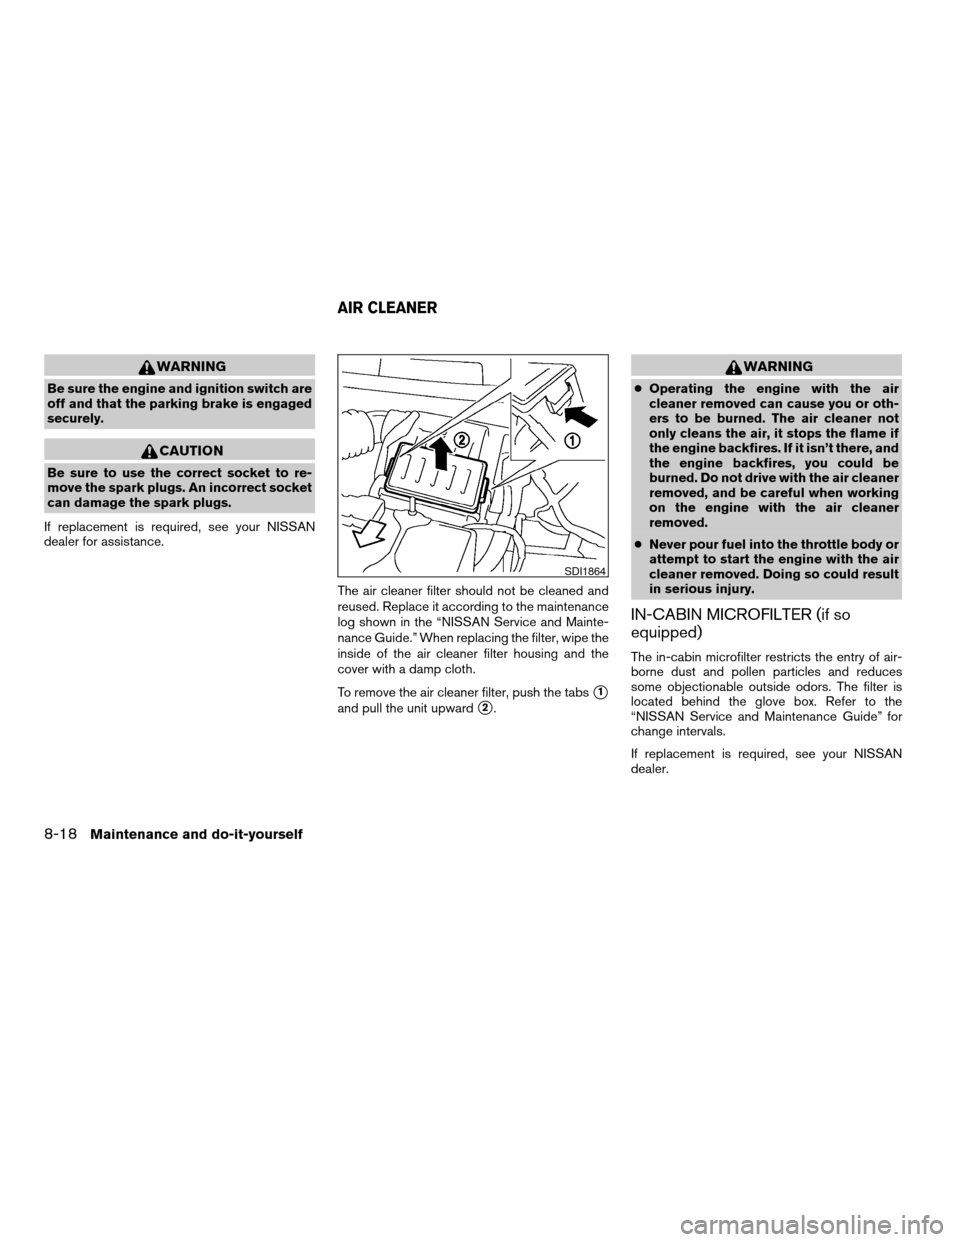
The air cleaner filter should not be cleaned and
reused. Replace it according to the maintenance
log shown in the “NISSAN Service and Mainte-
nance Guide.” When replacing the filter, wipe the
inside of the air cleaner filter housing and the
cover with a damp cloth.
To remove the air cleaner filter, push the tabs
s1
and pull the unit upwards2.
WARNING
cOperating the engine with the air
cleaner removed can cause you or oth-
ers to be burned. The air cleaner not
only cleans the air, it stops the flame if
the engine backfires. If it isn’t there, and
the engine backfires, you could be
burned. Do not drive with the air cleaner
removed, and be careful when working
on the engine with the air cleaner
removed.
cNever pour fuel into the throttle body or
attempt to start the engine with the air
cleaner removed. Doing so could result
in serious injury.
IN-CABIN MICROFILTER (if so
equipped)
The in-cabin microfilter restricts the entry of air-
borne dust and pollen particles and reduces
some objectionable outside odors. The filter is
located behind the glove box. Refer to the
“NISSAN Service and Maintenance Guide” for
change intervals.
If replacement is required, see your NISSAN
dealer.
SDI1864
AIR CLEANER
8-18Maintenance and do-it-yourself
ZREVIEW COPYÐ2008 Versa(vrs)
Owners ManualÐUSA_English(nna)
01/02/08Ðdebbie
X
Page 247 of 304

Proper brake inspection intervals should
be followed.For more information regarding
brake inspections, see the appropriate mainte-
nance schedule information in the “NISSAN Ser-
vice and Maintenance Guide”.
Two types of fuses are used. Type A is used in the
fuse boxes in the engine compartment. Type B is
used in the passenger compartment fuse box.
Type A fuses are provided as spare fuses. They
are stored in the passenger compartment fuse
box.
Type A fuses can be installed in the engine com-
partment and passenger compartment fuse
boxes.If a type A fuse is used to replace a type B fuse,
the type A fuse will not be level with the fuse
pocket as shown in the illustration. This will not
affect the performance of the fuse. Make sure the
fuse is installed in the fuse box securely.
Type B fuses cannot be installed in the under-
hood fuse boxes. Only use type A fuses in the
underhood fuse boxes.
LDI0455LDI0457
FUSES
Maintenance and do-it-yourself8-21
ZREVIEW COPYÐ2008 Versa(vrs)
Owners ManualÐUSA_English(nna)
01/02/08Ðdebbie
X
Page 251 of 304

KEYFOB
Replace the battery in the keyfob as follows:
s1Open the lid using a coinsA.
s2Remove the batterysB.
s3Install a new batterysCwith the “+” facing
down.
cHold the battery by the edges. Holding the
battery across the contact points will seri-
ously deplete the storage capacity.cDo not touch the internal circuit and electric
terminals as it could cause a malfunction.
Recommended battery: CR2025 or equivalent.
s4Close the lid securely.
5. Press the
button, then thebutton two or three times to check the key-
fob operation.
If the battery is removed for any reason
other than replacement, perform step 5.
cAn improperly disposed battery can
hurt the environment. Always confirm
local regulations for battery disposal.
cThe keyfob is water-resistant; how-
ever, if it does get wet, immediately
wipe completely dry.
cThe operational range of the keyfob
extends to approximately 33 ft (10 m)
from the vehicle. This range may vary
with conditions.
FCC Notice:
Changes or modifications not expressly ap-
proved by the party responsible for compli-
ance could void the user’s authority to op-
erate the equipment.
LDI0484
Maintenance and do-it-yourself8-25
ZREVIEW COPYÐ2008 Versa(vrs)
Owners ManualÐUSA_English(nna)
01/02/08Ðdebbie
X