2008 NISSAN VERSA HATCHBACK reset
[x] Cancel search: resetPage 70 of 304

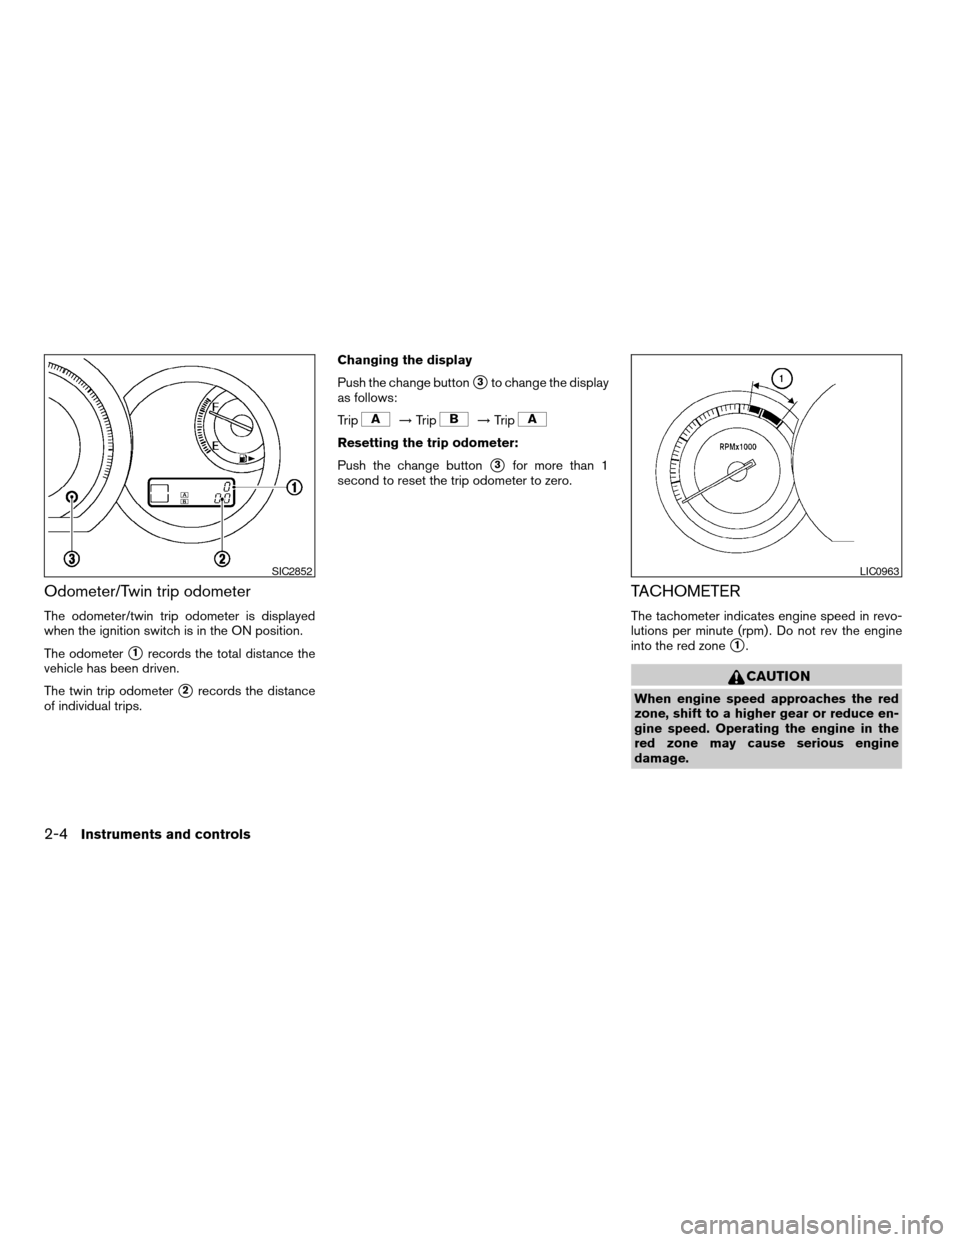
Odometer/Twin trip odometer
The odometer/twin trip odometer is displayed
when the ignition switch is in the ON position.
The odometer
s1records the total distance the
vehicle has been driven.
The twin trip odometer
s2records the distance
of individual trips.Changing the display
Push the change button
s3to change the display
as follows:
Trip
!Trip!Trip
Resetting the trip odometer:
Push the change button
s3for more than 1
second to reset the trip odometer to zero.
TACHOMETER
The tachometer indicates engine speed in revo-
lutions per minute (rpm) . Do not rev the engine
into the red zone
s1.
CAUTION
When engine speed approaches the red
zone, shift to a higher gear or reduce en-
gine speed. Operating the engine in the
red zone may cause serious engine
damage.
SIC2852LIC0963
2-4Instruments and controls
ZREVIEW COPYÐ2008 Versa(vrs)
Owners ManualÐUSA_English(nna)
01/02/08Ðdebbie
X
Page 76 of 304

automatically turn off when the tire pressure is
adjusted. After the tire is inflated to the recom-
mended pressure, the vehicle must be driven at
speeds above 16 MPH (25 km/h) to activate the
TPMS and turn off the low tire pressure warning
light. Use a tire pressure gauge to check the tire
pressure.
For additional information, see “Tire Pressure
Monitoring System (TPMS)” in the “Starting and
driving” section and in the “In case of emergency”
section.
TPMS malfunction:
If the TPMS is not functioning properly, the low
tire pressure warning light will flash for approxi-
mately 1 minute when the ignition switch is
placed in the ON position. The light will remain on
after the 1 minute. Have the system checked by a
NISSAN dealer.
For additional information, see “Tire Pressure
Monitoring System (TPMS)” in the “Starting and
driving” section.
WARNING
cIf the light does not illuminate with the
ignition switch in the ON position, have
the vehicle checked by a NISSAN dealer
as soon as possible.cIf the light illuminates while driving,
avoid sudden steering maneuvers or
abrupt braking, reduce vehicle speed,
pull off the road to a safe location and
stop the vehicle as soon as possible.
Driving with under-inflated tires may
permanently damage the tires and in-
crease the likelihood of tire failure. Se-
rious vehicle damage could occur and
may lead to an accident and could re-
sult in serious personal injury. Check
the tire pressure for all four tires. Adjust
the tire pressure to the recommended
COLD tire pressure shown on the Tire
and Loading Information label to turn
the low tire pressure warning light OFF.
If the light still comes on while driving
after adjusting the tire pressure, a tire
may be flat. If you have a flat tire, re-
place it with a spare tire as soon as
possible.
cWhen a spare tire is mounted or a wheel
is replaced, the TPMS will not function
and the low tire pressure warning light
will flash for approximately 1 minute.
The light will remain on after 1 minute.
Contact your NISSAN dealer as soon as
possible for tire replacement and/or
system resetting.cReplacing tires with those not originally
specified by NISSAN could affect the
proper operation of the TPMS.
CAUTION
cThe TPMS is not a substitute for the
regular tire pressure check. Be sure to
check the tire pressure regularly.
cIf the vehicle is being driven at speeds
of less than 16 MPH (25 km/h) , the
TPMS may not operate correctly.
cBe sure to install the specified size of
tires to the 4 wheels correctly.
Low windshield washer fluid
warning light (if so equipped)
This light comes on when the windshield washer
fluid is at a low level. Add windshield washer fluid
as necessary. See “Window washer fluid” in the
“Maintenance and do-it-yourself” section of this
manual.
P position selecting warning
light (if so equipped)
The light blinks red and the warning buzzer
sounds if you are outside of the vehicle with the
Intelligent Key and the engine is off, but the
selector lever is not in the P (Park) position.
2-10Instruments and controls
ZREVIEW COPYÐ2008 Versa(vrs)
Owners ManualÐUSA_English(nna)
01/03/08Ðdebbie
X
Page 97 of 304

AUTOMATIC MOONROOF
The moonroof will only operate when the ignition
switch is in the ON position. The automatic
moonroof is operational for about 45 seconds,
even if the ignition switch is turned to the ACC or
OFF position. If the driver’s door or the front
passenger’s door is opened during this period of
about 45 seconds, power to the moonroof is
canceled.
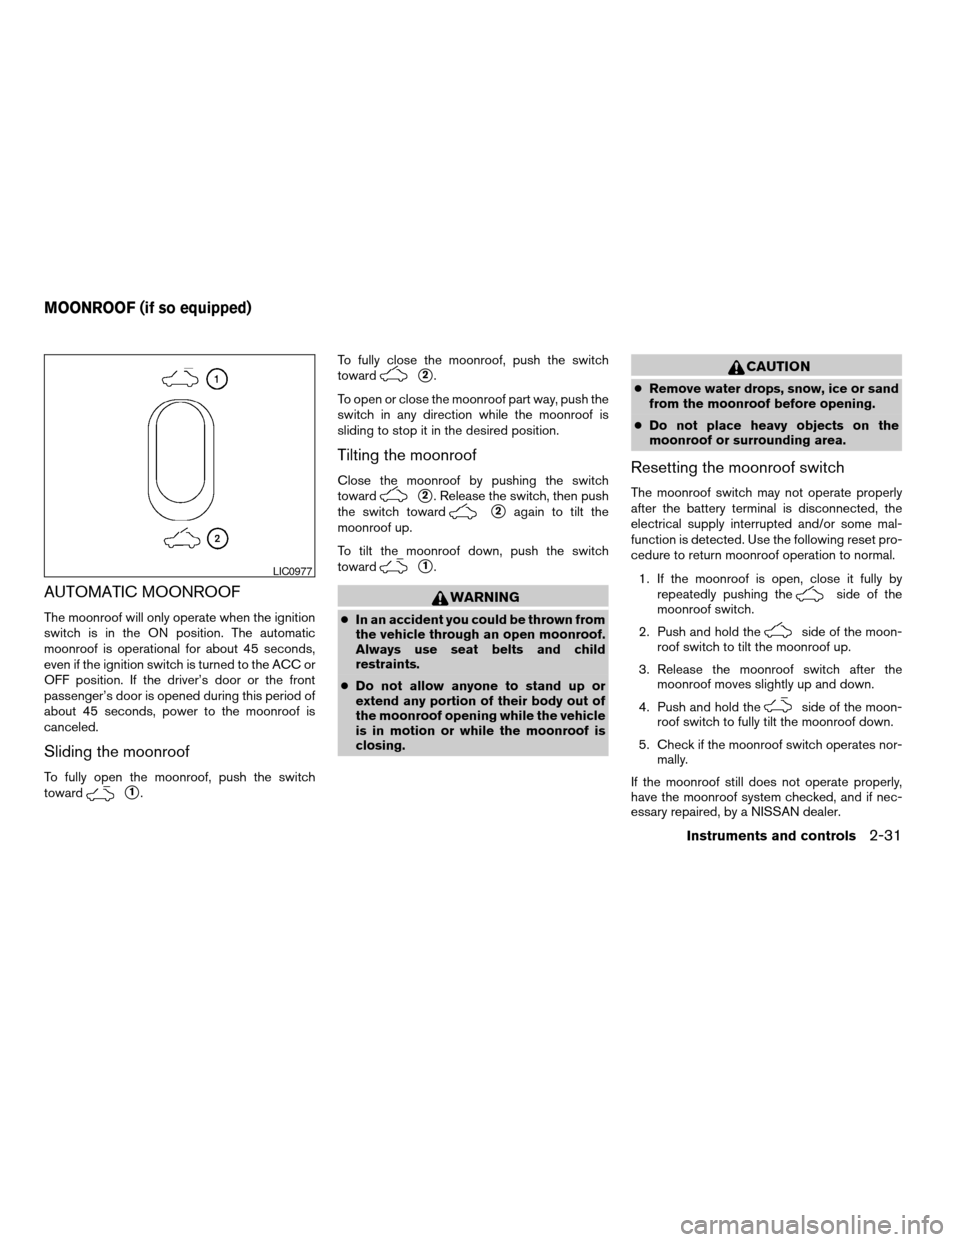
Sliding the moonroof
To fully open the moonroof, push the switch
toward
s1.To fully close the moonroof, push the switch
toward
s2.
To open or close the moonroof part way, push the
switch in any direction while the moonroof is
sliding to stop it in the desired position.
Tilting the moonroof
Close the moonroof by pushing the switch
toward
s2. Release the switch, then push
the switch toward
s2again to tilt the
moonroof up.
To tilt the moonroof down, push the switch
toward
s1.
WARNING
cIn an accident you could be thrown from
the vehicle through an open moonroof.
Always use seat belts and child
restraints.
cDo not allow anyone to stand up or
extend any portion of their body out of
the moonroof opening while the vehicle
is in motion or while the moonroof is
closing.
CAUTION
cRemove water drops, snow, ice or sand
from the moonroof before opening.
cDo not place heavy objects on the
moonroof or surrounding area.
Resetting the moonroof switch
The moonroof switch may not operate properly
after the battery terminal is disconnected, the
electrical supply interrupted and/or some mal-
function is detected. Use the following reset pro-
cedure to return moonroof operation to normal.
1. If the moonroof is open, close it fully by
repeatedly pushing the
side of the
moonroof switch.
2. Push and hold the
side of the moon-
roof switch to tilt the moonroof up.
3. Release the moonroof switch after the
moonroof moves slightly up and down.
4. Push and hold the
side of the moon-
roof switch to fully tilt the moonroof down.
5. Check if the moonroof switch operates nor-
mally.
If the moonroof still does not operate properly,
have the moonroof system checked, and if nec-
essary repaired, by a NISSAN dealer.
LIC0977
MOONROOF (if so equipped)
Instruments and controls2-31
ZREVIEW COPYÐ2008 Versa(vrs)
Owners ManualÐUSA_English(nna)
01/02/08Ðdebbie
X
Page 121 of 304

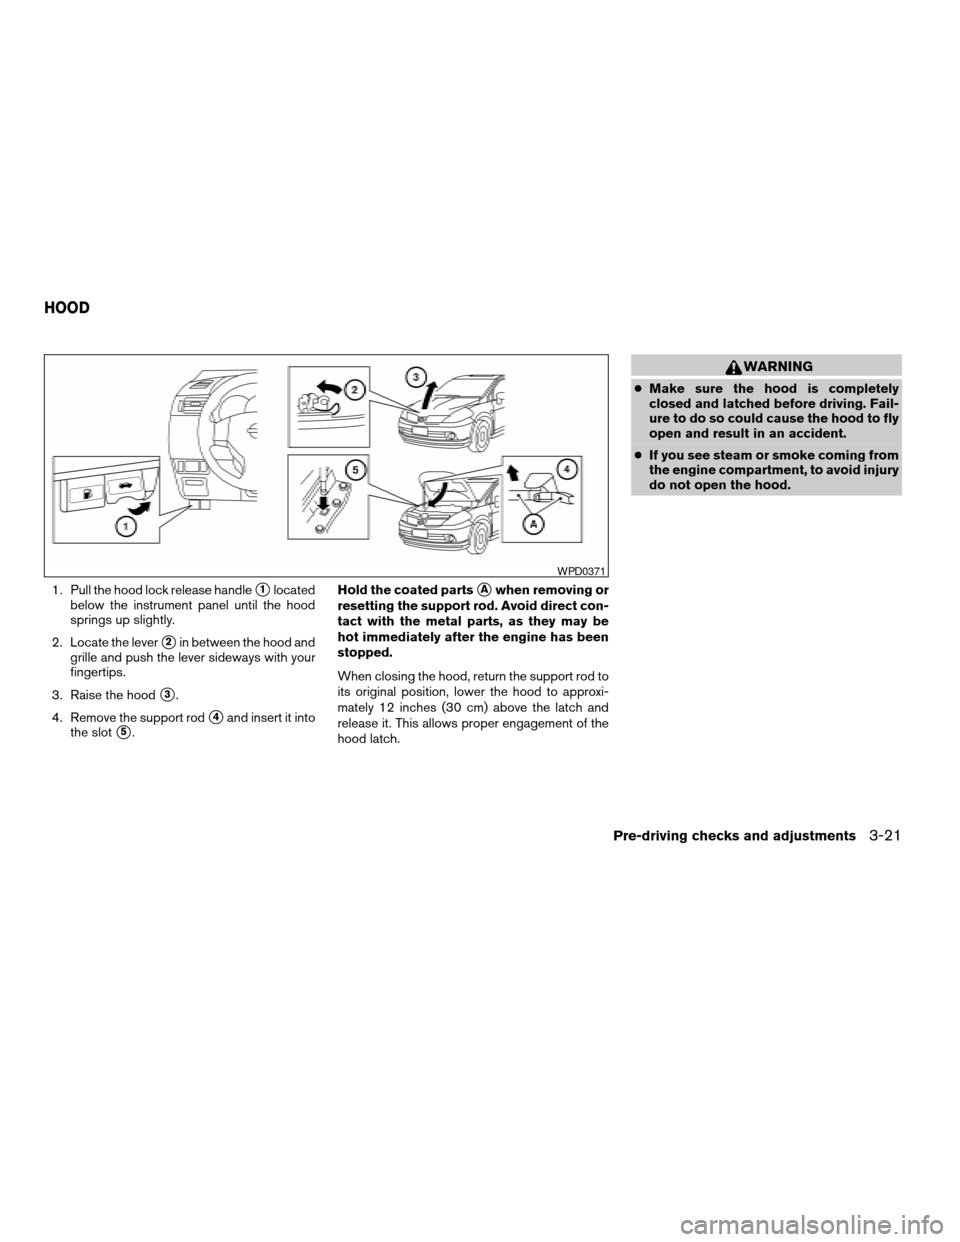
1. Pull the hood lock release handles1located
below the instrument panel until the hood
springs up slightly.
2. Locate the lever
s2in between the hood and
grille and push the lever sideways with your
fingertips.
3. Raise the hood
s3.
4. Remove the support rod
s4and insert it into
the slot
s5.Hold the coated parts
sAwhen removing or
resetting the support rod. Avoid direct con-
tact with the metal parts, as they may be
hot immediately after the engine has been
stopped.
When closing the hood, return the support rod to
its original position, lower the hood to approxi-
mately 12 inches (30 cm) above the latch and
release it. This allows proper engagement of the
hood latch.
WARNING
cMake sure the hood is completely
closed and latched before driving. Fail-
ure to do so could cause the hood to fly
open and result in an accident.
cIf you see steam or smoke coming from
the engine compartment, to avoid injury
do not open the hood.
WPD0371
HOOD
Pre-driving checks and adjustments3-21
ZREVIEW COPYÐ2008 Versa(vrs)
Owners ManualÐUSA_English(nna)
01/02/08Ðdebbie
X
Page 146 of 304

1. PRESET A·B·C button
2.
CD eject button
3. TUNE/SEEK buttons
4. CD insert slot
5. CD button
6. FM·AM button7. Station select (1 - 6) buttons
8.(CD seek/track) button
9.
(CD rewind) button
10. RDM button
11. VOL control knob
12. PWR button13. MENU button
14. RPT button
15.
(CD fast forward) button
16.
(CD seek/track) button
FM/AM RADIO WITH COMPACT
DISC (CD) PLAYER
For all operation precautions, see9Audio opera-
tion precautions9earlier in this section.
PWR button and VOL control knob
Turn the ignition key to the ACC or ON position,
then press the PWR button. If you listen to the
radio with the engine not running, turn the key to
the ACC position. The mode (radio or CD) that
was playing immediately before the system was
turned off resumes playing.
When no CD is loaded, the radio comes on.
Pressing the PWR button again turns the system
off.
Turn the VOL control knob to the right to increase
volume or to the left to decrease volume.
MENU button (BASS, TREBLE, FADE, BAL-
ANCE and CLOCK):
Press the MENU button to change the mode as
follows:
BAS!TRE!FAD!BAL!CLK!Audio!
BAS
LHA0657
4-16Heater, air conditioner, audio and phone systems
ZREVIEW COPYÐ2008 Versa(vrs)
Owners ManualÐUSA_English(nna)
01/02/08Ðdebbie
X
Page 147 of 304

To adjust Bass, Treble, Fade and Balance, press
the MENU button until the desired mode appears
in the display. Press the TUNE/SEEK button to
adjust Bass and Treble to the desired level. You
can also use the TUNE/SEEK button to adjust
Fader and Balance modes. Fader adjusts the
sound level between the front and rear speakers
and Balance adjusts the sound between the right
and left speakers.
Once you have adjusted the sound quality to the
desired level, press the MENU button repeatedly
until the radio or CD display reappears. Other-
wise, the radio or CD display will automatically
reappear after about 10 seconds.
Clock operation
Press the MENU button until CLK-ON or CLK-
OFF is displayed, use the TUNE/SEEK button to
turn the clock display on or off.
Clock set
If the clock is not displayed with the ignition
switch in the ACC or ON position, you need to
select the CLK-ON mode. Press the MENU but-
ton repeatedly until CLK-OFF mode is displayed.
Use the TUNE/SEEK button to enable CLK-ON
mode.
1. Press the MENU button repeatedly until
CLK-ON mode appears.2. Press the MENU button again, the time will
start flashing.
3. Press the TUNE/SEEK button
orto adjust the hour.
4. Press the MENU button again; the display
will switch to the minute adjustment mode.
5. The minutes will start flashing. Press
TUNE/SEEK button
orto ad-
just the minutes.
6. Press the MENU button again to exit the
clock set mode.
The display will return to the regular clock display
after 10 seconds, or press the MENU button
again to return to the regular clock display.
Resetting the time
Hold the MENU button down and then press the
TUNE/SEEK button; the time will reset as fol-
lows:
cIf the displayed minutes before the reset are
in the range of :00 - :29, the hour displayed
before the reset will stay the same and the
minutes will be reset to :00.
cIf the displayed minutes before the reset are
in the range of :30 - :59, the hour displayed
before the reset will advance by one hour
and the minutes will be reset to :00.For example, if the MENU button and the
TUNE/SEEK button are pressed while the time
displayed is between 8:00 and 8:29, the display
will be reset to 8:00. If the buttons were pressed
while the time was between 8:30 and 8:59, the
display will be reset to 9:00. At the same time the
display will return to the audio.FM/AM radio operation
FM·AM button:
Press the FM·AM button to change from AMÃ!
FM reception.
The FM stereo indicator, ST, illuminates during
FM stereo reception. When the stereo broadcast
signal is weak, the radio automatically changes
from stereo to monaural reception.
TUNE/SEEK buttons:
Manual tuning
Press the
orbutton for less than 0.5
seconds for manual tuning.
SEEK tuning
Press the
orbutton for more than
1.5 seconds to seek through the frequencies.
Seek tuning begins from low to high frequencies,
or high to low frequencies depending on which
button is pressed, and stops at the next broad-
Heater, air conditioner, audio and phone systems4-17
ZREVIEW COPYÐ2008 Versa(vrs)
Owners ManualÐUSA_English(nna)
01/02/08Ðdebbie
X
Page 148 of 304

casting station. Once the highest broadcasting
station is reached, the radio continues in the seek
mode at the lowest broadcasting station.
Station memory operations:
18 stations can be set for the FM and AM radio to
the A, B and C preset button in any combination
of AM or FM stations.
1. Press the PRESET A·B·C button to change
between storage banks. The radio displays
the icon A, B or C to indicate which set of
presets are active.
2. Tune to the desired station using manual
TUNE or SEEK tuning. Press and hold any of
the desired station memory buttons (1 – 6)
until a beep sound is heard. (The radio mutes
when the select button is pressed.)
3. The channel indicator will then come on and
the sound will resume. Programming is now
complete.
4. Other buttons can be set in the same man-
ner.
If the battery cable is disconnected, or if the fuse
opens, the radio memory will be canceled. In that
case, reset the desired stations.Compact disc (CD) player operation
Turn the ignition key to the ACC or ON position,
and carefully insert the compact disc into the slot
with the label side up. The compact disc is auto-
matically pulled into the slot and starts to play.
If the radio is already operating, it automatically
turns off and the compact disc begins to play.
CD button:
When the CD button is pressed with a compact
disc loaded and the radio playing, the radio turns
off and the last used compact disc starts to play.
Rewind and Fast
Forward buttons:
When the
orbutton is pressed
while the compact disc is playing, the compact
disc plays at an increased speed while rewinding
or fast forwarding. When the button is released,
the compact disc returns to normal play speed.
SEEK/TRACK buttons:
When
is pressed while the compact disc
is playing, the next track following the present
one starts to play from the beginning.
Press
several times to skip several tracks.
Each time the button is pressed, the CD ad-
vances 1 additional track. The track number ap-pears in the display window. (When the last track
on the compact disc is skipped, the first track is
played) .
When
is pressed, the track being played
returns to the beginning. Pressseveral
times to skip back several tracks. Each time the
button is pressed the CD moves back 1 track.
RPT button:
When the RPT button is pressed while the com-
pact disc is being played, the play pattern can be
changed as follows:
1 TRACK RPTÃ!Normal
1 TRACK RPT: The track that is currently playing
will be repeated.
RDM button:
When the RDM button is pressed while the com-
pact disc is being played, the play pattern can be
changed as follows:
RDMÃ!Normal
RDM: Tracks from the disc that is currently play-
ing will be played randomly.
4-18Heater, air conditioner, audio and phone systems
ZREVIEW COPYÐ2008 Versa(vrs)
Owners ManualÐUSA_English(nna)
01/02/08Ðdebbie
X
Page 150 of 304

1.CD LOAD button
2. CD insert slot
3. PRESET A·B·C button
4. CD button
5. RADIO button*
6.
CD eject button7. DISP button
8. CLOCK button
9. SEEK/TRACK/FILE button
10. SCRL button
11. SCAN button
12. AUDIO button13. Station and CD select (1–6) buttons
14. VOL control knob
15. PUSH PWR button
16. AUX button
17. AUX IN jack
18. RPT/RDM button
19. TUNE/FF·REW/FOLDER button
*No satellite radio reception is available
when the RADIO button is pressed to
access satellite radio stations unless
optional satellite receiver and antenna
are installed and an XMTsatellite radio
service subscription is active. Satellite
radio can only be installed in vehicles
that were factory pre-wired for satellite
radio. Satellite radio is not available in
Alaska, Hawaii and Guam.
FM/AM/SAT RADIO WITH
COMPACT DISC (CD) CHANGER
For all operation precautions, see9Audio opera-
tion precautions9earlier in this section.
No satellite radio reception is available when the
RADIO button is pressed to access satellite radio
stations unless optional satellite receiver and an-
tenna are installed and an XMTsatellite radio
service subscription is active. Satellite radio canLHA0659
4-20Heater, air conditioner, audio and phone systems
ZREVIEW COPYÐ2008 Versa(vrs)
Owners ManualÐUSA_English(nna)
01/02/08Ðdebbie
X