Page 240 of 304

WINDOW WASHER FLUID
RESERVOIR
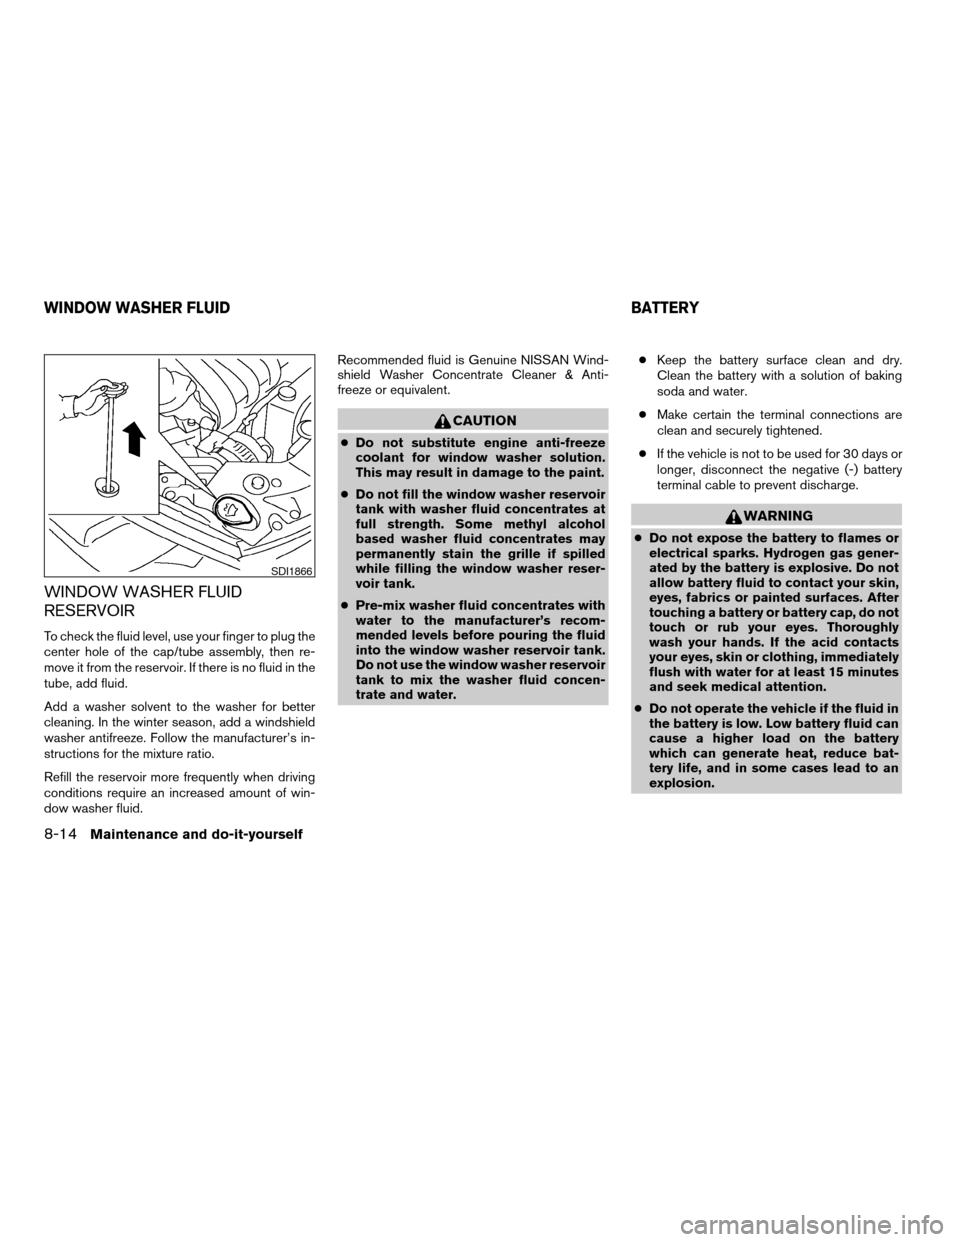
To check the fluid level, use your finger to plug the
center hole of the cap/tube assembly, then re-
move it from the reservoir. If there is no fluid in the
tube, add fluid.
Add a washer solvent to the washer for better
cleaning. In the winter season, add a windshield
washer antifreeze. Follow the manufacturer’s in-
structions for the mixture ratio.
Refill the reservoir more frequently when driving
conditions require an increased amount of win-
dow washer fluid.Recommended fluid is Genuine NISSAN Wind-
shield Washer Concentrate Cleaner & Anti-
freeze or equivalent.
CAUTION
cDo not substitute engine anti-freeze
coolant for window washer solution.
This may result in damage to the paint.
cDo not fill the window washer reservoir
tank with washer fluid concentrates at
full strength. Some methyl alcohol
based washer fluid concentrates may
permanently stain the grille if spilled
while filling the window washer reser-
voir tank.
cPre-mix washer fluid concentrates with
water to the manufacturer’s recom-
mended levels before pouring the fluid
into the window washer reservoir tank.
Do not use the window washer reservoir
tank to mix the washer fluid concen-
trate and water.cKeep the battery surface clean and dry.
Clean the battery with a solution of baking
soda and water.
cMake certain the terminal connections are
clean and securely tightened.
cIf the vehicle is not to be used for 30 days or
longer, disconnect the negative (-) battery
terminal cable to prevent discharge.
WARNING
cDo not expose the battery to flames or
electrical sparks. Hydrogen gas gener-
ated by the battery is explosive. Do not
allow battery fluid to contact your skin,
eyes, fabrics or painted surfaces. After
touching a battery or battery cap, do not
touch or rub your eyes. Thoroughly
wash your hands. If the acid contacts
your eyes, skin or clothing, immediately
flush with water for at least 15 minutes
and seek medical attention.
cDo not operate the vehicle if the fluid in
the battery is low. Low battery fluid can
cause a higher load on the battery
which can generate heat, reduce bat-
tery life, and in some cases lead to an
explosion.
SDI1866
WINDOW WASHER FLUID BATTERY
8-14Maintenance and do-it-yourself
ZREVIEW COPYÐ2008 Versa(vrs)
Owners ManualÐUSA_English(nna)
01/02/08Ðdebbie
X
Page 242 of 304
2. Check the fluid level in each cell. If it is
necessary to add fluid, add only distilled
water to bring the level up to the bottom of
the filler opening.Do not overfill.Vehicles operated in high temperatures or under
severe conditions require frequent checks of the
battery fluid level.
JUMP STARTING
If jump starting is necessary, see “Jump starting”
in the “In case of emergency” section of this
manual. If the engine does not start by jump
starting, the battery may have to be replaced.
Contact a NISSAN dealer.
Type A
LDI0302
Type B
WDI0529
8-16Maintenance and do-it-yourself
ZREVIEW COPYÐ2008 Versa(vrs)
Owners ManualÐUSA_English(nna)
01/02/08Ðdebbie
X
Page 243 of 304

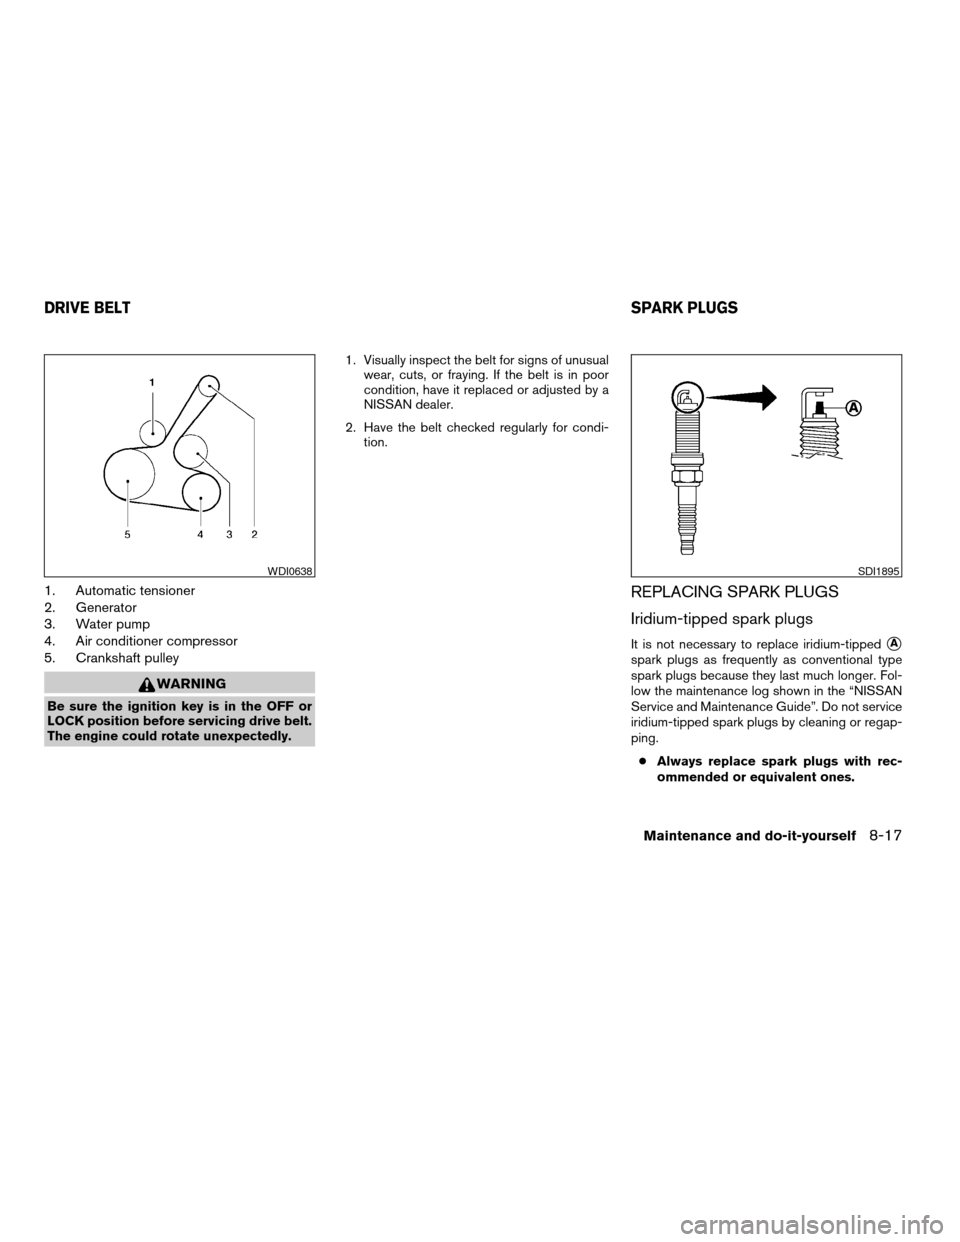
1. Automatic tensioner
2. Generator
3. Water pump
4. Air conditioner compressor
5. Crankshaft pulley
WARNING
Be sure the ignition key is in the OFF or
LOCK position before servicing drive belt.
The engine could rotate unexpectedly.1. Visually inspect the belt for signs of unusual
wear, cuts, or fraying. If the belt is in poor
condition, have it replaced or adjusted by a
NISSAN dealer.
2. Have the belt checked regularly for condi-
tion.
REPLACING SPARK PLUGS
Iridium-tipped spark plugs
It is not necessary to replace iridium-tippedsA
spark plugs as frequently as conventional type
spark plugs because they last much longer. Fol-
low the maintenance log shown in the “NISSAN
Service and Maintenance Guide”. Do not service
iridium-tipped spark plugs by cleaning or regap-
ping.
cAlways replace spark plugs with rec-
ommended or equivalent ones.
WDI0638SDI1895
DRIVE BELTSPARK PLUGS
Maintenance and do-it-yourself8-17
ZREVIEW COPYÐ2008 Versa(vrs)
Owners ManualÐUSA_English(nna)
01/02/08Ðdebbie
X
Page 244 of 304

WARNING
Be sure the engine and ignition switch are
off and that the parking brake is engaged
securely.
CAUTION
Be sure to use the correct socket to re-
move the spark plugs. An incorrect socket
can damage the spark plugs.
If replacement is required, see your NISSAN
dealer for assistance.
The air cleaner filter should not be cleaned and
reused. Replace it according to the maintenance
log shown in the “NISSAN Service and Mainte-
nance Guide.” When replacing the filter, wipe the
inside of the air cleaner filter housing and the
cover with a damp cloth.
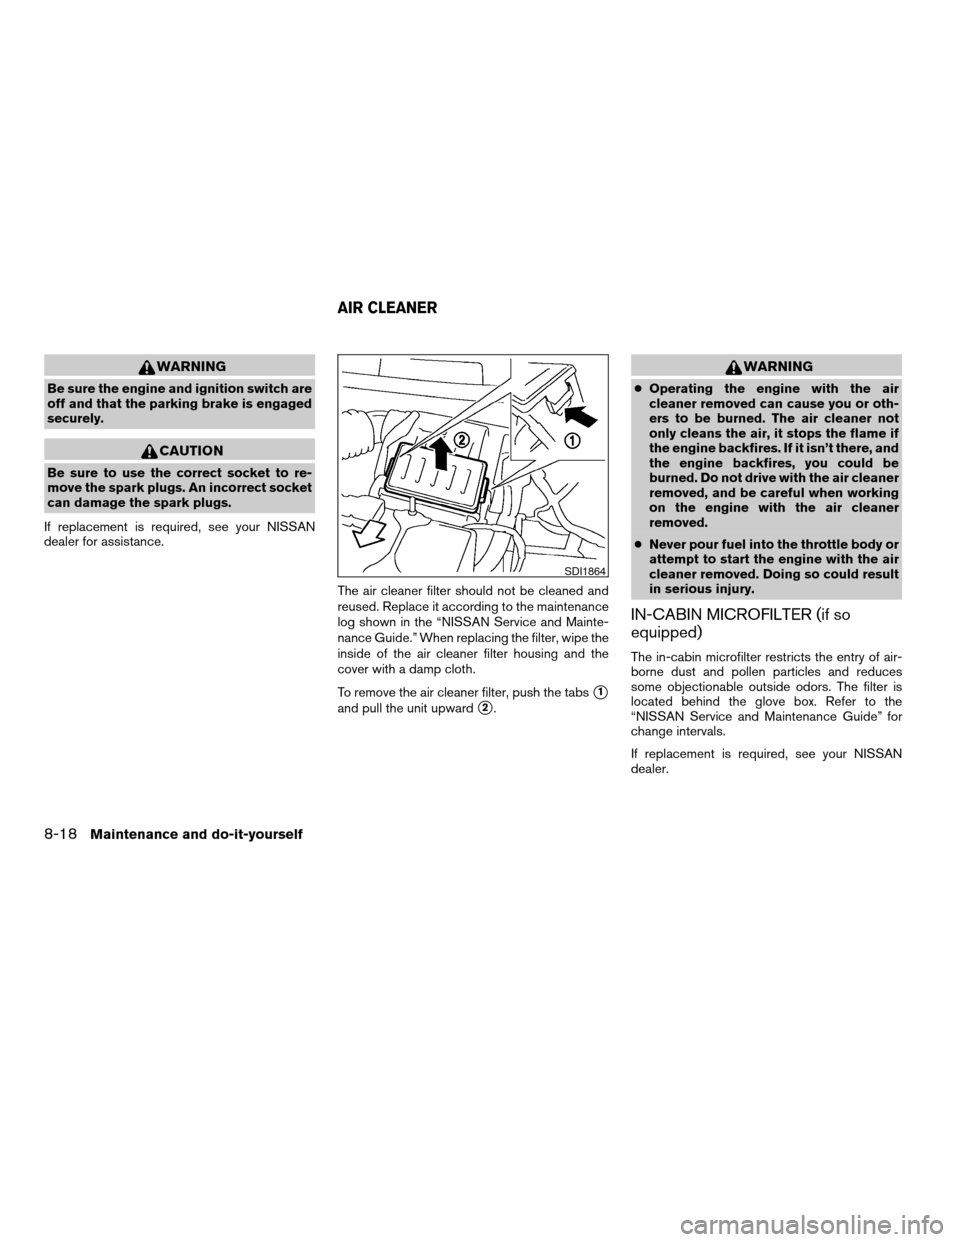
To remove the air cleaner filter, push the tabs
s1
and pull the unit upwards2.
WARNING
cOperating the engine with the air
cleaner removed can cause you or oth-
ers to be burned. The air cleaner not
only cleans the air, it stops the flame if
the engine backfires. If it isn’t there, and
the engine backfires, you could be
burned. Do not drive with the air cleaner
removed, and be careful when working
on the engine with the air cleaner
removed.
cNever pour fuel into the throttle body or
attempt to start the engine with the air
cleaner removed. Doing so could result
in serious injury.
IN-CABIN MICROFILTER (if so
equipped)
The in-cabin microfilter restricts the entry of air-
borne dust and pollen particles and reduces
some objectionable outside odors. The filter is
located behind the glove box. Refer to the
“NISSAN Service and Maintenance Guide” for
change intervals.
If replacement is required, see your NISSAN
dealer.
SDI1864
AIR CLEANER
8-18Maintenance and do-it-yourself
ZREVIEW COPYÐ2008 Versa(vrs)
Owners ManualÐUSA_English(nna)
01/02/08Ðdebbie
X
Page 247 of 304

Proper brake inspection intervals should
be followed.For more information regarding
brake inspections, see the appropriate mainte-
nance schedule information in the “NISSAN Ser-
vice and Maintenance Guide”.
Two types of fuses are used. Type A is used in the
fuse boxes in the engine compartment. Type B is
used in the passenger compartment fuse box.
Type A fuses are provided as spare fuses. They
are stored in the passenger compartment fuse
box.
Type A fuses can be installed in the engine com-
partment and passenger compartment fuse
boxes.If a type A fuse is used to replace a type B fuse,
the type A fuse will not be level with the fuse
pocket as shown in the illustration. This will not
affect the performance of the fuse. Make sure the
fuse is installed in the fuse box securely.
Type B fuses cannot be installed in the under-
hood fuse boxes. Only use type A fuses in the
underhood fuse boxes.
LDI0455LDI0457
FUSES
Maintenance and do-it-yourself8-21
ZREVIEW COPYÐ2008 Versa(vrs)
Owners ManualÐUSA_English(nna)
01/02/08Ðdebbie
X
Page 248 of 304
ENGINE COMPARTMENT
CAUTION
Never use a fuse of a higher or lower
amperage rating than specified on the
fuse box cover. This could damage the
electrical system or cause a fire.
If any electrical equipment does not come on,
check for an open fuse.
1. Be sure the ignition switch and the headlight
switch are OFF.
2. Open the engine hood.3. Remove the fuse box cover by pushing the
tab
s1and lifting the cover up from the right
side
s2, then the left sides3.
4. Remove the fuse with the fuse puller. The
fuse puller is located in the center of the fuse
block in the passenger compartment.
5. If the fuse is open
sA, replace it with a new
fuse
sB.
6. If a new fuse also opens, have the electrical
system checked and repaired by a NISSAN
dealer.
WDI0551WDI0452
8-22Maintenance and do-it-yourself
ZREVIEW COPYÐ2008 Versa(vrs)
Owners ManualÐUSA_English(nna)
01/02/08Ðdebbie
X
Page 253 of 304

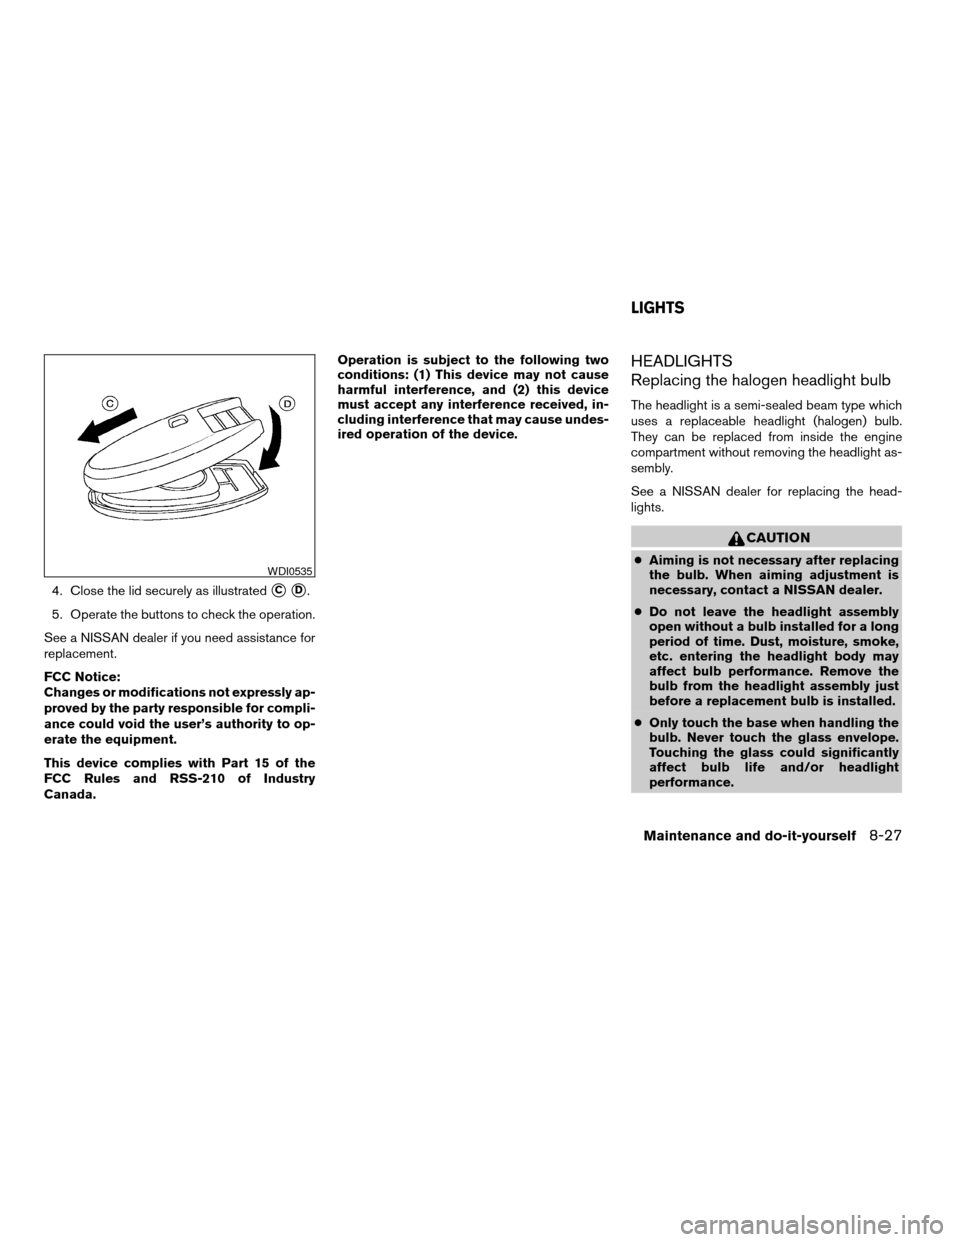
4. Close the lid securely as illustratedsCsD.
5. Operate the buttons to check the operation.
See a NISSAN dealer if you need assistance for
replacement.
FCC Notice:
Changes or modifications not expressly ap-
proved by the party responsible for compli-
ance could void the user’s authority to op-
erate the equipment.
This device complies with Part 15 of the
FCC Rules and RSS-210 of Industry
Canada.Operation is subject to the following two
conditions: (1) This device may not cause
harmful interference, and (2) this device
must accept any interference received, in-
cluding interference that may cause undes-
ired operation of the device.
HEADLIGHTS
Replacing the halogen headlight bulb
The headlight is a semi-sealed beam type which
uses a replaceable headlight (halogen) bulb.
They can be replaced from inside the engine
compartment without removing the headlight as-
sembly.
See a NISSAN dealer for replacing the head-
lights.
CAUTION
cAiming is not necessary after replacing
the bulb. When aiming adjustment is
necessary, contact a NISSAN dealer.
cDo not leave the headlight assembly
open without a bulb installed for a long
period of time. Dust, moisture, smoke,
etc. entering the headlight body may
affect bulb performance. Remove the
bulb from the headlight assembly just
before a replacement bulb is installed.
cOnly touch the base when handling the
bulb. Never touch the glass envelope.
Touching the glass could significantly
affect bulb life and/or headlight
performance.WDI0535
LIGHTS
Maintenance and do-it-yourself8-27
ZREVIEW COPYÐ2008 Versa(vrs)
Owners ManualÐUSA_English(nna)
01/02/08Ðdebbie
X
Page 269 of 304

9 Technical and consumer information
Capacities and recommended fuel/lubricants.........9-2
Fuel recommendation...........................9-3
Engine oil and oil filter recommendations..........9-5
Air conditioner system refrigerant and oil
recommendations..............................9-6
Specifications.....................................9-7
Engine........................................9-7
Wheels and tires...............................9-8
Dimensions and weights........................9-8
When traveling or registering your vehicle in
another country...................................9-9
Vehicle identification...............................9-9
Vehicle identification number (VIN) plate..........9-9
Vehicle identification number
(chassis number)...............................9-9
Engine serial number...........................9-10
F.M.V.S.S./C.M.V.S.S. certification label..........9-10
Emission control information label...............9-10Tire and loading information label................9-11
Air conditioner specification label................9-11
Installing front license plate........................9-11
Vehicle loading information........................9-12
Terms........................................9-12
Determining vehicle load capacity...............9-13
Loading tips..................................9-15
Measurement of weights.......................9-15
Towing a trailer...................................9-16
Flat towing....................................9-16
Uniform tire quality grading........................9-16
Emission control system warranty..................9-17
Reporting safety defects (US only).................9-18
Readiness for inspection/maintenance (I/M) test.....9-18
Event Data Recorders (EDR).......................9-19
Owner’s Manual/Service Manual order information . . . 9-20
In the event of a collision.......................9-20
ZREVIEW COPYÐ2008 Versa(vrs)
Owners ManualÐUSA_English(nna)
01/02/08Ðdebbie
X